Strawberry Cheesecake Protein Balls: Your New Favorite Healthy Treat!
Hey there, friend! Emily here, coming to you from my perpetually flour-dusted kitchen counter. Have you ever had one of those days where you’re buzzing with energy, conquering your to-do list, and then—bam—3 PM hits and all you can think about is the creamy, dreamy slice of cheesecake hiding in the fridge? Or maybe you’re rushing out the door after a great workout, and your stomach starts rumbling for something substantial, not just another bland protein bar. I’ve been there more times than I can count.
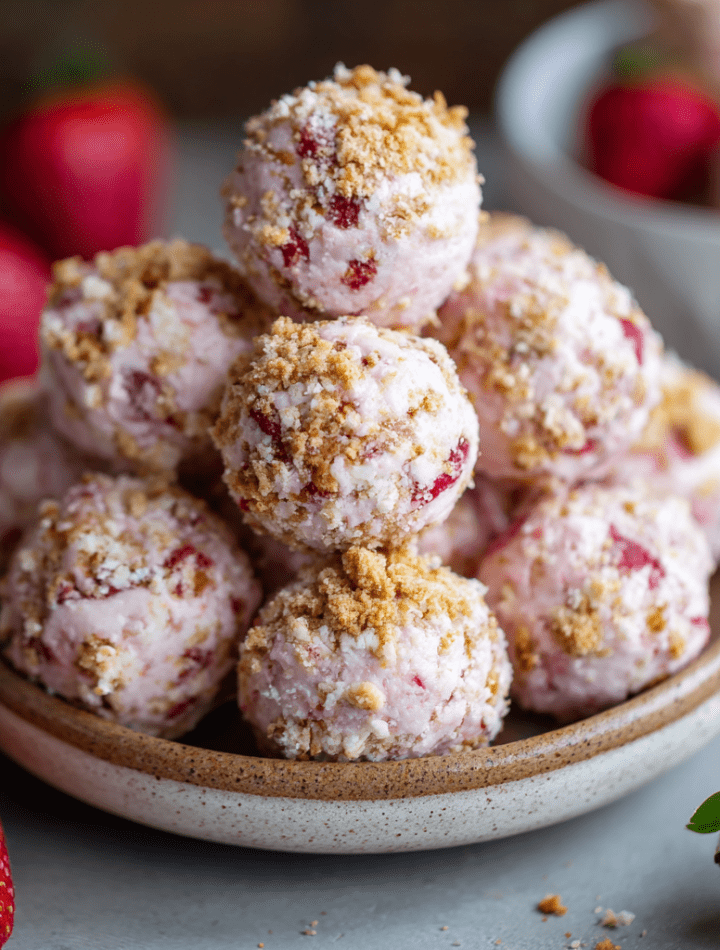
That exact craving—the clash between my love for decadent desserts and my need for nourishing, energy-packed fuel—is what inspired these little bites of joy. I’m thrilled to share my recipe for No-Bake Strawberry Cheesecake Protein Balls. Imagine the tangy sweetness of ripe strawberries, the luxurious creaminess of cheesecake, and a satisfying protein punch, all rolled into a pop-in-your-mouth snack you can make in about 10 minutes. No oven required, no fancy equipment, just a bowl, a spoon, and a whole lot of love.
This isn’t about deprivation; it’s about celebration. It’s about creating something so delicious and fun that it feels like a treat, while also giving your body the good stuff it deserves. Whether you need a post-gym recharge, a lunchbox surprise for the kids, or a just-because snack that won’t lead to a sugar crash, these protein balls are your answer. So, tie on your favorite apron (the messy one is totally welcome here), and let’s make something incredibly tasty together!

A Berry Sweet Memory: Where This Recipe Began
This recipe has its roots in two of my favorite places: my grandma’s sun-drenched backyard patch and my first, hilariously tiny apartment kitchen. Every summer, we’d spend hours picking strawberries, our fingers stained pink, eating more than we saved. Grandma would make the most incredible fresh strawberry jam, and the smell would fill her whole house.
Years later, fresh out of culinary school and living in an apartment the size of a postage stamp, I was experimenting with healthy snacks. I wanted to capture that pure, sunny strawberry flavor and the indulgent feeling of her desserts, but in a way that fit my new, on-the-go life. My first attempt was… a sticky, pink disaster. Let’s just say I learned the hard way that mashing berries releases a lot of liquid! But that “happy kitchen accident” led me to try almond flour to soak it up, and the magic started to happen. When I finally landed on adding just a touch of real cream cheese, it was like a lightbulb went off. I’d brought my grandma’s strawberry field and the essence of a classic cheesecake right into my healthy snack. It’s a taste of nostalgia, repackaged for real, busy, delicious life.
Gathering Your Goodies: What You’ll Need
Here’s the simple, wholesome lineup that creates the magic. I love knowing why each ingredient is there, so I’ve shared my little chef insights and swaps for you!
- 1 cup almond flour: This is our base, giving the balls structure and a lovely, moist texture. It’s packed with healthy fats and keeps things gluten-free. Chef’s Tip: If you’re out, oat flour (just blitz rolled oats in a blender!) works in a pinch, though the texture will be a bit more dense.
- ½ cup vanilla protein powder: The protein powerhouse! Vanilla adds a perfect backdrop. Chef’s Tip: Use a powder you enjoy the taste of on its own. For a vegan option, a plant-based vanilla protein works beautifully.
- ¼ cup cream cheese, softened: The “cheesecake” star! It brings that iconic tangy creaminess. Let it sit out for 20-30 minutes to soften—it mixes in like a dream. Chef’s Tip: For a dairy-free version, a high-quality vegan cream cheese alternative will do the trick.
- ¼ cup mashed strawberries: The fruity heart of the recipe! Use the ripest, reddest berries you can find for maximum sweetness and flavor. Chef’s Tip: I mash mine with a fork for a bit of texture, but you can puree them for a smoother, pinker dough.
- 2 tbsp honey or maple syrup: Our natural sweetener and binder. Honey gives a classic flavor, while maple syrup keeps it vegan. Chef’s Tip: If your strawberries are super sweet, you can reduce this by half a tablespoon.
- ½ tsp vanilla extract: The flavor enhancer! It deepens all the other flavors and makes the whole thing smell like a bakery. Always use pure vanilla if you have it.
- ¼ cup crushed graham crackers (optional, for rolling): The finishing touch that screams “cheesecake!” It adds a nostalgic crunch. Chef’s Tip: Gluten-free graham crackers work perfectly here. For a lower-carb option, try a sprinkle of extra almond flour or crushed nuts.
Let’s Get Rolling: Your Simple Step-by-Step Guide
Ready? This is the fun, hands-in part. I’ll walk you through each step with my favorite kitchen hacks to ensure perfect balls every single time.
- Combine the Dry Crew: In a medium mixing bowl, add your almond flour and vanilla protein powder. Give them a quick whisk with a fork. This isn’t just busywork—aerating these ingredients prevents clumps and ensures everything blends evenly later. You’ll get a light, uniform powder.
- Welcome the Cream Cheese: Plop your softened cream cheese right into the center of the dry mix. Here’s a hack: use a fork or a sturdy silicone spatula to start cutting the cream cheese into the flour mixture. It will look crumbly at first, like a pastry dough. That’s perfect! Keep working it until no large streaks of cream cheese remain.
- Add the Wet Wonders: Now, pour in your glorious pink mashed strawberries, honey (or maple syrup), and vanilla extract. This is where the magic happens! Switch to mixing with your hands (yes, really!). Squeeze, knead, and fold the mixture until it comes together into a soft, slightly sticky, cohesive dough. If it feels too wet and won’t hold together, add a tablespoon more almond flour. If it’s too dry and crumbly, add a teaspoon of water or a smidge more mashed berry. Trust your instincts here—you’ve got this!
- Chill Time (The Secret Step!): This is my non-negotiable pro tip. Pop the bowl of dough into the fridge for 15-20 minutes. Chilling firms up the fats and makes the dough infinitely easier to roll without sticking to your palms. It’s a game-changer!
- Roll into Balls: Scoop out about a tablespoon of dough. I use a small cookie scoop for speed and uniformity, but a spoon works just fine. Roll it gently between your palms to form a smooth, 1-inch ball. Place it on a plate or baking sheet lined with parchment paper. Repeat with the rest of the dough. If your hands get sticky, dampen them slightly with water.
- The Graham Cracker Hug (Optional but Recommended): Pour your crushed graham crackers into a shallow bowl. Take each ball and gently roll it around in the crumbs, pressing lightly so they adhere. This gives that authentic cheesecake-crust experience and makes them look adorable.
- The Final Chill: Once all your balls are rolled (and maybe you’ve taste-tested one… chef’s privilege!), cover the plate and refrigerate for at least 30 minutes. This sets their shape and gives you that perfect, firm-yet-creamy texture we’re after.
How to Serve & Savor Your Creation
You did it! Now, for the best part. I love storing these in a glass jar or an airtight container in the fridge—they keep beautifully for up to a week (if they last that long!).
These protein balls are the ultimate grab-and-go hero. Toss a couple in a small container for a mid-morning desk snack, or pop a few in your gym bag for a post-workout recharge. They’re also the star of a simple, elegant snack plate. Arrange them on a cute plate with a few fresh strawberries, a sprinkle of graham cracker dust, and maybe a little dollop of whipped cream for a seriously impressive (yet effortless) dessert for guests. I love having one with my afternoon coffee—it feels like a decadent treat but powers me through the rest of my day without a slump. They’re also the sweetest homemade gift! Package a few in a little clear bag tied with ribbon for a friend who needs a tasty pick-me-up.
Make It Your Own: Fun Flavor Twists!
The basic formula is your playground. Once you master the classic strawberry, try one of these delicious variations!
- Mixed Berry Bliss: Swap the strawberries for mashed raspberries or blackberries. The seeds add a nice texture, and the flavor is wonderfully tart and vibrant.
- Chocolate-Dipped Dream: After the balls are set, dip half of each one into melted dark chocolate. Let the chocolate harden on parchment paper. Instant elegance and a rich, antioxidant boost!
- Lemon Blueberry Cheesecake: Use mashed blueberries. Replace the vanilla extract with ½ tsp of lemon extract and add a teaspoon of lemon zest to the dough. Roll in crushed vanilla wafer cookies instead of graham crackers. So fresh!
- Peanut Butter Cup: Omit the strawberries. Add 2 tablespoons of natural peanut butter (or any nut butter) to the dough along with the wet ingredients. Roll in crushed peanuts or cocoa powder. A protein-packed delight!
- Tropical Escape: Use mashed ripe mango or pineapple (squeeze out excess juice!). Add a tablespoon of unsweetened shredded coconut to the dough, and roll the finished balls in more coconut. Paradise in a bite!
Emily’s Kitchen Notes & Stories
This recipe is a living, breathing thing in my kitchen! It’s evolved from that initial sticky mess into my most-requested healthy snack. My kids love to help with the rolling—it’s a fantastic, easy cooking project for little hands (just be prepared for a colorful kitchen afterwards!).
One of my favorite memories is bringing a huge batch of these to a friend who’d just had a baby. She texted me later saying they were the only thing getting her through the 2 AM feeding sessions—easy to eat with one hand and satisfying enough to feel like a real treat. That’s exactly what I want my recipes to be: little edible hugs that make real life a bit sweeter and a whole lot easier. Don’t stress about perfection. If your balls aren’t perfectly round, they’ll still taste amazing. Cooking is about joy, not perfection.
Your Questions, Answered!
Q: My dough is too sticky to roll. What did I do wrong?
A: No worries! This usually means your berries were extra juicy or you need a touch more almond flour. Add one tablespoon at a time until it’s manageable. And don’t skip the chilling step—it’s crucial for fixing stickiness!
Q: Can I use frozen strawberries?
A> Absolutely! Thaw them completely first, then mash. You might even get more intense strawberry flavor. Just be sure to drain any excess liquid in the bowl after thawing so your dough doesn’t get soggy.
Q: What’s the best protein powder to use?
A> I recommend a vanilla whey protein isolate or casein powder for the creamiest texture. Plant-based blends (like pea/rice protein) work great too but may yield a slightly denser ball. The golden rule: choose one you like the taste of on its own!
Q: How long do they last, and can I freeze them?
A> They’ll stay fresh in an airtight container in the fridge for 7-10 days. And yes, they freeze beautifully for up to 2 months! Lay them on a parchment-lined sheet to freeze solid first, then transfer to a freezer bag. Thaw in the fridge overnight.
Nourishment in Every Bite
While I’m all about flavor first, I love knowing that what I’m eating is also fueling me well. These balls are a fantastic balance of macronutrients. The almond flour provides healthy fats and fiber, which help keep you full and satisfied. The protein powder, of course, delivers a solid protein punch to support muscle recovery and steady energy levels. Using real fruit and natural sweeteners means you’re avoiding refined sugars. Each ball is a concentrated little package of energy that’s perfect for stabilizing blood sugar and crushing cravings. Remember, these are estimates and can vary based on your specific ingredients, but one thing’s for sure: you’re giving your body a delicious dose of real-food goodness.
Prep Time: 10 minutes | Chill Time: 30 minutes | Total Time: 40 minutes | Servings: 10-12 balls
Per Ball (approximate): Calories: ~90 | Protein: 5g | Carbs: 5g | Fat: 6g | Fiber: 1g
Print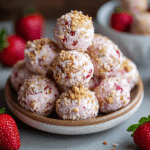
Strawberry Cheesecake Protein Balls : No-Bake, Creamy & Packed with Goodness
- Total Time: 40 minutes
- Yield: 10–12 balls 1x
Description
These no-bake Strawberry Cheesecake Protein Balls are the perfect balance of sweet, creamy, and nourishing. Made with real strawberries, cream cheese, and vanilla protein powder, they bring all the flavor of dessert with none of the guilt. Ideal for post-workout bites, mid-afternoon pick-me-ups, or healthy on-the-go snacking.
Ingredients
1 cup almond flour
½ cup vanilla protein powder
¼ cup cream cheese, softened
¼ cup mashed strawberries
2 tbsp honey or maple syrup
½ tsp vanilla extract
¼ cup crushed graham crackers (optional, for rolling)
Instructions
In a mixing bowl, combine almond flour, protein powder, and softened cream cheese.
Add mashed strawberries, honey, and vanilla extract. Mix until a soft dough forms.
Roll the mixture into 1-inch balls.
Optional: Roll each ball in crushed graham crackers for a cheesecake-style finish.
Refrigerate for at least 30 minutes to firm up.
Enjoy chilled for a creamy, fruity, protein-rich snack.
- Prep Time: 10 minutes
- Chill Time: 30 minutes
Nutrition
- Calories: 90 Per Ball
- Fat: 6g Per Ball
- Carbohydrates: 5g Per Ball
- Fiber: 1g Per Ball
- Protein: 5g Per Ball
Final Thoughts from My Kitchen to Yours
Well, my friend, we’ve reached the end of our no-bake adventure! I hope you’re as excited to make these Strawberry Cheesecake Protein Balls as I am whenever I whip up a batch. They prove that “healthy” doesn’t have to mean boring or restrictive—it can be bursting with flavor, fun, and fond memories.
This recipe is a testament to my core belief: food should make you feel good, inside and out. It should be a source of joy, connection, and vitality. So whether you’re fueling a busy day, treating yourself after a workout, or simply craving something sweet and satisfying, I hope these little pink bites become a staple in your kitchen.
Thank you for letting me share my recipe and stories with you. If you make them, I’d love to hear about it! Tag me on social or leave a comment on the blog. Now, go enjoy the fruits of your (minimal) labor. You deserve it!
With love and a fully stocked snack jar,
Emily