The Easiest, Most Delicious Chocolate Strawberry Bark (Ready in Under an Hour!)
Hey there, friend! It’s Emily, coming at you from my perpetually flour-dusted kitchen counter. Can we talk for a second about the magic that happens when chocolate meets strawberry? It’s a classic for a reason—like the culinary version of your favorite cozy sweater. But sometimes, you want that perfect bite without turning on the oven, creaming butter for an hour, or creating a sink full of dishes. That’s where this gorgeous Chocolate Strawberry Bark swoops in to save the day.
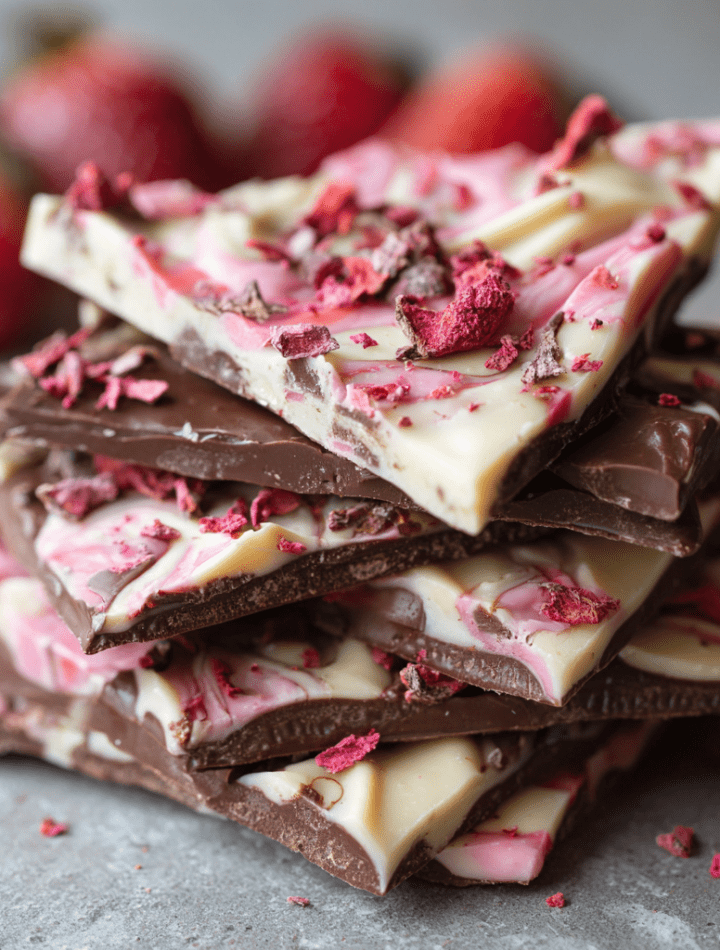
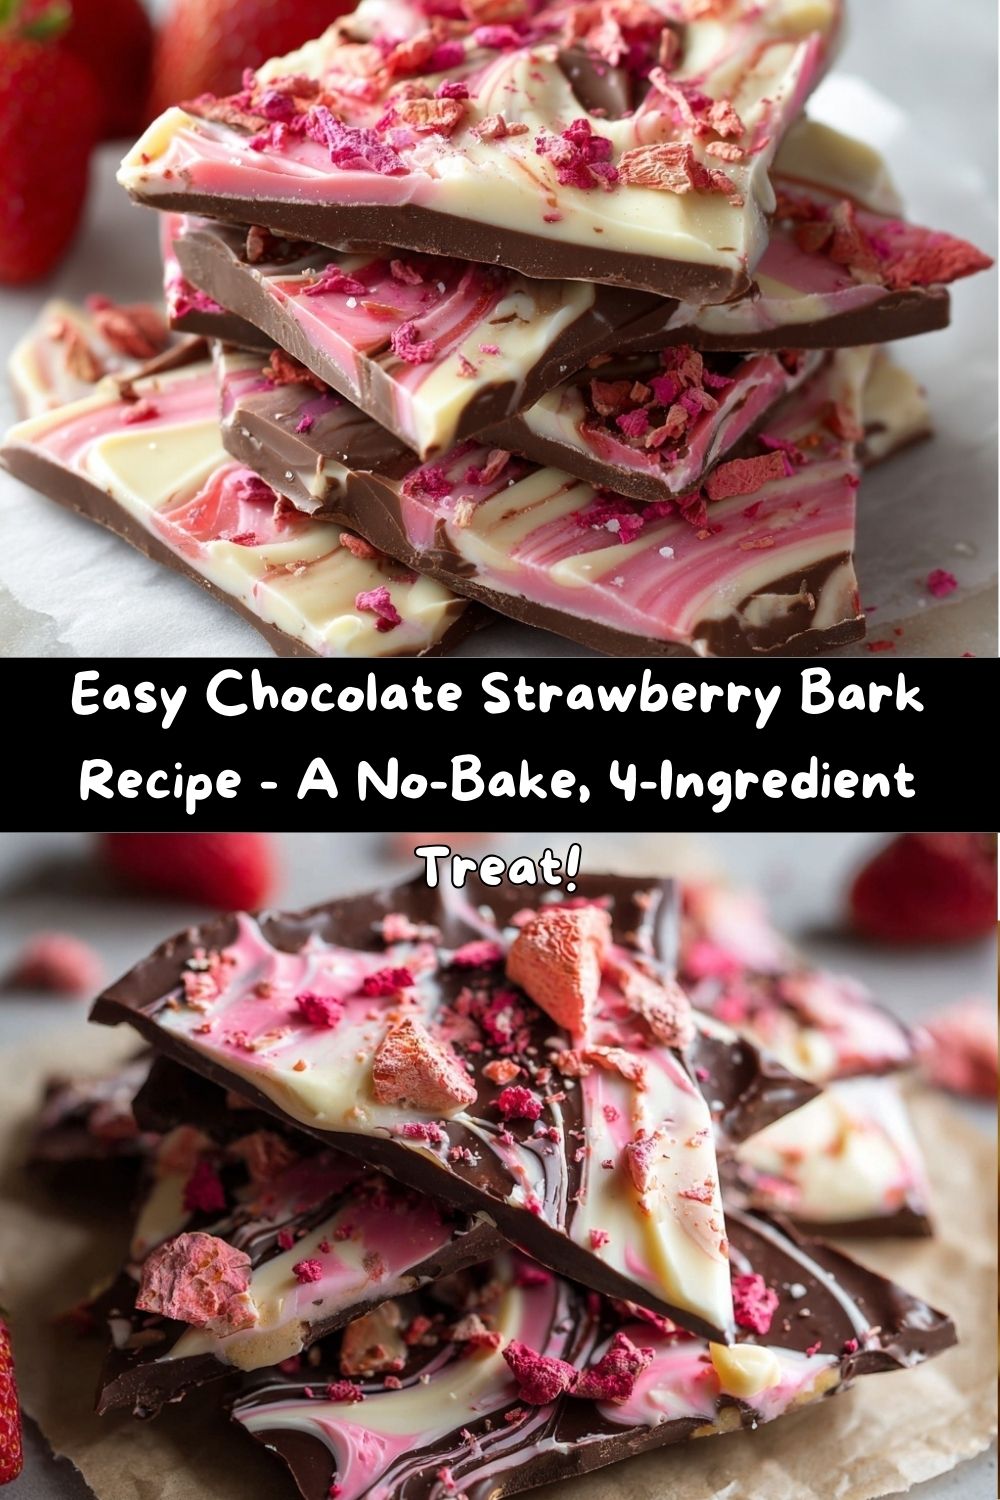
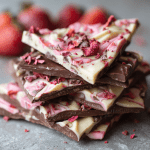
Imagine this: a rich, dark chocolate base, swirled with a blush-pink white chocolate, all studded with tangy, crunchy bits of freeze-dried strawberries. It’s sweet, it’s a little tart, it’s effortlessly elegant, and it shatters into the most satisfying pieces. This isn’t just a recipe; it’s your secret weapon for last-minute hostess gifts, a stunning addition to any dessert board, or that little sweet something you deserve with your afternoon coffee. It’s the kind of treat that looks like you fussed for hours, but between you and me? We’ll have it chilling in the fridge in about 10 minutes flat. So, tie on that apron (the cute one with the pockets!), and let’s make something beautifully delicious together.
A Sweet Slice of Memory
This recipe always takes me back to my first “fancy” dessert attempt as a kid. It was my mom’s birthday, and my budget was strictly allowance-based. A bakery cake was out of the question, but I was determined. I salvaged a half-eaten bar of dark chocolate and a handful of strawberry candies from the pantry, melted, swirled, and sprinkled with pure, seven-year-old pride. It was… lumpy. The “bark” was more of a “puddle with crunchy bits.” But when my mom took a bite, her face lit up like I’d presented her with a trophy. That moment taught me that the heart behind the food matters just as much as the technique.
This bark is the grown-up, infinitely more delicious version of that kitchen experiment. It captures that same spirit of joyful, from-the-heet making but with a few chef-approved upgrades (goodbye, stale strawberry candies!). Every time I make it, I remember that it’s not about perfection; it’s about sharing something sweet, literally and figuratively.
What You’ll Need (And Why!)
Gather your squad! The beauty here is in the simplicity. Here’s what you need and my best tips for each:
- 6 oz Dark Chocolate (Chopped): This is our flavor foundation. I prefer a chocolate bar labeled 60-70% cacao for a nice balance—rich but not bitter. Chef’s Insight: Using a bar you love to eat out of hand guarantees a great-tasting bark. You can also use high-quality dark chocolate chips, but bars often melt more smoothly.
- 6 oz White Chocolate (Chopped): The creamy canvas for our pink swirl! Look for real white chocolate (cocoa butter should be in the ingredients) for the best melt and flavor. Substitution Tip: If you’re not a white chocolate fan, you can swap it for milk chocolate or even more dark!
- A few drops of Red or Pink Food Coloring (Optional): This is purely for that gorgeous, Instagram-worthy pink hue. Chef’s Hack: For a natural tint, try a tiny pinch of beet root powder or a smudge of freeze-dried strawberry powder mixed into the melted white chocolate.
- 1/3 cup Freeze-Dried Strawberries, Crushed: THE star of the show! Freeze-dried are essential here—they pack a massive strawberry punch and stay super crunchy. Fresh berries contain water and will make your bark soggy. Pro Tip: Leave some pieces a little bigger for beautiful texture and visual pops of red.
- Flaky Sea Salt (My Secret Weapon!): Okay, this wasn’t in the original list, but trust me. A tiny sprinkle of flaky salt (like Maldon) over the wet chocolate elevates every single flavor. It’s non-negotiable in my kitchen!
Let’s Make Some Magic: Step-by-Step
Ready? This is the fun part. We’re going to move with confidence but no stress. I’ve got your back with every step.
- Prep Your Stage. Line a standard baking sheet with parchment paper. Don’t use wax paper! Parchment is your best friend for easy release. No need to grease it.
- Melt the Dark Chocolate. Place your chopped dark chocolate in a microwave-safe bowl. Microwave in 30-second bursts at 50% power, stirring vigorously with a dry spoon or spatula between each burst. Why 50% power? It prevents scorching and gives you more control. Stop when there are just a few small lumps left—the residual heat will melt them as you stir. This is called “carry-over cooking” and it’s a great way to avoid overheating.
- Create the Base. Pour the smooth, melted dark chocolate onto your prepared parchment. Use an offset spatula or the back of a spoon to spread it into a rustic rectangle, about 1/4-inch thick. It doesn’t need to be perfect! Pop the whole tray into the fridge for 5-7 minutes. This sets the base just enough so the two chocolates will swirl instead of blending into one muddy color.
- Melt & Color the White Chocolate. While the dark chills, melt the white chocolate using the same gentle, 30-second method. White chocolate is more delicate and can seize (get clumpy) if overheated, so low and slow is key! Once melted, stir in your food coloring, if using, until you get a pretty pink shade.
- The Art of the Swirl. Pull your tray from the fridge. Dollop the pink white chocolate all over the set dark chocolate base. Now, take a toothpick, a skewer, or the tip of a small knife. Gently drag it through the chocolates in loose figure-eight patterns or zig-zags. Don’t overdo it! A few graceful swirls look much more elegant than over-mixed mud.
- Add the Crunch & Chill. Immediately sprinkle the crushed freeze-dried strawberries evenly over the top. Follow it with that magical pinch of flaky sea salt. Now, let it set! Transfer the tray to the refrigerator for a solid 20-30 minutes, until the bark is completely firm to the touch.
- Break and Revel! This is the best part. Remove the bark (it should lift off the parchment in one sheet). Place it on a cutting board and use your hands to break it into beautiful, irregular shards. Alternatively, use a knife to chop it into neat pieces. Your choice!
How to Serve Your Gorgeous Creation
Okay, you’ve made a masterpiece. Now, let’s show it off! Pile the bark pieces high on a beautiful platter for your next get-together—it’s a total crowd-pleaser. For gifting, tuck pieces into clear cellophane bags tied with a ribbon, or layer them in a festive tin between sheets of parchment. It makes a heartfelt, handmade gift that everyone adores.
My favorite way to enjoy it? On a little dessert board next to a cup of strong coffee or a glass of red wine. The bitter coffee or fruity wine cuts the sweetness perfectly. It’s also a fantastic topping, crumbled over vanilla ice cream or Greek yogurt for an instant dessert upgrade.
Make It Your Own: Fun Flavor Twists!
The basic formula is your playground. Here are a few of my favorite riffs:
- Nutty Crunch: Swap half the strawberries for chopped toasted pistachios, almonds, or pecans. The nuttiness with the dark chocolate is divine.
- Tropical Vibes: Use freeze-dried raspberries or mango instead of strawberries, and add a sprinkle of shredded coconut to the white chocolate.
- Peppermint Party: Perfect for the holidays! Omit the strawberries and food coloring. Add 1/4 tsp of peppermint extract to the white chocolate and sprinkle with crushed candy canes.
- S’mores Bark: Sprinkle mini marshmallows and crushed graham crackers over the dark chocolate base before adding the white chocolate swirl.
- Vegan/Dairy-Free: Use a high-quality vegan dark chocolate and dairy-free white chocolate. Ensure all other ingredients are vegan-friendly.
Emily’s Kitchen Notes & Confessions
I’ve made this bark approximately a zillion times, and it’s evolved from that first lumpy childhood attempt. My biggest “aha” moment was learning that a briefly chilled base is the key to a clean swirl. I once tried to swirl on a warm base, and let’s just say I ended up with “mauve mud bark.” It still tasted good, but it wasn’t pretty!
This recipe is also my go-to for using up ends of chocolate bars. Got a little bit of three different kinds? Melt them together for a custom “mystery mix” base! Cooking should be fun and forgiving. If your swirls aren’t magazine-perfect, I promise the flavor will be 100% fantastic.
Your Questions, Answered!
Q: My white chocolate got clumpy and seized! What happened?
A: Oh, we’ve all been there! White chocolate is sensitive to moisture and heat. If even a drop of water or steam gets in, or if it gets too hot, it seizes. To fix it, try stirring in a teaspoon of vegetable oil or melted coconut oil. It might not get perfectly smooth again, but it will be spreadable. For next time, ensure your bowl and tools are completely dry and melt on lower power.
Q: Can I use fresh strawberries?
A: I don’t recommend it. The water content will seep out, making the bark sticky and causing the chocolate to bloom (get those white streaks). Freeze-dried are the way to go for intense flavor and crunch without the mess.
Q: How do I store it, and how long does it last?
A: Store it in an airtight container in the fridge for up to 2 weeks. You can also freeze it for up to 3 months! The cold keeps it perfectly snappy.
Q: My bark is soft at room temperature. Why?
A> This usually means the chocolate wasn’t fully tempered (a process that stabilizes it). Since we’re using a quick-melt method, it’s normal for it to soften a bit when warm. Just keep it chilled until right before serving. Using high-quality chocolate with a higher cocoa butter content will also help it stay firmer.
Chocolate Strawberry Bark : Sweet, Swirled, and Perfect for Snacking or Gifting
- Total Time: 40 minutes
- Yield: 12 pieces 1x
Description
This Chocolate Strawberry Bark is as pretty as it is delicious—layered with creamy dark chocolate, pink-tinted white chocolate, and bursts of tangy freeze-dried strawberries. It’s a quick, no-bake treat that looks elegant but takes just minutes to make. Perfect for holidays, dessert platters, or a sweet treat to keep stashed in the fridge.
Ingredients
6 oz dark chocolate, chopped
6 oz white chocolate, chopped
A few drops of red or pink food coloring (optional)
1/3 cup freeze-dried strawberries, crushed or halved
Instructions
Line a baking sheet with parchment paper.
Melt dark chocolate in a microwave-safe bowl in 30-second intervals, stirring between each until smooth. Spread evenly over the parchment.
Melt white chocolate the same way. Stir in a drop or two of pink or red food coloring, if using.
Gently spoon white chocolate over the dark chocolate and swirl with a toothpick or knife.
Sprinkle freeze-dried strawberries on top while chocolate is still soft.
Chill in the refrigerator for 20–30 minutes until set, then break into pieces
- Prep Time: 10 minutes
- Chill Time: 30 minutes
Nutrition
- Calories: 120 / Piece
- Fat: 7g / Piece
- Carbohydrates: 12g / Piece
- Fiber: 1g / Piece
- Protein: 1g / Piece
A Quick Nutritional Glance
While this is definitely a treat, it’s nice to know what you’re enjoying! This info is per piece (based on 12 pieces). Remember, using high-quality dark chocolate means you’re getting antioxidants (flavanols) and less sugar than milk chocolate. The freeze-dried strawberries add a touch of vitamin C and fiber. It’s a sweet bite that, when enjoyed mindfully, can be part of a happy, balanced life. Everything in moderation, including moderation—sometimes you just need a big piece of chocolate bark!
- Calories: ~120
- Protein: 1g
- Carbohydrates: 12g
- Fat: 7g
- Fiber: 1g
Final Thoughts from My Kitchen to Yours
And there you have it! Your guide to creating the simplest, most impressive sweet treat in your repertoire. I hope you feel inspired, equipped, and excited to try it. More than that, I hope you have as much fun making it as I do. The kitchen is my happy place, and my goal is always to help you find that same joy—no five-star training required, just a willingness to try and a love for good food.
If you make this bark (and I truly hope you do!), tag me @TastyChow online so I can see your beautiful creations. Now, go break off a piece of that bark, pour yourself something delicious, and enjoy the sweet, crunchy, chocolatey fruits of your labor. You’ve earned it! Until next time, keep chasing flavor and cooking with heart.
With love and a full cookie jar,
Emily