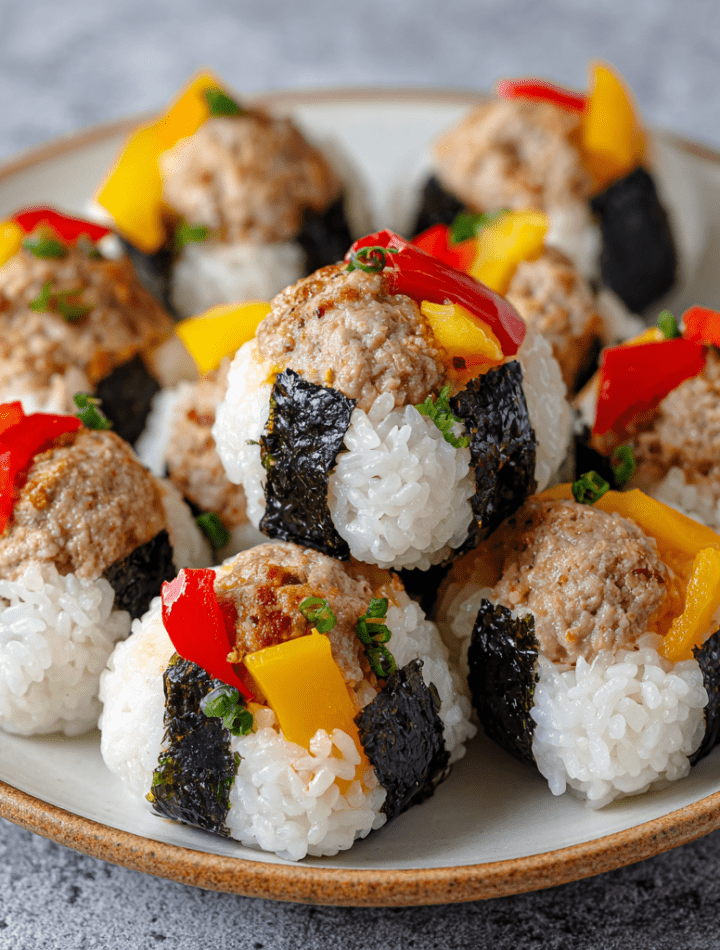
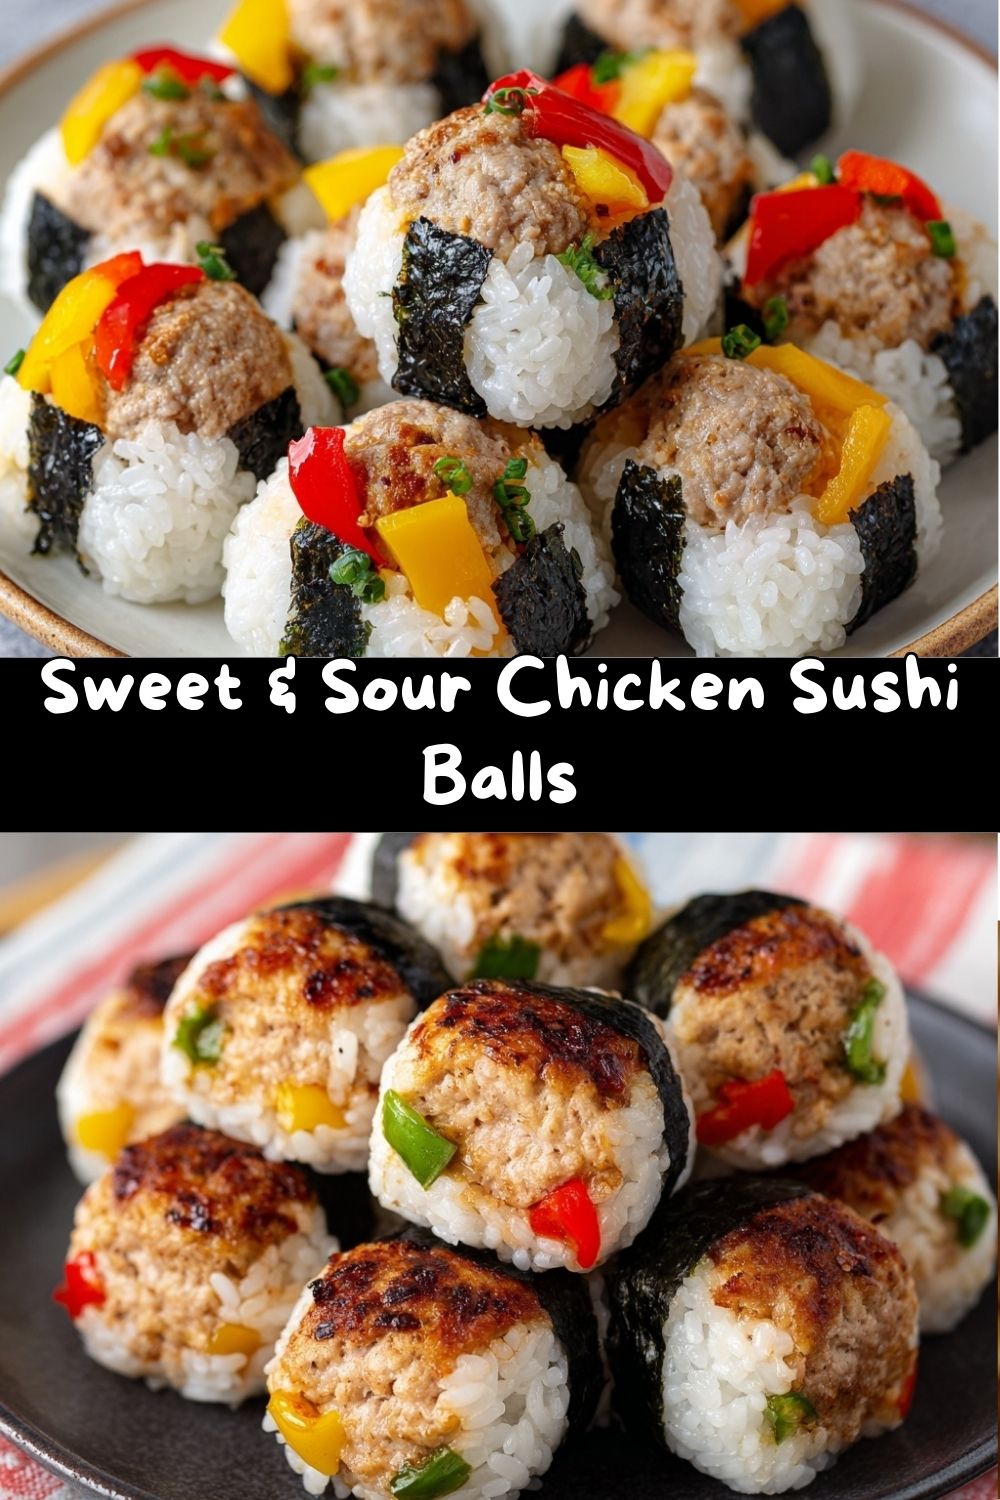
Sweet & Sour Chicken & Rice Sushi Balls – Onigiri-Style Bento Bites
Today, we’re mashing up two of my favorite worlds: the comforting, familiar flavor of classic sweet and sour chicken, and the adorable, portable magic of Japanese onigiri (rice balls). The result? These utterly irresistible Sweet & Sour Chicken & Rice Sushi Balls.
Imagine this: a fluffy, slightly tangy mound of sticky sushi rice, hiding a secret pocket of savory, saucy ground chicken. The whole thing gets a cute little “hug” from a strip of nori (seaweed), making it the perfect no-utensils-needed bite. They’re a total game-changer for bento boxes, after-school snacks, picnics, or just a way to make Tuesday lunch feel special. They’re kid-approved, adult-adored, and so much easier to make than they look. Trust me, if you can make a meatball, you can absolutely rock these. So, tie on that apron, grab your favorite mixing bowl, and let’s turn lunchtime into playtime!
The Takeout Box That Started It All
This recipe has its roots in a very specific, glossy-white takeout container. Growing up, our family’s “big treat” dinner was ordering Chinese food. I’d always, always zero in on the Sweet & Sour Chicken. That perfect crunch, that vibrant red sauce clinging to each piece—it was my culinary holy grail. I’d even fish out the last pineapple chunks from the sauce with my fingers (no shame!).
Years later in culinary school, I fell head-over-heels for the elegant simplicity of Japanese cuisine, especially onigiri. The idea of a complete, flavorful meal wrapped up in a neat little rice package blew my mind. One day, while packing my husband’s lunch, I had a lightbulb moment: What if I put my childhood favorite inside my new favorite? A few messy (but delicious) kitchen experiments later, these fusion bites were born. They’re my happy place where nostalgia meets fun, hands-on cooking. Every time I make them, I think of that little kid with sauce on her chin, and it just makes me smile.
Gather Your Flavor Squad
Here’s everything you need to create these flavor-packed bites. Don’t stress about perfection—cooking is about making it work for you!
For the Sweet & Sour Chicken Filling:
- 1/2 lb ground chicken: I love using ground chicken here because it’s lean, cooks fast, and soaks up the sauce beautifully. Chef’s Tip: Ground turkey or pork work just as well!
- 1/2 cup sweet & sour sauce: The star flavor! Use your favorite store-bought brand for ease, or if you’re feeling fancy, whisk up a quick homemade version with pineapple juice, vinegar, ketchup, and brown sugar.
- 1/2 tsp garlic powder: Adds a quick, punchy base note without any chopping. Fresh minced garlic is great too—just cook it for 30 seconds before adding the chicken.
- 1/4 cup finely diced bell pepper (optional): I love the tiny pop of color and crunch! Any color works. If you’re not a pepper person, skip it or swap in finely diced water chestnuts.
- Salt & pepper to taste: Don’t forget to season your protein. It makes all the difference.
For the Sushi Rice:
- 2 cups cooked short-grain or sushi rice: This is key! Short-grain rice is starchier and stickier than long-grain, which is what holds our balls together. Cook it according to package directions. Pro Insight: Slightly overcooking it (a tad mushy) is actually better for onigiri than undercooking!
- 1 tbsp rice vinegar: This gives the rice its classic, subtle tang and helps it shine. In a pinch, apple cider vinegar with a pinch of sugar works.
- 1/2 tsp sugar & 1/4 tsp salt: These get dissolved into the vinegar before mixing. They season the rice and balance the acidity perfectly.
For Assembly:
- Nori sheets, cut into strips: The seaweed “belt” that holds our creation together and adds that iconic, savory, umami flavor. You can find nori in the international aisle. Use kitchen shears to cut them easily.
- Bowl of water & a pinch of salt: Your secret weapon against sticky hands! Wet, salted hands prevent the rice from becoming a gluey mess on your fingers.
Let’s Build Some Deliciousness: Step-by-Step
Ready for the fun part? Let’s get our hands a little messy and make some magic. I’ll walk you through every step with my favorite kitchen hacks.
Step 1: Make the Flavor-Packed Filling
Grab a medium skillet and place it over medium heat. Crumble in your ground chicken, sprinkling it with the garlic powder, salt, and pepper. Cook it, breaking it up with a spoon, until it’s no longer pink and is nicely browned—this builds flavor! Now, pour in that glorious sweet & sour sauce and add the diced peppers if you’re using them. Give it all a good stir and let it simmer for 2-3 minutes. You’re looking for a thick, glazy consistency that coats the chicken, not a runny sauce. Once it’s perfect, take it off the heat and let it cool completely. Why cool? A hot filling will make your rice too warm and difficult to shape. Patience here pays off!
Step 2: Season the Rice Like a Pro
While your chicken cools, let’s tackle the rice. Your cooked rice should be warm, but not steaming hot. In a small bowl, whisk together the rice vinegar, sugar, and salt until the sugar and salt dissolve. Drizzle this mixture over the rice. Now, using a rice paddle or a flat spatula, use a slicing and folding motion to mix it in. Don’t stir aggressively or you’ll smash the grains! You just want to evenly distribute the seasoning. Let this sit for a few minutes until it’s cool enough to handle comfortably.
Step 3: The Fun Part – Shaping the Rice Balls!
This is the moment! Set up your station: a bowl of water with a big pinch of salt stirred in, your cooled rice, your cooled filling, a plate for your finished balls, and your nori strips.
- Wet Your Hands: Seriously, don’t skip this. Dip your hands in the salted water and shake off the excess. Re-wet between each ball.
- Create a Rice Base: Grab about 1/4 cup of rice. Gently press and flatten it into a disc in the palm of your wet hand. It should be about 1/4-inch thick.
- Add the Filling: Spoon about 1 heaping teaspoon of the sweet & sour chicken mixture into the center of the rice disc. Don’t overfill, or it’ll burst out!
- Encase and Shape: Take another small scoop of rice (about 2 tablespoons) and place it on top of the filling. Now, gently use both hands to cup and press the rice around the filling, forming a ball or a triangle. Apply firm but gentle pressure—you want it to hold its shape, not be a dense brick. If you see a little filling peeking out, just patch it with a tiny bit more rice.
- The Nori Hug: Wrap a strip of nori around the middle of your rice ball. The slight moisture from the rice will make it stick. This isn’t just for looks; it gives you a non-stick handle to hold while eating!
Repeat with the remaining rice and filling. If the rice starts sticking again, just re-wet those hands! You’ll be a pro by the third one.
How to Serve & Savor Your Creation
Okay, you’ve crafted these adorable little flavor bombs. Now, let’s make them shine! These onigiri are incredibly versatile.
For a classic bento box, pack 2-3 rice balls alongside some fresh fruit (like orange wedges or grapes), steamed edamame, and maybe a few cucumber slices. They’re perfect at room temperature, making them the ultimate packed lunch.
Want to make it a fun appetizer or snack platter? Arrange them on a beautiful plate with small dipping bowls of extra sweet & sour sauce, soy sauce, or even a spicy mayo (mix sriracha with mayo!). Let everyone grab and dip.
For dinner, I love serving them warm, straight from shaping, with a big, simple side salad. It feels special without any fuss. However you serve them, the joy is in that first bite where you hit the saucy, savory center. Pure happiness!
Mix It Up! Flavor Twists & Swaps
The basic formula here is your canvas. Get creative and make it your own!
- Spicy Korean BBQ: Swap the sweet & sour sauce for gochujang (Korean chili paste) thinned with a little soy sauce and honey. Use ground beef or pork for the filling.
- Teriyaki Veggie: Go vegetarian! Sauté finely chopped mushrooms, carrots, and onions until soft, then mix with teriyaki sauce. Use this as your filling. So hearty and delicious.
- “Pizza Pocket” Style: Kids go nuts for this. Fill with a spoonful of marinara sauce, a few bits of chopped pepperoni, and a tiny sprinkle of shredded mozzarella. Wrap in rice and serve.
- For a Rice Swap: Short on sushi rice? Medium-grain rice like Calrose will work in a pinch. For a cauliflower rice version, sauté riced cauliflower until dry, season with vinegar, and press firmly. Note: It won’t stick quite as well, but it’s a great low-carb option.
- Furikake Fun: Before shaping, mix 1-2 tablespoons of furikake (Japanese rice seasoning) into your rice for extra flavor and a beautiful speckled look.
Chef Emily’s Kitchen Confessions
The first time I tried to make these, I made a critical error: I used hot filling. It was a disaster! The rice turned gummy, the balls fell apart, and I basically created sweet & sour chicken rice mush. Not my finest moment. I learned the hard way that cooling the filling is non-negotiable. Now, I often make the filling ahead of time and stash it in the fridge.
Also, don’t be afraid if your first rice ball looks… rustic. Mine did! Shaping is a tactile skill that you get better at with each one. Embrace the imperfections—they taste just as amazing. Some of my favorite kitchen memories are of my niece and nephew helping me shape these, making lopsided, nori-covered masterpieces with huge grins on their faces. That’s what it’s all about.
Your Questions, Answered!
Let’s tackle the common hiccups before they happen.
Q: My rice balls are falling apart! What am I doing wrong?
A: The #1 culprit is usually dry rice or dry hands. Make sure your rice is freshly cooked and still warm/steamy when you season it. And keep that bowl of salted water right next to you—wet hands are your best friend! Also, press firmly when shaping. You need enough pressure to make the rice grains stick to each other.
Q: Can I make these ahead of time?
A: Absolutely! You can make the filling and season the rice up to a day ahead. Store them separately in the fridge. Let the rice come to room temp before shaping (it’s easier to work with). Once shaped, store the finished rice balls in a single layer in an airtight container in the fridge for up to 2 days. The nori will soften in the fridge, but they’ll still taste great.
Q: My rice is sticking to my hands even when they’re wet. Help!
A: Add more salt to your water bowl! The salt creates a barrier. You can also lightly dampen your hands with a bit of oil (like a neutral sesame or vegetable oil) instead of water.
Q: Can I freeze onigiri?
A: Yes, but with a plan! Wrap each unwrapped rice ball (no nori yet) tightly in plastic wrap. Freeze for up to a month. To eat, thaw in the fridge overnight or defrost in the microwave at low power. Re-wrap with a fresh strip of nori after reheating.
A Quick Nutritional Glance
Please note: The following is an estimate for one rice ball (assuming a yield of 10), based on the ingredients used. Values can vary depending on specific brands of sauce and meat.
- Calories: ~180 kcal
- Carbohydrates: 26g (The rice gives you energy!)
- Protein: 9g (Great from the chicken to keep you full)
- Fat: 4g
- Sugar: 4g (Mainly from the sauce)
- Sodium: 360mg
These bites are a balanced little package! They’re dairy-free and easily adaptable for other dietary needs (see the variations above for veggie or low-carb ideas). They provide a good mix of complex carbs and protein, making them a satisfying snack or meal component.
Final Thoughts from My Kitchen to Yours
And there you have it, my food-loving friends! These Sweet & Sour Chicken & Rice Sushi Balls are more than just a recipe; they’re a reminder that cooking should be fun, playful, and full of flavor. They take a familiar favorite and present it in a new, hands-on way that brings joy before you’ve even taken a bite. Whether you’re packing lunches, feeding hungry kiddos, meal-prepping for the week, or just craving something different from the usual bowl-and-fork routine, these little bento bites deliver big.
I hope they spark a little creativity in your kitchen, too. Recipes like this remind me why I love cooking so much—it’s not just fuel, it’s comfort, nostalgia, and discovery all rolled (or balled!) into one. So go ahead, grab that rice, roll up your sleeves, and make a batch. Let each bite take you somewhere fun.
And if you end up with a few lopsided, quirky rice balls? Even better. It means you laughed, you played, and you cooked with heart. That’s the real magic.
Until next time, keep tasting boldly, cooking joyfully, and making everyday meals feel like an adventure.
—Emily