The Ultimate Comfort Food Hack: Cheesy Chicken Crescent Rolls
Hey there, friend! Pull up a chair and let’s talk about one of life’s greatest kitchen miracles: the magical moment when buttery, flaky crescent dough meets a creamy, cheesy, chicken-y filling. If you’re staring down another busy week and the question “What’s for dinner?” is starting to sound like a horror movie tagline, I’ve got your back. These Cheesy Chicken Crescent Rolls are here to save the day, the mood, and your hungry belly.
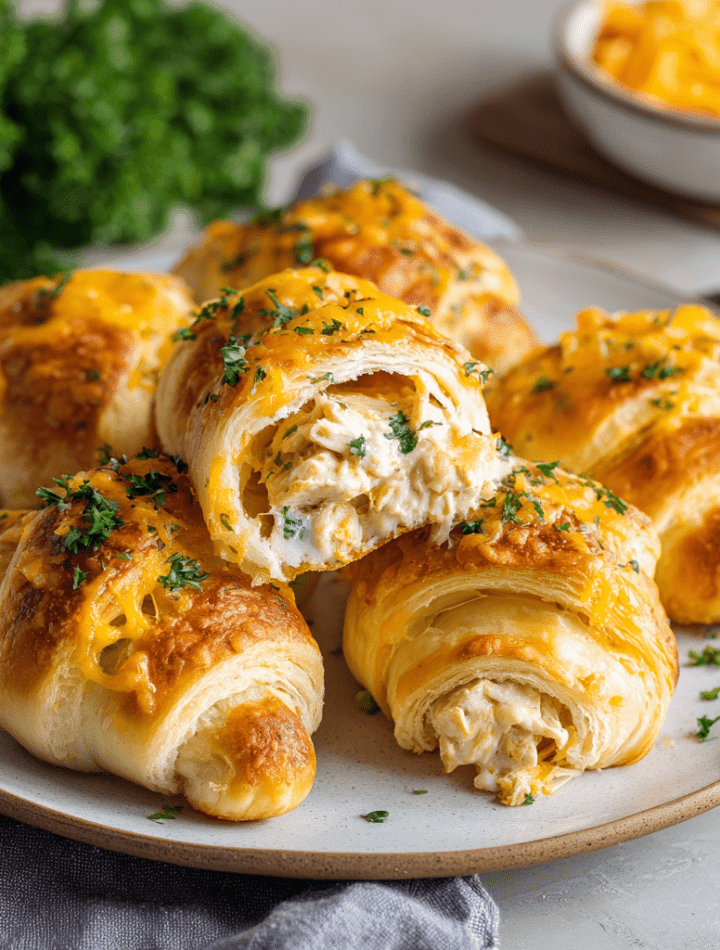
Picture this: golden-brown, pastry-wrapped bundles, hot from the oven, with cheese bubbling out the sides. You break one open, and the steam carries the scent of garlic, rich cream cheese, and tender chicken. It’s the kind of food that makes everyone, from picky kiddos to foodie partners, come running to the table. No fuss, no fancy techniques—just pure, unadulterated comfort.
I created this recipe for those nights when you need a win. When you want something homemade and heartwarming, but you also really want to be done in under an hour so you can finally start that Netflix show. This is that recipe. It’s flexible, forgiving, and so darn delicious. It’s the culinary equivalent of your favorite cozy sweater. So, tie on that apron (the messy one is totally welcome here), and let’s make something incredible together. Your new go-to dinner is just a few rolls away!

A Tale of Two Kitchens: Grandma’s Spoon & My Happy Accident
This recipe, like so many of my favorites, has roots in two very different kitchens. The first is my Grandma Ruth’s, where the smell of baking dough was a Sunday morning religion. She didn’t use crescent rolls, but her hands worked magic with biscuit dough, pinching it around leftover stewed chicken for a humble, heavenly pocket pie. That feeling of being wrapped in love and carbs? That’s what I’m always chasing.
The second kitchen was my first post-culinary school apartment, tiny and perpetually chaotic. One night, facing down a container of leftover rotisserie chicken, a lone tube of crescent dough in the fridge, and a serious case of “chef-brain fatigue,” I had a “what if?” moment. I mixed the chicken with the soft cream cheese and cheddar I had, rolled it up, and crossed my fingers. What came out of the oven wasn’t just dinner; it was a revelation. It was all the comfort of Grandma’s kitchen, delivered in a quick, fun, pull-apart package. It was the happy accident that became a staple, and I’ve been tweaking and loving it ever since. It reminds me that the best food often comes not from perfection, but from creativity and a willingness to play.
Gathering Your Flavor Crew: Ingredients & Insights
Here’s your shopping list for golden, gooey success! I’ve added my chef-y two cents on each one because knowing your ingredients is the first step to cooking with confidence.
- 2 cups cooked shredded chicken: The star of the show! I use rotisserie chicken for ultimate ease and flavor, but leftover baked or poached chicken works beautifully. Chef’s Tip: For the best texture, shred it with two forks or your hands—small chunks are better than big pieces for rolling!
- 1 (8-count) tube crescent roll dough: Our buttery, flaky vehicle to deliciousness. Keep it chilled until the very last second for the easiest handling.
- 1/2 cup cream cheese, softened: The secret to the luxuriously creamy, cohesive filling. Chef’s Swap: Out of cream cheese? An equal amount of full-fat ricotta or even a thick garlic-herb spreadable cheese can work in a pinch.
- 1/2 cup shredded cheddar or mozzarella cheese: The melty glue. I love sharp cheddar for its tang, but mozzarella gives you that epic cheese-pull effect. A blend is fantastic too!
- 1/4 cup sour cream: Adds a touch of tang and keeps the filling moist. Plain Greek yogurt is a perfect 1:1 substitute if that’s what you have.
- 1/4 teaspoon garlic powder: We’re using powder here for its even distribution and gentle, non-burning flavor. It’s the quiet background singer that makes everything better.
- Salt and pepper to taste: Don’t skip these! They wake up all the other flavors. Taste your filling before you roll.
- Optional: 1/2 cup shredded cheese for topping, parsley for garnish: The extra cheese topping creates a gorgeous, crispy-chewy crust. Fresh parsley adds a pop of color and a hint of freshness that cuts the richness perfectly.
Let’s Get Rolling: Your Step-by-Step Roadmap to Perfection
Ready to build these little bundles of joy? Follow these steps, and I’ll walk you through every pro tip and hack I’ve learned along the way.
Step 1: Preheat & Prep. Crank your oven to 375°F (190°C). Lightly grease your 9×13-inch baking dish with butter, oil, or a quick spritz of cooking spray. This little step is your insurance policy against any cheesy spillage sticking for eternity.
Step 2: Create the Dreamy Filling. In a medium bowl, combine your shredded chicken, softened cream cheese, sour cream, that 1/2 cup of shredded cheese, garlic powder, salt, and pepper. Here’s my favorite part: get in there with your (clean!) hands and mix it. It’s the best way to make sure every strand of chicken is coated in that creamy, cheesy goodness. Taste it! Does it need more pepper? A pinch more salt? This is your moment to be the boss of your flavor.
Step 3: Unroll & Conquer the Dough. Open the crescent roll tube (that *pop* is so satisfying). Unroll the dough on a clean surface and gently separate it along the perforated lines into eight triangles. If the dough feels like it’s sticking or tearing, a light dusting of flour on your hands and the surface works wonders.
Step 4: Fill & Roll Like a Pro. Place 1-2 heaping tablespoons of the chicken mixture onto the wider end of each triangle. Don’t get greedy and overfill, or you’ll have a leaky situation. Just a nice, plump mound. Then, start rolling from the wide end toward the narrow tip, tucking the dough around the filling as you go. It doesn’t have to be perfect! A little rustic charm is part of the appeal. Place each roll seam-side down in your prepared dish. They can cozy up right next to each other.
Step 5: The Golden Touch. If you’re using the optional extra cheese, now’s the time to sprinkle it generously over the top of all the rolls. This isn’t just for looks; it creates an incredible flavor crust.
Step 6: Bake to Golden Bliss. Slide the dish into your preheated oven and bake for 20-25 minutes. You’re looking for the tops to be a deep, golden brown and the cheese in the filling to be bubbly. If your oven has hot spots, rotate the dish halfway through. The smell will be absolutely intoxicating.
Step 7: Garnish & Serve with Love. Let them cool for just 5 minutes—this lets the filling set slightly so it doesn’t volcano out when you bite. Then, sprinkle with fresh chopped parsley for that gorgeous finish. Serve warm and watch the smiles appear.
How to Serve These Golden Gems
Presentation is part of the fun! You can serve these right from the baking dish for a family-style, help-yourself vibe. I love placing a few on a wooden board or a simple white platter—it makes even a Tuesday night feel special. For a complete, balanced meal that’s pure comfort, pair them with:
- A bright, crisp garden salad with a tangy vinaigrette to cut through the richness.
- A warm bowl of creamy tomato soup for the ultimate nostalgic dunking experience.
- Some steamed green beans or roasted broccoli for a veggie side.
- For a game-day or party spread, put out a dish of these with a side of ranch dressing or extra marinara for dipping. They disappear fast!
Make It Your Own: Delicious Twists & Swaps
Once you’ve mastered the classic, the playground is open! Here are some of my favorite ways to riff on this recipe.
- Buffalo Chicken: Swap the sour cream for ranch dressing. Mix 1/4 cup of Frank’s RedHot (or your favorite hot sauce) into the chicken filling. Use a blue cheese or pepper jack cheese blend. Top with a drizzle of ranch after baking.
- BBQ Bacon Ranch: Use a Monterey Jack cheese. Stir 3 tablespoons of your favorite BBQ sauce into the filling. Add 1/3 cup of cooked, crumbled bacon. Serve with extra BBQ for dipping.
- Veggie-Packed: Sauté 1/2 cup each of finely diced bell pepper and onion until soft, let cool, and mix into the filling. You can also add a handful of fresh spinach, finely chopped.
- Everything Bagel: Before baking, brush the tops of the rolls with a beaten egg and sprinkle generously with everything bagel seasoning. Game-changer.
- Gluten-Free/Dairy-Free: Use a gluten-free crescent dough alternative (available in some stores) or even gluten-free puff pastry sheets cut into squares. For dairy-free, use vegan cream cheese, shreds, and sour cream.
Chef Emily’s Notebook: Extra Sprinkles of Wisdom
This recipe has been on quite a journey with me! I’ve made it for new moms, for potlucks where I needed a guaranteed crowd-pleaser, and on countless “I just can’t even” nights. One time, I accidentally used whipped cream cheese (it was all I had) and added a handful of frozen peas and carrots to the mix to clean out the fridge. My husband declared it the best version yet—the peas added little pops of sweetness! So don’t be afraid to clean out your veggie drawer. The filling is a fantastic blank canvas. The true evolution has been learning that the messier my hands get while mixing and rolling, the more love seems to get baked right in. It’s a hands-on, joyful recipe—embrace it!
Your Questions, Answered: FAQs & Fixes
Q: My filling is leaking out everywhere while baking! What did I do wrong?
A: Ah, the classic “cheese lava flow.” This usually means we overfilled the rolls. Stick to 1-2 tablespoons max, and make sure you’re rolling snugly, tucking the dough as you go. A little leakage is normal and delicious, but a flood means scale it back next time.
Q: Can I make these ahead of time?
A> Absolutely! You can assemble the rolls, place them in the baking dish, cover tightly, and refrigerate for up to 24 hours. When you’re ready, just pop them in the oven—you may need to add 3-5 extra minutes since they’re starting from cold. You can also freeze the unbaked rolls on a parchment-lined sheet, then transfer to a bag once solid. Bake from frozen, adding 10-15 minutes to the bake time.
Q: My crescent dough is tearing/too sticky. Help!
A> That dough can be finicky if it gets too warm. If it’s tearing, just pinch it back together—it’s very forgiving. If it’s sticky, a light dusting of flour on your fingers and the work surface is the trick. Work quickly for best results!
Q: What’s the best way to reheat leftovers?
A> To recapture that flaky texture, reheat in a 350°F oven or a toaster oven for about 10 minutes. The microwave will work in a pinch but will soften the pastry.
Nutritional Information (A Note from My Kitchen)
While I’m all about joy-first eating, I know many folks like to have the facts! Here’s a basic breakdown per serving (2 rolls), based on the standard recipe. Remember, your specific brands and any modifications will cause variations.
- Calories: ~430
- Protein: 26g (Great for keeping you full!)
- Carbohydrates: 22g
- Fat: 28g
- Fiber: 1g
- Sodium: ~550mg
To lighten it up slightly, you can use reduced-fat cream cheese and cheese, and a light sour cream. Adding those veggies from the variation above will boost the fiber! As always, this is meant to be part of a balanced diet—enjoy it alongside your favorite greens.
Final Thoughts: Your Kitchen Awaits!
And there you have it, my friend! Your complete guide to creating the easiest, cheesiest, most family-approved dinner that feels like a hug on a plate. I hope this recipe finds its way into your regular rotation, bringing as much ease and happiness to your table as it has to mine. Remember, cooking isn’t about perfection; it’s about the messy, joyful process of creating something delicious to share. So the next time you’re in a dinner rut, grab that tube of dough and remember: golden, bubbly, cheesy salvation is just 30 minutes away.
I’d love to hear how your Cheesy Chicken Crescent Rolls turn out! Did you add a twist? Did the kids go crazy for them? Tag me on social or leave a comment on the blog—sharing your kitchen wins is my favorite thing. Now, go forth and bake! And as always… let’s chow down.
— Emily 🧡