The Pie That Dreams Are Made Of: My Silky, No-Bake Chocolate Pudding Pie
Hey friends, Emily here! Can we talk about magic for a second? Not the rabbit-out-of-a-hat kind (though that’s cool too), but the kind that happens in your mixing bowl. The magic that turns a handful of simple ingredients into a dessert so unbelievably creamy, so deeply chocolatey, and so soul-satisfyingly perfect that it makes you pause mid-bite just to say, “Wow.” That’s what this Chocolate Pudding Pie is all about.
If you’ve ever been intimidated by pies that require a rolling pin, a pastry degree, or a prayer to the baking gods, I’m giving you a virtual high-five right now. This is your new secret weapon. It’s a luscious, silky-smooth chocolate pudding, cradled in a buttery, crumbly crust, and it doesn’t need a single second in the oven. Just your stovetop, your fridge, and a little bit of stirring love. It’s the dessert you make when you want all the glory of a show-stopping pie with the ease of a weekday treat. Whether it’s for a holiday table that needs a star, a dinner party where you want to impress, or a Tuesday night when chocolate therapy is non-negotiable, this pie has your back. So, tie on your favorite apron (the messy one tells the best stories), and let’s make some no-bake perfection together!
Grandma June’s Spoon and The Pudding That Started It All
This pie takes me right back to my grandma June’s linoleum-tile kitchen. She was a pudding whisperer. While other grandmas had famous cakes or pies, Grandma June’s claim to fame was a simple pot of homemade chocolate pudding, always served still-warm in little floral bowls. She’d stand at the stove, her wooden spoon moving in slow, patient figure-eights, and I’d perch on a stool, watching the liquid magically transform into a glossy, thick ribbon of chocolate. The rule was you had to wait for it to cool, but we’d always “test” it with a spoonful while it was still piping hot, burning our tongues and declaring it absolutely worth it.
This pie is that memory, all grown up. It’s her foolproof pudding technique, poured into a crisp crust to make it portable and party-ready. Every time I make it, I can almost smell her kitchen—a mix of chocolate, vanilla, and the faint scent of the roses she grew by the back door. It’s more than a recipe; it’s a warm, chocolatey hug from the past. Making it feels like sharing that hug with everyone at my table, and now, with you.
Gathering Your Chocolate Dream Team
Here’s the beautiful part: the ingredient list is short, sweet, and probably already in your pantry. Let’s break it down.
For the Crust:
- 1 ½ cups crushed graham crackers or Oreo crumbs: The foundation! Graham crackers give a lovely honeyed, buttery flavor that pairs perfectly with chocolate. Chef’s Insight: For a richer, fudgier base, go with Oreo crumbs (cream filling and all!). Just toss whole cookies in a food processor or bash them in a zip-top bag with a rolling pin.
- ¼ cup melted butter: This is the glue that holds our crust together. Use unsalted so you control the saltiness. For a dairy-free swap, coconut oil works beautifully.
- 2 tablespoons sugar: Omit this if you’re using Oreo crumbs! The cookies are sweet enough already. With graham crackers, this little bit of sugar gives the crust a delightful sandy texture.
For the Chocolate Pudding Filling:
- ½ cup sugar: Sweetens the deal. I use regular granulated sugar here for a clean sweetness that lets the chocolate shine.
- ¼ cup unsweetened cocoa powder: This is where the deep, authentic chocolate flavor lives. Use a good-quality cocoa powder—it makes all the difference. Dutch-processed will give a slightly milder, darker flavor, while natural cocoa has a brighter, fruitier tang. Both work!
- ¼ cup cornstarch: The wizard behind the curtain! This is our thickening agent, responsible for that gorgeous, sliceable yet silky texture. Do not substitute flour here; cornstarch gives a clearer, glossier finish.
- ¼ teaspoon salt: The flavor enhancer. It might seem small, but salt makes the chocolate taste MORE chocolatey. Trust me.
- 2 ¾ cups milk: Whole milk is my go-to for ultimate creaminess, but 2% works in a pinch. For a dairy-free version, full-fat canned coconut milk is a decadent and delicious alternative.
- 4 oz semi-sweet chocolate, chopped: The double-chocolate punch! Using real chocolate in addition to cocoa powder gives the pudding an incredible depth and a professional, velvety mouthfeel. Use a bar you love eating plain.
- 1 teaspoon vanilla extract: The aromatic finishing touch. It rounds out all the flavors. A tiny splash of almond extract is also a fun secret twist.
- 1 tablespoon butter: Stirred in at the end, this adds a luxurious sheen and a hint of richness that takes the pudding from great to “oh-my-goodness.”
Let’s Build Some Pie Magic: Step-by-Step
This is where the fun happens! Put on some good music, and let’s get cooking.
- Make the Crust: In a medium bowl, mix your chosen crumbs, melted butter, and sugar (if using) until it looks like wet sand. Pour it into a standard 9-inch pie dish. Here’s my favorite trick: use the bottom of a flat measuring cup to press the crumbs firmly and evenly across the bottom and up the sides. This compacting is key to a crust that holds together when sliced. Pop it in the fridge to set up while you make the filling.
- Whisk the Dry Team: In a medium saucepan (off the heat), whisk together the sugar, cocoa powder, cornstarch, and salt. Whisk it really well to break up any lumps in the cocoa or cornstarch. A lump-free start means a silky-smooth finish.
- Introduce the Milk: Slowly, while whisking constantly, pour in the milk. I do this in a slow stream to avoid any dry pockets. Keep whisking until everything is completely combined and you have a thin, chocolatey liquid.
- Cook with Patience & Love: Place the saucepan over medium heat. Now, your job is to stir. And stir. And stir some more. I like to switch between a whisk and a silicone spatula (to get the corners). After about 5-7 minutes, you’ll feel it start to thicken. Don’t stop stirring! It will go from liquid to a thick, bubbling lava-like consistency. Let it bubble gently for a full 60 seconds—this cooks out the starchy taste from the cornstarch.
- The Grand Finale (Butter & Chocolate): Remove the pan from the heat immediately. Add the chopped chocolate, vanilla extract, and that tablespoon of butter. Stir, stir, stir until the chocolate and butter are fully melted and incorporated, and the pudding is gloriously smooth and glossy.
- Assemble & Chill: Retrieve your chilled crust. Pour the warm pudding directly into the crust. Smooth the top with your spatula. To prevent a “skin” from forming (though some of us love that skin!), place a piece of plastic wrap directly onto the surface of the warm pudding. Refrigerate for at least 4 hours, but overnight is even better. This is the hardest part—waiting!
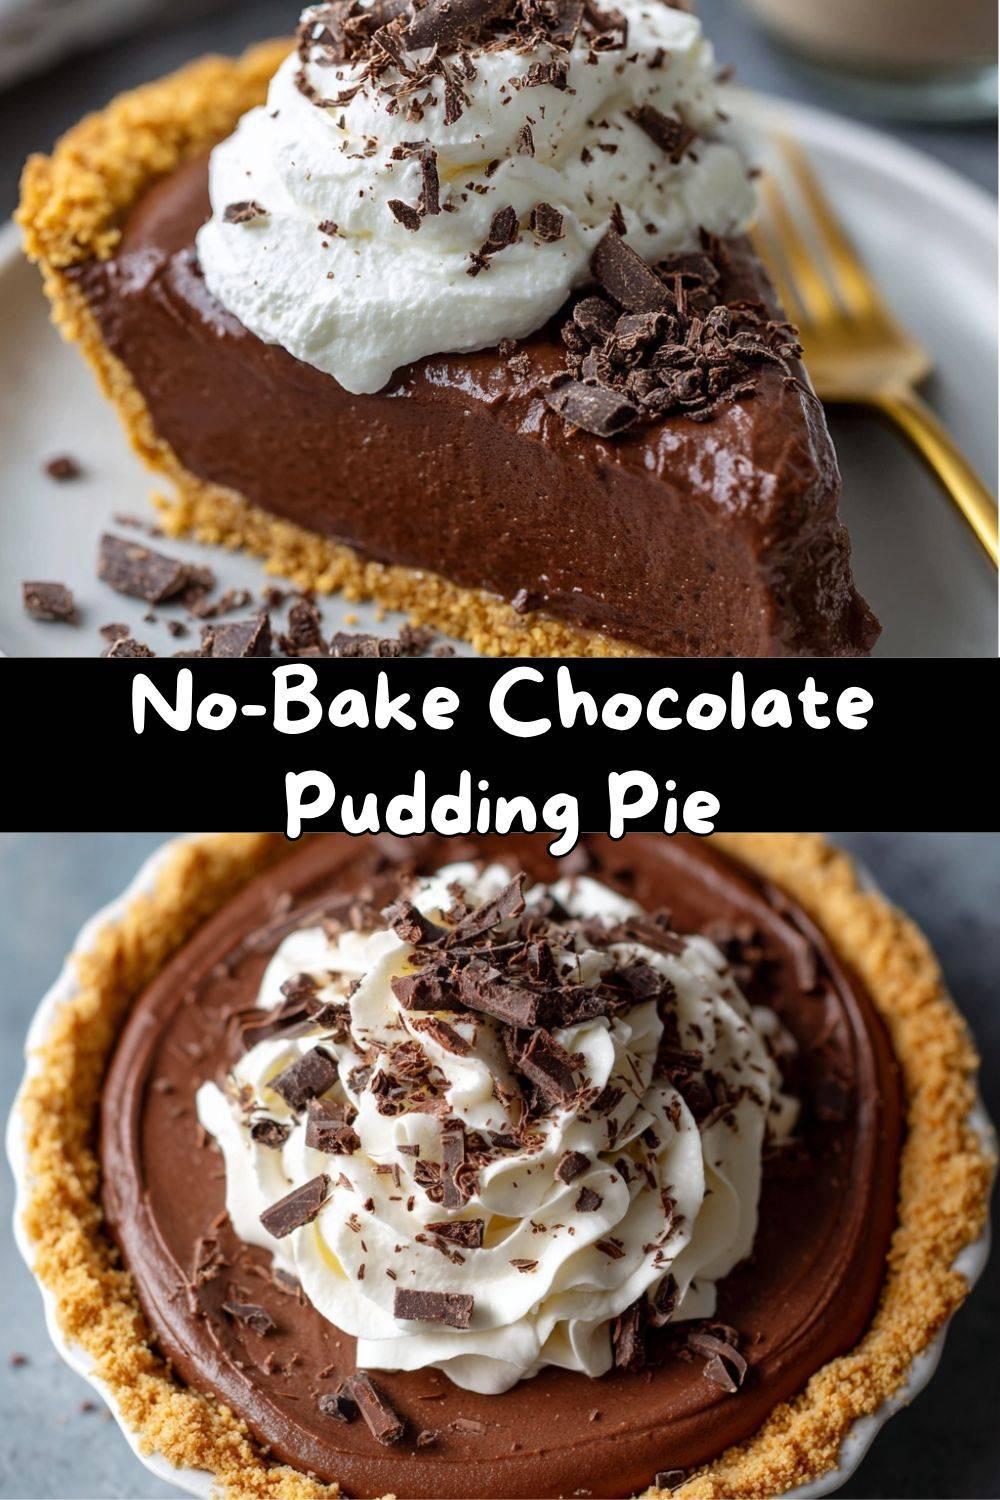
How to Serve This Beauty
When it’s finally time to serve, run a thin knife under hot water, dry it, and gently slide it between the pie and the dish to loosen. Slice with your warmed knife for cleaner cuts.
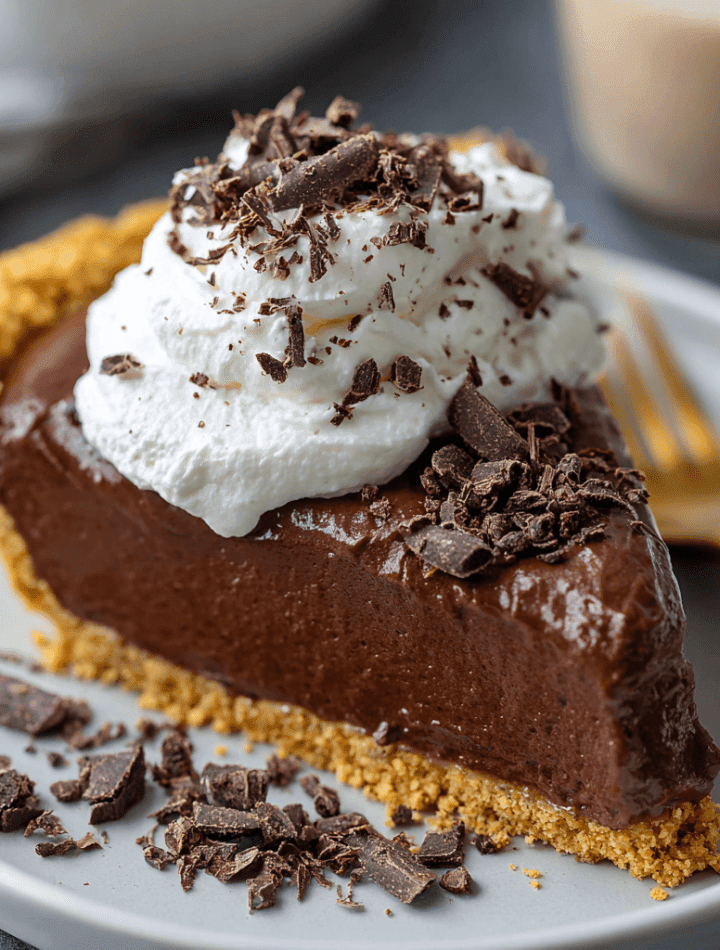
I love serving this pie straight from the fridge, cold and firm. A dollop of freshly whipped cream (sweetened with just a touch of powdered sugar and vanilla) is non-negotiable for me. For the grand finale, a sprinkle of chocolate shavings (use a vegetable peeler on a chocolate bar), a few curls, or even a dusting of cocoa powder makes it look like it came from a fancy patisserie. Serve it on its own, or with a handful of fresh raspberries on the side—their tartness is a dream with the rich chocolate.
Make It Your Own: Delicious Twists & Swaps
This recipe is a fantastic canvas for your creativity! Here are a few of my favorite riffs:
- Salted Caramel Chocolate: Drizzle the bottom of the crust with ½ cup of good salted caramel sauce before adding the pudding. Sprinkle a little flaky sea salt on the whipped cream topping.
- Peanut Butter Cup: Swap the graham crackers for crushed peanut butter cookies for the crust. After pouring the pudding, drop spoonfuls of peanut butter onto the surface and swirl gently with a knife.
- Mocha Madness: Dissolve 1-2 teaspoons of instant espresso powder into the milk before adding it to the dry ingredients. It won’t taste like coffee, just like a deeper, more intense chocolate.
- Mint Chocolate Chip: Add ½ teaspoon of peppermint extract with the vanilla. Fold ½ cup of mini chocolate chips into the thickened pudding right before pouring it into the crust.
- Dairy-Free/Vegan: Use Oreos (check for dairy) or vegan graham crackers with coconut oil for the crust. For the filling, use full-fat coconut milk and a high-quality dairy-free chocolate. The result is incredibly rich and decadent.
Chef Emily’s Notes from a Messy Apron
This recipe has been my trusty sidekick for years, and it’s evolved in funny ways. Once, I was filming a reel and got so caught up chatting that I accidentally used a whole cup of cornstarch. Let me tell you, we ended up with a chocolate pie that could have been used as a doorstop! We laughed so hard we cried. Moral of the story: measure your cornstarch.
I’ve also learned that this pie is incredibly forgiving. If you get a tiny lump, just press the warm pudding through a fine-mesh sieve before pouring it into the crust—no one will ever know. And that “skin” that forms if you skip the plastic wrap? In my family, we fight over it. It’s a badge of honor for a homemade pudding pie.
Your Questions, Answered!
Q: My pudding is lumpy! What did I do wrong?
A: Lumps usually happen if the dry ingredients weren’t fully whisked together before adding the milk, or if the heat was too high and the mixture thickened too fast. Next time, whisk your dry mix thoroughly and keep the heat at a steady medium. If you have lumps, just blend the finished pudding with an immersion blender or push it through a sieve.
Q: Can I make this ahead of time?
A: Absolutely! This pie is a dream make-ahead dessert. It needs the chill time anyway. You can make it up to 2 days in advance. Just add the whipped cream and toppings right before serving.
Q: Why did my filling not set up firmly?
A> This almost always means the pudding wasn’t boiled for long enough. That full 60-second boil after it thickens is crucial to activate the cornstarch’s full thickening power. Also, ensure you’re using the correct amount of cornstarch and giving it the full 4+ hour chill.
Q: Can I use a store-bought crust?
A> Of course! A pre-made graham cracker crust will work in a pinch for ultimate ease. I’d still recommend giving it a quick 10-minute chill in the fridge before adding the filling.
Nutritional Info (Because We’re Curious!)
Here’s a rough estimate per slice (based on 8 servings, using whole milk and a graham cracker crust, without whipped cream topping). Remember, this is a treat meant to be savored and enjoyed!
- Calories: ~290
- Carbohydrates: 35g
- Fat: 15g
- Protein: 4g
- Sugar: 22g
Prep Time: 20 mins | Chill Time: 4 hours | Total Time: 4 hours 20 mins | Servings: 8
Final Chocolatey Thoughts
And there you have it, my friend—the path to no-bake chocolate pudding perfection. This pie is proof that the most memorable desserts aren’t always the most complicated. They’re the ones made with a bit of love, a lot of good chocolate, and the simple joy of creating something delicious to share.
I hope this recipe becomes a staple in your kitchen, the one you turn to when you need a guaranteed smile. When you make it, tag me @TastyChow—I want to see your beautiful creations and hear your kitchen stories! Now, go grab a fork, get that first creamy bite, and let’s chow down.
With love and a chocolate-smeared apron,
Emily