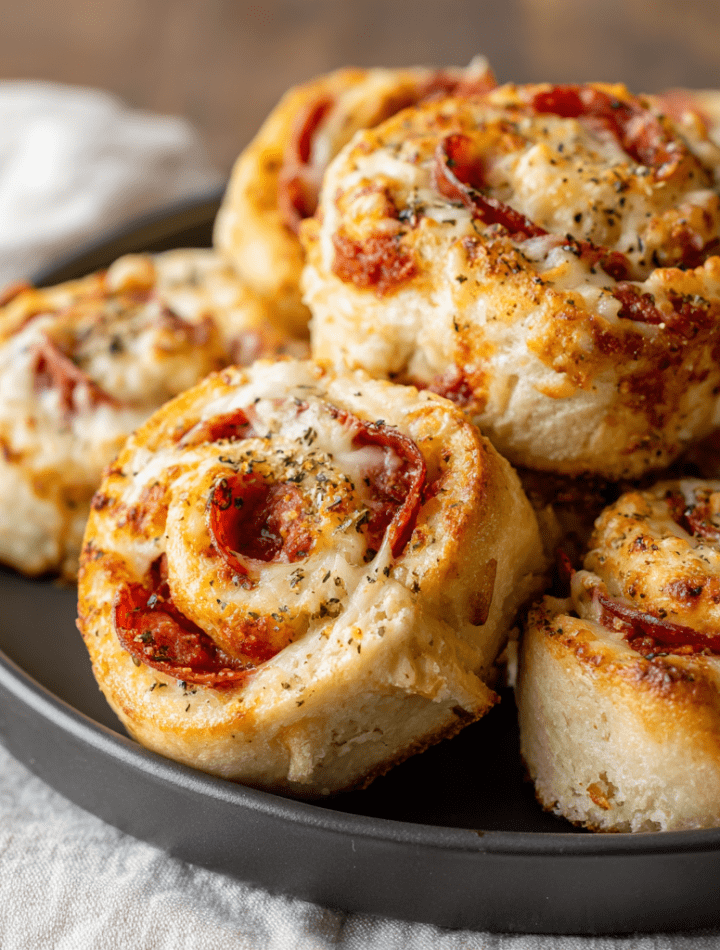
Sourdough Discard Pepperoni & Cheese Pizza Rolls: Your New Favorite Snack Hack!
Hey there, friend! Let’s have a real kitchen chat for a second. Are you, like me, a proud yet slightly tormented sourdough enthusiast? You lovingly feed your starter, you bake gorgeous loaves, but then… there’s that jar of discard in the fridge. It stares at you. You feel a pang of guilt thinking about tossing it. “It’s just flour and water!” you think, “But it has so much potential!”
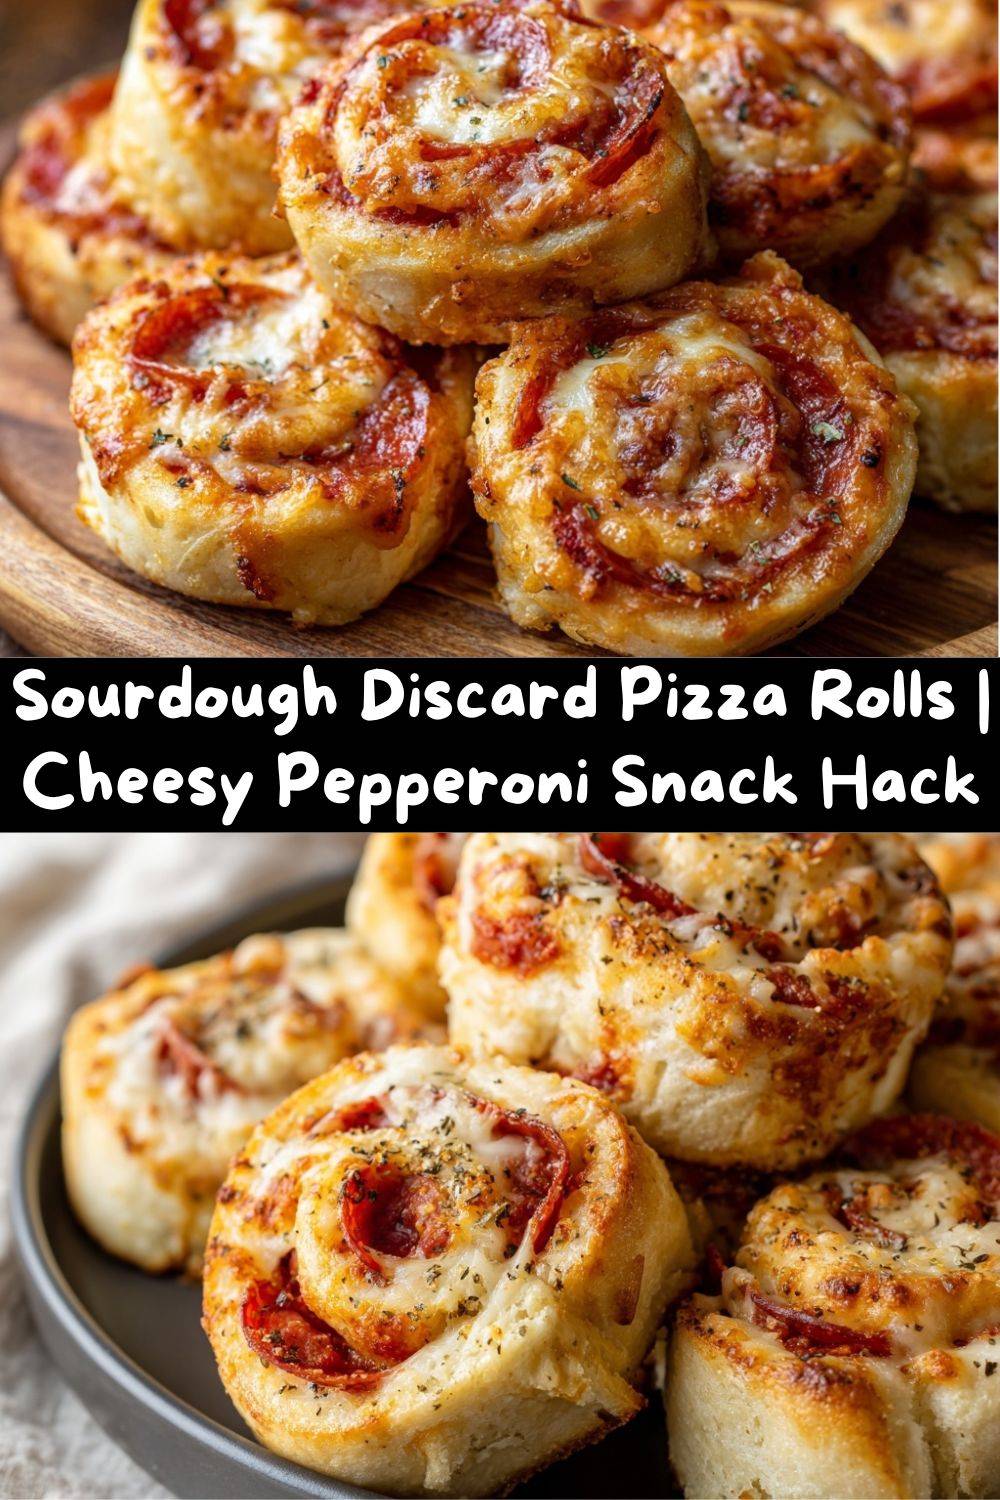
Well, toss that guilt right out the window (but definitely not the discard!), because I’ve got the absolute most fun, cheesy, and downright delicious solution for you. Today, we’re turning that tangy discard into Sourdough Discard Pepperoni & Cheese Pizza Rolls. Imagine: soft, golden-brown swirls of dough, packed with gooey, stretchy mozzarella, savory pepperoni, and just enough pizza sauce to make things interesting. They pull apart with the most satisfying tear, they’re perfect for dipping, and they make your kitchen smell like a pizza parlor’s best day ever.
This isn’t just a recipe; it’s a snack-time revolution. Whether you’re packing lunchboxes, hosting game day, needing a quick after-school treat, or just want a pizza fix without the commitment of a whole pie, these rolls are your answer. They’re approachable, they’re forgiving (hello, active yeast helping our sourdough friend along!), and they are guaranteed to bring smiles. So, grab your apron, rescue that discard from the back of the fridge, and let’s make something messy, cheesy, and incredibly tasty together.
The Little Loaf That Could: My Sourdough Journey
My love affair with sourdough started not in a fancy culinary school kitchen, but on my grandma’s sunlit countertop. She didn’t call it “discard”; she called it “sponge” or “leftover friend,” and she’d never, ever dream of wasting it. I remember watching her, her hands dusted with flour, using yesterday’s bit of starter to make the most incredible fluffy pancakes and crispy waffles. That lesson—that everything in the kitchen has value and a second act—stuck with me.
When I began my own sourdough journey years later, after more than a few tragic, dense loaves (we’ve all been there!), I always heard her voice. That jar of discard became a challenge and a canvas. I started experimenting: crackers, muffins, pretzels. But the moment I rolled that tangy dough around some cheese and pepperoni, I knew I’d struck gold. It was the perfect marriage of my grandma’s waste-not wisdom and my own love for over-the-top, shareable comfort food. These rolls are more than just a snack; they’re a little edible hug from my past, and I’m so excited to share that feeling with you.
Gathering Your Pizza Party Ingredients
Here’s everything you’ll need to create these pull-apart wonders. I’ve added my little chef notes because knowledge is power—and tastier pizza rolls!
- 1 cup sourdough discard – Straight from the fridge is perfect! The cool temperature helps control the dough’s rise. Don’t stress if it’s a bit hungry or super bubbly; sourdough is resilient.
- 1 ½ cups all-purpose flour – The reliable workhorse. I sometimes swap ½ cup with bread flour for a chewier bite, but AP works beautifully.
- ½ tsp salt – Crucial for flavor. It also strengthens the gluten. Don’t skip it!
- 1 tsp sugar – A tiny bit to give the yeast (our optional helper) a quick snack and aid in browning.
- 1 tsp instant yeast (optional) – Here’s my secret for predictable, faster rises! The sourdough provides incredible flavor, while the yeast gives a guaranteed lift. It’s the best of both worlds.
- 2 tbsp olive oil – For richness and a supple, soft dough. Extra virgin adds great flavor.
- ⅓–½ cup warm water – Start with ⅓ cup and add more as needed. Flour hydrates differently every day!
For the Filling:
- ½ cup pizza sauce – Use your favorite jarred brand or homemade. Pro tip: If it’s very watery, simmer it for 5 minutes to thicken so your dough doesn’t get soggy.
- 1 cup shredded low-moisture mozzarella – Pre-shredded is fine for convenience, but block cheese you shred yourself melts creamier (it doesn’t have anti-caking agents).
- ½ cup sliced pepperoni – Regular or mini work! If you have a little extra, I love crisping a few in a pan to sprinkle on top after baking.
- Optional: Italian seasoning or garlic powder – A light sprinkle over the sauce layer adds a wonderful aromatic punch.
Let’s Make Some Magic: Step-by-Step
Ready? Let’s get our hands doughy! This process is therapeutic, I promise.
- Make the Dough: In a large bowl, combine the sourdough discard, flour, salt, sugar, and instant yeast (if using). Give it a quick whisk to distribute everything. Add the olive oil and ⅓ cup of warm water. Chef’s Hack: I mix with a wooden spoon until a shaggy dough forms, then dive in with my hands. If it feels too dry and isn’t coming together, add the remaining water, one tablespoon at a time. The dough should be soft and slightly tacky, but not sticky.
- Knead It Smooth: Turn the dough out onto a lightly floured surface. Knead for 5-8 minutes. You’re looking for a smooth, elastic ball that springs back lightly when poked. Chef’s Tip: Put on your favorite song and knead to the beat! It makes the time fly and is a great arm workout.
- First Rise (The Patient Part): Place your lovely dough ball in a lightly oiled bowl, turning it once to coat. Cover with a damp kitchen towel or plastic wrap. Let it rise in a warm spot for 1-2 hours, until roughly doubled in size. Overnight Option: For incredible flavor, stick the covered bowl in the fridge right after kneading. Let it rise slowly for 12-24 hours. Pull it out 1 hour before rolling to take the chill off.
- Roll It Out: Punch down the risen dough (so satisfying!) and turn it out onto a lightly floured surface. Using a rolling pin, roll it into a rectangle about ¼ inch thick, roughly 10×14 inches. Try to get it even so your rolls are uniform.
- Add the Fillings: Spread the pizza sauce evenly over the dough, leaving a ½-inch border along one long edge (this helps seal the roll). Sprinkle with the shredded cheese, then layer on the pepperoni. Give it a light dusting of Italian seasoning if you’re feeling fancy.
- Roll & Slice: Starting from the long side opposite the clean border, tightly roll the dough into a log, pinching the clean edge to seal it. Chef’s Trick: Use a sharp serrated knife or unflavored dental floss to slice the log into 8-10 even pieces. (To use floss: slide it under the log, cross the ends over the top, and pull—clean cuts every time!)
- Second Rise: Place the rolls, cut-side-up, in a greased 9-inch round cake pan or square baking dish, leaving a little space between them. Cover and let them rise again for 30-60 minutes, until puffy.
- Bake to Golden Perfection: Preheat your oven to 375°F (190°C). Bake the rolls for 20-25 minutes. You’re looking for deep golden-brown tops and bubbly, molten cheese peeking out. If they’re browning too fast, tent with foil. Let them cool in the pan for just 5 minutes before devouring. That brief rest lets the cheese set slightly so it doesn’t all ooze out on the first bite!
How to Serve These Cheesy Swirls of Joy
Presentation is part of the fun! I like to serve these right in the baking pan, family-style, so everyone can gather around and grab a roll. The pull-apart action is half the experience. For extra pizzazz, brush the hot rolls with a little garlic butter (melted butter + minced garlic) as soon as they come out of the oven and sprinkle with grated Parmesan and chopped fresh parsley.
Dipping Sauce Bar: This is non-negotiable in my house. Set out small bowls of warm marinara sauce, creamy ranch dressing, and even a spicy sriracha mayo. Let everyone customize their dip!
These rolls are incredibly versatile. Pack them in a lunchbox (they’re great at room temp), slice them in half and griddle them in a pan with a little butter for a next-day crispy treat, or arrange them on a platter for your next party. They disappear fast, so you might want to make a double batch!
Get Creative: Recipe Variations
Once you’ve mastered the classic, the world is your cheesy oyster! Here are a few of my favorite twists:
- Three Cheese & Spinach: Swap pepperoni for a mix of ricotta, mozzarella, and Parmesan, with a handful of chopped fresh or thawed frozen spinach (squeezed very dry).
- BBQ Chicken: Use BBQ sauce instead of pizza sauce. Fill with shredded cooked chicken, red onion, and a mix of mozzarella and cheddar cheese.
- Veggie Lover’s: Sauté mushrooms, bell peppers, and onions until soft. Let them cool, then scatter over the sauce with the cheese. Olives are also a fantastic add-in!
- Everything Bagel: Before baking, brush rolls with an egg wash and sprinkle generously with Everything Bagel Seasoning. Serve with a side of scallion cream cheese for dipping—mind-blowing!
- Spicy Hawaiian: A controversial but delicious combo! Use a spicy pizza sauce, add diced ham, mozzarella, and a few small pieces of pineapple. Trust me, it works!
Chef Emily’s Kitchen Notebook
This recipe has become a staple in our house, and it’s evolved from a “what can I do with this discard?” experiment to a requested treat. I’ve learned a few things along the way: First, don’t be afraid of a wet dough when mixing—it often leads to a softer roll. Second, the overnight cold rise is a game-changer for flavor and fits a busy schedule perfectly. And third, the first time I made these, I was so excited I tried to slice the roll with a dull knife. Pepperoni and cheese flew everywhere! Hence my passionate advocacy for the dental floss method. Learn from my messy mistakes, friends. Your kitchen floor will thank you.
FAQs & Troubleshooting
Q: My dough didn’t rise much. What happened?
A: Don’t panic! Sourdough discard can be a bit sluggish, especially if it was very cold or inactive. That’s exactly why I love adding the instant yeast as an insurance policy. Ensure your water was warm (not hot) and that you let the dough rise in a warm, draft-free spot (like an off oven with the light on). The overnight fridge method is also very forgiving.
Q: The rolls were soggy inside. How can I prevent that?
A: This usually points to too much sauce or a sauce that was too thin. Make sure you’re using a thick pizza sauce and spreading a thin, even layer. Also, ensure your oven is fully preheated so they start cooking immediately.
Q: Can I make these ahead of time?
A> Absolutely! You can assemble the rolls through the slicing step, place them in the pan, cover tightly, and refrigerate overnight. The next day, let them sit at room temp for an hour, then bake as directed. You can also freeze the unbaked rolls on a parchment-lined tray, then transfer to a bag. Bake from frozen, adding 5-10 minutes to the bake time.
Q: Can I skip the yeast and use only sourdough discard?
A> You can, but the rise will be slower and less predictable. You’ll need to let the dough rise until truly doubled, which could take 4-6 hours or more depending on your starter’s activity. The texture will be a bit denser but still deliciously tangy.
Nutritional Information (A Note from Chef Emily)
Hey, I believe food is about joy and nourishment, in that order! While I’m not a dietitian, I can give you a general estimate to help with your planning. Please remember, these values can vary based on the specific brands and amounts of ingredients you use.
Estimated Nutrition Per Roll (based on 10 rolls): Calories: ~220 | Protein: 9g | Carbohydrates: 23g | Fat: 11g | Saturated Fat: 4g | Sodium: ~480mg
Chef’s Tips for Tweaks: To lower sodium, look for low-sodium pizza sauce and pepperoni, or reduce the amount of each. For a higher-protein version, you can substitute up to ½ cup of the flour with whole wheat flour or add a scoop of unflavored protein powder to the dry ingredients. Using part-skim cheese can also reduce fat content slightly. The beauty of homemade is you’re in control!
Final Thoughts: Share the Love!
And there you have it! From a jar of humble sourdough discard to a pan of glorious, cheesy, pull-apart pizza magic. I hope this recipe brings as much fun and flavor to your kitchen as it has to mine. Cooking is about connection—to our food, to our past, and to the people we share it with.