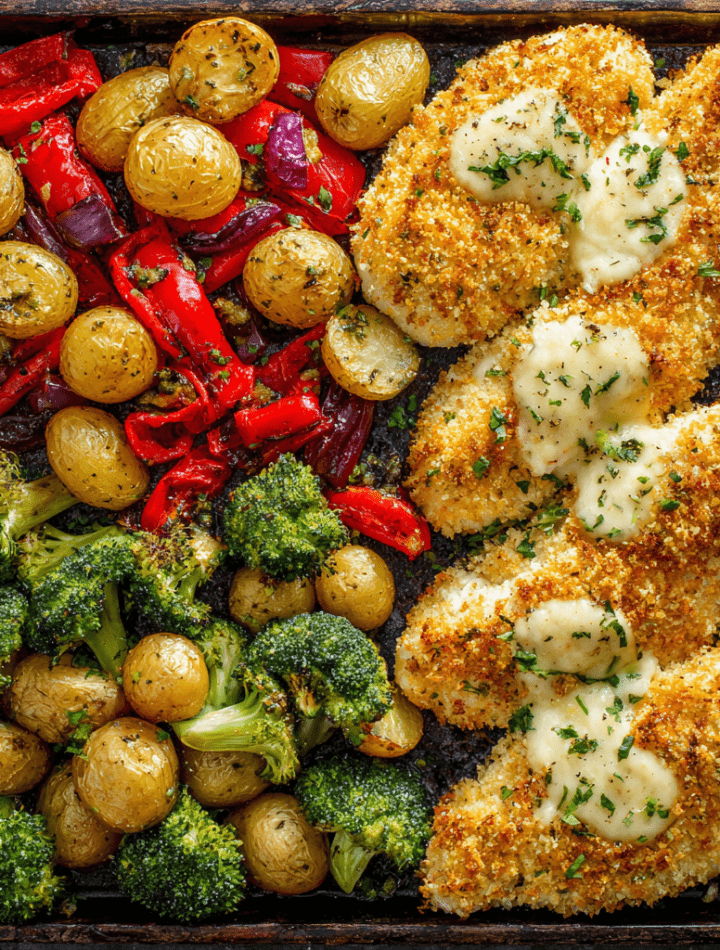
Parmesan-Crusted Chicken Sheet Pan Dinner: Your New Weeknight BFF
Hey friends! Emily here, apron on and oven preheating. Let’s talk about the universal weeknight dinner dream: something crispy, cheesy, comforting, and—here’s the kicker—incredibly easy to clean up. If you’re nodding along, maybe even doing a little happy dance at the mere thought, then you and I are already on the same wavelength. This Parmesan-Crusted Chicken Sheet Pan Dinner isn’t just a recipe; it’s a one-pan promise of pure, unadulterated deliciousness with minimal fuss.
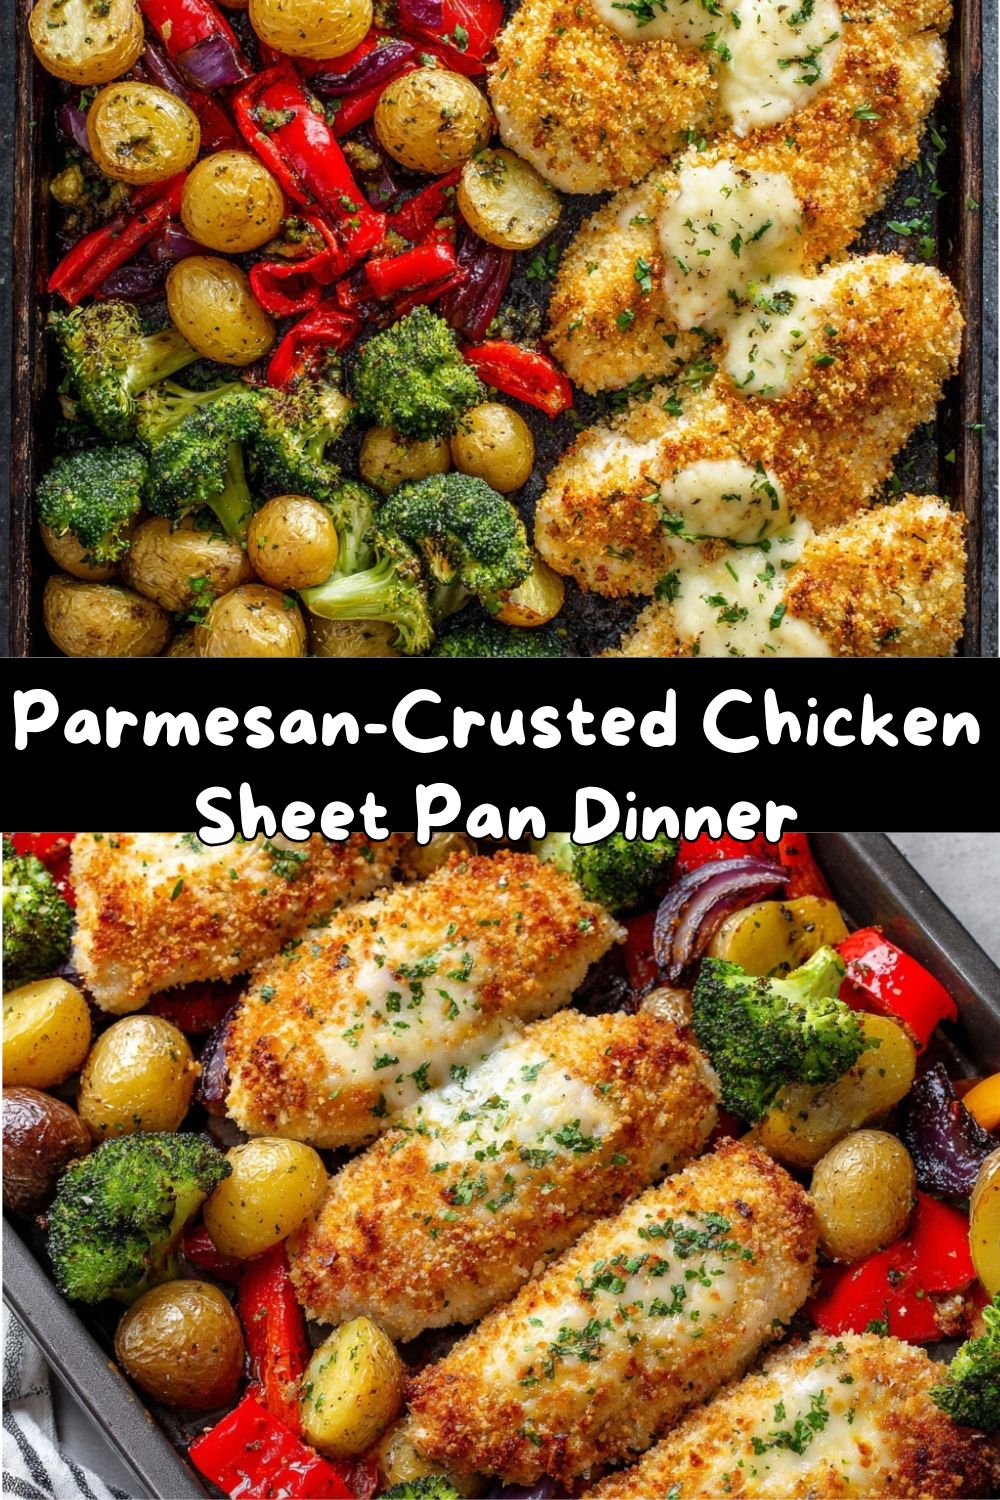
We’re taking juicy chicken breasts, giving them a golden, savory crust of Parmesan and panko, and roasting them alongside a medley of vibrant, seasoned veggies. The magic happens all on one pan. The cheese toasts into a perfect crunch, the chicken stays tender, and the veggies caramelize in those tasty drippings. It’s a symphony of flavors and textures that comes together with the simplicity of a sheet pan and a hot oven. No babysitting multiple burners, no towering pile of dishes—just a gorgeous, complete meal you can plunk right in the middle of the table. So, let’s ditch the stress and embrace the messy, beautiful joy of a dinner that feels like a treat but cooks like a Tuesday. Ready? Let’s make some magic!
A Little Story About Big Flavor (and My Grandma’s Apron)
This recipe always takes me back to my grandma’s kitchen, a place where “fancy” and “easy” happily coexisted. She had a magical way of making a simple weeknight supper feel like a special occasion. I can still see her, in that flour-dusted floral apron, pulling a sizzling pan from the oven—the aroma of roasting garlic and Parmesan filling the entire house. It wasn’t about complex techniques; it was about layering good, honest flavors and letting the oven do the work while everyone gathered, hungry and happy, around the table.
My version is a love letter to that feeling. I’ve swapped in panko for her classic breadcrumbs for extra crunch and added my favorite Italian seasoning blend. But the heart of it—the promise of a crispy, cheesy crust giving way to perfectly cooked chicken, all sharing a pan with hearty veggies—is pure nostalgia. It’s the food equivalent of a warm hug, the kind of dish that builds memories one delicious, easy Tuesday night at a time.
What You’ll Need: Simple Ingredients, Big Impact
Here’s your shopping list for one-pan perfection! I’ve included my favorite tips and swaps so you can make this dish your own.
- 4 boneless, skinless chicken breasts: The star of our show! Look for breasts that are roughly the same size so they cook evenly. Chef’s Insight: If yours are very thick, give them a gentle pound with a rolling pin or pan to an even ¾-inch thickness. This ensures quick, uniform cooking and maximum crust-to-chicken ratio!
- ½ cup grated Parmesan cheese: Not the powdery stuff in the shaker! Use freshly grated Parmesan or a good-quality pre-grated variety from the refrigerated section. This is what creates that deep, savory, umami crunch. Sub Tip: Pecorino Romano is a fantastic, slightly saltier swap.
- ½ cup panko breadcrumbs: My secret weapon for an ultra-crispy, airy crust that doesn’t get soggy. Chef’s Insight: For extra flavor and color, toast the panko in a dry skillet for 2-3 minutes before mixing it with the Parmesan. It’s a game-changer!
- 1 teaspoon garlic powder & 1 teaspoon Italian seasoning: Our flavor boosters! Garlic powder distributes evenly, and Italian seasoning is a convenient herb blend. Sub Tip: No Italian seasoning? Use ½ tsp dried oregano and ½ tsp dried basil.
- Salt and black pepper, to taste: Season with confidence! Don’t forget to season the coating mixture AND the chicken itself.
- 2 eggs, beaten: Our “glue.” Beating them well creates a smooth layer for the crust to stick to.
- For the Veggies:
- 2 cups baby potatoes, halved: Creamy, hearty, and they roast up beautifully. Sub Tip: Sweet potato cubes or halved Brussels sprouts are awesome too.
- 1 cup broccoli florets: For a pop of green and lovely caramelized edges.
- 1 red bell pepper, sliced: Adds sweetness, color, and a tender-crisp bite.
- 2 tablespoons olive oil: Helps the veggies roast and crisp. Avocado oil works great too.
- Salt, pepper, and extra Parmesan (optional): A little extra cheese on the veggies as they roast? Always a yes from me.
Let’s Get Cooking: Your Foolproof Roadmap to Crispy Goodness
Follow these steps, and you’ll have a golden, aromatic pan of goodness in no time. I’m chatting you through each one with my best tips!
- Preheat & Prep Your Pan: Crank your oven to 400°F (200°C). This high heat is key for getting that chicken crispy and the veggies roasted, not steamed. Line a large, rimmed baking sheet with parchment paper or foil. Chef’s Hack: A light spray of cooking oil on the parchment under where the chicken will go helps prevent any stubborn sticking.
- Create the “Magic Dust” Coating: In a shallow bowl or plate, mix together the grated Parmesan, panko, garlic powder, Italian seasoning, a good pinch of salt, and a few cracks of pepper. Give it a whisk with a fork to break up any clumps and distribute the flavors evenly. Take a whiff—that’s the smell of dinner success!
- The Chicken Dip Station: Set up your assembly line! Pat the chicken breasts very dry with paper towels (crucial for coating adherence!). Lightly season both sides with salt and pepper. Place the beaten eggs in another shallow dish. Now, one by one, dip each breast into the egg, letting the excess drip off, then firmly press it into the Parmesan-panko mixture. Press, press, press! Coat both sides and all edges, really adhering that delicious crust. Place the coated chicken on one side of your prepared pan.
- Veggie Party Time: In a large bowl, toss the halved baby potatoes, broccoli florets, and sliced bell pepper with the olive oil, salt, and pepper. Get your hands in there to make sure every nook and cranny is glossy. Arrange them in a single layer on the other half of the baking sheet, leaving a little space around the chicken for air circulation. If you’re feeling fancy, sprinkle a little extra Parmesan over the veggies now.
- Bake to Golden Perfection: Slide the pan into your hot oven and bake for 25-30 minutes. The goal: chicken with an internal temperature of 165°F and a gorgeous golden-brown crust, and potatoes that are easily pierced with a fork. Chef’s Tip: For extra crispiness on the chicken, you can broil for the final 1-2 minutes, but WATCH IT LIKE A HAWK to prevent burning.
- The Grand Finale – Rest & Serve: Once out of the oven, let the chicken rest on the pan for 5 minutes. This lets the juices redistribute, ensuring every bite is moist. Then, it’s showtime!
How to Serve It Up: From Pan to Plate with Flair
This dinner is a complete meal straight from the pan, but a few finishing touches make it restaurant-level lovely. I love to transfer everything to a big, warm platter for family-style serving. The vibrant peppers and green broccoli against the golden chicken just looks so inviting!
Drizzle a little high-quality extra virgin olive oil or a squeeze of fresh lemon juice over the top for a bright finish. Scatter with some chopped fresh parsley, basil, or chives for a hit of color and freshness. If you’re a lemon lover (guilty!), serve with extra lemon wedges on the side. For a creamy counterpoint, a dollop of garlic aioli or a simple side of marinara sauce for dipping takes it over the top. It’s hearty enough to stand alone, but a simple side salad with a tangy vinaigrette is always a welcome, refreshing addition.
Make It Your Own: 5 Tasty Twists
Love the base recipe? Here are some fun ways to play with your food!
- The “Everything Bagel” Chicken: Swap the Italian seasoning for 2 teaspoons of Everything Bagel Seasoning in the crust. Mind. Blown.
- Spicy Sriracha-Honey Drizzle: Whisk together 2 tbsp each of sriracha and honey. After baking, drizzle this sweet-heat sauce over the chicken and veggies.
- Lemon-Herb Zing: Add the zest of one lemon to the panko-Parmesan mixture and use rosemary or thyme instead of Italian seasoning. Bright and herby!
- Gluten-Free & Keto-Friendly: Use crushed pork rinds or almond flour in place of the panko for a gluten-free, low-carb crust that’s still super crispy.
- Veggie Swap-Out: Use this method with any sturdy veg! Try asparagus spears, cubed butternut squash, cauliflower florets, or red onion wedges. Just adjust cutting sizes for even cooking.
Emily’s Kitchen Notes: A Few More Nuggets of Love
This recipe is a true workhorse in my house, and it’s evolved from my early days of sometimes-soggy crusts (we’ve all been there!). The biggest lesson? DRY CHICKEN and PRESSING THE COATING. Don’t skip patting those breasts dry—it’s the difference between a crust that slides off and one that becomes one with the chicken. And press that cheesy mixture on with love and a little force!
Over time, I’ve also learned the value of not overcrowding the pan. If your sheet pan looks packed, use two! Crowding steams the food instead of roasting it. And finally, don’t be afraid to let those veggies get a little charred on the edges—that’s where the flavor lives! This dish is forgiving, fun, and always a crowd-pleaser.
Your Questions, Answered!
Q: My coating isn’t sticking to the chicken! What did I do wrong?
A: The usual suspects are 1) Not patting the chicken dry enough, or 2) Not pressing the coating on firmly. The egg acts as glue, but it needs a dry surface to adhere to. Give it a good pat-down and a confident press into the crumbs.
Q: Can I use chicken thighs instead of breasts?
A: Absolutely! Bone-in, skin-on thighs would be divine—just increase the cooking time by 10-15 minutes to ensure they’re cooked through. The crust might not stick to the skin side as well, so focus on coating the meaty side.
Q: My veggies aren’t cooked through when the chicken is done.
A> This usually means your veggie pieces are too large. For next time, cut potatoes smaller or give them a 5-10 minute head start in the oven before adding the chicken and quicker-cooking veggies like broccoli. You can also pop the sheet pan back in for an extra 5-10 minutes with just the veggies if the chicken is done, covering the chicken loosely with foil to keep it warm.
Q: Can I prep this ahead of time?
A> You can coat the chicken and chop the veggies up to a day ahead. Store the coated chicken on a plate, covered, in the fridge, and keep the chopped veggies in separate bags. Let the chicken sit at room temp for 15 minutes before baking. I don’t recommend assembling the whole raw pan ahead, as the crust can get soggy.
Nutritional Info (Per Serving, Approximate)
This information is an estimate calculated using a nutrition database. Values will vary based on specific ingredients and portion sizes.
- Calories: 510
- Protein: 46g (Excellent source for muscle repair and keeping you full!)
- Carbohydrates: 22g (Primarily from the nutrient-dense potatoes and veggies)
- Fat: 26g (A balance from the olive oil, Parmesan, and eggs)
- Fiber: 4g (Thanks to the broccoli and potatoes with skin on!)
This meal offers a great balance of lean protein, complex carbs, and healthy fats, making it a satisfying and nourishing dinner choice.
Final Thoughts: One Pan to Rule Them All
And there you have it, my friends—the path to a crispy, cheesy, effortless dinner that delivers on flavor and saves your sanity. This Parmesan-Crusted Chicken Sheet Pan Dinner is more than just a recipe; it’s a strategy for happier weeknights. It’s proof that you don’t need complicated techniques or a mountain of dishes to put a truly delicious, homemade meal on the table.
I hope this recipe finds a cozy spot in your regular rotation and becomes a new favorite for your own family table. Give it a try, play with the variations, and make it yours. And when you do, I’d love to hear about it! Tag me on social or leave a comment over on the blog. Now, go preheat that oven and get ready for some serious, satisfying crunch. Happy cooking, and as always, chow down with love!
— Emily