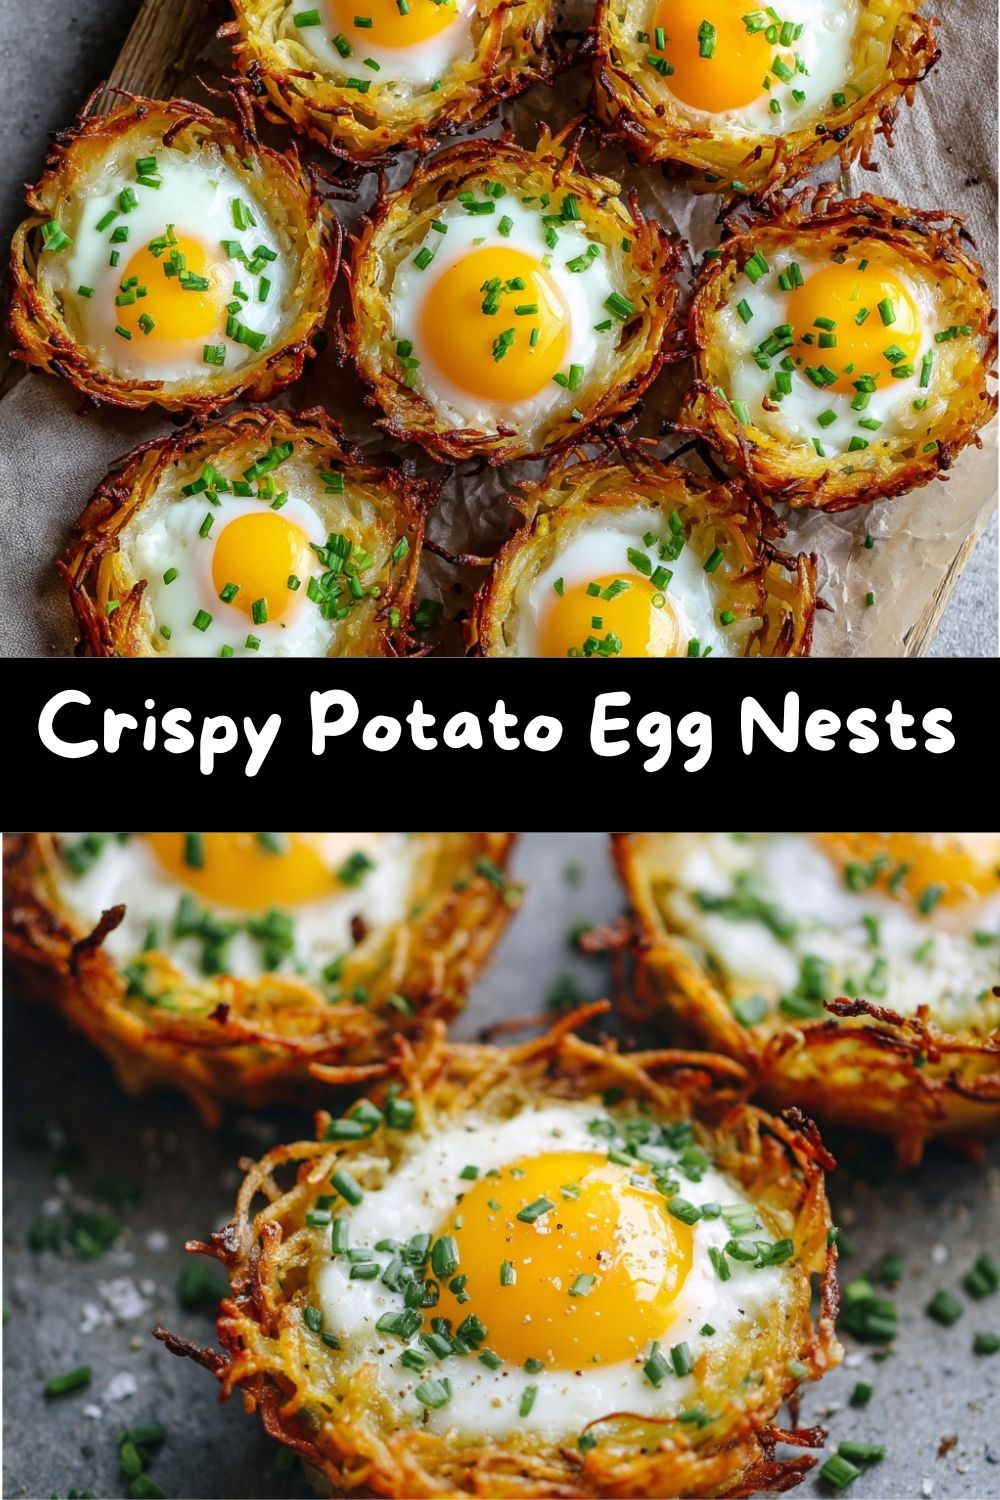
Crispy Potato Egg Nests – Baked Brunch Perfection in Every Bite
Hey there, friend! Let me paint you a picture: It’s a lazy Saturday morning. Sunlight’s streaming through the kitchen window, coffee’s brewing, and you’re craving something for breakfast that feels special but doesn’t require a full-on culinary production. You want crispy, you want gooey, you want something that makes everyone at the table go, “Ooh, what’s THAT?”
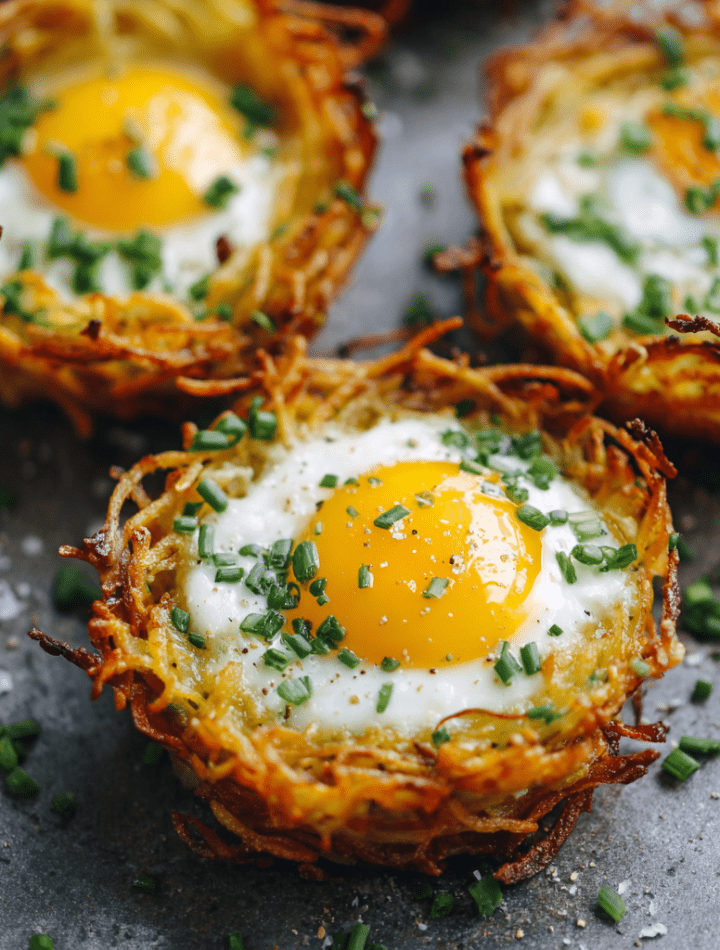
Enter my Crispy Potato Egg Nests. Imagine all the best parts of hash browns—golden, shatteringly crisp edges, tender centers—shaped into adorable little cups. Now, imagine cracking a perfect egg right into that savory nest and baking it until the whites are just set and the yolk is dreamily jammy. It’s a handheld brunch masterpiece, a total crowd-pleaser, and honestly? It’s a whole lot of fun to make.
This recipe is my go-to when I want to serve up smiles without spending the whole morning chained to the stove. It’s forgiving, customizable, and baked all at once for easy serving. Whether you’re feeding your family, impressing weekend guests, or meal-prepping a stellar breakfast for the week, these nests deliver. So, tie on that apron (the messy one is totally welcome here), and let’s turn some simple spuds and eggs into something truly magical.
The Sunday Morning That Started It All
This recipe has roots deep in my grandma’s kitchen, though she’d probably call my version “fancy.” Her classic was just shredded potatoes fried crisp in her trusty cast iron, always served with a soft-fried egg on top. My job, as her tiny sous-chef, was to carefully pat the spuds dry with a dishtowel. I’d stand on my step-stool, feeling very important, while she’d tell me the secret was to get them “good and dry, Emmy, or they won’t sing in the pan.”
The first time I made these into actual “nests” was a happy accident. I was in culinary school, trying to recreate that childhood memory for a bunch of sleepy classmates during a weekend brunch potluck. I only had a muffin tin and an oven. In a moment of “let’s see what happens,” I pressed the potatoes into the cups, crossed my fingers, and baked them. When I pulled out that first tray of golden, cup-shaped hash browns, we all cheered. Cracking the eggs right into them felt like pure genius. It was that perfect blend of nostalgia and innovation—my grandma’s love, baked into a new, shareable form. Every time I make them now, I think of her, and I hope you’re making some delicious memories of your own with them, too.
Gathering Your Nest-Building Materials
Here’s everything you need to create this brunch magic. I’ve added my chef-y notes to help you pick and swap with confidence!
- 3 cups shredded potatoes – Fresh russets or Yukon Golds work wonderfully (just squeeze out that excess moisture!), but a bag of thawed frozen hash browns is the ultimate busy-morning hack. No judgment here!
- 1 tbsp olive oil or melted butter – Olive oil gives a lovely crispness, while butter adds that rich, nostalgic flavor. For a fun twist, try bacon fat!
- Salt & black pepper, to taste – Season your potatoes well. They’re the foundation! I use kosher salt for better control.
- 6 large eggs – The star of the show. Room temperature eggs are less likely to cool down your hot nests, helping them cook evenly.
- Optional toppings – This is where you shine! Shredded cheddar or gruyère, chopped chives or green onions, diced avocado, a dollop of salsa, or my personal favorite, a drizzle of hot sauce.
Let’s Build Some Nests: Your Step-by-Step Guide
Follow these steps, and you’ll be a nest-building pro in no time. I’m chatting right alongside you with all my best tips!
- Preheat & Prep: Fire up your oven to 400°F (200°C). This hot temperature is key for maximum crispiness. Now, take your 6-cup muffin tin and grease it generously. I mean it—get in all those crevices with oil, butter, or non-stick spray. This ensures your beautiful nests will pop right out after baking. Trust me, this step is non-negotiable!
- Season the Spuds: In a big bowl, toss your shredded potatoes with the olive oil or melted butter, salt, and pepper. Use your hands! It’s the best way to make sure every strand is coated and seasoned. If you’re using fresh potatoes, take an extra minute to wring them out in a clean kitchen towel. Removing that starchy water is the #1 secret to crispiness.
- Form the Nests: Divide the potato mixture evenly among the muffin cups. Here’s my hack: Use a small glass or a shot glass to really press the potatoes down firmly and up the sides. You want a nice, compact cup shape with a hollow in the center. Good structure now means a sturdy nest that can hold its precious egg cargo later.
- First Bake (The Crispening!): Slide the tray into the hot oven and bake for 15-20 minutes. You’re looking for golden brown edges. Peek in at 15 minutes—if the nests look light, give them another 5. This initial bake sets the form and creates that delicious crunchy shell. Your kitchen will start smelling amazing.
- Add the Eggs: Pull the tray out (carefully, it’s hot!). Crack one egg into each golden potato nest. Pro tip: Crack each egg into a small bowl first, then gently slide it into the nest. This prevents shells and gives you more control. Season the eggs lightly with another pinch of salt and pepper.
- Second Bake (The Set-Up): Return the tray to the oven. Now, 10-12 minutes is your window for egg perfection. For a soft, jammy yolk, aim for the 10-minute mark. For a fully set yolk, go for 12-13. The eggs will continue to cook a tad from residual heat once out of the oven, so pull them when the whites are just set.
- The Grand Finale: Let the nests cool in the tin for 2-3 minutes. This lets everything settle and makes removal easier. Then, run a small knife or offset spatula around the edges and gently lift them out. Add your favorite toppings and serve immediately while they’re hot and crispy!
How to Serve These Golden Gems
Presentation is part of the fun! I love serving these nests on a big, rustic platter lined with a cute kitchen towel or parchment paper. Scatter some extra fresh chives or parsley over the top for a pop of color. They’re a complete package all on their own, but they also play incredibly well with others. For a full brunch spread, pair them with a simple mixed greens salad with a bright vinaigrette to cut through the richness, some oven-crisped bacon or sausage links, and a big bowl of fresh fruit. Want to keep it super simple? Just add a few avocado slices and a bottle of your best hot sauce to the table. Let everyone customize their perfect bite!
Get Creative! 5 Fun Twists on the Classic Nest
Once you’ve mastered the basic nest, the world is your potato! Here are a few of my favorite ways to mix things up:
- The Everything Bagel: Mix 1 tbsp of everything bagel seasoning into the potatoes before baking. Top the finished nests with a schmear of cream cheese and extra chives. Unreal.
- Southwest Fiesta: Add 1/2 cup of shredded pepper jack cheese and 1/4 cup of finely diced bell pepper to the potato mix. After adding the egg, top with a spoonful of black beans and corn. Serve with salsa and sour cream.
- Green Goddess: Stir 1/2 cup of finely chopped spinach and 1/4 cup of grated parmesan into the potatoes. The spinach wilts perfectly as it bakes, giving you a veggie-packed start to the day.
- Fully Loaded: Crumble cooked bacon or breakfast sausage into the potato mixture. After the second bake, top with cheddar cheese, a dollop of sour cream, and a sprinkle of green onion. It’s a hearty diner-style breakfast in one bite.
- Dairy-Free/Veggie Boost: Use sweet potatoes instead of russets for a vitamin-packed twist! Just note they might be a bit softer. Use avocado oil, and skip the cheese toppings for a delicious dairy-free version.
Chef Emily’s Kitchen Notes
This recipe has evolved from my “let’s experiment” school days into my most-requested brunch item. The biggest lesson? Don’t skimp on the greasing of the pan. I once had a hopeful batch turn into a “potato egg scramble” because I got lazy with the spray. We ate it with forks and it was still delicious, but it wasn’t the pretty nests I’d promised!
I also love using this method for meal prep. I’ll bake the potato nests alone, let them cool completely, and freeze them in a single layer on a baking sheet before transferring to a bag. On busy mornings, I pop a frozen nest in the toaster oven, crack in an egg, and bake. It feels like a gourmet cheat code. The recipe is a template for joy—play with it, make it yours, and most importantly, enjoy the process and the people you share it with.
FAQs & Nest Rescue Tips
Q: My nests are sticking to the pan! Help!
A: First, make sure you greased the tin *very* well. If they’re still sticking, let them cool a full 5 minutes—they often release as they cool. Then, slide a thin, flexible silicone spatula or paring knife all the way around and under the bottom. For next time, a light coating of oil *and* a spritz of non-stick spray is my golden combo.
Q: Can I make these ahead of time?
A> Absolutely! You have two great options: 1) Prep the potato nests (through step 4) up to a day ahead. Store them covered in the fridge, then add cold eggs and bake as directed, adding a couple extra minutes. 2) Fully bake, cool, and freeze as mentioned in my notes above.
Q: My egg yolk cooked all the way through. How do I get it jammy?
A> The window is small but manageable! Check at 9 minutes. If the whites still look translucent, give them another minute. The yolks should still look soft and jiggle slightly when you shake the pan—they’ll firm up during the cool-down period. Also, using room-temp eggs helps them cook faster and more evenly.
Q: Can I add the cheese with the eggs or before?
A> You can, but timing matters! If you want the cheese mixed into the potato nest itself, add it in step 2. If you want a melty cheese topping on the egg, sprinkle it on in the last 3-4 minutes of the second bake so it doesn’t burn.
Nutritional Information (Per Nest)
While I’m all about flavor and joy first, it’s nice to know what’s fueling your day! These approximate values are for one nest made with olive oil and no optional toppings. Remember, toppings will change these numbers.
- Calories: ~180
- Protein: 7g (A great start to your daily needs!)
- Carbohydrates: 12g (Complex carbs from potatoes for sustained energy.)
- Fat: 10g (Healthy fats from oil and the nutrient-rich egg yolk.)
- Fiber: 1g (Boost this by using sweet potatoes or adding veggies to the mix!)
This dish provides a balanced mix of protein, carbs, and fats to keep you satisfied all morning. It’s a wholesome, real-food breakfast that tastes like a treat.
Your New Brunch Secret Weapon
And there you have it, my friend—everything you need to make these irresistible Crispy Potato Egg Nests a star in your own kitchen. This recipe is more than just a set of instructions; it’s an invitation to play, to share, and to create something wonderfully delicious without the stress. It proves that the most memorable meals often come from simple ingredients and a little bit of love (and a well-greased muffin tin!).
I hope you and your people absolutely love them. When you make them, I’d be thrilled if you tagged me @TastyChow so I can see your beautiful creations! Now, go forth, bake some nests, and conquer your day, one delicious, crispy, jammy bite at a time.
With love and a full belly,
Emily