My 3-Ingredient Cottage Cheese Pizza Crust: The High-Protein, Gluten-Free Game Changer You NEED
Hey there, friend! Let’s talk about one of life’s greatest universal truths: everyone loves pizza. That glorious combination of crispy crust, melty cheese, and your favorite toppings is basically a food group of its own. But if you’re like me—someone who loves to feel good and eat deliciously—that traditional dough can sometimes leave you feeling a little… weighed down. Maybe you’re exploring gluten-free living, keeping an eye on carbs, or just trying to sneak more protein into your day without sacrificing flavor. If you nodded to any of that, then pull up a stool, because I’m about to share one of my all-time favorite kitchen magic tricks.
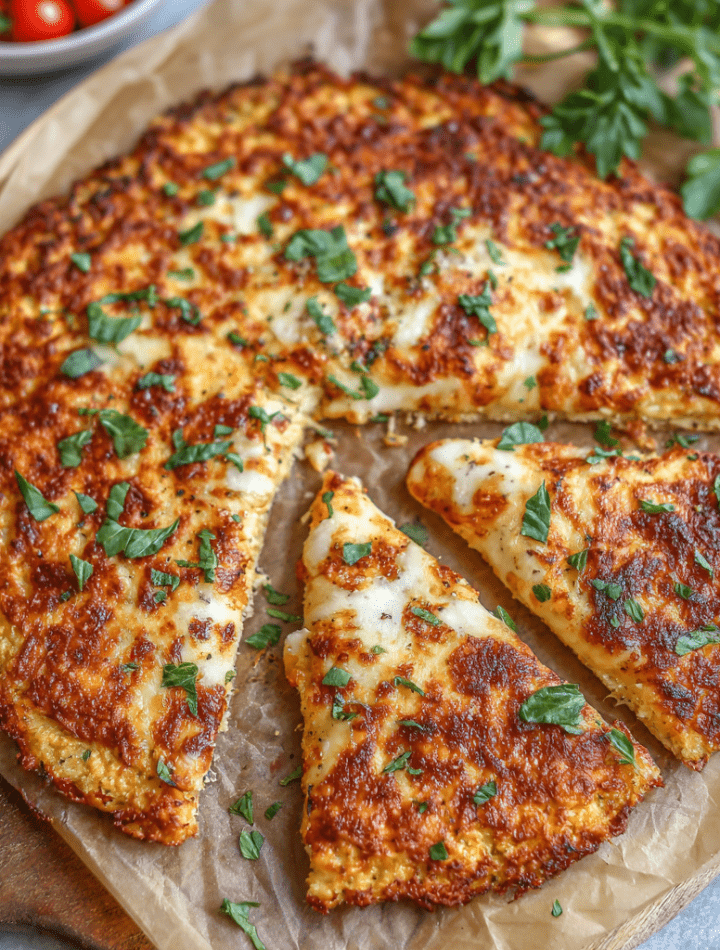
This 3-Ingredient Cottage Cheese Pizza Crust is a total revelation. It’s not just “good for a healthy alternative”—it’s legitimately delicious, sturdy enough to hold a mountain of pepperoni, and has a satisfying, savory flavor that will make you forget you’re eating something packed with protein and naturally gluten-free. The best part? It comes together in about 10 minutes with ingredients you probably already have. No yeast, no complicated dough techniques, no waiting around for a rise. Just blend, spread, bake, and top. This recipe was born from a happy accident in my kitchen (more on that later!) and has become a weekly staple in our house. So, are you ready to revolutionize your pizza night? Let’s grab our aprons and make something amazing together.
The “Happy Accident” That Started It All
I have to confess: this crust wasn’t born from some meticulously planned recipe development session. Nope. It was a classic “Emily-in-a-pinch” kitchen moment. Picture this: It was a random Tuesday, my stomach was grumbling for something cheesy and comforting, and my pantry was looking… sparse. I had a giant tub of cottage cheese I needed to use up, some eggs, and a bag of mozzarella staring back at me. The idea of a traditional dough felt like too much work.
In a flash of “what if?” energy—the same kind that led to both my best and worst culinary creations—I threw it all in the blender. I figured I’d make some kind of weird baked cheese pancake. But as I spread that creamy, cheesy mixture onto a sheet pan, a lightbulb went off. This looks like pizza dough. Twenty minutes later, I pulled out a gorgeous, golden, crispy-edged disc. I topped it with some jarred marinara, more cheese, and a few basil leaves, gave it another quick bake, and took a hesitant bite. Friends, my eyes literally widened. It was perfect. It had structure, flavor, and that irresistible cheesy pull. I texted a picture to my best friend immediately with the caption, “I think I just broke pizza.” And that’s how a clean-out-the-fridge experiment became one of Tasty Chow’s most beloved recipes. It just goes to show: sometimes the best food discoveries happen when you’re just playing around with love (and a well-stocked cheese drawer).
Gather Your (Simple!) Ingredients
Here’s the beautiful part: the core of this crust is just three things. I add a couple of spices for extra flavor, but they’re pantry staples. Let’s break it down.
- 1 Cup Cottage Cheese (low-fat or regular): This is our superstar! It provides the protein, moisture, and structure. Chef’s Insight: I don’t recommend fat-free here, as a little fat helps with browning and flavor. For the smoothest crust, give it a quick blend in a food processor or use small-curd cottage cheese. Sub Tip: For a dairy-free version, blended silken tofu or a thick, plain dairy-free yogurt can work in a pinch, though the flavor will vary.
- 2 Large Eggs: Our binder. They hold everything together and help the crust puff up slightly for a perfect texture.
- 1 Cup Shredded Mozzarella Cheese: This adds more protein, that iconic pizza flavor, and helps create a crispy, golden exterior. Chef’s Insight: Pre-shredded cheese works, but blocks you shred yourself melt more evenly. Sub Tip: Any good-melting cheese works! Try Monterey Jack, cheddar, or a dairy-free melty shred.
- 1 tsp Garlic Powder & 1 tsp Italian Seasoning: The flavor boosters! Garlic powder distributes flavor evenly, and Italian seasoning (a blend of oregano, basil, thyme, etc.) makes it taste like pizza from the first bake. Feel free to get creative—add a pinch of red pepper flakes, onion powder, or dried basil.
Let’s Build That Crust: Step-by-Step
Okay, team. Time to get our hands (or our food processor) dirty. This is so easy, I promise.
- Preheat & Prep: Fire up your oven to 400°F (200°C). This is the perfect temperature for golden edges without burning. Line a baking sheet with parchment paper. Chef’s Hack: Do NOT skip the parchment or use wax paper. This crust can stick, and parchment is your best friend for easy lifting. A light grease works too, but parchment is foolproof.
- The Magic Mix: In a blender or food processor, add the cottage cheese and eggs. Blend until completely smooth and creamy, about 30 seconds. This step is KEY for a uniform crust without curds! Pour this mixture into a bowl and stir in the shredded mozzarella and spices until it’s one cohesive, cheesy batter.
- Form Your Masterpiece: Pour the batter onto your prepared parchment. Using a spatula (or the back of a spoon), spread it out into your desired shape—a large round, a rectangle, even individual mini crusts! Aim for about 1/4 inch thick, and try to get the edges a bit even so they bake uniformly. Chef’s Commentary: Don’t stress about it being perfect! Rustic is charming. Just make sure there are no super thin spots.
- First Bake – The Foundation: Slide that sheet into your hot oven and bake for 15-20 minutes. You’re looking for a dry top, firm surface, and those edges turning a gorgeous golden brown. The crust will also puff up slightly—that’s the eggs doing their thing! Let it cool on the pan for just 5 minutes. This helps it set further.
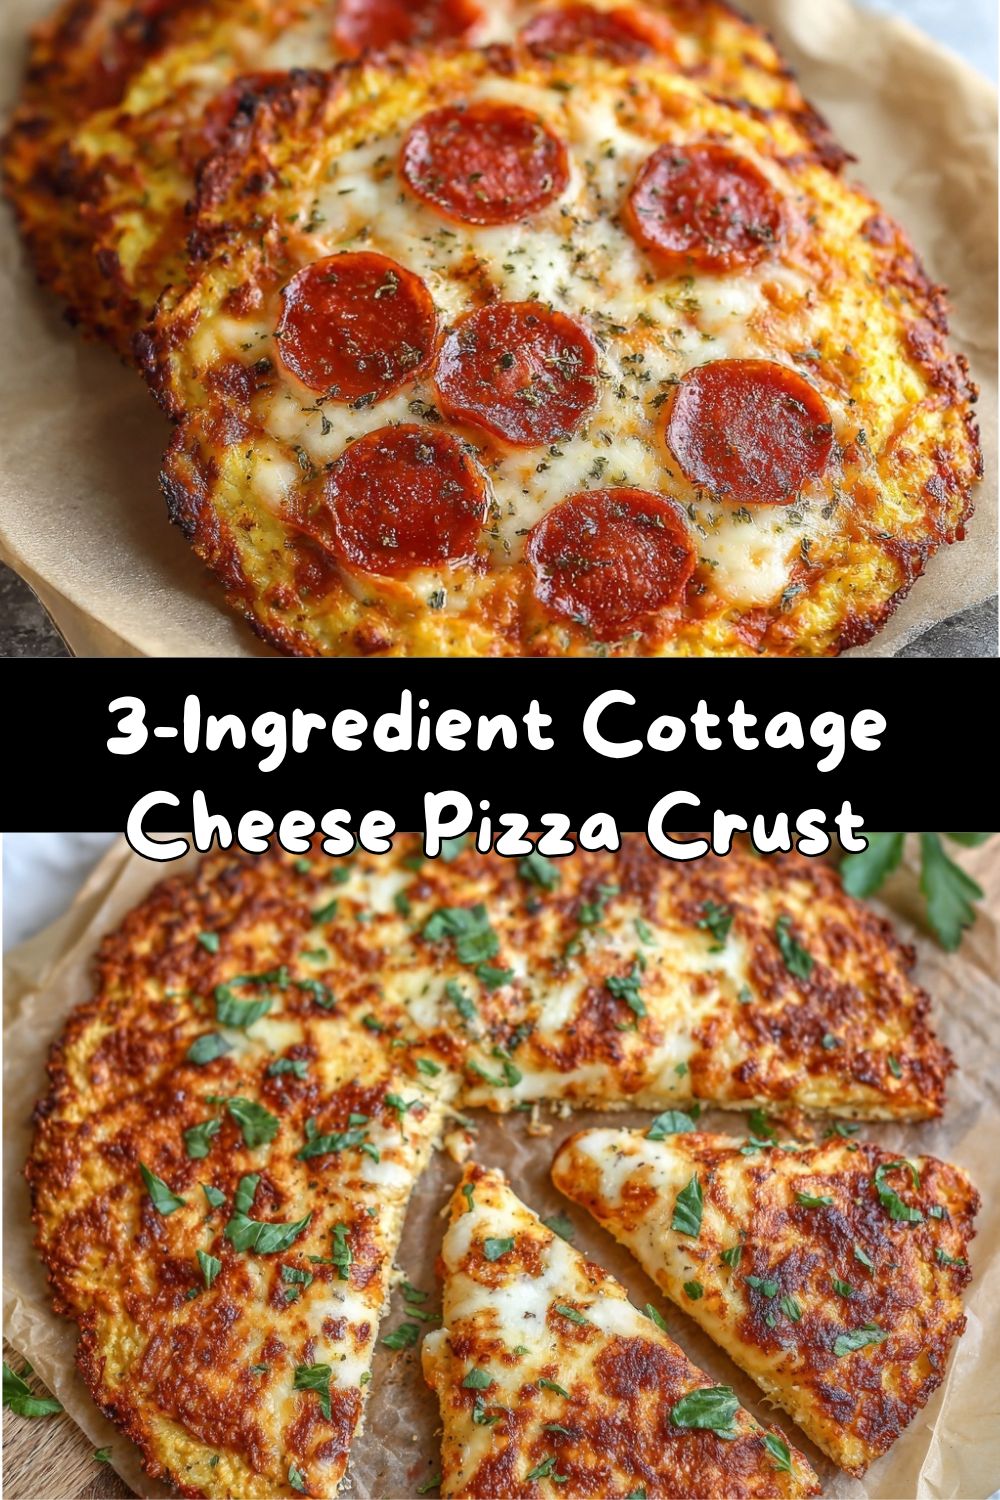
- Top & Finish: Now for the fun part! Spread on a thin layer of your favorite sauce (marinara, pesto, BBQ, alfredo—go wild!), add your toppings, and finish with a generous sprinkle of more cheese. Return it to the oven for 8-12 minutes, just until the new cheese is melted and bubbly and any meat toppings are heated through.
How to Serve & Savor Your Creation
Once that beauty comes out of the oven, let it rest for 2-3 minutes on the pan—this makes slicing cleaner. Use a pizza cutter or a sharp chef’s knife to slice it up. I love finishing it with fresh herbs right before serving: a shower of torn basil, a sprinkle of fresh oregano, or even some chopped chives. A light drizzle of good olive oil or a sprinkle of flaky sea salt takes it over the top. Because this crust is so sturdy, you can even pick it up and eat it like traditional pizza! Pair it with a simple green salad with a zippy vinaigrette to balance the richness, and you have a complete, satisfying meal that feels indulgent but fuels your body right.
5 Fun Ways to Mix It Up!
Once you master the base, the pizza (world) is your oyster! Here are some of my favorite twists:
- Everything Bagel Crust: After the first bake, brush the crust with an egg wash and sprinkle generously with everything bagel seasoning before adding your toppings. Incredible with lox and cream cheese-style toppings!
- Spicy Southwest: Add 1/2 tsp cumin and 1/2 tsp chili powder to the batter. Top with black beans, corn, diced chicken, pepper jack cheese, and a dollop of salsa or avocado crema after baking.
- Herb Garden Delight: Fold 2 tbsp of finely chopped fresh herbs (like parsley, dill, and chives) directly into the batter. Perfect for a white pizza with ricotta, mozzarella, and lemon zest.
- Protein-Packed “Hawaiian”: Use diced ham or cooked shredded chicken as a topping with pineapple and a mix of mozzarella and gouda. A sprinkle of red pepper flakes balances the sweetness.
- Dairy-Free/Vegan Version: Use a dairy-free cottage cheese alternative (like a nut-based one), a vegan egg substitute (like a flax egg, though texture will be denser), and your favorite vegan melty cheese shreds. It works!
Chef Emily’s Notes from the Kitchen
This recipe has evolved a bit since that first happy accident. The biggest lesson? Blending the cottage cheese is non-negotiable for that perfect, smooth base. I tried skipping it once for “speed,” and the texture was oddly curdled. Not great. Also, I’ve learned this crust is a fantastic blank canvas for meal prep. I’ll often bake 2-3 plain crusts on a Sunday, let them cool completely, and freeze them between layers of parchment. Then on a busy weeknight, I just pull one out, add toppings straight from frozen (add a few extra minutes to the bake time), and dinner is solved. Seeing how you all have made it your own—tagging me with your creations—is my absolute favorite thing. Keep those photos coming!
Your Questions, Answered!
Q: My crust turned out a bit wet/soggy in the middle. What happened?
A: This usually means it needed a longer first bake! Ovens vary, so go by look and feel, not just the timer. The top should look fully set and dry, and the edges should be golden brown. Also, make sure you’re not adding too much wet sauce before the second bake.
Q: Can I make this crust ahead of time?
A: Absolutely! Bake the plain crust completely, let it cool, and store it in the fridge for up to 3 days or freeze for a month. Add toppings and re-bake straight from the fridge/frozen (adding a few extra minutes if frozen).
Q: I don’t have a blender or food processor. Can I just mix by hand?
A> You can, but try to use the smallest-curd cottage cheese you can find and really mash it with a fork against the side of the bowl with the eggs until it’s as smooth as possible. A few tiny curds are okay, but a smoother blend gives a better texture.
Q: What’s the best way to reheat leftovers?
A> To keep it crispy, reheat slices in a toaster oven or air fryer at 350°F for 3-5 minutes. The microwave will work in a pinch but will soften the crust.
Nutritional Breakdown (A Per-Serving Estimate)
Let’s talk numbers! For one serving (roughly 1/4 of the plain crust, without toppings): You’re looking at about 220 calories, 18-20g of protein, 14-16g of fat, and only 3-5g of net carbohydrates. Compare that to a slice of traditional pizza dough, which can have 25-30g+ of carbs and much less protein, and you can see why this is such a popular choice for those following lower-carb, high-protein, or gluten-free lifestyles. It’s also a fantastic source of calcium. Remember, the final nutrition will depend on your specific brands of cheese and your toppings, so this is a great baseline. The high protein content is what makes this pizza so satisfying and keeps you full for hours!
Final Slice of Wisdom
At the end of the day, cooking is about joy, nourishment, and sharing. This Cottage Cheese Pizza Crust embodies all of that for me. It’s a recipe that proves healthy eating doesn’t have to mean giving up the foods you crave—it just means getting a little creative. It’s helped so many of you get dinner on the table, hit your wellness goals, and still have that “pizza night” feeling with your family. That makes my heart so full. So I hope you give it a try, play with your favorite toppings, and make it your own. And when you do, I’d love to hear about it! Share your stories and photos with me. Now, go forth and bake something delicious. You’ve got this!
With love and a full pizza pan,
Emily 🍕