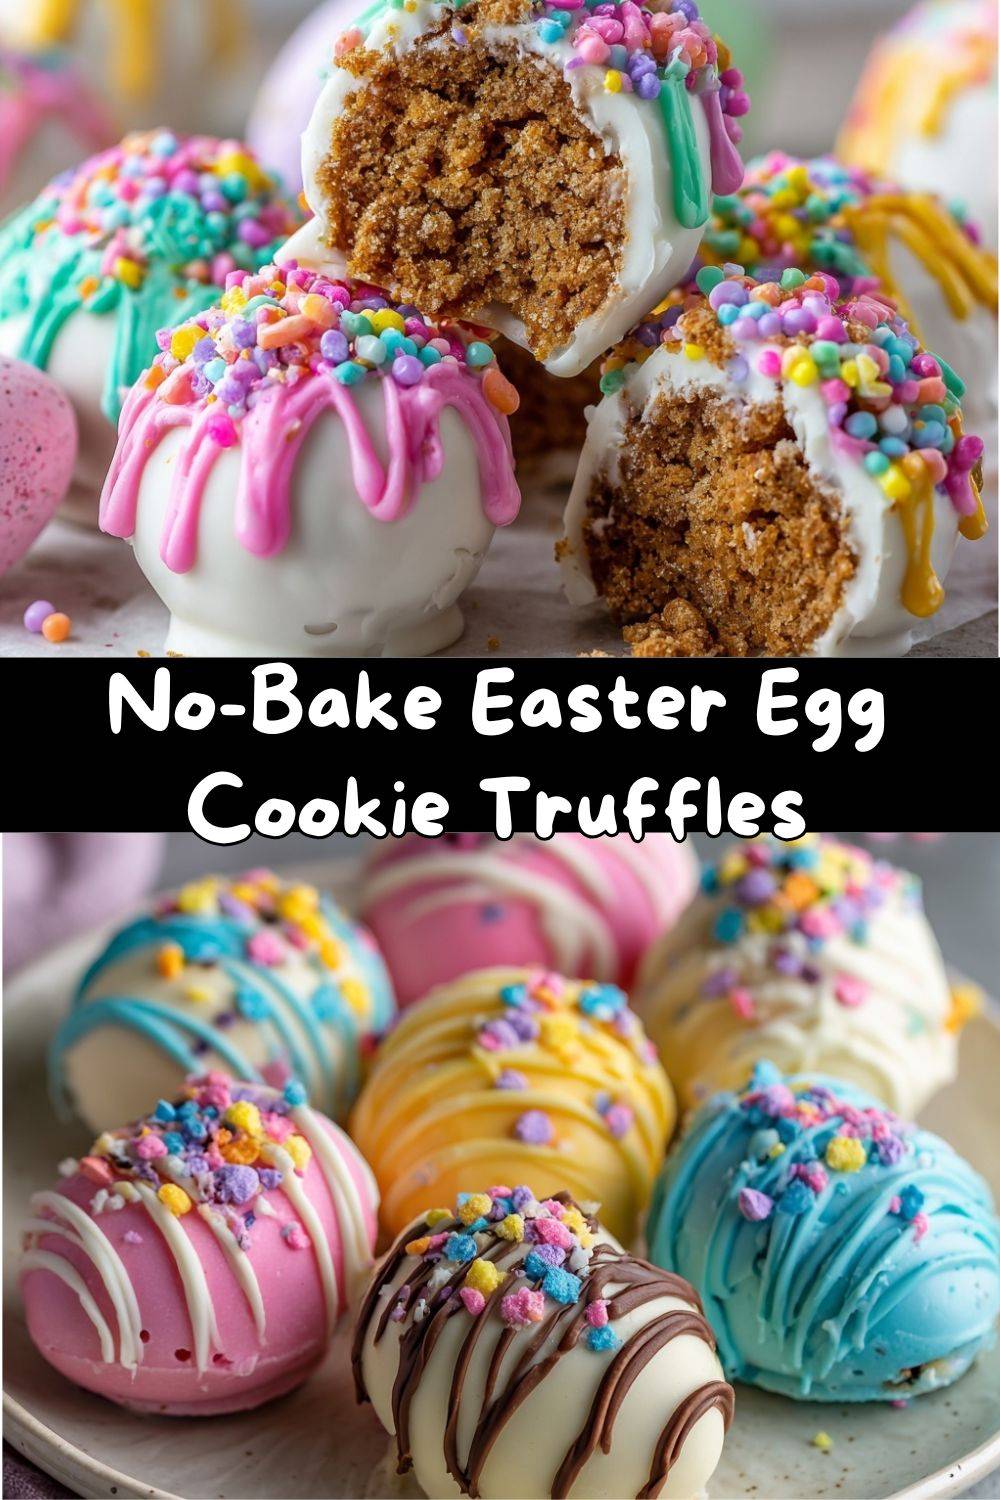
Easter Egg Cookie Truffles: No-Bake, Chocolate-Dipped, & Perfectly Festive!
Hey there, friend! Pull up a stool and let’s chat. Is it just me, or does the spring sunshine just beg for a sweet, handheld treat that tastes like celebration? You know the kind—the one that makes kids’ eyes go wide and gets a solid “oooooh” from your friends when you bring out the plate. But let’s be real: sometimes, between the ham glazing and the table setting, we don’t have hours to spend on a complicated dessert. That’s where these little miracles come in.
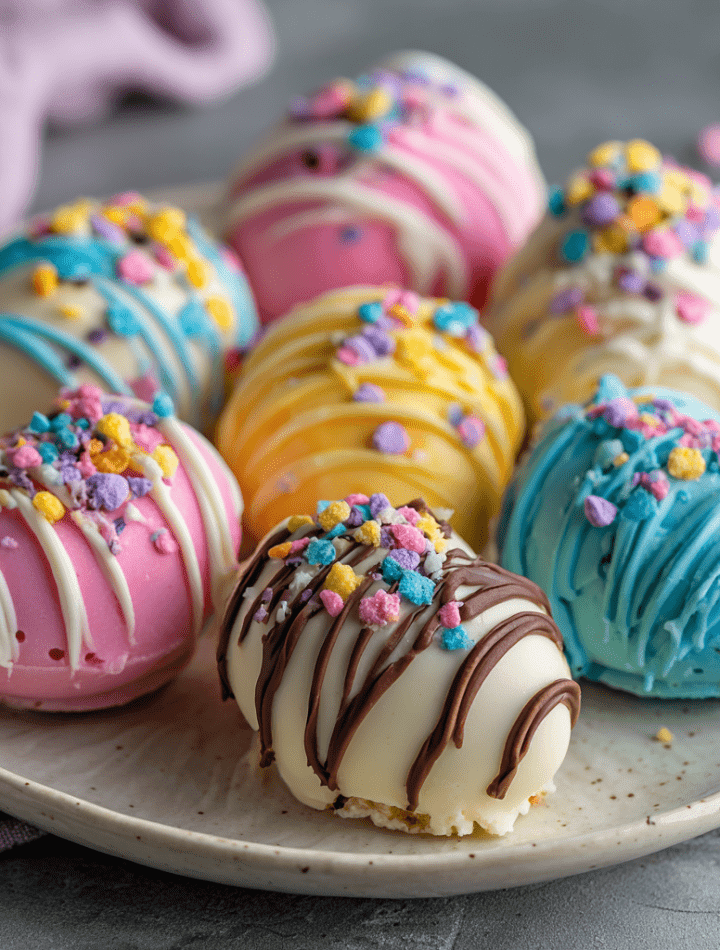
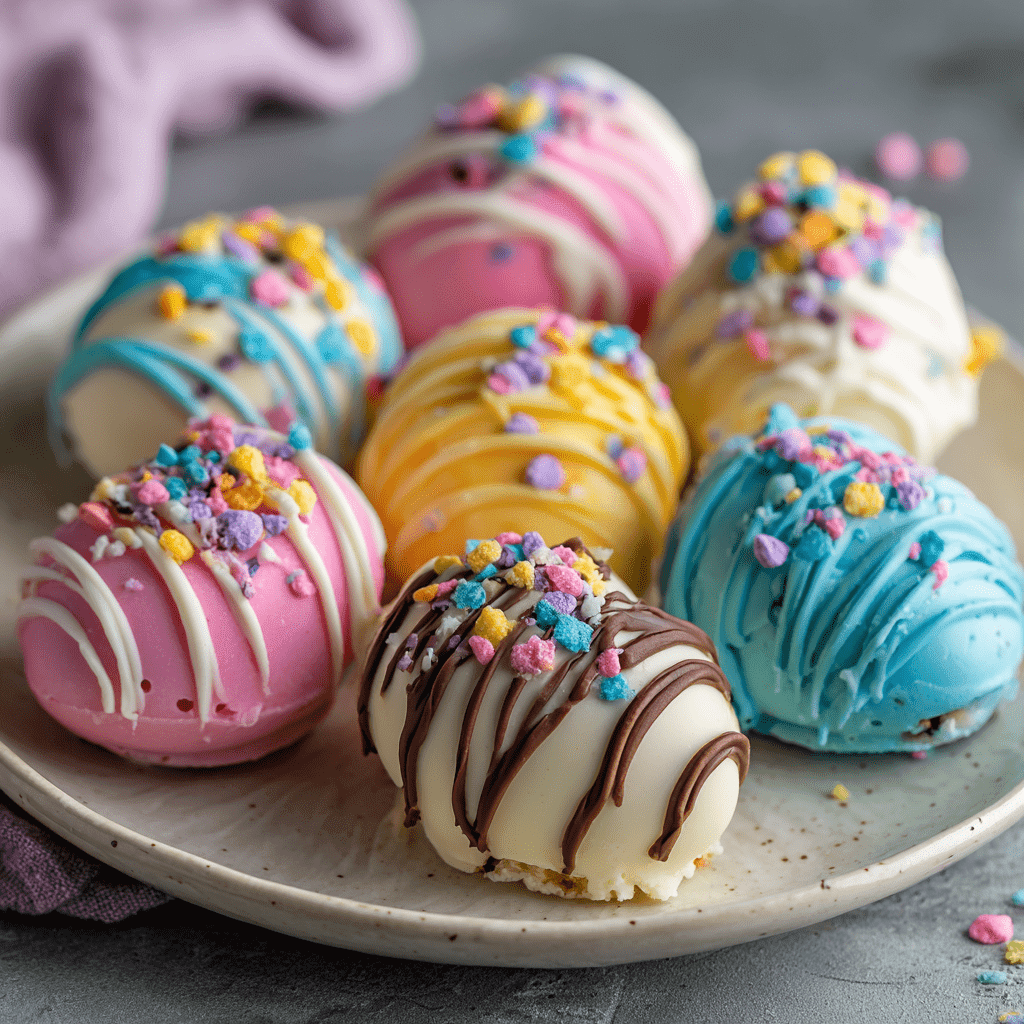
Introducing my No-Bake Easter Egg Cookie Truffles. Imagine this: rich, fudgy cookie crumbs hugged by creamy, tangy cream cheese, all hand-formed into adorable egg shapes and dipped in a glossy, colorful chocolate shell. They’re like the love child of a truffle and your favorite childhood cookies, dressed in their Sunday best for spring. The best part? Zero oven time. Just a food processor, a bowl, and a whole lot of fun. These truffles are my go-to for a last-minute dessert dash, a fun activity with the family, or a sweet homemade gift that looks like you fussed for hours. Spoiler: our secret is safe. So, tie on your favorite apron (the one with the stains of love, of course), and let’s make something deliciously simple and utterly delightful.
A Spoonful of Nostalgia: My First Kitchen “Egg Hunt”
This recipe always takes me right back to my grandma’s linoleum-floored kitchen. Easter was a major production. There was the dyed-egg assembly line, the yeasty smell of rising hot cross buns, and my grandma, a woman of few words but infinite kitchen wisdom. One year, probably when I was about seven, I was deemed “big enough” to help with the candy-making. Our project? A version of these very truffles, though we didn’t call them that. She called them “dirty snowballs,” which, to a kid, is basically the coolest name ever.
My job was to roll the sticky, chocolatey dough into “eggish” shapes. They were lopsided, some were more like potatoes than eggs, and my hands were covered in a layer of delicious grime. Grandma would just smile, her eyes crinkling, and say, “Every one is perfect because you made it.” Then came the magic: dipping them into melted pastel chocolate and shaking on sprinkles with reckless, joyful abandon. That moment—the creation, the mess, the shared pride—is baked into this recipe’s DNA. It’s not just about making candy; it’s about making memories. Every time I shape these eggs, I’m right back there, covered in chocolate and feeling like the most important chef in the world.
Gathering Your Treasure: What You’ll Need
Here’s the beautiful part: the ingredient list is short, sweet, and probably already in your pantry. Quality matters, but so does simplicity. Let’s break it down.
- 1 (14 oz) package Chocolate Sandwich Cookies (like Oreos®): This is our flavor foundation. I use the classic, but feel free to get creative here (see variations below!). No need to remove the cream filling—it adds to the richness. Chef’s Insight: A quick pulse in the food processor is key. You want fine, even crumbs for a smooth texture, not big chunks.
- 8 oz Cream Cheese, softened to room temperature: The binder and the secret weapon! The slight tang of cream cheese cuts through the sweetness of the cookies perfectly, creating that “can’t-eat-just-one” depth. Pro Tip: *Truly* softened cream cheese (leave it out for 1-2 hours) is non-negotiable. It mixes in seamlessly without overworking the dough.
- 1 ½ cups Candy Melts or White Chocolate Chips (in pastel colors): For that gorgeous, crackly shell. I often use candy melts (like Wilton® or Ghirardelli®) because they melt smoothly, set firmly, and come in every spring color imaginable. Substitution Tip: High-quality white chocolate bars, finely chopped, work wonderfully too. Add a teaspoon of coconut oil when melting for extra fluidity.
- Optional, but Highly Encouraged: Sprinkles, Sanding Sugar, or Melted White/ Dark Chocolate for Decorating: This is where personality shines! Pastel jimmies, pretty sprinkles, or a simple contrasting chocolate drizzle add that professional, festive finish. Go wild!
Let’s Get Rolling: Step-by-Step to Truffle Heaven
Ready? Let’s do this. Clear some counter space, cue up your favorite playlist, and let’s transform these simple ingredients into edible jewels.
- Crush to Perfection: Toss all the cookies (yes, the whole package, cream and all!) into your food processor. Pulse until you have a uniform, fine crumb. No food processor? No sweat! Place cookies in a heavy-duty zip-top bag and go to town with a rolling pin. It’s a great stress reliever! Chef’s Hack: A few quick pulses is all you need. Over-processing can make the oils release, making the crumbs greasy.
- The Big Mix: Dump those beautiful chocolate crumbs into a large mixing bowl. Add your gloriously soft cream cheese. Now, get in there with a sturdy spatula or (my preferred method) clean hands! Mix until no streaks of white remain and a soft, pliable dough forms. It will be thick and fudgy—that’s exactly what we want.
- Shape Your Eggs: Line a baking sheet with parchment paper. Scoop out about 1 tablespoon of dough (I use a small cookie scoop for uniformity). Roll it into a ball between your palms, then gently shape it into an oval/egg shape. Place it on the sheet. Repeat with all the dough. Pro Tip: If the dough gets too sticky, pop it in the fridge for 10 minutes. A little chill makes shaping a breeze.
- The Chill Pill: Once all your eggs are shaped, slide the entire tray into the freezer for 15-20 minutes. This is CRUCIAL. A firm, cold center is what prevents your truffle from falling apart during the chocolate dip. Don’t skip this step!
- Melt & Dip: While the eggs chill, melt your chocolate or candy melts. Do this in separate microwave-safe bowls, one color at a time. Microwave in 30-second bursts, stirring vigorously between each, until completely smooth. Chef’s Warning: Overheating chocolate is the enemy! Low and slow is the mantra. Remove one egg from the freezer. Using a fork or a dipping tool, lower it into the melted chocolate, tap off the excess, and gently slide it back onto the parchment. Immediately add sprinkles before the shell sets. Repeat with remaining eggs. Hack: If your chocolate gets thick, stir in a tiny bit of shortening or coconut oil to thin it.
- Set & Serve: Allow the chocolate to set completely at room temperature, or speed things up with a 10-minute fridge visit. Once set, they’re ready to dazzle!
How to Serve These Little Gems
Presentation is half the fun! I love arranging these on a festive platter lined with shredded green paper “grass” for a classic Easter basket look. For a more sophisticated vibe, try a white ceramic plate or a tiered cake stand. Pair them with fresh berries (strawberries, raspberries) for a pop of color and a fresh contrast to the rich chocolate. They’re the perfect end to a big meal because they’re just a bite or two of sweetness. I always put out a pretty tray on the counter during a gathering—they disappear like magic, one happy nibble at a time.
Make It Your Own: 5 Fun Twists on the Classic
The basic formula is your canvas. Get creative and play with flavors!
- The Golden Oreo® Bunny: Use Golden Oreos instead of chocolate. Dip in white chocolate and decorate with edible pink glitter or a tiny candy pearl for a “bunny tail.”
- Peanut Butter Paradise: Swap out 2 oz of the cream cheese for creamy peanut butter. Use peanut butter sandwich cookies. Dip in milk chocolate and sprinkle with chopped peanuts.
- Lemon Zing: Add the zest of one lemon to the cream cheese mixture. Use vanilla sandwich cookies. Dip in yellow candy melts and top with a tiny candied lemon slice.
- Coconut Nest: Mix ½ cup of toasted coconut into the cookie dough. After dipping in chocolate, roll the still-wet top in more toasted coconut to look like a nest.
- Dark Chocolate & Sea Salt (for the grown-ups): Use dark chocolate cookies. Dip in dark chocolate and finish with a delicate flake of sea salt immediately after dipping.
Chef Emily’s Notes from a Messy Apron
This recipe has evolved from my grandma’s “dirty snowballs” into my springtime staple. I’ve learned a few things along the way: First, wearing a dark shirt while dipping chocolate is a fool’s errand. Second, enlisting little helpers for the rolling and sprinkling stages is chaotic but creates the best memories. And third, these truffles are incredibly forgiving. A crack in the chocolate shell? Just call it “artisanal.” An egg that’s less than symmetrical? It has character! The goal is joy, not perfection. I often double the batch and keep a container in the fridge for my own secret snack attacks. No judgment here.
FAQs & Kitchen Rescue
Q: My dough is too sticky to shape! Help!
A: No problem! This usually means the cream cheese was a bit too warm or the room is hot. Simply cover the bowl and pop it in the fridge for 20-30 minutes to firm up. You can also lightly dust your hands with powdered sugar or cocoa powder when shaping.
Q: Why did my chocolate get clumpy or seize when melting?
A> This happens if even a single drop of water gets into the melting chocolate. Ensure all bowls and tools are completely dry. If it seizes, try stirring in a teaspoon of vegetable oil or shortening; sometimes you can bring it back.
Q: Can I make these ahead of time?
A: Absolutely! They are perfect for making ahead. Store fully set truffles in an airtight container in the fridge for up to 1 week, or freeze for up to 2 months. Let them come to room temperature for about 10 minutes before serving for the best texture.
Q: My chocolate coating is too thick and gloppy.
A: Thin it out! For candy melts, add a *tiny* bit of paramount crystals or coconut oil. For real chocolate, adding a small amount of finely chopped cocoa butter is best.
Nutritional Info (Because We’re Curious!)
Okay, let’s be honest—these are a treat, through and through. But it’s always good to know what you’re enjoying! The following is an approximate estimate per truffle (based on a batch of 20, using standard ingredients). Remember, variations will change these numbers.
- Calories: ~130
- Carbohydrates: 14g
- Fat: 8g
- Sugar: 10g
- Protein: 1g
These are rich, so one or two is usually perfect for satisfying that sweet tooth. The key is to savor them slowly, with a cup of coffee or a cold glass of milk, and enjoy every single bite guilt-free. Food is joy, remember?
Final Thoughts from My Kitchen to Yours
And there you have it! My beloved, no-fuss, always-impressive Easter Egg Cookie Truffles. They prove that the most memorable treats don’t need to be complicated—they just need to be made with a little bit of love (and maybe a few sprinkles). I hope this recipe finds its way into your spring traditions, creating laughter around your kitchen table and sweet moments with the people you cherish.
If you make them, I’d be absolutely thrilled to see your creations! Tag me on social @TastyChow so I can share in the fun. Now, go forth and make something delicious. Happy Easter, happy spring, and happy baking (or no-baking, in this case)!
With love and a full heart,
Emily 🐰