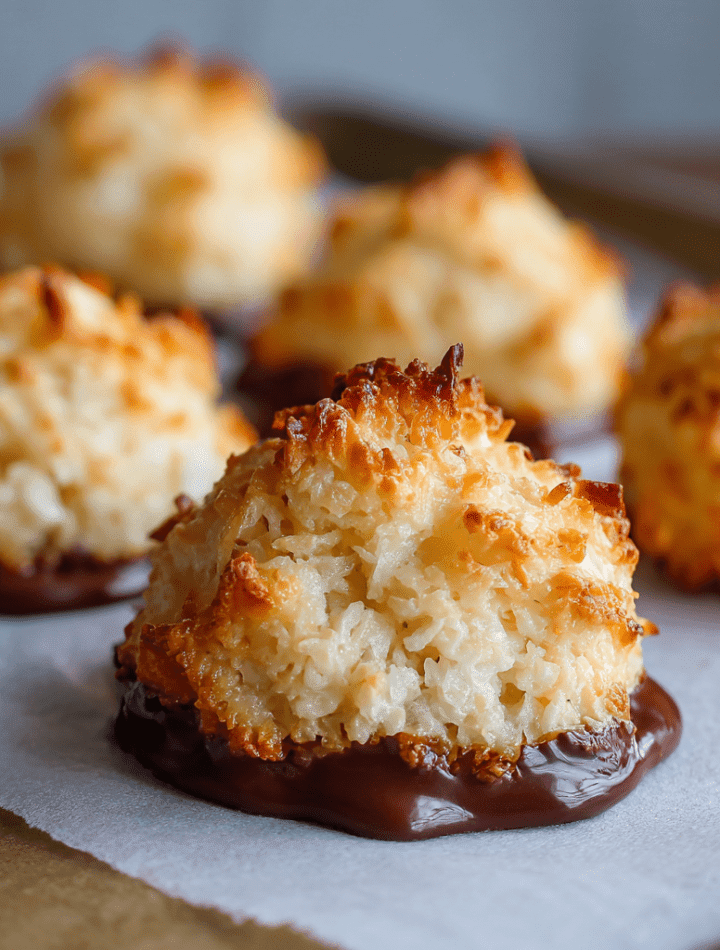
The Coconut Macaroon: Your New Favorite Chewy, Golden Bite of Joy
Hey there, friend! Come on in, grab an apron, and let’s talk about one of the most underrated, utterly delicious cookies to ever come out of an oven: the coconut macaroon. If you’ve ever walked past a bakery case and been mesmerized by those snowy, craggy mounds, dipped just so in a slick of dark chocolate, then you already know the magnetic pull of a good macaroon. But here’s my chef’s secret: they are laughably easy to make at home. I’m talking 10-minutes-of-active-work easy. No fancy techniques, no temperamental ingredients—just pure, unadulterated coconut joy that’s naturally gluten-free.
Today, we’re making the ultimate version: chewy on the inside, perfectly toasted and golden on the outside, with a texture that’s somehow both tender and substantial. They’re the kind of treat that feels fancy enough for a holiday cookie plate but simple enough for a Tuesday afternoon pick-me-up. And the best part? They are a blank canvas for your creativity. We’ll stick with the classic chocolate-dipped wonder, but I’ll also show you how to turn them into a rainbow of pastel beauties for spring or adapt them for different diets. This isn’t just a recipe; it’s your new go-to, never-fail, “wow, you made these?!” kitchen staple. So, preheat that oven to 325°F (165°C), and let’s make your kitchen smell like a tropical bakery.
My Grandma’s “Magic Trick” Cookies
My love affair with coconut macaroons started not in culinary school, but on a wobbly wooden stool in my Grandma Ruth’s kitchen. To me, her macaroons were pure magic. She’d take a bag of stringy, sweet coconut and a few other simple things from her pantry and, like a culinary wizard, transform them into these enchanting little hills. I remember watching, wide-eyed, as she’d drop the sticky batter onto the sheet. “Now we wait for the golden hats to appear,” she’d say.
The waiting was torture, but the reward was everything. She always let me have the first one, hot from the oven, when the exterior was crisp and the center was like a soft, warm cloud. She’d never dip them in chocolate—that was her “fancy pants” version for church potlucks. For us, they were perfect just as they were. To this day, the smell of toasting coconut instantly transports me back to that sunny linoleum floor, feeling loved and full of wonder. These cookies are more than a dessert; they’re a edible memory of simplicity and sweetness. Every time I make them, I feel like I’m sharing a little bit of that magic with you.
Gathering Your Coconut Crew: Simple Ingredients, Big Flavor
See? I told you it was simple! This is a powerhouse team where every player has a crucial role. Let’s break it down.
- 3 cups sweetened shredded coconut: This is the STAR. The texture and body of the macaroon live here. I use sweetened because it gives us the perfect moisture and classic flavor. Chef’s Insight: Don’t use flaked or desiccated coconut here—the shreds are key for that chewy, moist texture.
- 4 large egg whites: Our binder and structure-builder. They puff up slightly when whisked, giving the macaroons lift and a light interior. Substitution Tip: In a pinch, you can use refrigerated liquid egg whites. I’d use 1/2 cup (about 120ml).
- 3/4 cup granulated sugar: Sweetness, of course, but it also helps create a lovely, lightly crispy exterior as it caramelizes. Chef’s Insight: You can swap this with an equal amount of coconut sugar for a deeper, caramel-like flavor, but your macaroons will be darker in color.
- 1 teaspoon pure vanilla extract: The flavor enhancer. It rounds out the sweetness and adds a warm, aromatic note. Fun Twist: Try 1/2 tsp vanilla + 1/2 tsp almond extract for an amaretto-like vibe!
- A generous pinch of fine sea salt: Never, ever skip this. Salt makes the sweet flavors pop and balances the entire cookie. It’s the difference between “yum” and “WOW.”
- Optional Champions: Melted chocolate (semi-sweet or dark) for dipping. Gel food coloring (just a drop or two!) if you want to make stunning pastel versions for Easter or a baby shower.
Step-by-Step: Let’s Build Some Coconut Mountains!
Ready? This is where the fun happens. I’ll walk you through every step with my favorite kitchen hacks to guarantee success.
Step 1: Prep & Preheat. First, line a large baking sheet with parchment paper. Not wax paper! Parchment is your best friend here—it prevents sticking and makes cleanup a breeze. Now, preheat your oven to 325°F (165°C). A proper, fully heated oven is crucial for that even, golden toast.
Step 2: The Fussy-Free “Meringue.” In a medium bowl, combine your egg whites, sugar, vanilla, and that all-important pinch of salt. Grab a whisk or a fork and go to town! You’re not looking for stiff peaks like a traditional meringue. Just whisk vigorously for about 1-2 minutes until the mixture is frothy, opaque, and the sugar is mostly dissolved. You should see lots of little bubbles on the surface. That’s it! Easy, right?
Step 3: The Coconut Hug. Dump all your sweetened shredded coconut into the bowl. Now, use a flexible spatula to fold and stir until every single strand of coconut is glistening and coated with the egg white mixture. The mixture will be thick, sticky, and hold together when pinched. Chef’s Hack: If you’re making pastel macaroons, now’s the time! Divide the mixture into separate bowls and stir in a tiny drop of gel food coloring into each until you achieve a lovely, even pastel hue.
Step 4: Scoop & Shape. Using a small cookie scoop (about 1.5 tablespoons) or two spoons, portion the mixture onto your prepared sheet. Pack it firmly into the scoop for a nice shape. Leave about an inch of space between them—they won’t spread, but they need room for air to circulate for even browning. Don’t worry about making them perfectly smooth; those craggy tips are what get extra toasted and delicious!
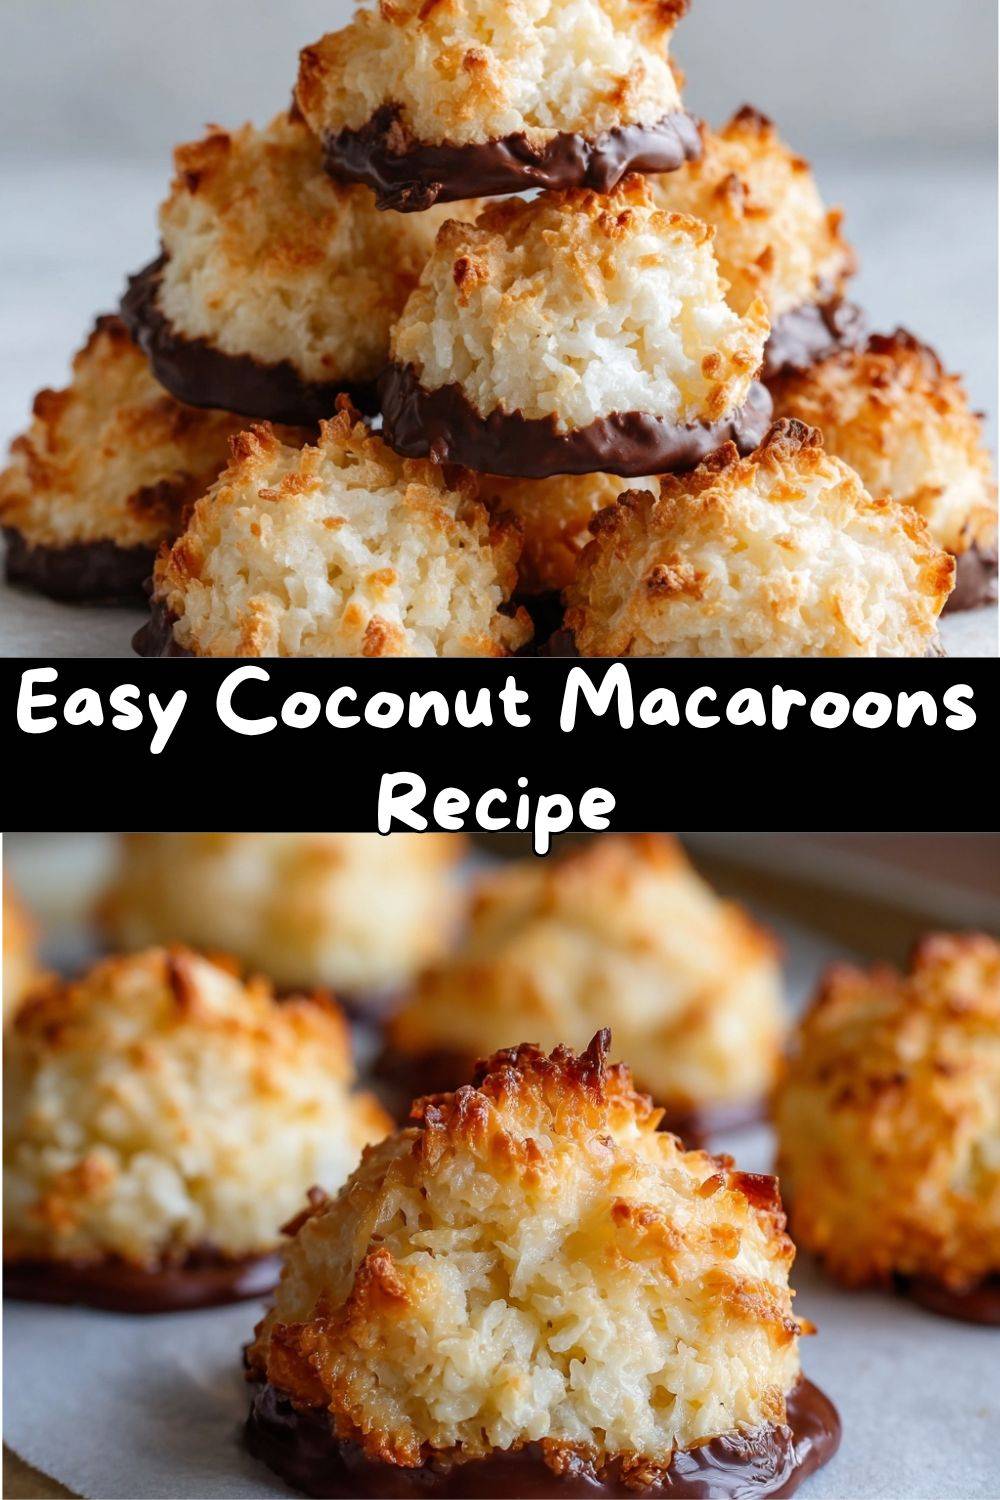
Step 5: Bake to Golden Perfection. Slide the sheet into the middle of your preheated oven. Bake for 20-25 minutes. You’re waiting for the edges and those craggy tops to turn a deep, toasty golden brown. The bottoms will also be lightly golden. Your kitchen will smell incredible. Once they’re beautifully colored, pull them out and let them cool completely on the baking sheet. They firm up as they cool.
Step 6: The Chocolate Dip (Optional, but Highly Recommended). Once cool, melt your chocolate in short bursts in the microwave, stirring frequently. Dip the flat bottom of each macaroon into the chocolate, let the excess drip off, and place back on the parchment. For a fancy drizzle, use a fork to zig-zag chocolate over the top. Let the chocolate set at room temperature (or speed it up in the fridge for 10 minutes).
How to Serve These Little Clouds of Happiness
Presentation is part of the fun! For a simple, rustic look, pile them high on a wooden board or a cake stand lined with a doily. They look gorgeous just like that. If you’ve gone the chocolate route, arrange them on a sleek white platter—the contrast is stunning. These are the perfect companion to a cup of strong coffee, black tea, or a glass of cold milk. They’re also a fantastic addition to a dessert buffet alongside fresh fruit, brownies, and other cookies. For a dinner party, place one or two on a small plate next to a tiny scoop of sorbet or vanilla ice cream for an elegant, easy dessert. Honestly, they rarely make it off the cooling rack in my house—they’re that good served straight into a waiting hand!
Get Creative! 5 Fun Ways to Shake Up Your Macaroons
Once you’ve mastered the classic, the world is your coconut-covered oyster. Here are some of my favorite riffs:
- Chocolate Chip Macaroons: Fold 1/2 cup of mini chocolate chips into the coconut mixture before scooping. Double the chocolate, double the fun.
- Key Lime Pie Macaroons: Add 1 tablespoon of freshly grated lime zest and 1 teaspoon of lime juice to the egg white mixture. Dip in white chocolate for the ultimate tropical treat.
- Almond Joy Version: Before baking, press a whole almond into the top of each scooped macaroon. Dip the cooled bottoms in dark chocolate. You’re welcome.
- Dairy-Free & Vegan: Replace the egg whites with aquafaba (the liquid from a can of chickpeas)! Use 1/2 cup of aquafaba and whisk it with the sugar and vanilla until very frothy and slightly thickened (about 2-3 minutes with a hand mixer). Proceed as directed.
- “Confetti” Macaroons: Perfect for birthdays! Omit vanilla, use 1/2 tsp clear imitation vanilla. Fold in 2-3 tablespoons of rainbow sprinkles with the coconut.
Chef Emily’s Kitchen Notes & Confessions
This recipe is a testament to the fact that the best things are often the simplest. It’s evolved in my kitchen only in its variations—the core formula is perfect as is. One funny story: I once, in a distracted hurry, used a whole egg instead of just the whites. The result was a strangely fluffy, slightly cakey macaroon that my husband still claims he liked (bless him). Stick to the whites for the right texture! These also freeze beautifully. I like to keep a stash of undipped macaroons in the freezer, then dip them in chocolate straight from the freezer when surprise guests show up—they think I’m a kitchen wizard. The secret is out!
FAQs: Your Questions, Answered!
Q: My mixture seems really wet/runny. What happened?
A: This usually means the egg whites weren’t whisked enough, or your coconut might be a different cut/brand with less absorbency. The fix? Add an extra 1/4 to 1/2 cup of shredded coconut until the mixture is thick and holds together when squeezed.
Q: Can I make these ahead of time?
A: Absolutely! They are fantastic make-ahead cookies. Store fully cooled macaroons (without chocolate dip) in an airtight container at room temp for up to 5 days, or freeze for up to 2 months. Dip in chocolate after thawing.
Q: Why did my macaroons turn out dry?
A: The most common culprit is over-baking. Ovens can vary, so start checking at 18 minutes. You want golden tips, but the centers should still feel slightly soft when you press them (they’ll firm up as they cool). Also, be sure you’re using sweetened, not unsweetened, coconut for maximum moisture.
Q: Can I use canned coconut milk or cream of coconut?
A> No, for this specific chewy-and-crisp texture, stick to the shredded coconut and egg white binder. Adding liquid coconut milk will change the structure completely and make them too wet.
Nutritional Information (A Quick Note!)
While we’re here for the joy of baking and eating, I know many of us like to have an idea of what’s in our treats. Here’s the approximate breakdown per macaroon (without chocolate dip), based on a batch of 20. Remember, this is an estimate, and values can vary based on specific ingredients used.
- Calories: 120
- Carbohydrates: 14g
- Fat: 6g
- Sugar: 11g
- Protein: 2g
The great news is that these are naturally gluten-free and grain-free, making them a wonderful option for friends with those dietary needs. They are a sweet, energy-dense treat perfect for an afternoon snack or a dessert. As always, enjoy them as part of a balanced life full of delicious flavors!
Final Thoughts: Your Kitchen, Your Rules
And there you have it! Everything you need to create perfect, chewy, toasted coconut macaroons that will impress anyone who tries them. I hope this recipe brings as much simple happiness to your kitchen as it has to mine and my grandma’s before me. Remember, baking is about joy, not perfection. If your macaroons are a little lopsided, or your chocolate dip isn’t restaurant-smooth, it doesn’t matter one bit. You made something delicious with your own two hands, and that’s a beautiful thing.
Now, I’d love to hear from you! Did you try the classic version or one of the fun twists? Tag me on social @TastyChow with your creations. Until next time, keep your spoons handy and your ovens warm.
With love and a sprinkle of coconut,
Emily