Pastel Meringue Cookies: Light, Crisp, and Elegantly Sweet
Hey there, friend! Grab a cup of tea and pull up a chair. Have you ever looked at a dessert table and been completely mesmerized by those beautiful, cloud-like, pastel-colored cookies? The ones that look almost too pretty to eat? You know the ones I mean—they look like little edible pillows of happiness. That’s the magic of Pastel Meringue Cookies.
Today, we’re diving into the wonderful, whisper-light world of meringues. Now, I know what some of you might be thinking: “Emily, meringues seem so fancy and finicky!” But let me let you in on a little secret: they’re actually one of the most forgiving and fun projects you can tackle in your kitchen. They require just a handful of simple ingredients, a bit of patience (mostly hands-off, I promise!), and a whole lot of love. The result? A cookie that’s shatteringly crisp on the outside, delicately chewy in the center, and melts away on your tongue in a sweet, airy whisper.
These aren’t just cookies; they’re tiny, edible works of art. They transform any ordinary afternoon tea, baby shower, Easter brunch, or spring celebration into something truly special. And the best part? When you pull a tray of these pastel beauties out of your own oven, you’ll feel like a pastry rockstar. So, tie on that apron—the messy one is totally welcome here—and let’s make something gorgeous and delicious together.
A Sky Full of Cookies: My Meringue Memory
My love affair with meringue started not in culinary school, but in my Grandma’s cozy, sun-drenched kitchen. She wasn’t a “fancy” baker, but she had a few legendary moves up her flour-dusted sleeve. One rainy spring Saturday, when I was about eight, she decided we were going to “bake clouds.” I remember staring at her, utterly confused, as she cracked eggs and carefully separated the whites from the yolks.
She handed me the copper bowl and the big whisk (my arm still aches thinking about it!) and told me to beat “until it looked like the foam on the ocean, then keep going.” I whisked and whisked, complaining the whole time, until suddenly—magic. The clear, slimy egg whites turned into a fluffy, white, glossy mountain. My jaw dropped. Then, she let me dip a clean finger into the food coloring jar—a soft pink—and swirl it through our cloud. We spooned dollops onto a baking sheet and slid them into the low oven. Hours later, we had these crisp, sweet puffs that tasted like pure, sugary joy. That day, my grandma taught me that kitchen magic isn’t about complexity; it’s about transformation. From simple eggs and sugar, we made edible sky.
Gathering Your Cloud-Making Ingredients
See? Just a few simple players. But in meringue, every ingredient has a starring role. Let’s chat about why each one matters and how you can make smart swaps.
- 4 large egg whites, room temperature: This is NON-NEGOTIABLE, friends. Room temperature egg whites whip up higher and faster than cold ones. Pro tip: Separate your eggs when they’re cold (it’s easier), then let the whites sit in a bowl on the counter for 30 minutes. Also, ensure not a single speck of yolk gets in there! Fat is the enemy of fluffy meringue.
- 1 cup granulated sugar: Fine, granulated sugar is perfect. It dissolves completely into the egg whites, creating that smooth, glossy, stable foam. Some recipes use superfine sugar, but regular granulated works beautifully when added slowly.
- ¼ teaspoon cream of tartar: This is your meringue’s best friend and security blanket. It’s an acid that stabilizes the egg white foam, helping it hold its shape and preventing it from collapsing or “weeping” (when liquid seeps out). If you’re in a pinch, you can use an equal amount of lemon juice or white vinegar.
- ½ teaspoon vanilla or almond extract: Pure flavor magic! Vanilla gives a classic, warm sweetness. Almond extract makes them taste like delicate macarons. You can also use clear vanilla if you want to keep the pastel colors ultra-vibrant.
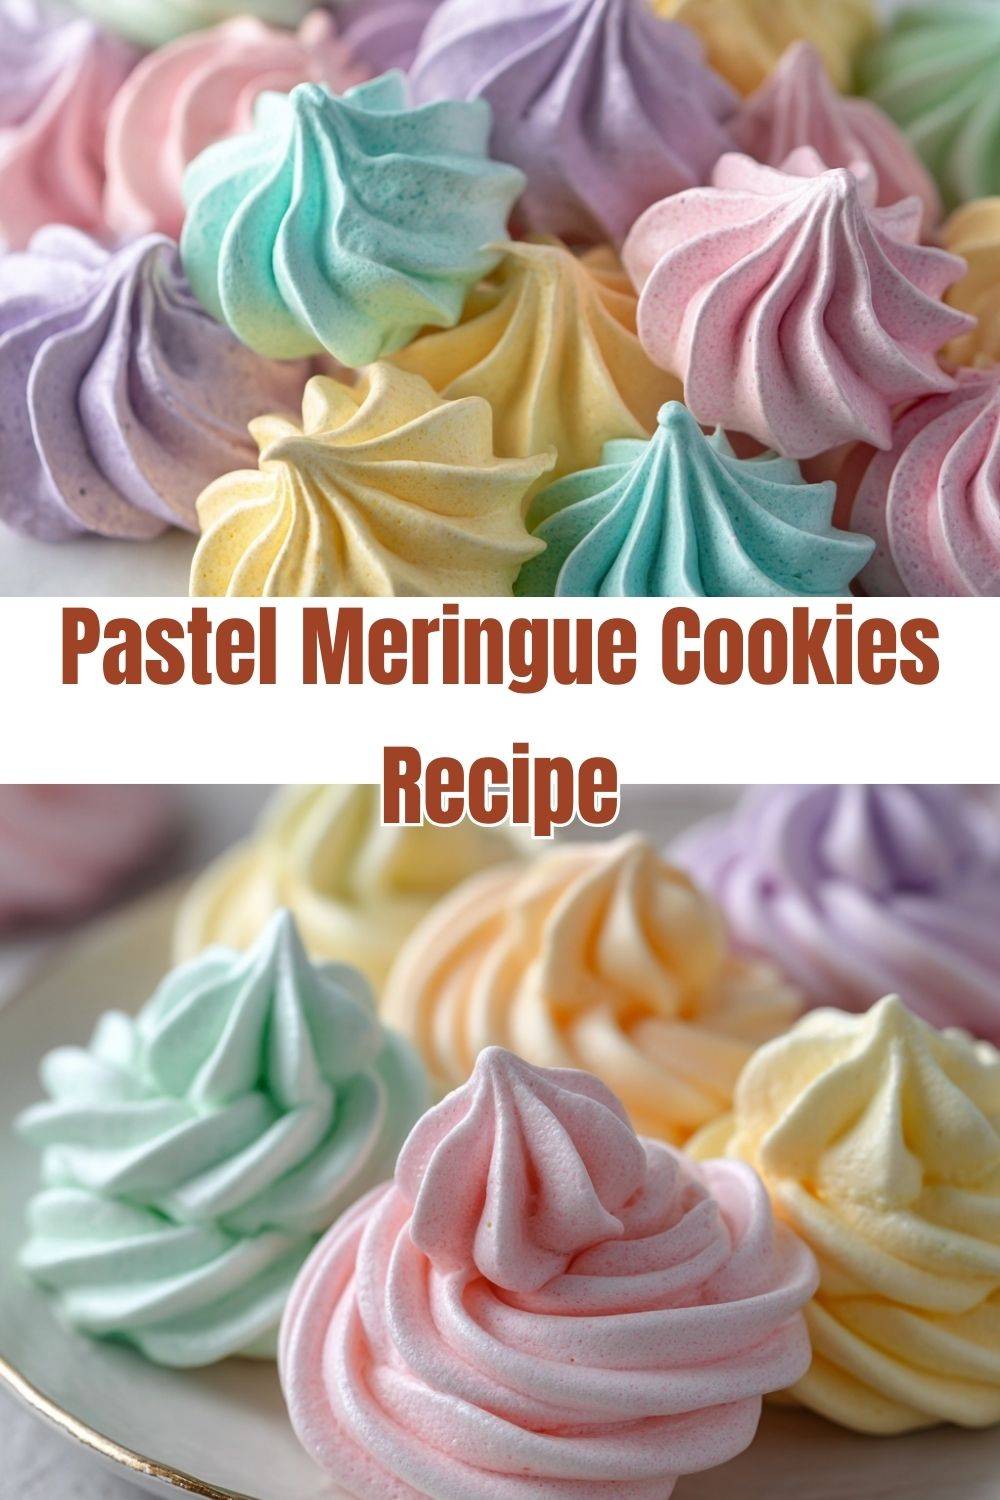
- Gel food coloring in pastel shades: Gel is the keyword here. Liquid food coloring can add too much moisture and deflate your beautiful meringue. Gel colors are highly concentrated, so you only need a tiny toothpick dab to achieve gorgeous, soft pastel hues like blush pink, mint green, baby blue, and lavender.
Step-by-Step: Let’s Pipe Some Clouds!
Ready? Let’s walk through this together. I’ll be with you every step of the way with my best chef hacks.
- Prep Your Stage. Preheat your oven to a low 200°F (95°C). This is a “dry” more than a “bake.” Line two baking sheets with parchment paper. Do not grease them or use wax paper. Meringue needs to stick a little to the parchment to not slide around. Trust me on this.
- The Clean Bowl Rule. In the bowl of your stand mixer (or a large, spotlessly clean metal or glass bowl if using a hand mixer), place your room-temperature egg whites and cream of tartar. Any trace of grease or fat (from a not-so-clean bowl or a rogue yolk) will prevent the whites from whipping properly. When in doubt, wipe the bowl with a little lemon juice or vinegar on a paper towel to ensure it’s squeaky clean.
- Whip to Soft Peaks. Start beating on medium speed. You’ll see the whites go from frothy to opaque and foamy. After a few minutes, you’ll have “soft peaks.” This means when you lift the beater, the peak that forms curls over gently at the tip. This is your foundation.
- The Sugar Shower. Now, increase the speed to medium-high. Here’s the key: add the sugar ONE tablespoon at a time, letting each incorporate for about 10-15 seconds before adding the next. This patience ensures the sugar dissolves completely, giving you a smooth, glossy, and stable meringue, not a gritty one. This whole process should take 2-3 minutes.
- Reach for the Sky (Stiff Peaks!). Keep beating! After all the sugar is in, beat for another 1-2 minutes until you have glorious, stiff, glossy peaks. “Stiff peaks” mean when you lift the beater straight up, the peak stands up straight and doesn’t droop. The meringue will be thick, shiny, and look like marshmallow fluff. Rub a little between your fingers—you shouldn’t feel any sugar granules. Now, beat in your vanilla or almond extract.
- Paint with Pastels. Divide the meringue into separate bowls for as many colors as you want. Using a toothpick, add a tiny dab of gel coloring to each. Gently fold it in with a spatula until you have a uniform, beautiful pastel shade. Don’t over-mix! For a gorgeous marbled effect, you can add a few dabs of color to your piping bag after filling it and give it a gentle squeeze/swirl.
- Pipe Your Dreams. Fit a piping bag with a large star tip (for pretty swirls) or a round tip (for classic kisses). Fill your bag and pipe 1-1.5 inch mounds or swirls onto your prepared sheets, spacing them about an inch apart. They won’t spread, but they need airflow. Have fun with it!
- The Long, Slow “Dry.” Place the sheets in the oven and bake for 1.5 hours. DO NOT open the oven door during this time! After 1.5 hours, turn the oven OFF. Leave the cookies in the closed, turned-off oven for another hour to cool and dry out completely. This slow cooling prevents cracking.
- The Grand Reveal. After the cooling hour, your meringues should be firm, dry to the touch, and lift off the parchment paper easily. If they feel soft or sticky, they need a bit more time in the residual oven heat. Let them cool completely on the sheets.
How to Serve These Little Clouds of Joy
Presentation is half the fun with these cookies! I love piling them high on a beautiful cake stand or a vintage platter—the different pastel colors look like a spring garden. They’re the perfect elegant accompaniment to a pot of herbal tea, a strong espresso, or a glass of cold lemonade.
Get creative! Use them to decorate the rim of a birthday cake or a bowl of berries and cream. Crumble them over ice cream or pudding for an incredible textural contrast. For a party, place one or two on each guest’s dessert plate as a sweet, light finish to a meal. They also make breathtakingly beautiful homemade gifts. Tuck them into a clear cellophane bag tied with a ribbon, and you’ve just made someone’s day.
Make It Your Own: Delicious Variations
Once you’ve mastered the basic cloud, the sky’s the limit! Here are a few of my favorite twists:
- Chocolate Swirl: After piping, use a toothpick to drag a little melted dark chocolate through the top of each meringue for a stunning marbled effect.
- Citrus Zest: Add 1 teaspoon of finely grated lemon, lime, or orange zest to the meringue along with the extract. Pair with corresponding pastel colors (yellow for lemon, etc.).
- Nutty Crunch: Gently fold ¼ cup of very finely chopped toasted pistachios or almonds into half the meringue before piping. The flavor and slight crunch are divine.
- “Vegan” Meringue (Aquafaba): Yes, it’s possible! Substitute the 4 egg whites for the liquid from one 15-oz can of chickpeas (about ½ cup aquafaba). Use ¼ tsp cream of tartar and ¾ cup sugar. Whip for longer (up to 15 mins) until stiff peaks form. The technique is identical!
- Mini Chip Cookies: For a fun “cookies and cream” vibe, gently fold 2-3 tablespoons of mini chocolate chips into the meringue after coloring.
Chef Emily’s Notes & Kitchen Confessions
This recipe has been my go-to for years, and it’s evolved with every batch. My biggest “Aha!” moment was learning the “cool in the oven” trick. I used to pull them out immediately, only to hear a chorus of tiny cracks as they cooled too quickly. Letting them cool slowly in the turned-off oven is a total game-changer for perfect, smooth meringues.
Also, humidity is the arch-nemesis of meringue. If it’s a particularly rainy or muggy day, your meringues might take longer to dry and can stay a bit chewy (which is still delicious!). For ultimate crispness, make these on a dry day. And a funny story: I once was so excited to color my meringues that I used liquid red food coloring for “pink.” I ended up with a sad, runny, pink puddle that refused to whip. We live and we learn! Now I keep a stash of gel colors just for these occasions.
Your Meringue Questions, Answered!
Q: My meringue won’t get stiff peaks. What did I do wrong?
A: The most common culprits are: 1) A speck of egg yolk or a greasy bowl, 2) Cold egg whites, or 3) Adding the sugar too quickly. Ensure your tools are spotless, your eggs are room temp, and you add the sugar slowly. A tiny bit of cream of tartar is your safety net!
Q: My meringues are sticky or chewy after cooling.
A: This usually means they needed more drying time. If they’ve cooled and are still sticky, you can return them to a 200°F oven for another 15-30 minutes, then let them cool in the oven again. Humidity can also cause this.
Q: Can I make these ahead of time?
A: Absolutely! Once completely cooled, store them in an airtight container at room temperature for up to 2 weeks. Do not refrigerate, as the moisture will make them soft.
Q: Can I freeze meringue cookies?
A: You can! Freeze them in a single layer on a baking sheet, then transfer to an airtight freezer-safe container. They’ll keep for 1-2 months. Thaw at room temperature in the container to avoid condensation.
Nutritional Information
Let’s be real: we’re not eating meringue cookies for their protein content. We’re eating them because they’re little bites of joy! That said, it’s nice to know what you’re enjoying. These cookies are naturally fat-free, gluten-free, and, if you use a plant-based extract, they can be dairy-free.
Per Cookie (recipe makes ~60 small cookies):
Calories: ~10 | Total Carbohydrates: 2g | Sugars: 2g | Protein: 0.2g | Fat: 0g
Because they are primarily sugar, I consider them a “sometimes” treat to be savored. Their lightness means it’s easy to enjoy just one or two to satisfy a sweet tooth without feeling overly indulgent. Pairing them with a source of protein or fat, like a handful of nuts or a cup of Greek yogurt, can help balance the sugar rush.
Final Thoughts from My Kitchen to Yours
Well, my friend, we did it! We turned simple eggs and sugar into a tray full of edible sunshine. I hope you feel proud, empowered, and maybe a little bit like a kitchen wizard. Remember, baking is an adventure—every batch teaches you something new.
Don’t stress if your first swirl isn’t perfect or if a meringue cracks. Those are your “homemade with love” signature marks. The important thing is the joy you pour into the process and the smiles they bring when you share them.
I’d love to see your beautiful creations! Tag me @TastyChow on social media so I can cheer you on. Now, go forth and bake clouds. Your kitchen is about to get a whole lot sweeter.
With a full heart and a sweet tooth,
— Emily 🥄