When a Single Serving of Chocolate Cake is the Only Answer
Hey there, fellow food lover! Let me paint you a picture. It’s 9:37 PM. The dishes are done, the day is finally winding down, and a specific, undeniable craving hits you right in the soul. It’s not just a “hmm, something sweet would be nice” feeling. No, this is a full-blown, heart-and-stomach-united demand for rich, decadent, melt-in-your-mouth chocolate cake. But the thought of making a whole cake? Or even digging a sad, store-bought cupcake out of the freezer? It just doesn’t fit the moment.
You want something now. Something warm, freshly made, and meant just for you. You deserve a little celebration, a quiet moment of indulgence, without the week-long commitment of a leftover cake staring you down from the counter.
That, my friend, is precisely why this recipe exists in my world. This Mini Chocolate Cake is my secret weapon, my go-to for instant comfort, and my gift to you for all those perfectly justifiable solo dessert moments. It’s ultra-cozy, deeply chocolatey, and comes together with a handful of pantry staples in less time than it takes to find your streaming remote. It’s a bakery-style experience, scaled for one (or maybe two, if you’re feeling generous). So, grab your favorite little ramekin, and let’s make a memory—and a magnificent mess—in the kitchen.
The Little Cake That Started It All
This recipe takes me back to my grandma’s kitchen, but not in the way you might think. Sure, she taught me the sacred art of her famous cinnamon rolls, but my most vivid dessert memory with her is far simpler. It was a rainy afternoon, and I was maybe seven, feeling a little glum. Without a word, she pulled out a chipped, floral-patterned teacup, a spoon, and a few canisters. With a wink, she started mixing right there in the cup. I watched, mesmerized, as she popped it into her ancient microwave (a behemoth of an appliance), and 60 seconds later, she presented me with a steaming, wobbly, magical chocolate pudding-cake.
It was messy. It was probably overly sweet. But in that moment, it was pure alchemy. The idea that you could conjure happiness from so little, so quickly, stuck with me. This mini cake is the grown-up, slightly more refined (but no less magical) descendant of that teacup treat. It’s a reminder that joy doesn’t need to be complicated or large. Sometimes, the most satisfying things come in the smallest, warmest, chocolate-filled packages.
Gathering Your Chocolatey Arsenal
Here’s everything you need for your personal cake masterpiece. The beauty is in its simplicity!
- 3 tbsp all-purpose flour: The foundation. This gives our cake structure. Chef’s Insight: For a slightly more tender crumb, you can swap this for cake flour. For a gluten-free version, a 1:1 GF blend works beautifully here.
- 2 tbsp cocoa powder: The star of the show! Use natural, unsweetened cocoa powder for that classic, robust chocolate flavor. Chef’s Insight: If you only have Dutch-processed cocoa, that’s okay! The small amount of acid in the other ingredients will still help it rise.
- 2 tbsp sugar: Sweetens the deal. I use regular granulated white sugar. Substitution Tip: You can use coconut sugar or even maple syrup (reduce the milk by about ½ tbsp if using liquid sweeteners).
- ¼ tsp baking powder: Our little lift engine! This is what gives the cake its perfect, slight rise and soft texture. Make sure it’s fresh.
- Pinch of salt: Do not skip this! Salt is a flavor enhancer—it makes the chocolate taste richer and more complex, balancing the sweetness.
- 2 tbsp milk (any kind): The hydrator. I use whole dairy milk for richness, but any milk you have works—almond, oat, soy. The cake might be a touch less rich with non-dairy, but still delicious.
- 1½ tbsp oil or melted butter: The moisture-maker. Oil yields an incredibly moist, tender cake that stays soft. Melted butter gives a richer, more buttery flavor. You can’t go wrong! I often use avocado or vegetable oil.
- ¼ tsp vanilla extract: The flavor booster. Vanilla and chocolate are best friends. It rounds out all the edges.
- Optional: chocolate chips or chopped chocolate: The bonus burst! I’m a firm believer in “more is more” when it comes to chocolate. A small handful folded in creates gorgeous melty pockets.
Let’s Build Your Mini Masterpiece: Step-by-Step
Ready? This is the fun part. We’re going from zero to cake in about 10 minutes flat.
Step 1: Choose Your Adventure (Oven or Microwave)
Preheat your oven to 350°F (175°C). If you’re going the microwave route for ultimate speed, have your microwave-safe ramekin (about a 6-8 oz size is perfect) at the ready. Chef’s Hack: I lightly grease my ramekin with a smidge of butter or oil, or give it a quick spritz of baking spray. This ensures your cake slides out beautifully or lets you eat it right from the dish with a spoon (no judgment!).
Step 2: The Dry Team Assemble
In a small bowl, add your flour, cocoa powder, sugar, baking powder, and that all-important pinch of salt. Grab a small whisk or a fork and give these dry ingredients a good mix. Chef’s Commentary: Whisking here does two things: it combines everything evenly so you don’t get a pocket of baking powder, and it aerates the flour a tiny bit, contributing to a lighter texture. It takes 10 seconds and makes a difference!
Step 3: Bring in the Wet Crew
Pour your milk, oil (or melted, slightly cooled butter), and vanilla extract right into the dry ingredients. Now, stir! Use a spoon or a small spatula and mix until you have a smooth, glossy, irresistible-looking brown batter. A few tiny lumps are okay, but aim for smooth. Chef’s Tip: Don’t over-mix! Once the ingredients are incorporated, stop. Over-mixing can lead to a tougher cake.
Step 4: The Chocolate Chip Bonus Round (Optional but Highly Recommended)
If you’re using chocolate chips or chopped chocolate, fold them in now. “Folding” just means gently stirring them in until they’re distributed. You want to keep that air in the batter, so be gentle.
Step 5: The Big Pour
Scrape every last bit of that luscious batter into your prepared ramekin. Give the ramekin a gentle tap on the counter to settle the batter and pop any large air bubbles.
Step 6: The Transformation (Bake or Zap)
For Oven: Bake for 12-15 minutes. Start checking at 12. The cake should be set on top, and a toothpick inserted into the center should come out with a few moist crumbs (not wet batter). It will continue to cook a bit as it cools. For Microwave: Microwave on high for 45-60 seconds. Start with 45! The top should look set and slightly damp. It will firm up as it sits. Microwave powers vary, so your first cake is a test for your appliance—consider it a delicious experiment!
Step 7: The (Brief) Patience Phase
Let the cake cool for at least 5 minutes. I know, it’s hard! But this allows it to set fully and saves you from a scalded tongue. The wait makes that first warm, gooey bite even more rewarding.
How to Serve Your Solo Sensation
This is where you make it your own! Here are a few of my favorite ways to plate up this little luxury:
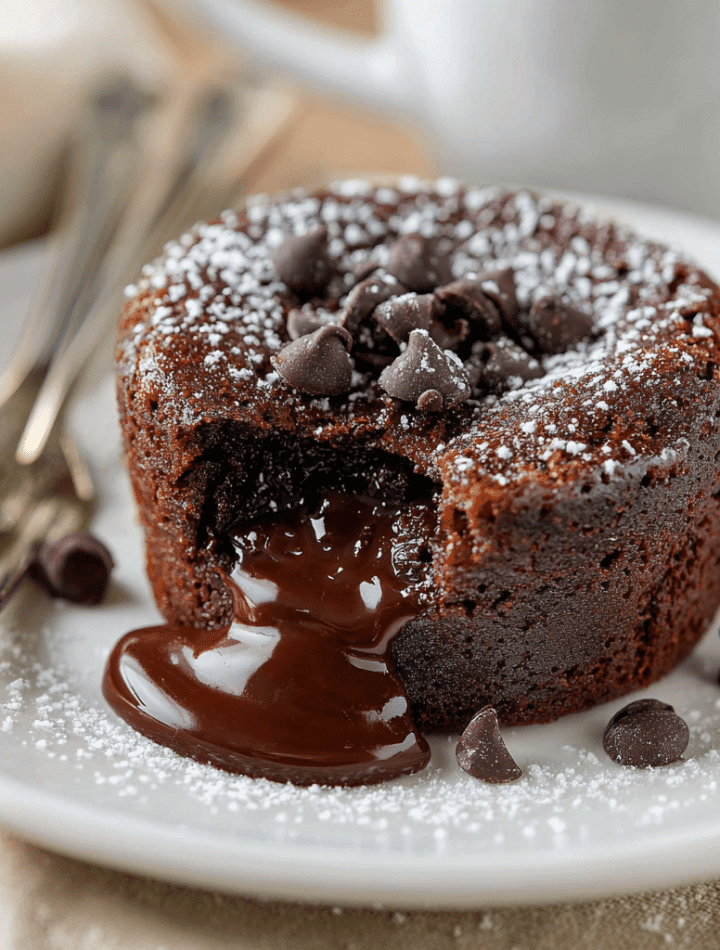
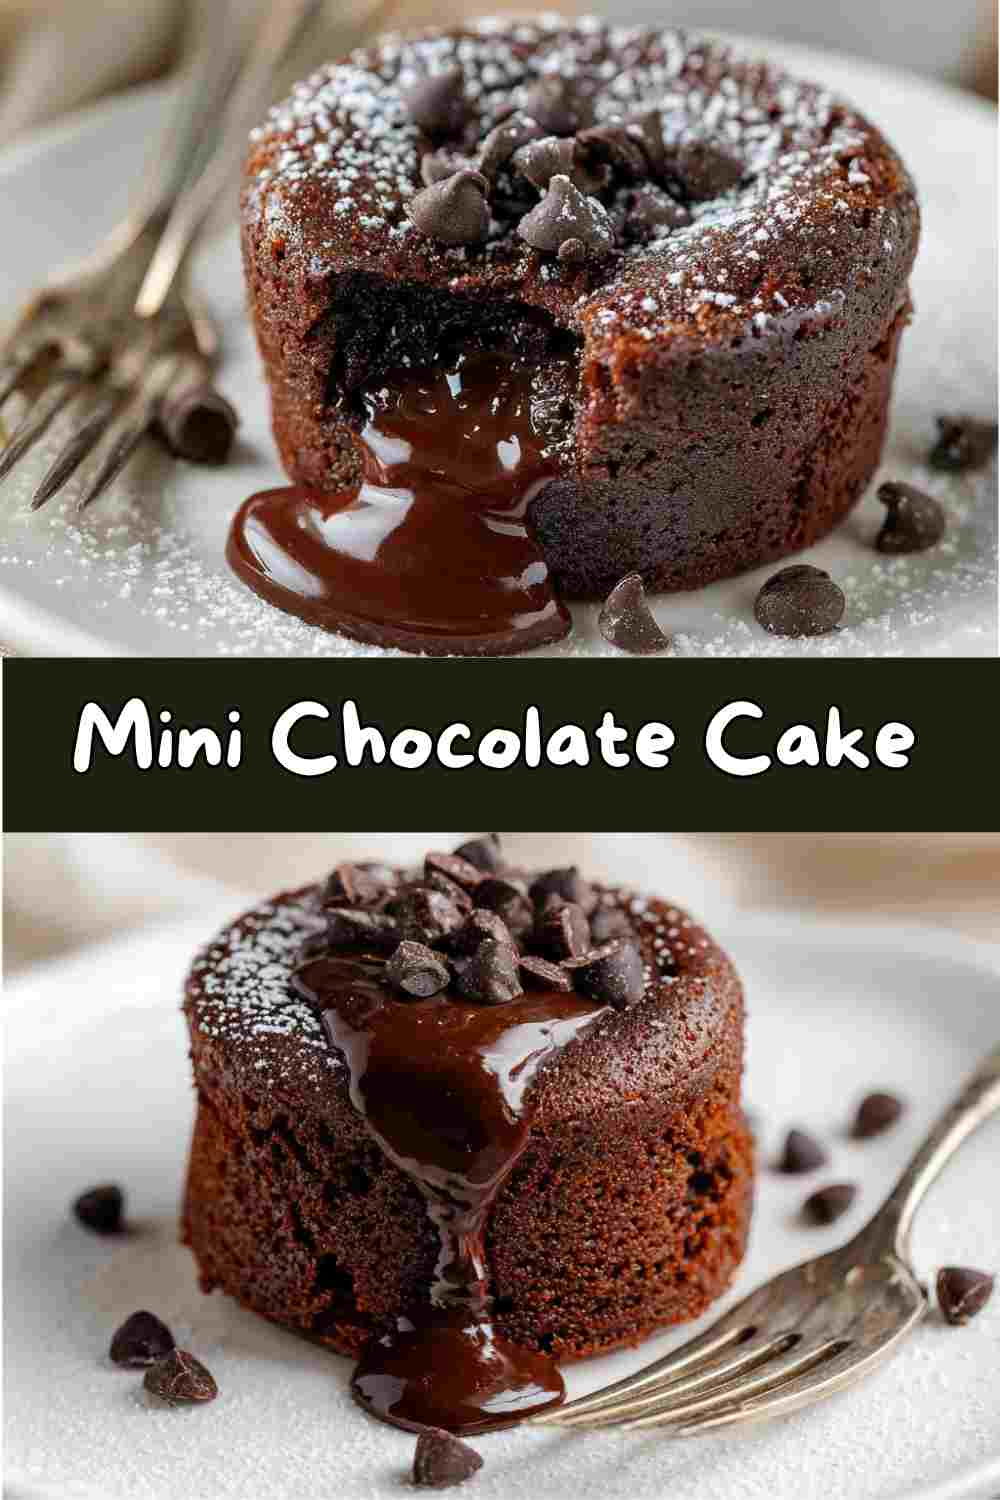
The Classic Cozy: Eat it straight from the ramekin with a spoon while it’s still warm. This is the ultimate low-effort, high-reward method. The edges are soft, the center is fudgy, and every bite is pure comfort.
The Plated Perfection: Let it cool for 5-10 minutes, then run a butter knife around the edge. Place a small plate on top, flip it over, and give it a gentle tap. Your cake should slide out beautifully. Dust it with a little powdered sugar or cocoa powder for a bakery-finish.
The À La Mode Dream: Top the warm cake with a scoop of vanilla ice cream or a dollop of freshly whipped cream. The contrast of warm cake and cold, creamy ice cream is a classic for a reason—it’s divine.
The Berry Good: Add a handful of fresh raspberries or sliced strawberries on the side. The bright, tart fruit cuts through the richness of the chocolate perfectly.
Get Creative: 5 Fun Twists on Your Mini Cake
Once you’ve mastered the basic recipe, the world is your chocolate oyster! Try these easy swaps:
- Peanut Butter Cup: Add 1 tbsp of peanut butter to the wet ingredients. Swirl a little extra on top of the batter before baking and sprinkle with chopped peanuts.
- Mocha Madness: Replace 1 tbsp of the milk with strong brewed coffee or espresso. It intensifies the chocolate flavor like you wouldn’t believe.
- Cookies & Cream: Fold in 2 tbsp of crushed Oreo pieces. You can even sprinkle a few on top before baking.
- Orange Zest Zing: Add the zest of a small orange (about ½ tsp) to the batter. Chocolate and orange are a sophisticated, heavenly pair.
- Dairy-Free/Vegan: Use almond or oat milk, and a neutral oil. For an egg-free recipe like this, that’s all you need to do—it’s naturally vegan without the egg!
A Few More Thoughts from My Kitchen to Yours
This recipe has been my trusty sidekick for years. It’s evolved from my grandma’s teacup experiment to my “I need cake STAT” solution during culinary school stress, to the recipe I now text to friends having a tough day. The core of it—simplicity and speed—has never changed. I’ve made it in dorm room microwaves, in fancy gas ovens, and even once in a toaster oven while camping (true story!). It’s forgiving and flexible. My biggest tip? Don’t be afraid to play. Add a dash of cinnamon, a sprinkle of sea salt on top before baking, or a drop of almond extract instead of vanilla. Make it yours. That’s what home cooking is all about.
Your Questions, Answered!
Q: My cake came out dry. What happened?
A: The most common culprit is over-baking, especially in the microwave. Microwaves vary wildly. Start with 45 seconds next time! For the oven, check at 12 minutes. Also, make sure you’re using a tablespoon measure for the oil/milk—a little less liquid can make a big difference in such a small recipe.
Q: Can I double or triple this recipe?
A: Absolutely! You can mix a bigger batch of the dry ingredients in a bowl, then just portion out what you need (about 7-8 tbsp of the dry mix per cake). Add the wet ingredients individually for each portion. It’s perfect for making a few mini cakes for a small gathering.
Q: Why did my cake sink in the middle?
A: A slight dip is normal for a moist, microwave cake. A major sinkhole usually means too much baking powder or, more likely, under-baking. The structure didn’t have time to set before it cooled. Try adding 10-15 seconds to your microwave time or a minute to your oven time.
Q: Can I make this in a mug?
A: You can, but a wide, shallow ramekin gives a better texture (more surface area to cook evenly). A deep mug can leave the center undercooked and the top overcooked. If you must use a mug, stop and stir the batter halfway through microwaving to help it cook evenly.
A Quick Nutritional Glance
Please remember, I’m a chef, not a dietitian! These are rough estimates based on the core recipe using 2% milk and vegetable oil, without optional add-ins like chocolate chips. This cake is a treat, a moment of indulgence. One mini cake has approximately: 220-260 calories, 4-5g protein, 30-35g carbohydrates, and 10-12g fat. Using butter will increase the saturated fat slightly, while using a nut milk may lower the calories and fat a bit. The beauty of a single-serving dessert is the built-in portion control—you enjoy every bite without the temptation of a whole cake. It’s about mindful satisfaction!
Final Thoughts: Your Dessert, Your Moment
And there you have it—your passport to instant chocolate satisfaction. This little cake is more than just a recipe; it’s a permission slip to enjoy a simple, homemade delight exactly when you want it. No fancy skills required, no huge time commitment, just pure, chocolatey joy in a few minutes flat.
I hope this mini chocolate cake becomes your secret weapon for cozy nights, small celebrations, or just because-Tuesdays. Life is short. Eat the (single-serving) cake. Make it, share a photo with me, and most importantly, savor every last bite.
With a full heart and a hopefully chocolate-smeared apron,
— Emily 🍫