Cheesecake Fruit Salad Roll-Ups: Your New Go-To No-Bake Sweet Bite!
Hey there, friend! Raise your hand if you’ve ever been staring into your fridge, craving something sweet, but the thought of preheating the oven feels like a monumental task. 🙋♀️ Yeah, me too. Some days, we all need a little dessert magic that doesn’t require a mixer, a baking sheet, or an hour of cleanup. That’s exactly why I’m so ridiculously excited to share these Cheesecake Fruit Salad Roll-Ups with you today.
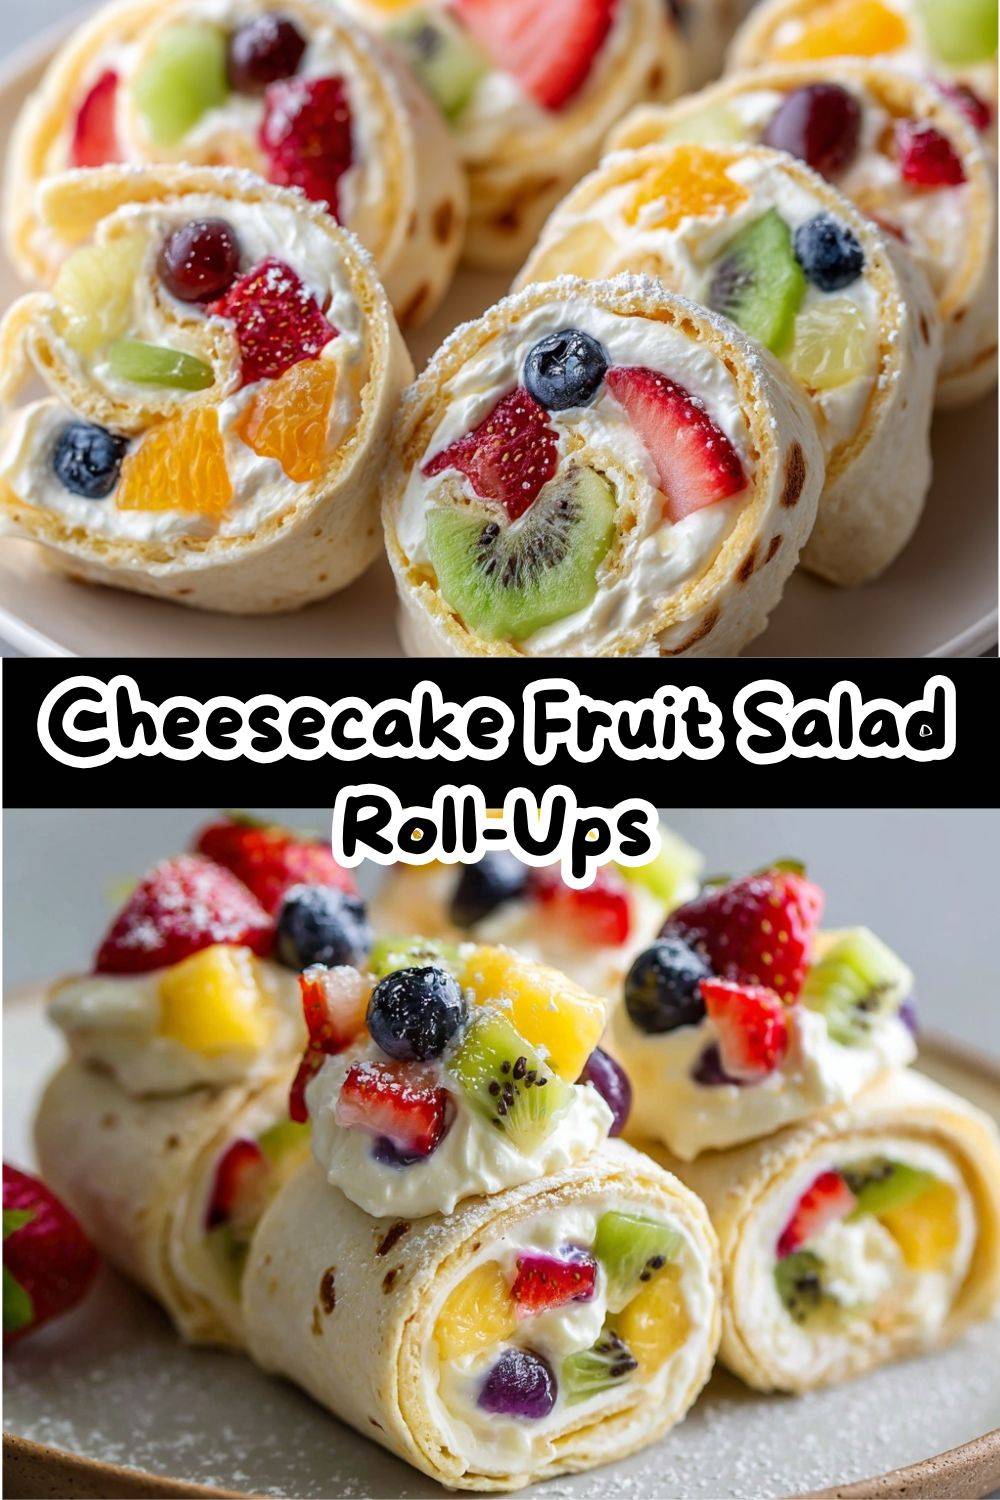
Imagine this: the rich, tangy creaminess of cheesecake, packed with bursts of juicy, fresh fruit, all wrapped up in a soft, pillowy tortilla and sliced into adorable little pinwheels. It’s like a fruit salad and a cheesecake had the most delicious, portable love child. The first time I made these, my family descended on the plate so fast I barely got a photo! They’re that good.
This recipe is the hero of spring gatherings, Easter brunches, baby showers, or those “I just need a pretty little treat” afternoons. They look like you fussed for hours, but our little secret? You’ll have them ready to chill in about 15 minutes flat. They’re light, fresh, and incredibly fun to eat. Whether you’re a kitchen newbie or a seasoned pro, these roll-ups are your ticket to effortless dessert brilliance. So, tie on that apron (the cute one with the stains, like mine!), and let’s make something delicious that’s as easy as it is impressive.
A Story of Strawberries, Grandma, and a Very Messy Counter
This recipe takes me right back to my grandma’s linoleum-tiled kitchen. She wasn’t a fancy baker, but she was a magician with simple, happy food. Every spring, when the local strawberries would finally hit their peak, she’d make what she called “Fancy Sandwich Rolls.” It was basically cream cheese thinned with a little milk and honey, smashed berries, all rolled up in white bread with the crusts cut off. To my six-year-old self, it was the height of culinary sophistication.
I remember standing on a stool, berry juice running down my wrists, “helping” her spread the filling. We’d make a glorious mess, and she’d always say, “Emily, food tastes better when you make it with someone.” Those rolls were more than a snack; they were a lesson in joy and simplicity. My Cheesecake Fruit Salad Roll-Ups are a grown-up, turbocharged homage to her creation. I swapped the bread for a soft tortilla (less likely to tear!), amped up the filling with Greek yogurt for tang, and threw in a rainbow of fruit. Every time I slice into one of these spirals, I see her smile and that sunny, berry-stained countertop. It’s nostalgia you can eat, and I hope it becomes a happy little tradition in your kitchen, too.
Gathering Your Rainbow: Ingredients & Chef Insights
Here’s everything you need to create these creamy, colorful delights. I’ve added my little chef-y notes next to each one because knowing the *why* makes you a more confident cook!
- 6 large flour tortillas: Go for the “burrito-sized” ones! The key here is freshness and softness. Stale tortillas will crack when you roll them. If yours are a bit stiff, quickly warm them in a dry skillet for 10-15 seconds per side to make them pliable. Chef’s Swap: For a gluten-free version, use your favorite large GF tortilla. Spinach or tomato tortillas add fun color, too!
- 8 oz cream cheese, softened: This is the star. Use full-fat, brick-style cream cheese for the best texture and stability. Let it sit on the counter for a good 30-60 minutes until it’s room-temperature soft. This is non-negotiable for a lump-free, spreadable filling! Chef’s Tip: For a lighter touch, Neufchâtel cheese works perfectly.
- ½ cup vanilla Greek yogurt or whipped topping: The yogurt adds a wonderful tang and protein boost, making the filling taste like a true cheesecake. The whipped topping (like Cool Whip) makes it dreamily light and airy. Choose your adventure! Chef’s Insight: If using yogurt, go for a thick, full-fat variety for the creamiest results.
- ⅓ cup powdered sugar: Powdered sugar (or confectioners’ sugar) dissolves instantly into the filling, sweetening it without any graininess. It also helps thicken the mixture slightly. Chef’s Swap: You can use granulated sugar, but blend it with the cream cheese for an extra minute to ensure it dissolves completely.
- 1 tsp vanilla extract: The flavor backbone! A pure vanilla extract makes all the difference, adding a warm, aromatic depth that elevates the whole filling.
- 1½ cups mixed fruit, finely chopped: This is where you play! Use what’s in season. I love a mix of strawberries, blueberries, kiwi, and pineapple. The key is to chop everything into small, uniform pieces so they distribute evenly and roll easily. Pro Tip: Pat your chopped fruit very dry with a paper towel. Extra juice will make the filling runny and the tortilla soggy.
- Optional: honey drizzle or powdered sugar for finishing: A light drizzle of honey right before serving adds a gorgeous sheen and floral sweetness. A dusting of powdered sugar makes them look like little snow-dusted jewels. Both are optional, but oh-so-pretty!
Let’s Roll! Step-by-Step Instructions with Chef Emily
Okay, team! Let’s transform these simple ingredients into something spectacular. Follow these steps, and you’ll be a roll-up master in no time.
Step 1: The Perfectly Soft Cream Cheese. First, make sure your cream cheese is truly softened. I like to take mine out when I start my morning coffee. If you’re in a pinch, you can microwave it on 50% power for 15-second intervals, but don’t let it melt! Pop it into a medium mixing bowl and beat it with a hand mixer (or a sturdy whisk and some elbow grease) for about a minute until it’s completely smooth, fluffy, and lump-free. This is the foundation of our creamy dream.
Step 2: Build the Cheesecake Filling. To the whipped cream cheese, add your vanilla Greek yogurt (or whipped topping), powdered sugar, and vanilla extract. Beat it again on medium speed until everything is fully incorporated and gloriously creamy. Stop and scrape down the sides of the bowl with a spatula to make sure no pockets of plain cream cheese are hiding. Taste it! This is the best part. Want it a touch sweeter? Add another tablespoon of powdered sugar. Dreamy, right?
Step 3: Fold in the Fruit Rainbow. Now, grab your thoroughly dried chopped fruit. Add it to the bowl. This is where we switch tools. Put the mixer away and grab your spatula. Use a gentle folding motion to incorporate the fruit. Why folding? We want to keep those beautiful fruit pieces intact and avoid turning the filling pink or blue from over-mixing. Just gently turn the mixture over itself until the fruit is evenly distributed.
Step 4: The Assembly Line. Lay your first tortilla flat on a clean cutting board. Using an offset spatula or the back of a spoon, spread a generous, even layer of the cheesecake fruit filling over the entire surface, all the way to the edges. We’re not making a burrito with filling just in the center—we want full coverage for those beautiful spiral slices! Use about ½ to ⅔ cup of filling per tortilla.
Step 5: The Tight Roll. Here’s the only slightly tricky part, but you’ve got this! Starting at the edge closest to you, begin rolling the tortilla away from you, keeping it as tight as possible without squeezing the filling out the ends. Apply gentle, even pressure as you roll. Think “snug, not strangled.” Once it’s rolled, place it seam-side down on a plate or baking sheet. Repeat with the remaining tortillas.
Step 6: The Essential Chill. This step is crucial for clean slices. Wrap each roll-up log tightly in plastic wrap. This helps them hold their cylindrical shape. Pop them in the refrigerator for at least 30 minutes, but an hour is even better. This firms up the filling, sets the structure, and makes slicing a breeze.
Step 7: Slice and Reveal the Magic! Unwrap your chilled logs. Using a sharp serrated knife (a bread knife works wonders), trim off the very ends of each log—they’re usually a bit messy. Then, slice the roll into 1-inch thick rounds. Wipe your knife clean between cuts for the prettiest edges. Behold your gorgeous, colorful pinwheels!
How to Serve These Little Show-Stoppers
Presentation is half the fun with these! You can go simple or full-on fancy, and they’ll always be a hit.
For a casual family treat, just arrange the spiral slices on a pretty plate or platter. Let the kids grab them as an after-school snack—they’re a guaranteed smile.
For a brunch or party, get creative! Arrange the slices in a sunburst pattern on a large serving board. Scatter a few whole berries and mint leaves around for a pop of color. You can also stack them in a glass trifle dish for a stunning, layered dessert salad effect.
If you’re serving them as part of a larger dessert spread, place a few slices in small paper cupcake liners on a tiered stand. It makes them individual, portable, and utterly adorable. Right before serving, that optional drizzle of honey or dusting of powdered sugar adds that final “wow” factor. Serve them chilled and watch them disappear!
Make It Your Own: Delicious Recipe Variations
The beauty of this recipe is its incredible flexibility. Once you master the basic technique, the flavor world is your oyster! Here are a few of my favorite twists:
- Tropical Vacation: Swap the mixed fruit for finely chopped mango, pineapple, kiwi, and shredded coconut. Add a teaspoon of lime zest to the filling for a bright, zingy kick. It’s like a piña colada in roll-up form!
- Berry Bliss: Use only berries—strawberries, raspberries, blueberries, blackberries. Consider swapping the vanilla extract for a dash of almond extract. The flavor pairing with berries is incredible.
- Chocolate-Dipped Delight: For the chocolate lovers! After slicing, gently dip half of each roll-up round into melted dark or white chocolate. Place on parchment paper to set. The combination of creamy filling, fruit, and a chocolate shell is next-level.
- Nutty & Crunchy: Fold ¼ cup of very finely chopped toasted pecans, almonds, or walnuts into the filling along with the fruit. The added texture is fantastic.
- Vegan-Friendly Version: Use a high-quality vegan cream cheese and coconut whipped topping. Sweeten with maple syrup or more powdered sugar to taste, and ensure your tortillas are vegan. It’s a fantastic inclusive option!
Chef Emily’s Notes from a (Sometimes) Messy Kitchen
This recipe has evolved from many happy (and a few messy) kitchen experiments. The first time I tried it, I used sour cream instead of yogurt and didn’t dry my fruit… let’s just say the rolls were delicious but *very* slippery to handle! Lesson learned: dry your fruit, friends.
I also learned that the chill time is not a suggestion. I was once in a rush and tried to slice after only 15 minutes. The filling squished out, and my beautiful spirals turned into abstract art. Not the look we’re going for! Patience rewards you with perfect pinwheels.
Over time, this has become my most-requested potluck dish. It travels like a dream (just keep it chilled in a cooler), and it always sparks conversation. It’s a reminder that the best recipes aren’t always the most complicated—they’re the ones that bring people together with a smile and a sweet, creamy bite.
FAQs & Troubleshooting: Your Questions, Answered!
Q: My tortilla cracked when I tried to roll it. What did I do wrong?
A: This usually means the tortilla was too dry/stale or the filling was spread too thick. Next time, quickly warm your tortillas in a microwave (covered with a damp paper towel for 10 seconds) or a dry skillet to make them pliable. Also, make sure your filling is creamy and spreadable—if it’s too thick, it can put pressure on the tortilla.
Q: Can I make these ahead of time?
A> Absolutely! They are perfect for making ahead. You can prepare the rolls (wrapped in plastic) and store them in the fridge for up to 24 hours before slicing. You can also slice them and store the slices in a single layer in an airtight container in the fridge for several hours. I don’t recommend freezing them, as the texture of the fruit and tortilla can suffer.
Q: The filling is a bit runny. How can I fix it?
A> Runny filling is almost always due to excess moisture from the fruit. Next time, be vigilant about drying your chopped fruit. If it’s already runny, you can try to salvage it by folding in a tablespoon or two of additional powdered sugar or a spoonful of instant cheesecake or vanilla pudding mix (dry powder) to help absorb moisture and thicken it up.
Q: What other fruits should I avoid?
A> I’d steer clear of fruits that release a *ton* of water or oxidize (turn brown) quickly. Watermelon and oranges (unless supreme segments, thoroughly dried) can make things soggy. Bananas and apples will brown unless you toss them in a little lemon juice first, but the acid can sometimes affect the filling’s texture.
Nutritional Information (Approximate)
While this is a dessert, it’s made with fresh ingredients and offers some nutritional benefits! This info is for one serving (about 4 roll-up slices), based on using full-fat cream cheese and vanilla Greek yogurt.
Calories: ~180 | Protein: 4g | Carbohydrates: 22g | Fat: 8g | Sugar: 10g
And just like that, you’ve got a dessert that proves easy and beautiful can live happily ever after.
These Cheesecake Fruit Salad Roll-Ups are the kind of recipe that quietly becomes your secret weapon—the one you pull out when you want something fresh, festive, and guaranteed to disappear fast. They’re playful without being fussy, sweet without being heavy, and flexible enough to match whatever fruit is calling your name that day.
More than anything, they’re a reminder that some of the best moments in the kitchen don’t come from perfection—they come from rolling up your sleeves, spreading a little cream cheese, and sharing something joyful with the people you love. Whether you’re making these for a spring brunch, a holiday table, or a random Tuesday that needs a little sparkle, I hope they bring smiles and maybe even a few sticky fingers.
If you give these a try, I’d absolutely love to see how you make them your own. Tag me over at @TastyChow or share them with someone who could use a sweet, no-bake win. Until next time, keep cooking with curiosity, keep desserts simple, and never underestimate the power of a really good roll-up.
With love from my kitchen to yours,
Emily 💛