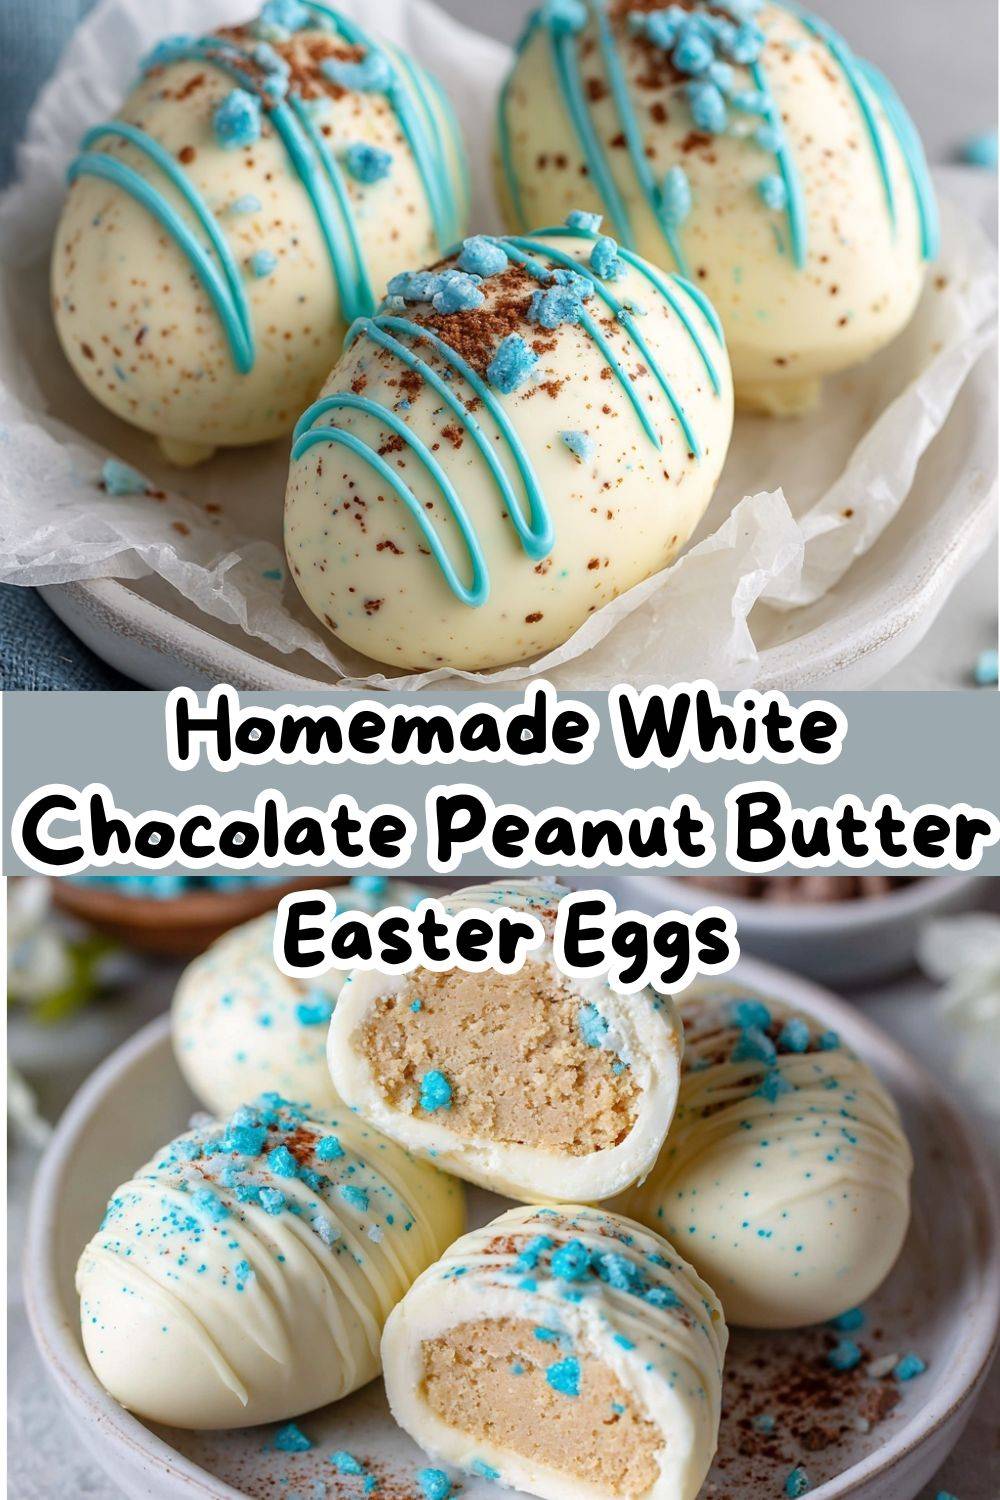
Let’s Make Some Chocolate Magic!
Hey there, my fellow food adventurer! 🐣 Can you smell it? That unmistakable, dreamy scent of melting chocolate wafting through the kitchen? If there’s one thing that screams “Easter fun” to me (besides a certain bunny’s deliveries), it’s the joy of making homemade chocolate eggs. Forget the waxy, bland store-bought ones—we’re crafting smooth, rich, incredibly delicious chocolate treasures right here, with our own two hands.
And the best part? This is a zero-bake, beginner-friendly, absolutely foolproof recipe. Whether you’re a seasoned kitchen pro or someone who considers “making toast” a culinary achievement, I’ve got you. We’re talking minimal ingredients, maximum payoff, and a whole lot of happy dancing when you pop those perfect eggs out of their molds.
This isn’t just about candy; it’s about creating a moment. It’s about the laughter when someone licks the spoon, the quiet pride of gifting something you made with love, and the simple magic of turning cocoa and sugar into a festive centerpiece for your Easter basket. So, tie on your favorite apron (the messy one is the best one!), clear a little counter space, and let’s make something deliciously memorable together. Ready to chow down on some creativity?
The Sweet Start of a Tradition
My love affair with homemade Easter eggs started not in culinary school, but on a linoleum floor, covered in glitter. I was about seven, and my Nana, the queen of “from-scratch,” declared we were ditching the plastic grass and making our own basket goodies. I remember the sheer awe of watching her transform a lumpy bar of chocolate into a glossy, liquid pool in her chipped double boiler (which was really just a bowl over a pot!).
She didn’t have fancy silicone molds back then. We used humble plastic halves, and my job was the “glue”—dipping my tiny finger in the melted chocolate to carefully seal the two halves together. They were always lopsided, often smudged with my fingerprints, and absolutely perfect. The taste of those slightly-thick-shelled, pure chocolate eggs? Unbeatable. It taught me that the best recipes aren’t about perfection; they’re about the story, the mess, and the people you share them with. Every time I make these, I think of her, and I hope this recipe becomes a part of your story, too.
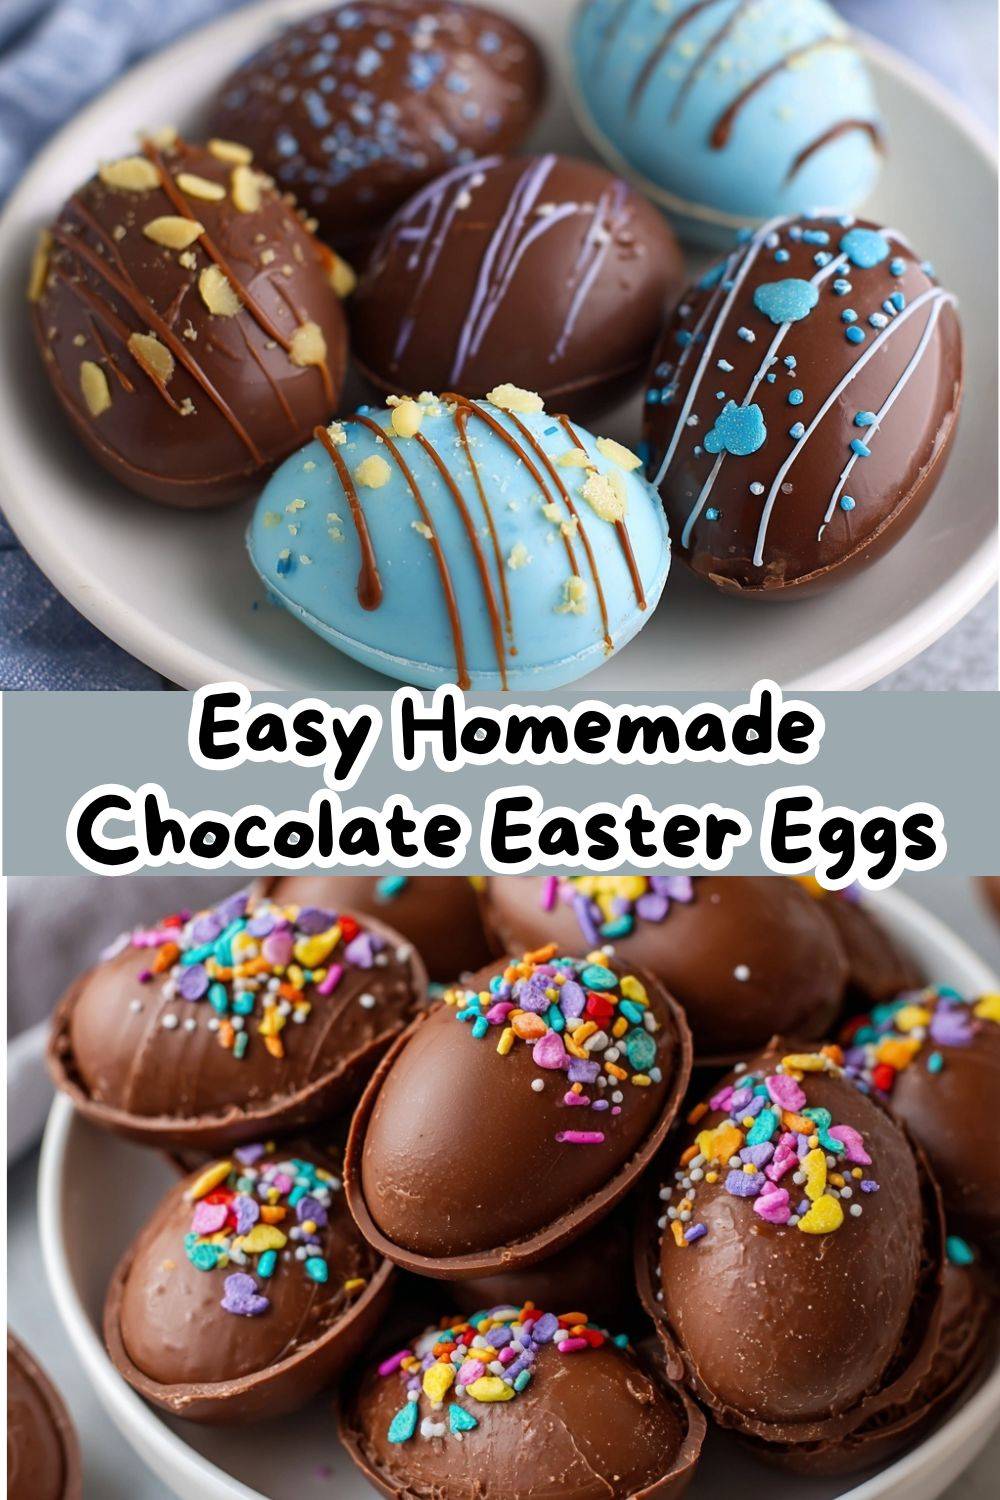
Gather Your Happy-Making Ingredients
Here’s the beautiful shortlist for your chocolate masterpiece! Quality matters here, but don’t stress—this is about joy, not judgment.
- 10 oz (about 1 ½ cups) High-Quality Chocolate Chips or Chopped Bars: This is your star! Use milk chocolate for classic sweetness, dark (55-70%) for a richer, grown-up vibe, or semi-sweet for the perfect middle ground. Chef’s Insight: Chocolate chips have stabilizers to hold their shape when baked, which is actually great for molding. Chopped baking chocolate will give you an ultra-smooth, professional finish. You can’t go wrong!
- 1 tsp Coconut Oil or Vegetable Shortening (optional but recommended): This little secret weapon makes the melted chocolate more fluid for easier coating and gives the finished eggs a gorgeous, snappy shine. Substitution Tip: If you don’t have either, it’s okay to skip it! Your eggs might just have a slightly softer set and a more matte finish.
- For Filling (The Fun Part!): This is where you get creative! Choose one or mix and match:
- Smooth Peanut Butter or Almond Butter: A timeless match for chocolate. For a fluffier filling, mix it with a little powdered sugar.
- Soft Caramel or Dulce de Leche: Hello, decadence! Store-bought is fine, or use my easy 3-ingredient caramel sauce.
- Toasted Chopped Nuts (Pecans, Hazelnuts, Almonds): Adds amazing crunch and flavor.
- Mini Candies or Sprinkles: Think crushed peppermints, mini M&M’s, or pastel Easter sprinkles for a surprise inside!
Let’s Create: Your Step-by-Step Guide to Egg-cellence
Follow these steps, and you’ll be a chocolate egg artisan in no time. I’ve packed each one with my favorite kitchen hacks!
- Prep Your Molds & Station. Grab your silicone egg molds (they’re flexible and make removal a dream). Give them a very light wipe with a neutral oil (like canola) on a paper towel—this is an extra insurance policy for flawless release. Have a baking sheet ready to place the molds on; it makes moving them to the fridge much easier. Chef’s Hack: Working in a cool, dry room is ideal. Chocolate hates humidity and heat!
- Melt the Chocolate Like a Pro. You have two great options:
- Double Boiler (My Preferred Method): Bring a small pot of water to a bare simmer. Place a heatproof bowl on top, ensuring the bottom doesn’t touch the water. Add chocolate and oil/shortening. Stir gently and constantly with a rubber spatula until just melted and smooth. This method gives you the most control.
- Microwave (The Quick Fix): In a microwave-safe bowl, combine chocolate and oil. Heat on 50% power in 20-30 second bursts, stirring vigorously after each interval. Stop when there are just a few small lumps—the residual heat will melt them as you stir. CRUCIAL TIP: Do not overheat! Burnt chocolate is grainy and sad. We’re going for silky, not scorched.
- Coat the Molds – The First Layer. Using a small spoon, pour or brush a generous amount of melted chocolate into each mold cavity. Now, lift and tilt the mold, using the back of the spoon or a pastry brush to spread the chocolate up the sides. You want a nice, even coat, not a puddle at the bottom. This creates your egg’s shell. Don’t worry about perfection! Chef’s Commentary: This part is oddly meditative. Swirl, tilt, cover. Think of it as painting your chocolate canvas.
- Chill & Repeat for a Sturdy Shell. Place the molds on the baking sheet and pop them in the fridge for 10-12 minutes. This sets the first layer. Then, take them out and add a second, thinner coat of chocolate over the first. This double-layer method guarantees your eggs won’t crack when you pop them out and feel substantial when you bite into them. Back in the fridge they go for another 10 minutes.
- Fill & Seal (If You’re Adding Goodies!). Once the shells are set, it’s filling time! Add a small dollop (about ½ tsp) of your chosen filling to one half of the paired egg cavities. Don’t overfill, or they won’t close! Now, for the magic trick to seal them: briefly press the rim of an empty egg half onto a slightly warm plate (run it under hot water and dry it). This melts the chocolate edge just enough to act as glue. Quickly press it onto the filled half, hold for a few seconds, and voilà! You’ve made a whole egg!
- The Grand Reveal. Chill the sealed eggs for a final 15 minutes, until completely firm. Then, flex the silicone molds from the back—your beautiful chocolate eggs should pop right out! If they’re being shy, a gentle push from the wider end usually does the trick.
How to Serve Up Your Sweet Success
You did it! Now, let’s make these beauties shine.
For a classic Easter basket, nestle them in some shredded paper grass or linen napkins. You can also place them in small, colorful cupcake liners for a charming display on your dessert table. Feeling extra? Give them a little drizzle with some melted white chocolate and a sprinkle of sea salt or pastel nonpareils while the drizzle is still wet.
These homemade eggs aren’t just candy; they’re a heartfelt gift. Stack a few in a clear cellophane bag, tie with a ribbon, and add a handwritten tag. It’s a present that says, “I made this just for you,” and trust me, that taste of love is the best ingredient of all.
Get Creative! 5 Fun Twists on the Classic
Once you’ve mastered the basic egg, the flavor playground is open! Here are some of my favorite riffs:
- The Peanut Butter Cup Egg: Fill with a mixture of ¼ cup smooth peanut butter, 2 tbsp powdered sugar, and a pinch of salt. Seal, then drizzle with more dark chocolate. A match made in heaven!
- Salted Caramel Surprise: Fill with a small dollop of thick caramel sauce and a tiny flake of sea salt before sealing. The sweet-salty combo is irresistible.
- Cookies & Cream Dream: Add 2-3 crushed Oreo cookie pieces to the melted chocolate for your second coat, creating a speckled shell. Fill with a white chocolate ganache or just enjoy the crunchy shell!
- “Bunny Bait” Eggs: Mix a few tablespoons of mini pretzel pieces, rainbow sprinkles, and mini chocolate chips into your filling for a fun, crunchy, confetti-like interior.
- Vegan & Dairy-Free: Use high-quality dairy-free chocolate chips and coconut oil. Fill with a nut butter or a vegan caramel. Easy and inclusive!
Emily’s Kitchen Notes & Stories
This recipe has evolved from my Nana’s basic version to my kitchen-testing playground. One year, in a fit of “let’s make it fancy,” I tried adding orange zest to the chocolate. My then-toddler nephew took one bite, made a face, and said, “Auntie Em, this tastes like Christmas, not Easter.” Point taken! Now I keep the chocolate pure and let the fillings do the talking.
The biggest lesson? Embrace the imperfect eggs. The one with the thumbprint, the slightly wobbly seal—those are the ones I eat immediately for “quality control.” They all taste the same: like happiness and homemade triumph.
Your Questions, Answered!
Q: My chocolate got thick, grainy, or seized up! What happened?
A: Ah, the dreaded seize! This usually means a tiny drop of water or steam got into the chocolate. Chocolate and water are enemies. To salvage it, try stirring in a splash of warm coconut oil or vegetable shortening (not butter, as it contains water) until it smooths out. Prevention is key: make sure all bowls and tools are completely dry.
Q: My eggs are sticking to the mold! How do I get them out?
A: Don’t force them! First, ensure they are fully chilled. If they still stick, place the mold in the freezer for 5-7 minutes. The chocolate will contract slightly and should pop out easily. Next time, don’t skip that very light oiling of the mold.
Q: Can I use white chocolate or candy melts?
A: Absolutely! White chocolate can be trickier to melt—go low and slow. Candy melts (or confectionery coating) are actually the easiest for beginners as they’re designed for molding and set very firmly. Follow the package melting directions.
Q: How far in advance can I make these?
A: They store beautifully! Keep them in an airtight container in the fridge for up to 2 weeks, or in a cool, dark pantry for up to 1 week. They also freeze well for up to 2 months. Thaw in the fridge overnight.
A Quick Nutritional Glance
Let’s be real—these are a treat, and that’s okay! The nutritional info will vary greatly based on your chocolate and fillings. As a general guide, one medium-sized plain milk chocolate egg (about 0.8 oz / 22g) made with this recipe contains approximately 120-140 calories, 8g fat, 12g carbohydrates, and 1-2g protein.
Using dark chocolate will add antioxidants (like flavonoids) and typically less sugar. Adding nut butter increases healthy fats and protein, while caramel or candy fillings will increase sugar content. The joy and satisfaction of making something from scratch? That’s calorie-free and soul-feeding! 🥰
Your Delicious Journey Awaits
And there you have it, friend! You’re now fully equipped to create the most delightful, personal, and tasty homemade Easter eggs on the block. This is more than a recipe—it’s an invitation to play, to create memories, and to share something truly special.
I hope your kitchen is filled with laughter, your spoons are covered in chocolate, and your Easter is incredibly sweet. Thank you for letting me be a part of your cooking adventure. Now, go forth and make some delicious magic! And be sure to tag me @TastyChow if you share your creations—I love seeing your kitchen wins!
With love and a full heart (and belly),
Emily 🐰✨