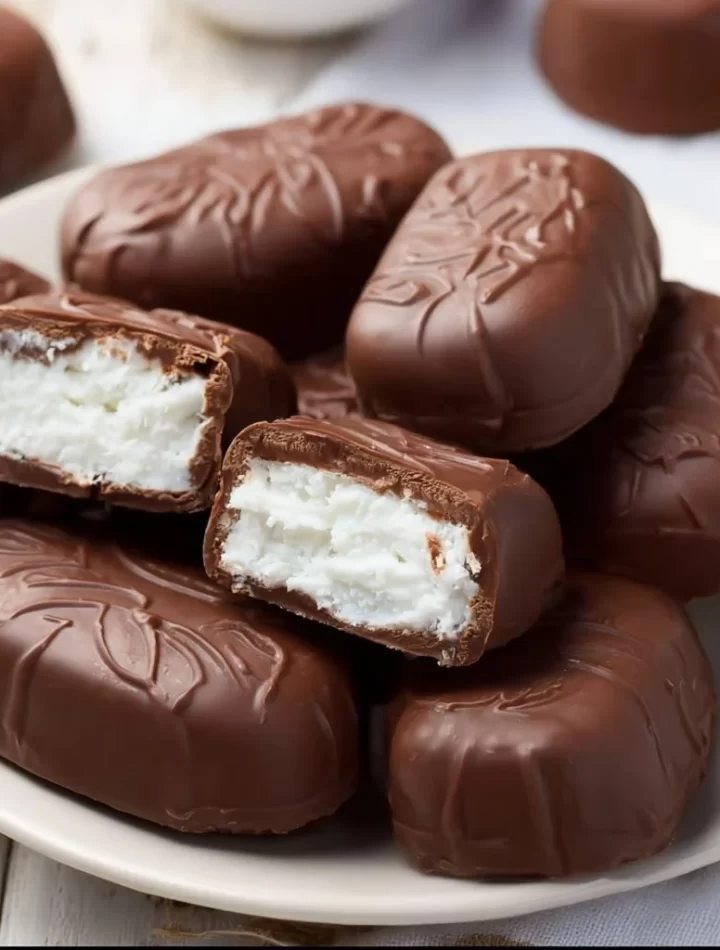
Deliciously Homemade Bounty Bars: The Ultimate Chocolate Coconut Recipe
Hey there, fellow food lover! 👋 Today, we’re diving into the world of sweet, chewy, chocolatey goodness with a recipe that’s sure to tickle your taste buds: homemade Bounty Bars! You know, those delightful chocolate-covered coconut treats that always seem to disappear from the store shelves? Well, I’ve got you covered with a simple, scrumptious recipe that’ll make you feel like a culinary superstar.
Imagine this: a soft, creamy coconut filling nestled inside a rich chocolate coating, each bite bursting with tropical flavor. Whether you’re prepping a sweet treat for movie night, hosting a gathering with friends, or just craving something sweet (we’ve all been there), these chocolate coconut bars are the perfect go-to.
Best of all, making Bounty Bars at home means you can use quality ingredients, customize them to your liking, and enjoy them fresh from your kitchen. Trust me, once you try these, you’ll never look at store-bought bars the same way again. So roll up those sleeves, get ready for a bit of chocolatey mess, and let’s chat about some fun stories and tips as we embark on this little kitchen adventure together!
Personal Story
Now, let me take you on a little journey to my childhood—back to sunny afternoons spent in my grandma’s kitchen, where the scent of baked goods mingled with the sweet aroma of coconut. Grandma had this incredible knack for whipping up treats that not only tasted divine but also came with stories that brought the family together. One of my favorite memories is helping her create these luscious coconut bars at her kitchen counter. We’d laugh, sneak bites of chocolate, and chat about the good old days, giving life to her classic recipes with a sprinkle of our own flair.
Together, we’d make batches of coconut treats, dipping them into melted chocolate and eagerly waiting for them to set in the fridge. Each step was a lesson in patience and the joy of creating something together. Those coconut bars sparked my love for baking and sharing food with loved ones—an experience I carry with me in every recipe I develop today. Now, it’s time for me to share this deliciousness with you!
Ingredients
Here’s what you’ll need to make your very own Bounty Bars. I promise there’s nothing fancy here—just quality ingredients that come together to create magic.
-
Unsweetened Shredded Coconut (3 cups): This gives your bars that chewy, rich coconut flavor. Want a different texture? Try using finely shredded coconut or even coconut flakes for a more rustic look!
-
Sweetened Condensed Milk (1 cup): Creamy and rich, this is the glue that binds your coconut together. If you need a dairy-free option, you can find coconut condensed milk at most stores, or you can whip up your own!
-
Powdered Sugar (1 cup): This helps to sweeten the filling and keeps it perfectly moist. If you prefer a less sweet option, feel free to adjust the amount or use coconut palm sugar instead.
-
Dark Chocolate Chips (12 oz): For that luscious coating! Dark chocolate has a great bittersweet flavor, but if milk chocolate is more your style, go for it—there are no hard and fast rules here!
-
Coconut Oil (2 tablespoons): This is optional but helps the chocolate coating to melt smoothly and harden just right. You can skip it if you want, but it lends a nice sheen to your chocolate.
-
A pinch of Sea Salt: This balances the sweetness and enhances the flavors. Trust me, it’s worth it!
Quick Chef Insight:
- Coconut Love: Did you know that coconut is packed with healthy fats and fiber? While we’re indulging in these treats, it’s nice to know there’s a little something nutritious hiding in there!
Step-by-Step Instructions
Alright, let’s roll up those sleeves and get cooking! Here’s how you can make your homemade Bounty Bars—the ultimate chocolate coconut experience.
Step 1: Prepare the Coconut Mixture
-
In a large mixing bowl, combine the unsweetened shredded coconut and sweetened condensed milk. Mix until the coconut is fully coated and sticky. This is the point where you realize just how delicious this is going to be!
Tip: Feel free to adjust how coconutty you want your filling to be. Add more coconut for a denser bar or more condensed milk for a softer texture.
Step 2: Shape the Bars
-
Line a baking dish or a cookie sheet with parchment paper (trust me, you’ll be thankful later!). Take about two tablespoons of the coconut mixture and form it into a rectangular bar shape. Repeat until you’ve used up all the mixture—this should make about 12-15 bars.
Chef Hack: Wet your hands with a little bit of water to prevent the coconut mixture from sticking to your hands as you shape the bars.
Step 3: Chill the Bars
- Place the shaped bars into the fridge for about 30 minutes, or until they’re firm. This will make dipping them in chocolate a breeze!
Step 4: Melt the Chocolate
-
While your bars chill, melt the dark chocolate chips and coconut oil together. You can do this in a microwave in 30-second increments, stirring in between, or use a double boiler for a more controlled melt.
Pro Tip: Don’t overheat the chocolate, or it may seize up. Stir it gently until it’s just melted and smooth.
Step 5: Dip the Bars
-
Once the bars are firm, take them out of the fridge. Using a fork or a dipping tool, dip each cold bar into the melted chocolate, making sure it’s fully coated. Shake off any excess chocolate and place it back on the parchment-lined tray.
Tip: If you want to keep the chocolate on the thinner side, dip the bars quickly. For a thicker coat, let them rest in the chocolate a bit longer.
Step 6: Set the Chocolate
- Place the dipped bars back in the fridge for about 15-20 minutes, or until the chocolate hardens.
Step 7: Enjoy!
- Once the chocolate is set, it’s time to dig in! You can serve them straight from the fridge or let them sit for a few minutes at room temperature for a softer bite.
Final Chef Tip: Don’t forget to sneak a taste or two along the way; they’re just too tempting!
Serving Suggestions
Presentation is key, even with a simple treat like Bounty Bars! Arrange your chocolate coconut bars on a beautiful platter or a rustic wooden board for a fun touch. Feel free to garnish with a sprinkle of sea salt for that extra flair, or even drizzle some more melted chocolate on top for a decadent effect.
You can also pair these bars with a cup of coffee or a scoop of vanilla ice cream on the side to elevate your dessert game. Trust me; your friends and family will be begging for more!
Recipe Variations
Feeling adventurous? Here are a few creative twists you can try on the classic Bounty Bar recipe:
-
Nutty Coconut Bounty Bars: Add a handful of chopped nuts (like almonds or walnuts) to the coconut mixture for an added crunch and flavor burst.
-
Chocolate-Dipped Cherry Bars: Fold in some chopped dried cherries or cranberries into the coconut mixture for a sweet and tart flavor combination.
-
Minty Fresh Bounty: Add a few drops of peppermint extract into the melted chocolate for a refreshing twist. Pair it with a sprinkle of crushed candy canes for a festive holiday treat!
-
Vegan Version: Use vegan chocolate chips and coconut condensed milk to create a dairy-free delight that everyone can enjoy.
-
Chocolate Coconut Brownies: Crumble the Bounty Bars into brownie batter before baking for a coconut-chocolate extravaganza!
Chef’s Notes
These homemade Bounty Bars hold a special place in my heart, as they remind me of those sunny afternoons spent in my grandma’s kitchen. Over the years, I’ve played around with the recipe, occasionally adding in flavors inspired by desserts from different cultures I’ve experienced on my travels. These bars have evolved from a simple treat into a canvas for creativity!
And while they might be a bit messy to make (chocolate-covered fingers, anyone?), the laughter and joy they bring make every sugary smudge worth it!
FAQs and Troubleshooting
Q1: What if my chocolate is too thick?
If your chocolate is too thick or starts to seize, you can add a teaspoon of coconut oil or vegetable oil to help thin it down. Just reheat gently while stirring.
Q2: Can I freeze these bars?
Absolutely! These bars freeze really well. Just store them in an airtight container, and they should maintain their deliciousness for up to three months.
Q3: What’s the best way to slice these bars once they’re set?
Use a sharp knife warmed under hot water to get clean cuts. Wipe it dry in between cuts for the best results.
Q4: They came out too sweet; what can I do?
Oh no! If you find them too sweet, you can balance it out by pairing them with a bit of tangy yogurt or dipping them in dark chocolate with a higher cocoa content next time!
Nutritional Info
These homemade Bounty Bars are a delightful treat, and as with any dessert, moderation is key. Here’s a glimpse of the nutritional breakdown per bar (based on an approximate serving size):
- Calories: 160
- Total Fat: 10g
- Saturated Fat: 7g
- Cholesterol: 5mg
- Sodium: 30mg
- Total Carbohydrates: 17g
- Dietary Fiber: 2g
- Sugars: 13g
- Protein: 2g
Of course, these numbers can vary based on specific ingredients used, so feel free to use this as a guideline!
Final Thoughts
There you have it! A delectable, homemade version of Bounty Bars that you can whip up in your own kitchen. This recipe is not just about indulging your sweet tooth; it’s about creating memories, having fun, and sharing love through food. So, whether you’re making them for a gathering or just for yourself (because you totally deserve it!), remember to enjoy the process.
Food is best when shared, so grab your fork, gather your fellow food lovers, and let’s chow down on some delicious homemade Bounty Bars. Remember, every bite is a hug from the kitchen. Happy cooking, and see you next time for more delightful kitchen adventures! 🍫🥥
Print
Deliciously Homemade Bounty Bars
- Total Time: 45 minutes
- Yield: 12-15 servings 1x
- Diet: Vegetarian
Description
Homemade Bounty Bars with a soft coconut filling coated in rich dark chocolate.
Ingredients
- 3 cups Unsweetened Shredded Coconut
- 1 cup Sweetened Condensed Milk
- 1 cup Powdered Sugar
- 12 oz Dark Chocolate Chips
- 2 tablespoons Coconut Oil
- A pinch of Sea Salt
Instructions
- Combine the unsweetened shredded coconut and sweetened condensed milk in a large mixing bowl until sticky.
- Shape about two tablespoons of the mixture into rectangular bars and place them on parchment paper.
- Chill the bars in the fridge for about 30 minutes until firm.
- Melt dark chocolate chips and coconut oil together, stirring gently until smooth.
- Dip each bar into the melted chocolate, coating fully and shaking off excess.
- Set the dipped bars back in the fridge for 15-20 minutes until chocolate hardens.
- Enjoy! Serve chilled or at room temperature.
Notes
Feel free to adjust sweetness and texture by modifying the coconut and condensed milk quantities.
- Prep Time: 15 minutes
- Cook Time: 30 minutes
- Category: Dessert
- Method: No-Bake
- Cuisine: International
Nutrition
- Serving Size: 1 bar
- Calories: 160
- Sugar: 13g
- Sodium: 30mg
- Fat: 10g
- Saturated Fat: 7g
- Unsaturated Fat: 3g
- Trans Fat: 0g
- Carbohydrates: 17g
- Fiber: 2g
- Protein: 2g
- Cholesterol: 5mg
Keywords: Bounty Bars, chocolate coconut, homemade dessert