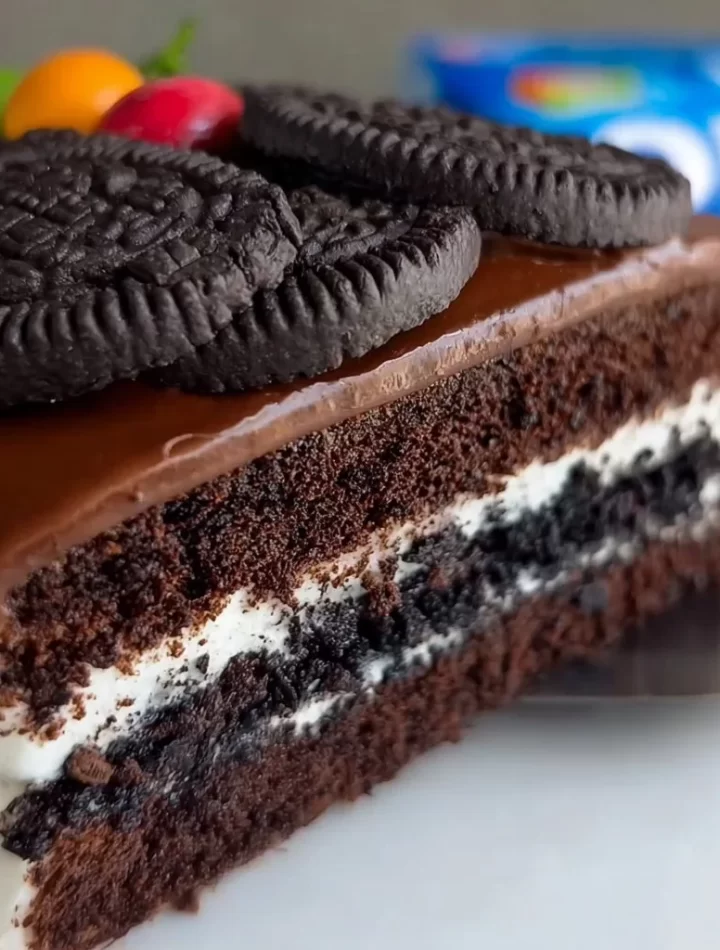
Oreo Biscuit Cake: A Deliciously Fun Treat
Hey there, my fellow food lover! If you’re anything like me, your sweet tooth sometimes leads you on unexpected adventures. Picture this: a rainy afternoon, the scent of something sweet wafting through your kitchen, and the sound of laughter as you mix and mold deliciousness into existence. Today, I’m thrilled to take you on a delightful journey to create something truly magical: Oreo Biscuit Cake! 🥳
This cake is not only incredibly easy to make, but it’s also a showstopper that will leave everyone fighting over the last piece. And who can resist the irresistible crunch of Oreo cookies complemented by a luscious, creamy twist? Trust me, this dish is bound to become your new go-to dessert for every occasion, from family gatherings to movie nights with friends.
Imagine the look on your loved ones’ faces as you unveil this decadent cake. The best part? You don’t need to be a baking wizard to pull it off! With just a handful of ingredients that may already be hanging out in your pantry, you’ll be able to whip up a dessert that looks as gorgeous as it tastes. Are you ready to explore the sweet and charming world of Oreo Biscuit Cake? Let’s dive right in!
Personal Story
Let me take you back to a sunny afternoon during my childhood—my grandma was in the kitchen, her apron on and flour sprinkled everywhere like a magical dust. She had a knack for creating desserts that made our family gatherings feel like a celebration. This one particular day, she decided to experiment with some of her favorite biscuits and cookies.
She pulled out a package of Oreos and asked me to help crush them. With each satisfying crunch, I couldn’t help but giggle. The idea was simple: combine those delightful cookies with cream and layer them up. Little did I know, we were on the path to creating the Oreo Biscuit Cake, which would quickly become a family favorite!
As the cake came together, I remember the excitement in the kitchen, the playful banter, and the golden rule: taste everything! We licked the spatula, laughed about the mess, and when the cake finally set in the fridge, I was bursting with anticipation. Today, every time I bake this cake, I am reminded of those joyful moments spent with my grandma. It’s not just a recipe; it’s a delicious memory wrapped in sweetness!
Ingredients
Here’s what you’ll need to whip up this Oreo Biscuit Cake:
- Oreo Cookies:
- About 24 Oreo cookies will do. These classic cookies are not only delicious but also versatile. If you’re feeling adventurous, use more flavors like Mint or Birthday Cake Oreos for a twist!
- Butter:
- You’ll need ½ cup of unsalted butter, melted. This adds richness to the cake. If you want a dairy-free option, try using coconut oil or dairy-free margarine!
- Cream Cheese:
- 8 ounces of softened cream cheese creates that lovely cream layer. For a lighter option, swap with Greek yogurt, or for a vegan twist, use cashew cream!
- Powdered Sugar:
- About 1 cup will do. This gives that sweet flavor and perfect texture. You can use coconut sugar or a sugar substitute if you want to make it healthier.
- Heavy Cream:
- 1 cup of heavy cream, whipped into soft peaks for that light, fluffy texture. If you don’t have heavy cream, try using coconut cream for a dairy-free version!
- Chocolate Chips (optional):
- About ½ cup, melted, to drizzle on top for that extra indulgence. You could even use white chocolate or dark chocolate for different flavor dimensions.
- Vanilla Extract (optional):
- Just a teaspoon elevates the flavor. If you’re feeling zesty, a little lemon zest complements the chocolate beautifully.
Step-by-Step Instructions
Step 1: Prepare the Oreos
Start by separating the cream filling from half of the Oreos. Trust me; it’s easy! Just twist, and the filling will stay on one side. You’ll find that it’s oddly satisfying. Then, crush the cookies into fine crumbs and set them aside. Use a food processor or a strong zip-top bag and a rolling pin—I always find smashing is a fantastic stress reliever!
Step 2: Create the Oreo Base
In a mixing bowl, combine the crushed Oreos with melted butter until it resembles wet sand. Here’s a little chef hack: if the mixture feels too dry, add a teaspoon of milk. Now, press this mixture firmly into the base of your cake pan. The tighter the crumb, the better it will hold together. Use your fingers or the back of a measuring cup to get it nice and even.
Step 3: Whip the Cream Cheese Mixture
In another bowl, beat the softened cream cheese with powdered sugar and a splash of vanilla extract (if using). You want it to be smooth and fluffier than a cloud. This creamy layer is going to be the star of the show! Ain’t nothing like a creamy coating to bring this cake to life.
Step 4: Fold in Whipped Cream
Gently fold in the cooled, whipped heavy cream until it’s well incorporated with the cream cheese mixture. Be careful not to deflate it—this lightness is what makes the cake so dreamy!
Step 5: Layer the Cake
Spread half of the cream cheese mixture on top of the Oreo base. Then, sprinkle crushed Oreos over the cream. Repeat the layering process with the remaining cream and finish off with a sprinkle of more Oreo crumbs on the top. A pro tip: chill between layers can help set each layer beautifully!
Step 6: Chill
Now, cover the cake with plastic wrap and let it chill in the fridge for at least 4 hours—ideally overnight if you can resist! This cooling time allows everything to set and meld beautifully, creating that scrumptious slice we all live for.
Step 7: Serve with Flair
Once it’s firm, remove the cake from the pan. Drizzle it with melted chocolate chips (if desired), and for an extra touch, you could garnish with whipped cream and Oreo pieces. The presentation is just as important, so feel free to go wild with it!
Serving Suggestions
When it comes to serving this delightful treat, presentation is key! Here’s how I suggest plating your Oreo Biscuit Cake to impress:
- Slice It Up: Use a hot knife (dip it in hot water and dry it off) to get clean cuts for your slices. No one likes a crumbly cut!
- Add Fresh Elements: Serve with fresh berries like strawberries or raspberries for a pop of color and a tart contrast to the sweetness.
- Ice Cream Duo: A scoop of vanilla or chocolate ice cream on the side takes this dessert to the next level!
- Garnish Wisely: A dusting of powdered sugar or a dollop of whipped cream adds a touch of elegance. You could even sprinkle some crushed Oreos on top for extra crunch!
Recipe Variations
Feeling adventurous? Here are some creative twists you can give to this yummy Oreo Biscuit Cake:
- Layered Delight: Transform the cake into a trifle by layering the ingredients in individual cups for a fun, portable dessert.
- Nutty Twists: Add crushed nuts (like almonds or pecans) between the layers for a delightful crunch.
- Mint Chocolate or Orange Zest: Swap in mint-flavored Oreos for a refreshing twist, or add some zesty orange zest to the cream layer for something unexpectedly awesome.
- Vegan Version: Replace dairy ingredients with vegan substitutes, like using almond milk cream cheese and coconut whipped cream.
- S’mores Style: Mix in mini marshmallows and a layer of graham cracker crumbs for a nostalgic campfire feel!
Chef’s Notes
As with every recipe, feel free to make it your own. This Oreo Biscuit Cake is one I’ve played with over the years, and there’s no wrong way to approach it! I’ve tried countless variations, from adding different flavor extracts to experimenting with various fillings. Once, I made a banana version by incorporating mashed bananas into the cream cheese layer. The result? Pure bliss!
The fun of cooking is that it’s a journey, so don’t be afraid to let your creativity run wild. Plus, with a cake this easy, you’ll find yourself baking it on repeat!
FAQs and Troubleshooting
1. My cake is too crumbly; what did I do wrong?
No worries! If your base is too crumbly, it may need a bit more melted butter or a splash of milk. Make sure it holds together when pressed into the pan.
2. How do I store leftovers?
You can keep it in an airtight container in the fridge for up to five days—or longer if you don’t mind sacrificing that delightful creaminess!
3. Can I freeze this cake?
Absolutely! Just cut it into individual slices, wrap them well in plastic, and place in a freezer bag. They can last for up to a month. Just let them thaw in the fridge before serving!
4. What if I don’t have a springform pan?
No problem! You can use any cake pan; it just might take a little more care when removing it. Grease the pan well, and you can use parchment paper for easier removal.
Nutritional Info
(Per Slice – based on 12 servings)
- Calories: ~250
- Total Fat: 16g
- Saturated Fat: 8g
- Carbohydrates: 27g
- Sugars: 15g
- Protein: 3g
Please keep in mind that these numbers vary depending on the brands and exact measurements you use, but it’s a fun little guide to reference as you indulge!
Final Thoughts
In a world where food brings people together, Oreo Biscuit Cake embodies everything I love about cooking and sharing meals with those we cherish. It’s a sweet reminder of life’s simple pleasures, much like the time spent with my grandma in our humble kitchen.
I hope you enjoy making this scrumptious dessert as much as I do! It’s perfect for birthdays, family dinners, or even a cozy night in on the couch with your favorite movie. So, gather your ingredients, don some lively music, and let the good vibes flow.
Remember, in the kitchen, fun is just as important as flavor! Happy baking, my foodie friend! 🍰✨
Let’s keep the sweet vibes rolling! If you try this recipe or mix it up with your own twist, I’d love to hear about it! Happy cooking! 🥳
Print
Oreo Biscuit Cake
- Total Time: 240 minutes
- Yield: 12 servings 1x
- Diet: Vegetarian
Description
A deliciously fun treat made with Oreo cookies, cream cheese, and whipped cream, perfect for any occasion.
Ingredients
- 24 Oreo cookies
- ½ cup unsalted butter, melted
- 8 ounces cream cheese, softened
- 1 cup powdered sugar
- 1 cup heavy cream, whipped
- ½ cup chocolate chips (optional)
- 1 teaspoon vanilla extract (optional)
Instructions
- Prepare the Oreos by separating the cream filling from half of the cookies, then crush them into fine crumbs.
- Create the Oreo base by mixing the crushed Oreos with melted butter and pressing into the bottom of a cake pan.
- Whip the cream cheese mixture by beating cream cheese with powdered sugar and vanilla until smooth.
- Fold in the whipped heavy cream gently until well combined.
- Layer the cake by spreading half of the cream cheese mixture on the Oreo base and adding crushed Oreos; repeat the layers.
- Chill in the fridge for at least 4 hours or overnight.
- Serve with melted chocolate drizzle and garnish with whipped cream and Oreo pieces.
Notes
Feel free to experiment with different flavors, such as Mint Oreos or adding nuts for a crunchy texture.
- Prep Time: 15 minutes
- Cook Time: 0 minutes
- Category: Dessert
- Method: Chilling
- Cuisine: American
Nutrition
- Serving Size: 1 slice
- Calories: 250
- Sugar: 15g
- Sodium: 300mg
- Fat: 16g
- Saturated Fat: 8g
- Unsaturated Fat: 6g
- Trans Fat: 0g
- Carbohydrates: 27g
- Fiber: 1g
- Protein: 3g
- Cholesterol: 30mg
Keywords: Oreo cake, dessert, easy cake, no-bake dessert, Oreo dessert