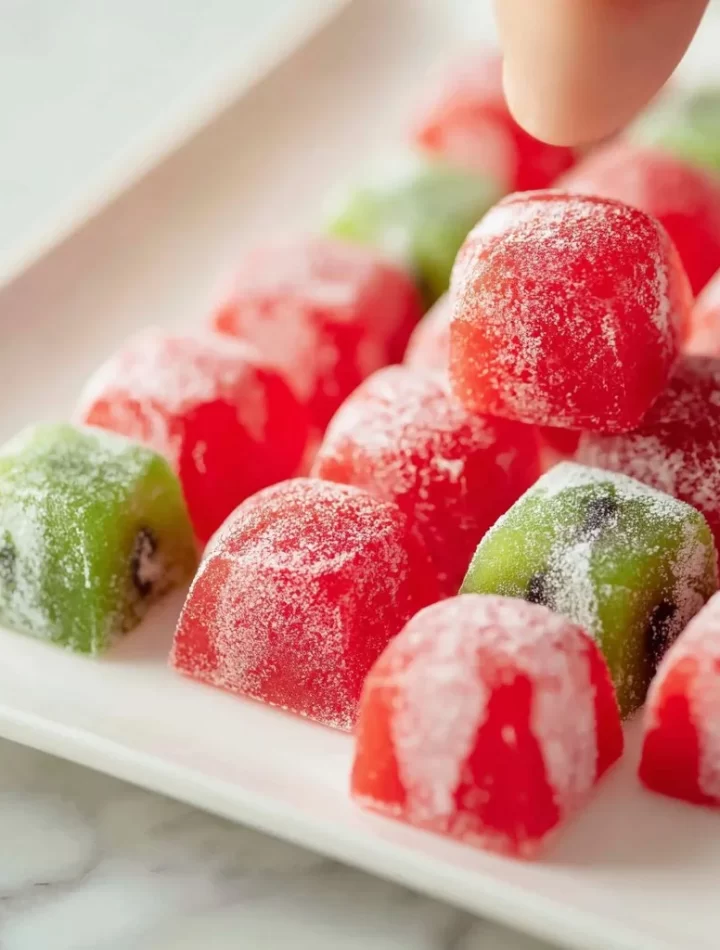
Watermelon Mochi: A Dreamy Summer Treat Awaits!
Hey there, fellow food lover! 🌟 If you’ve ever wandered through the aisles of an Asian market or caught a glimpse of a trendy dessert shop, you might have stumbled upon an enchanting treat known as mochi. But let’s add a splash of summer magic to this rice cake delight! Enter: Watermelon Mochi. Imagine biting into a soft, chewy exterior that lovingly encases a refreshing watermelon filling. It’s the perfect playful twist on a traditional favorite, and trust me, you’re going to want to make this for your next summer gathering!
A Sweet Summer Memory
Before I dive into the recipe, let me share a little story that’s close to my heart. Growing up, my summers were filled with endless adventures and delightful treats. One vivid memory that stands out is the first time I tried watermelon for dessert. You know that feeling when you take a bite of a perfectly juicy slice on a hot day? Pure bliss! Then, my friend introduced me to mochi at a local festival, and my taste buds danced with joy. The way the chewy texture complemented the fresh flavors was an eye-opener.
Fast forward to a few years later, while experimenting in my cozy kitchen, I thought to combine these two summer loves—watermelon and mochi—into one thrilling dessert. The result was nothing short of magical! With this recipe, I hope to bring a piece of that nostalgic summer joy to your kitchen. Ready to whip up some Watermelon Mochi? Let’s get started!
Ingredients
Here’s what you’ll need to channel your inner chef and create this delightful dessert.
- Sweet White Rice Flour (Mochiko)
- This is your base for making the mochi dough. Its sticky nature is crucial for that chewy consistency. If you can’t find mochiko, a similar glutinous rice flour can work in a pinch, but mochi may lose some of its signature flavor!
- Granulated Sugar
- A little sweetness goes a long way! This sugar will add just the right amount of sweetness to balance the flavor of the watermelon. You can swap it with coconut sugar or agave for a different flair.
- Water
- Essential for mixing the dough. Make sure the water is at room temperature, so it doesn’t clump the flour.
- Fresh Watermelon
- Your star ingredient! When choosing a watermelon, look for ones that feel heavy for their size and have a dull skin for ripeness. If fresh watermelon is unavailable, you can use store-bought watermelon puree—just make sure it’s 100% pure and unsweetened.
- Cornstarch
- This is your best friend to prevent the mochi from sticking to your hands and work surface. You can use potato starch if you’re avoiding cornstarch or want a slightly different texture.
- Salt
- Just a pinch will enhance the sweet flavors, bringing everything together beautifully. You can use sea salt or kosher salt for added crunch and flavor.
Now that we have our ingredients lined up, it’s time to get your hands a little messy!
Step-by-Step Instructions
- Prepare the Watermelon Filling
- Start by cutting the watermelon into small cubes. You’ll want about 1 cup of chunks. If you have leftover watermelon, toss it in a refreshing salad or smoothie! Next, blend the watermelon chunks until you have a smooth puree—no lumps here! You can quickly strain it to remove any pulp. Pour the puree into a saucepan over medium heat.
- Make the Puree Sweet
- Add 2 tablespoons of sugar to the watermelon puree in the saucepan. Stir continuously until the mixture starts to thicken—a process that takes about 5–8 minutes. Once thick, allow it to cool slightly, then pour it into a silicone mold (ice cube trays work too!). Freeze it for about 2 hours or until set.
- Prepare the Mochi Dough
- In a large mixing bowl, combine 1 cup of sweet white rice flour (Mochiko), the remaining 2 tablespoons of sugar, and a pinch of salt. Gradually add ¾ cup of water, mixing until everything is well combined and smooth.
- Cook the Mochi
- Now it’s time for some magic! Transfer the mochi mixture to a microwave-safe bowl and cover it with plastic wrap. Microwave it on high for 1 minute, stir it, then microwave again for 1 minute. Your goal is to achieve a sticky, doughy consistency. If needed, microwave for an additional 30 seconds. Be careful—it can get hot!
- Dust and Separate
- Sprinkle cornstarch generously over a clean surface; you don’t want sticking mishaps here. Once the mochi is cool enough to handle, transfer it to the dusted surface. Using a rolling pin, roll it out until it’s about ½ inch thick. Don’t worry about perfection—an imperfect shape just adds character!
- Cut and Fill
- Using a round cookie cutter, cut out circles of mochi. Take the frozen watermelon balls and place one in the center of each mochi disc. It’s like a little surprise encapsulated in chewy goodness! Pinch the edges of the mochi together to seal it, making sure there are no openings.
- Coat with Cornstarch
- Roll your newly formed mochi in more cornstarch to ensure they don’t stick together. Carefully place them in an airtight container, and repeat the process with any remaining mochi circles.
- Chill and Serve
- Before indulging, pop your Watermelon Mochi in the fridge for about 30 minutes. This cooling time helps the flavors meld beautifully and firms them up.
And there you have it—a batch of Watermelon Mochi ready to impress your friends and family!
Serving Suggestions
Presentation makes everything! For that Insta-worthy look, serve your Watermelon Mochi on a colorful platter or in a clear glass bowl. Dust with a little extra cornstarch, and don’t shy away from garnishing with fresh mint leaves for a pop of color. If you want to elevate the experience, you can drizzle melted chocolate over them or pair with a scoop of vanilla or coconut ice cream to make it a dessert extravaganza! Trust me, everyone will be reaching for seconds.
Recipe Variations
Looking to switch things up? Here are a few fun twists on the classic Watermelon Mochi:
- Mixed Fruit Mochi: Substitute watermelon with other juicy fruits like mango, strawberry, or even peach for a total tropical vibe!
- Chocolate Mochi: Add cocoa powder to the dough for chocolate-flavored mochi. Fill with a chocolate ganache or hazelnut spread for a decadent treat.
- Green Tea Twist: Mix matcha powder into the mochi dough for a pretty green color and a hint of earthy flavor.
- Coconut Delight: Add shredded coconut into the mochi dough for a tropical taste and a delightful chewy texture.
- Savory Mochi: Feeling adventurous? Try a savory version by filling the mochi with cream cheese and a sprinkle of chives for a unique appetizer.
Chef’s Notes
This Watermelon Mochi recipe has transformed over the years as I’ve tweaked the mixture and filling to create the best version ever. One time, I even made a batch with champagne-infused watermelon for a grown-up treat; it was a hit at a summer barbecue! Remember, cooking should be fun, and making mistakes is part of the journey. If your mochi doesn’t turn out perfectly the first time, don’t fret! Embrace the imperfection—it’s part of what makes homemade food so charming.
FAQs and Troubleshooting
- Why did my mochi turn out too sticky?
- This often happens if the dough has too much water. Next time, try reducing the water by 1-2 tablespoons.
- Can I use a different flour?
- Mochiko is recommended for that chewy texture. If you use standard rice flour, the mochi might be grainy rather than smooth. Stick with glutinous rice flour for the best results.
- How do I store leftover mochi?
- Place them in an airtight container with a dusting of cornstarch to prevent sticking. They can last in the fridge for up to a week!
- Why did my filling leak?
- Make sure to pinch the mochi tightly to seal the filling securely. A little practice goes a long way!
Nutritional Info
While mochi is undoubtedly a delightful treat, it’s essential to be mindful of portion sizes. A typical piece of Watermelon Mochi can range between 70-80 calories. In addition to being gluten-free, they also contain a good amount of hydration from watermelon. Plus, using fresh fruit gives you vitamins and minerals that contribute to overall well-being—how’s that for a sweet deal?
For variations with added chocolate or coconut, do keep an eye on the added sugars and fats.
Final Thoughts
So there you have it—your guide to crafting Watermelon Mochi that’s bursting with summer flavors. This delightful treat is sure to impress at any gathering, and the fun of making mochi in your kitchen is an experience worth sharing. Not only does it bring back cherished memories of childhood summers, but it also encourages creativity and experimentation. So why not gather your loved ones and make a day of it? Get comfortable, roll up those sleeves, and let’s make amazing food together.
Once you’ve whipped up your batch, be sure to share a pic and tag me. I can’t wait to see your creations! Grab that fork (or just dive in with your hands, no judgment here), and enjoy every single bite of your Watermelon Mochi. Bon appétit! 🍉✨
Print
Watermelon Mochi
- Total Time: 60 minutes
- Yield: 8 servings 1x
- Diet: Gluten-Free
Description
A delightful summer treat combining the chewy texture of mochi with refreshing watermelon filling.
Ingredients
- 1 cup Sweet White Rice Flour (Mochiko)
- 4 tablespoons Granulated Sugar
- ¾ cup Water
- 1 cup Fresh Watermelon, diced
- 1 tablespoon Cornstarch
- Pinch of Salt
Instructions
- Prepare the Watermelon Filling by cutting the watermelon into small cubes and blending until smooth. Strain and pour into a saucepan.
- Add 2 tablespoons of sugar to the watermelon puree and cook until thickened, about 5–8 minutes. Pour into molds and freeze for 2 hours.
- Combine 1 cup Mochiko, 2 tablespoons of sugar, and a pinch of salt in a bowl. Gradually mix in ¾ cup of water until smooth.
- Transfer the mixture to a microwave-safe bowl, cover, and microwave for 1 minute, stir, and repeat until doughy consistency is reached.
- Dust a clean surface with cornstarch and roll out the mochi dough until ½ inch thick.
- Cut out circles with a cookie cutter. Place frozen watermelon balls in the center and pinch to seal.
- Roll the formed mochi in cornstarch to prevent sticking and place in an airtight container.
- Chill in the fridge for 30 minutes before serving.
Notes
If your mochi doesn’t come out perfect, embrace the imperfection—it’s part of the charm!
- Prep Time: 20 minutes
- Cook Time: 15 minutes
- Category: Dessert
- Method: Microwaving
- Cuisine: Asian
Nutrition
- Serving Size: 1 piece
- Calories: 75
- Sugar: 12g
- Sodium: 5mg
- Fat: 0g
- Saturated Fat: 0g
- Unsaturated Fat: 0g
- Trans Fat: 0g
- Carbohydrates: 16g
- Fiber: 0g
- Protein: 1g
- Cholesterol: 0mg
Keywords: watermelon, mochi, summer dessert, gluten-free treat, Asian dessert