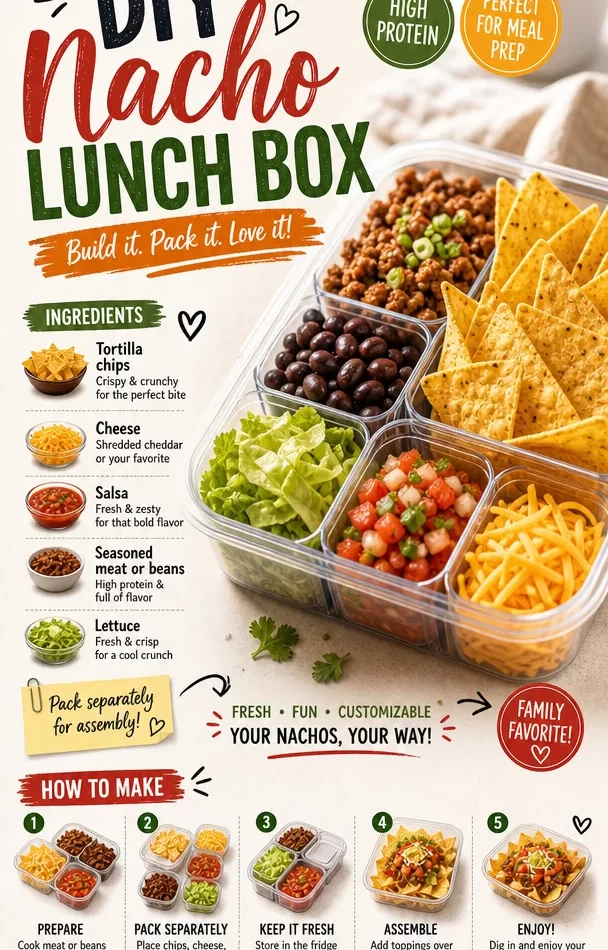
DIY Nacho Lunch Box: A Flavorful Adventure You Can Pack!
Hey there, fellow food lovers! 👋 Are you ready to take your lunch game to the next level? Today, we’re diving into the delicious world of DIY Nacho Lunch Boxes! Trust me; they’re not just for movie nights or game days anymore. With bold flavors and customizable options, these nacho boxes can be a delightful midday treat that keeps your taste buds dancing. Whether for adults or little ones, everyone loves nachos, and we’re going to make them easy to pack and fun to eat. So, grab your apron, and let’s embark on this tasty journey together!
A Little Trip Down Memory Lane
Growing up, nachos were always synonymous with family gatherings and late-night movie marathons. I remember one particular summer evening, the sun was setting, and my family decided to have a fun “build-your-own nachos” night. We laid out an array of toppings on our plaid tablecloth, from gooey cheese to spicy jalapeños, and each of us created our nacho masterpieces. The laughter, the friendly competition to create the best nacho pile, and the stories shared over those crunchy bites became some of my fondest memories.
Fast forward to culinary school (where nachos were definitely not on the curriculum), and I found myself reminiscing about those summer nights. I knew I had to bring that joy into my current culinary adventures. Thus was born the idea of a DIY Nacho Lunch Box! It’s a perfect way to combine nostalgia with creativity in the kitchen. So, let’s get started on making your own version that can be enjoyed anywhere, anytime!
Ingredients
For a successful DIY Nacho Lunch Box, gather the following ingredients. These create a solid foundation for tasty goodness:
-
Tortilla Chips: The base of your nachos! Opt for sturdy ones that can hold toppings without breaking too easily. Looking for healthier options? Try baked or whole grain chips.
-
Cheese: Shredded cheddar is a classic, but feel free to mix it up! Monterey Jack, pepper jack, or even gouda can add a new twist. If you prefer dairy-free options, check out nut-based cheeses!
-
Refried Beans: They add a creamy texture and protein punch. You can use black or pinto beans for a twist or even make your own from scratch for a fresher taste.
-
Fresh Salsa or Pico de Gallo: Freshness is key! You can easily whip up some homemade salsa using tomatoes, onions, cilantro, and lime juice. No tomatoes on hand? Try corn salsa instead!
-
Jalapeños: For those who like some heat! Pickled jalapeños add a nice tang. Not a fan of spicy? Skip them or substitute with sliced bell peppers.
-
Sour Cream or Greek Yogurt: Creamy goodness to balance the flavors. For a healthier swap, Greek yogurt works wonders and adds protein!
-
Guacamole: Because who doesn’t love guac? It brings a smooth, rich flavor. If avocados aren’t available, sub in some hummus for a unique spin.
-
Chopped Green Onions: For freshness and crunch! These can be omitted or swapped for chives if you prefer.
-
Cilantro: Adds a fresh, herbaceous note. Not a fan? Try using parsley instead!
Step-by-Step Instructions
Time to cook up something incredible! Follow these steps to prepare your DIY nacho lunch box:
-
Choose Your Base: Start by selecting a lunch box or container with dividers (or small bowls) to separate your ingredients. This keeps everything fresh and prevents soggy chips!
-
Layer in the Chips: Place your tortilla chips in one section, ensuring they are evenly stacked. You want enough room so they don’t crush each other.
-
Prepare the Beans: If using canned refried beans, heat them slightly in the microwave or on the stove until warm and easy to spread. This step isn’t necessary if you’ll pack them cold, but warm beans are super nice. Transfer them into a small container. If you prefer making your beans, cook beans from scratch until soft, mash them slightly, and let cool before packing.
-
Add the Cheese: Take your shredded cheese and sprinkle a generous handful over the chips. If you want to melt the cheese, it’s best to do this just before serving—microwave them on medium heat until gooey and melted for the ultimate nacho experience!
-
Pack the Salsa: Spoon some salsa into a small container that seals tightly to prevent any leaks. If you’re feeling adventurous, try adding a bit of fresh diced mango for a sweet twist!
-
Slice the Jalapeños: If using fresh jalapeños, slice them thinly. If you’re using pickled jalapeños, drain them well before packing them into a separate compartment.
-
Prepare the Creamy Elements: Add sour cream or Greek yogurt into a small container (don’t forget a sprinkle of salt!). This will act as your cooling agent against the spiciness.
-
Make the Guacamole: Mash your avocado or ready-made guacamole in a small bowl, adding a touch of lime juice to keep it bright and flavorful. Seal well in its separate container.
-
Chop the Green Onions: For a fresh touch, chop the green onions and sprinkle them on top of the nachos just before serving to keep them crisp.
-
Don’t Forget the Cilantro: If you love cilantro, chop it finely and add it as a fresh garnish right before it’s time to dig in!
And there you have it—a beautifully packed DIY Nacho Lunch Box, ready to take on your day!
Serving Suggestions
Presentation matters, even in a lunch box! When ready to serve, here are some ideas to make your nachos pop:
-
Outdoor Picnic Vibes: Head out for a picnic? Lay down a blanket, spread out your delicious lunch box, and arrange the nachos in a neat pile. Use vibrant, colorful toppings to make your dish eye-catching!
-
Break Room Delight: Make your co-workers’ mouths water when you open your lunch! Arrange the nachos like a nacho mountain and have small bowls for dips right next to them.
-
Themed Lunches: Tie in decorations or themed napkins—add a little fiesta flair if you’re serving these nachos at a party!
Recipe Variations
Here are some fun spins on the classic nacho lunch box:
-
BBQ Chicken Nachos: Swap out the refried beans with shredded BBQ chicken for an entirely different flavor sensation.
-
Breakfast Nachos: Use scrambled eggs, black beans, cheese, and top with avocado for a great breakfast twist.
-
Sweet Potato Nachos: For a unique base, bake thin slices of sweet potato, crisp them up, and use those as your nacho base instead!
-
Veggie Nachos: Go all-in on veggies! Load your nachos with roasted bell peppers, corn, black olives, and zucchini slices for a refreshing take.
-
Tex-Mex Shrimp Nachos: Instead of traditional toppings, add spiced shrimp on top along with avocado and fresh pico de gallo for a seafood delight!
Chef’s Notes
I’ve learned that nachos are incredibly forgiving and endlessly customizable. Over the years, I’ve experimented with various toppings, flavors, and even sweet versions (yes, chocolate nachos are a thing!).
My love for nachos stems from their ability to unite people around food, much like my grandma’s cinnamon rolls on Sundays. Remember, cooking should be fun, and nachos are the perfect canvas for your creativity! So don’t sweat the small stuff; go with what you love and enjoy the process.
FAQs and Troubleshooting
-
Can I make nacho toppings in advance?
Absolutely! Prepare ingredients like refried beans, guacamole, and salsa the day before. Just keep everything in airtight containers and assemble before serving. -
What’s the best way to keep my nachos fresh?
To keep nachos as fresh as possible, avoid topping them until you’re ready to eat. Pack all items separately, as soggy chips are a nacho no-no! -
What can I do if my nachos get soggy?
If nachos start to become soggy from moisture, pop them briefly in the oven or microwave, and they’ll crisp back up! -
How can I make them gluten-free?
Check the labels on your tortilla chips and ingredients to ensure they are all gluten-free. Most corn chips are a safe bet!
Nutritional Info
When it comes to nachos, nutrition can vary greatly based on your ingredients, but here’s a rough estimation for a standard DIY Nacho Lunch Box:
- Calories: 600-800 calories per serving, depending on cheese and toppings.
- Protein: Approximately 18-25g, especially if you include beans and proteins like chicken or shrimp.
- Fat: Will vary mainly with cheese and guacamole. A healthy option is to use Greek yogurt and more veggies to keep it lighter!
- Carbohydrates: Mostly from chips—look for whole-grain or baked options for a healthier twist.
Keep in mind that you can adjust each portion based on your dietary needs!
Final Thoughts
DIY Nacho Lunch Boxes are truly a love letter to the joy of eating and sharing food! They’re not just a meal; they’re an experience, beckoning memories of laughter and love around the table. So whether you’re packing lunch for a busy day at work, school, or just whipping them up on a relaxed Saturday, nachos remind us that food can be both fun and fulfilling.
I can’t wait to hear how your nacho lunch box turns out! Share your creations and inspiring toppings; let’s keep this delicious journey going. Until next time, happy cooking and keep chasing those flavors! 🍽️
Print
DIY Nacho Lunch Box
- Total Time: 30 minutes
- Yield: 2 servings
- Diet: Vegetarian
Description
A delightful and customizable nacho lunch box perfect for work or school, combining bold flavors and fun toppings.
Ingredients
- Tortilla Chips
- Cheese (shredded cheddar, Monterey Jack, or nut-based cheese)
- Refried Beans (black or pinto)
- Fresh Salsa or Pico de Gallo
- Jalapeños (pickled or fresh)
- Sour Cream or Greek Yogurt
- Guacamole (or hummus)
- Chopped Green Onions
- Cilantro
Instructions
- Choose your base: Select a lunch box or container with dividers.
- Layer in the chips: Place tortilla chips in one section.
- Prepare the beans: Heat canned refried beans if desired.
- Add the cheese: Sprinkle shredded cheese over chips.
- Pack the salsa: Spoon salsa into a small, sealed container.
- Slice the jalapeños: Slice fresh or pack pickled jalapeños.
- Prepare the creamy elements: Add sour cream or Greek yogurt to a small container.
- Make the guacamole: Mash avocados and add lime juice.
- Chop the green onions: Sprinkle on top just before serving.
- Don’t forget the cilantro: Add it as a garnish right before eating.
Notes
Make nacho toppings in advance and keep all items separately to maintain freshness.
- Prep Time: 15 minutes
- Cook Time: 15 minutes
- Category: Lunch
- Method: No Cooking Required
- Cuisine: Mexican
Nutrition
- Serving Size: 1 lunch box
- Calories: 700
- Sugar: 6g
- Sodium: 600mg
- Fat: 40g
- Saturated Fat: 20g
- Unsaturated Fat: 15g
- Trans Fat: 0g
- Carbohydrates: 70g
- Fiber: 8g
- Protein: 22g
- Cholesterol: 30mg
Keywords: nachos, lunch box, DIY nachos, customizable, meal prep