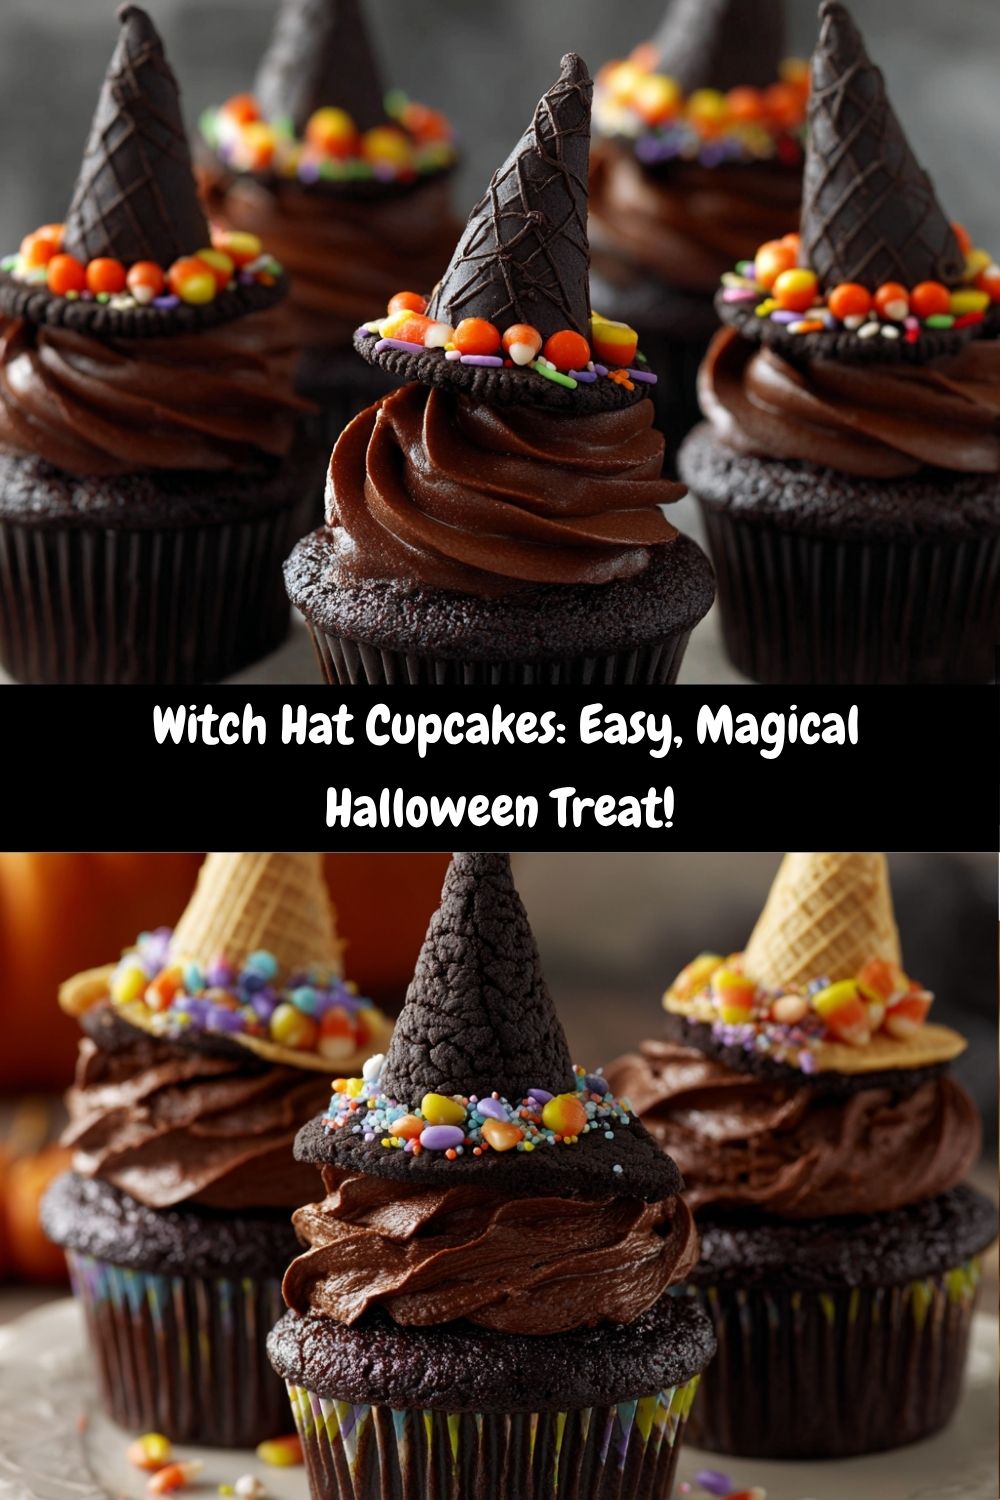
Spellbindingly Sweet: Witch Hat Cupcakes That’ll Steal the Show!
Hey there, my fellow kitchen conjurers! 👋 Chef Emily here, your partner in all things deliciously magical. Picture this: crisp autumn air, the scent of cinnamon and chocolate swirling through your kitchen, and a tray of whimsical treats that make everyone gasp with delight. That’s the enchantment of these Witch Hat Cupcakes! Perfect for Halloween parties, spooky movie nights, or just adding a dash of playful mischief to your week, these cupcakes are pure edible joy. They’re not just dessert—they’re tiny edible sculptures that spark giggles and “how’d you DO that?!” questions. I’m all about recipes that feel like a warm hug and a happy dance rolled into one, and these? They’re exactly that. No fancy skills needed—just a sprinkle of fun, a swirl of frosting, and a whole lot of love. Ready to turn your kitchen into a cauldron of creativity? Grab your apron (the messy one, always!), and let’s brew up some magic together. Trust me, these hats are about to become your new Halloween tradition!
A Sprinkle of Nostalgia: My First “Magical” Baking Fail
Okay, confession time: my first attempt at witch hat treats? Total goblin chaos! 🎃 I was nine, “helping” my grandma with her legendary Halloween bash. We had store-bought cupcakes, Oreos, and ice cream cones… and my brilliant idea was to glue them together with maple syrup. Cue sticky fingers, collapsing hats, and a kitchen floor that looked like a candy goblin exploded! But Grandma? She just laughed, wiped my syrup-streaked cheek, and said, “Sweetheart, magic takes practice—and better glue!” We scrapped the syrup, melted chocolate chips instead, and suddenly… wizardry! That moment—the messy joy, the giggles, the triumphant bite into a crispy-chocolate-hatted cupcake—stuck with me. It’s why I love this recipe so much. It’s not about perfection; it’s about playfulness. Every time I dip those cones, I’m back in her flour-dusted kitchen, learning that the best memories (and desserts) are often the ones that start a little messy. Now, let’s make YOUR magical memory!
Your Witchy Pantry: Gathering the Magic
Here’s your potion list! Most are pantry staples, and I’ve tucked in swaps for flexibility. Pro Tip: Use room-temperature ingredients—they blend smoother than a witch’s flight!
- 12 chocolate cupcakes (homemade or boxed mix): Rich, moist base for our hats! Chef’s Insight: Box mix is FINE—I use it when short on time! For homemade, add 1 tsp espresso powder to deepen the chocolate flavor.
- 1½ cups chocolate frosting: The “glue” and decadent cloud under the hat. Substitution: Swap for vanilla, cream cheese, or orange frosting for a color pop!
- 12 flat, round chocolate sugar cookies: The hat’s sturdy brim. Chef’s Hack: Oreos work great (scrape off filling for less sweetness). Gluten-free? Use GF cookies!
- 12 pointed ice cream cones (or mini sugar cones): The iconic hat shape! Note: Sugar cones hold shape better than wafer cones when dipped.
- 1 cup melted chocolate (chips or bars): Your edible “super glue.” Insight: Use dark, milk, or white chocolate! Add 1 tsp coconut oil for smoother dipping.
- Colorful candies or sprinkles: The hat’s magical trim! Fun Twist: Sour belts, mini M&Ms, edible glitter, or even crushed freeze-dried berries for spooky sparkle.
Conjuring Your Cupcakes: Step-by-Step Sorcery
Wands optional—spatulas recommended! Follow these steps, and you’ll be a dessert wizard in no time. Let’s brew!
- Bake & Cool: Whip up your cupcakes (box mix or my fave homemade recipe here!). Let them cool COMPLETELY on a wire rack. Chef’s Hack: Pop them in the freezer for 15 mins to speed things up—warm cupcakes make melting hats!
- Frosting Swirl: Load chocolate frosting into a piping bag fitted with a star tip (or snip a corner off a zip-top bag!). Pipe a tall, generous swirl onto each cupcake, starting at the edge and spiraling inward. Tip: Make the swirl slightly wider than your cookie base—it’s the hat’s “cushion!”
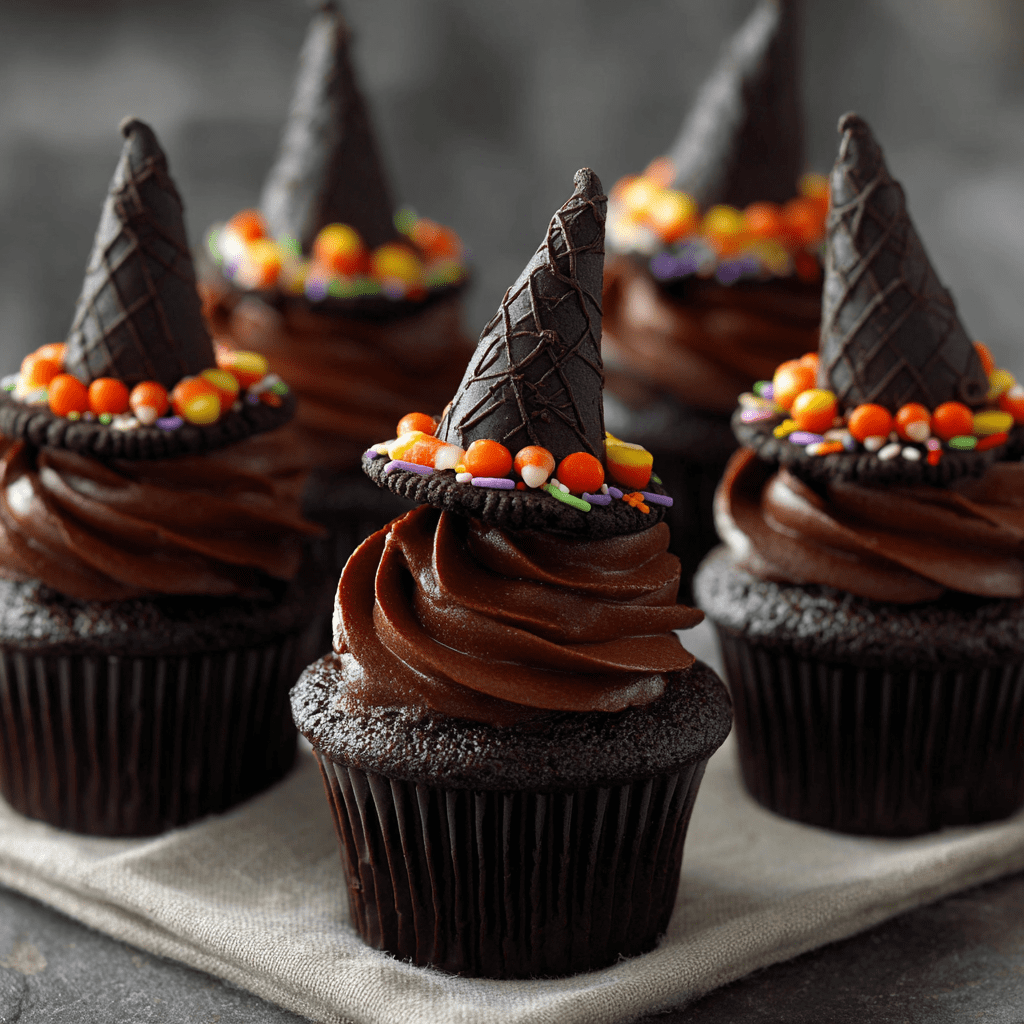
- Hat Assembly: Melt chocolate in a microwave-safe bowl in 30-second bursts, stirring until smooth. Holding a cone by the tip, dip the wide OPEN end into the melted chocolate (about ¼ inch deep). Immediately press it onto the center of a cookie. Hold for 10 seconds. Repeat for all hats. Critical Tip: Let hats set upside-down (cone pointing up) on parchment paper for 5 mins—this prevents sliding!
- Trim the Brim: Dip the cookie edge (where it meets the cone) into melted chocolate OR pipe a ring of chocolate around the join. Quickly roll or press candies/sprinkles onto the chocolate “glue” to create a hatband. Chef’s Joy: Let kids do this step—messy fingers = maximum fun!
- The Grand Reveal: Gently press a finished hat, cookie-side down, onto the frosting swirl of each cupcake. Angle it slightly for a “jaunty witch” vibe! Pro Move: If a hat feels wobbly, pipe a tiny dot of extra frosting under the cookie brim for stability.
Presenting Your Potion: Serving Spellbook
Presentation is part of the magic! Arrange your Witch Hat Cupcakes on a tiered stand or a slate board dusted with cocoa “dirt.” Tuck in faux spider webs, plastic bugs, or autumn leaves around the base. For extra drama, place them under a glass cloche before revealing! These are perfect with a steaming mug of spiced apple cider or a cold glass of milk. Serve them at room temperature—the chocolate hat stays crisp, and the frosting stays dreamy!
Brew Up Your Own Magic: 5 Spellbinding Twists
Customize your coven! Here are my favorite riffs:
- “Wicked Witch of the West” Hats: Dip cones in GREEN candy melts. Use purple frosting and black sprinkles!
- Gluten-Free Ghosts: Use GF cupcakes/cookies. Frost with white buttercream, add two mini chocolate chips for eyes UNDER the hat.
- Mummy Madness: Frost cupcakes with vanilla. Drape hats with thin strips of fruit leather “bandages,” leaving one candy eye peeking out!
- Pumpkin Spice Enchantment: Swap chocolate cupcakes for pumpkin spice. Frost with cinnamon cream cheese frosting. Roll hat trim in orange sprinkles!
- Vegan Wands: Use vegan cupcakes, frosting, and dark chocolate. Trim hats with dairy-free candy buttons or shredded coconut dyed green.
From My Cauldron to Yours: Chef Emily’s Scribbles
This recipe evolved from that sticky childhood disaster! Over the years, I’ve learned: thicker frosting holds hats better (hence the generous swirl!), and setting cones upside-down is a GAME-CHANGER. One Halloween, I used red candy melts for “Ruby Slipper” hats—adorable, but they bled color everywhere! Lesson: gel food coloring in white chocolate works better. 😂 My biggest joy? Seeing YOUR creations! Tag me @TastyChow—I live for those flour-dusted kitchen triumphs. Remember, if a hat cracks or a cupcake leans like the Tower of Pisa? Smile, snap a pic, and call it “quirky charm.” Baking’s about joy, not perfection. Now go make some (slightly controlled) chaos!
Your Witchy Qs Answered: FAQs & Fixes
Q: Help! My hats keep sliding off the cupcakes. What went wrong?
A: Three likely culprits! 1) Cupcakes were still warm—frosting melts. Cool completely! 2) Frosting swirl too small—make it wider than the cookie base. 3) Hats assembled too soon—let chocolate “glue” set fully (5-10 mins). Fix: Pipe extra frosting around the cookie base as “support.”
Q: Can I make these ahead of time?
A: Absolutely! Bake cupcakes 1-2 days ahead; store unfrosted in an airtight container. Assemble hats 1 day ahead; store at room temp in a single layer. Frost cupcakes and add hats the day of serving for best texture. Frosted/hatted cupcakes hold well for 6 hours at room temp.
Q: My melted chocolate is too thick! How do I fix it?
A> Stir in 1 tsp coconut oil or vegetable shortening at a time until smooth. Avoid butter or milk—they can seize chocolate! If it seizes (becomes grainy), add ½ tsp warm water and stir vigorously.
Q: Any nut-free candy trim ideas?
A> Stick to sprinkles, Skittles, Starburst strips, or Sour Patch Kids! Always check labels. For chocolate, use Enjoy Life chips (nut-free facility).

Witch Hat Cupcakes
- Total Time: 40 minutes
- Yield: 12 cupcakes 1x
Description
Add a little hocus pocus to your Halloween dessert table with these whimsical Witch Hat Cupcakes! With rich chocolate cake, a swirl of decadent frosting, and playful candy-topped hats, they’re as enchanting to look at as they are to eat. Whether you’re conjuring up a party or a cozy night in, these cupcakes are spellbindingly fun.
Ingredients
12 chocolate cupcakes (homemade or boxed mix)
1½ cups chocolate frosting
12 chocolate sugar cookies (flat and round)
12 ice cream cones or mini sugar cones
1 cup melted chocolate (for dipping)
Colorful candies or sprinkles (for hat trim)
Instructions
Bake chocolate cupcakes and let them cool completely.
Pipe a generous swirl of chocolate frosting onto each cupcake.
Dip cones in melted chocolate and let set slightly. Attach to cookies to form hats.
Decorate the hats with candy around the base—like a candy belt or sprinkle trim.
Top each frosted cupcake with a witch hat, pressing gently into the frosting.
- Prep Time: 20 minutes
- Cook Time: 18–20 mins
Nutrition
- Calories: 310 / Cupcake
- Sugar: 28g / Cupcake
- Fat: 15g / Cupcake
- Carbohydrates: 40g / Cupcake
- Protein: 3g / Cupcake
Nutritional Whispers (Per Cupcake)
Calories: ~310 | Fat: 15g | Carbs: 40g | Sugar: 28g | Protein: 3g
Note: Estimates based on standard ingredients. Swaps (like vegan butter) will alter values. Enjoy as a bewitching treat!
Final Thoughts: A Little Kitchen Magic Goes a Long Way ✨🧙♀️
And just like that, you’ve brewed up a batch of cupcakes that could charm the socks off even the grumpiest goblin. These Witch Hat Cupcakes aren’t just about the chocolatey goodness or the adorable toppers—they’re about the moment when someone’s eyes light up, grin spreading, because you brought a bit of magic to the table.
The real spell here is how easy they are to make without sacrificing the “wow” factor. You don’t need a cauldron or a coven—just a handful of pantry staples, a little melted chocolate, and a willingness to embrace the joyful mess that comes with Halloween baking.
Whether you go classic black hats, glitter-dusted glam, or pumpkin spice enchantment, every variation carries its own bit of whimsy. So tie on that apron, pop on your favorite spooky playlist, and let your kitchen smell like cocoa and nostalgia. Because the best magic? It’s made with laughter, shared with friends, and always leaves a little frosting on your nose.