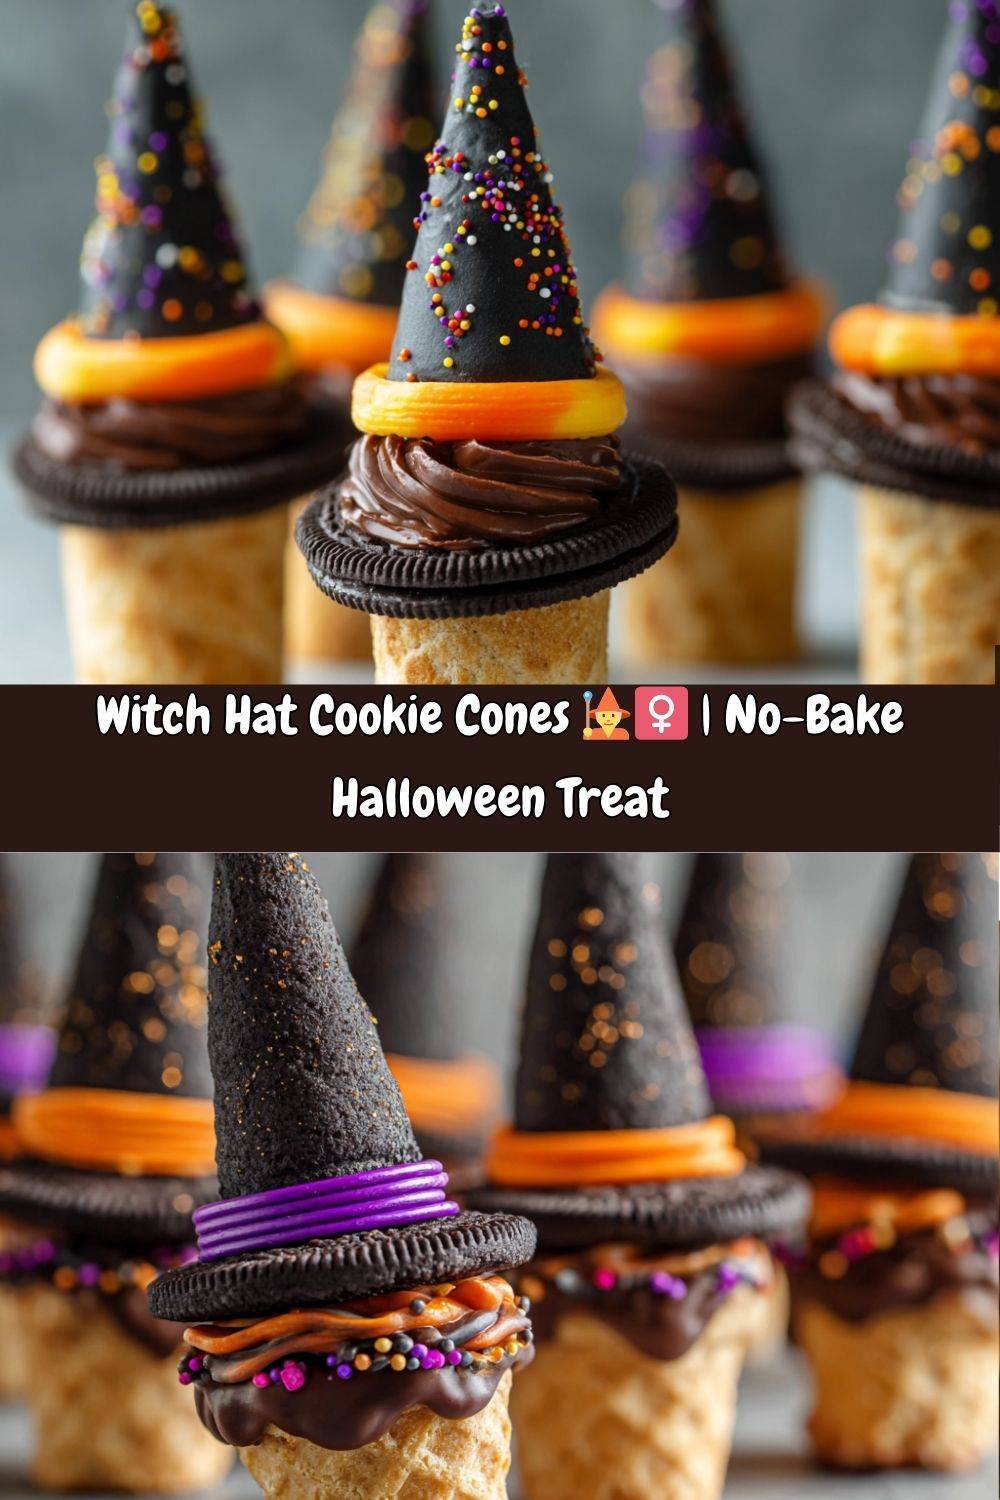
Cast a Spell on Your Taste Buds with Witch Hat Cookie Cones!
Hey there, kitchen magicians! 👋 Emily here, your fellow flavor-wizard and messy-apron enthusiast. Can you feel it? That crisp autumn air, the crunch of leaves underfoot, and the giddy anticipation of Halloween creeping closer? There’s magic brewing in the kitchen today, and I’ve got a treat that’ll make your inner child (and your actual kids!) squeal with delight. Meet my Witch Hat Cookie Cones – the spookiest, cutest, most ridiculously fun no-bake goodies you’ll make this season! 🧙♀️✨
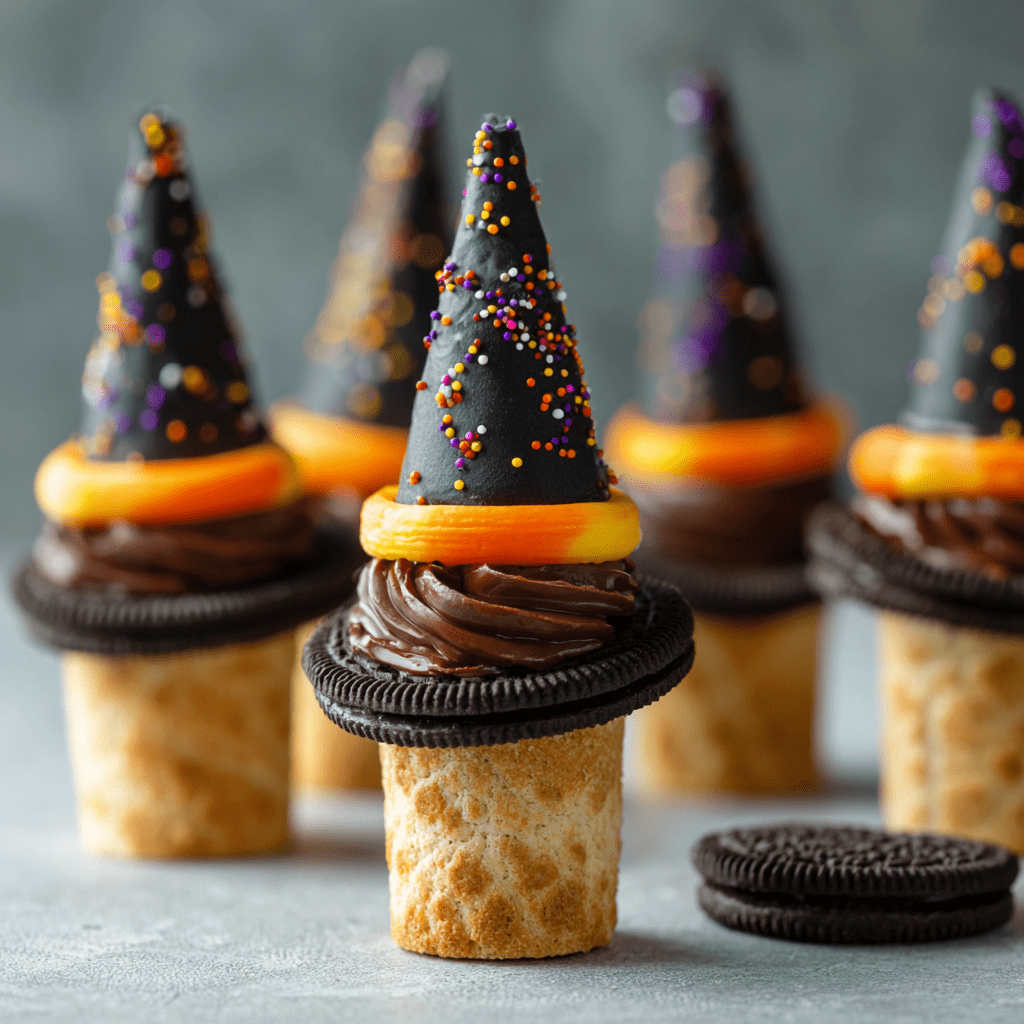
Imagine this: Crispy sugar cones transformed into enchanting witch hats, dipped in velvety chocolate, perched proudly on a fudgy cookie base, and cinched with a whimsical candy belt. They’re like edible fairy-tale props! And the best part? Zero baking required. Whether you’re hosting a haunted house party, crafting with littles ones, or just craving a dose of whimsy with your afternoon coffee, these hats are your golden (or should I say, chocolatey?) ticket. They’re the kind of treat that sparks joy, invites giggles, and makes everyone whisper, “How did you make these?!” So grab your wand—err, spatula—and let’s conjure up some delicious magic together!
Grandma’s Kitchen & The Birth of a Sweet Spell
This recipe? It’s pure nostalgia with a chocolate coating. Picture tiny Emily (maybe 7 years old?), perched on a wobbly stool in my grandma’s flour-dusted kitchen. Halloween was her Super Bowl. She’d transform her tiny cottage into a haunted wonderland, complete with hand-cut paper bats and apple-bobbing tubs. One blustery October afternoon, she plopped a box of ice cream cones and a bag of chocolate kisses on the counter. “We’re making magic hats,” she declared, eyes twinkling like jack-o’-lanterns. We fumbled – oh, did we fumble! Chocolate dripped everywhere, our first “hats” looked like lopsided mushrooms, and we nearly glued our fingers together with melted candy. But when we finally nailed it? Pure. Joy. That memory – the smell of melting chocolate, Grandma’s laugh, our disastrously perfect creations – is baked into these cookie cones. Every time I make them, I feel like that wide-eyed kid again, covered in sprinkles and utterly enchanted. It’s not just a recipe; it’s a little edible heirloom. 🍂👵
Your Magical Potion: Ingredients & Insights
Gather your coven! These ingredients are simple, but each plays a crucial spell-casting role. Here’s the breakdown:
- 12 sugar cones: The hat’s foundation! Look for sturdy, un-cracked cones. Chef’s Insight: Avoid waffle cones – they’re too textured for smooth dipping. Sub: Cake cones work in a pinch, but they’re shorter and less dramatic.
- 12 large round cookies: Your magical base. Chef’s Pick: Double-stuff Oreos add stability and decadence. Sub: Fudge rounds (extra gooey!), homemade sugar cookies (bake them thick!), or gluten-free cookies if needed.
- 1 ½ cups semi-sweet chocolate chips: The enchantment layer! Chef’s Secret: Semi-sweet balances sweetness. Sub: Candy melts (for vibrant colors!), dark chocolate (adult-mode), or white chocolate dyed orange or purple!
- 2 tsp coconut oil (optional but golden): The wizard’s trick! This makes dipping silky smooth and gives a gorgeous shine. Sub: Vegetable shortening (not butter – it seizes chocolate!).
- Decorative candy belts or frosting: The hat’s signature band! Fun Find: Sour Punch Straws (cut lengthwise) or Fruit by the Foot work brilliantly. Sub: Pipe royal icing or melted colored candy melts.
- Sprinkles or edible glitter: The pixie dust! Pro Tip: Black sanding sugar, purple nonpareils, or green “witch dust” glitter make them pop. Sub: Crushed freeze-dried raspberries for a tart, colorful sparkle!
Optional Surprise: Drop a dollop of peanut butter, caramel sauce, or even a mini marshmallow inside the cone before dipping for a hidden magical core!
Conjuring Your Hats: Step-by-Step Sorcery
Ready to work your kitchen magic? Let’s brew! Don your apron (expect chocolate splatters!), and follow these steps:
- Melt Your Chocolate Cauldron: Combine chocolate chips and coconut oil in a microwave-safe bowl. Microwave in 30-second bursts, stirring vigorously in between, until silky smooth (usually 90-120 seconds total). Chef’s Hack: Use a deep, narrow bowl – it makes dipping cones WAY easier! Watch Out: Don’t overheat! Burnt chocolate is a sad, grainy spell gone wrong. If it seizes, add 1 tsp hot water and stir like crazy to rescue it.
- Dip Your Witchy Spires: Hold a sugar cone by the pointed tip. Swirl, dip, or spoon the melted chocolate over the ENTIRE outer surface. Let excess drip back into the bowl for 5-10 seconds. Pro Tip: Rotate slowly over the bowl for an even coat. Place dipped cones open-end UP on a parchment-lined tray. Why? Gravity helps the chocolate set smoothly toward the brim.
- Attach the Magical Base: Working quickly (before chocolate sets!), take a dipped cone and place it UPSIDE DOWN (pointy tip pointing up!) firmly onto the center of a cookie. Press gently. Chef’s Wisdom: Do this step RIGHT after dipping each cone. If the chocolate skins over, it won’t stick! If one wobbles, prop it gently with rolled-up parchment until set.
- Let the Magic Set (Mostly!): Allow hats to sit at room temp for 10-15 minutes until chocolate is no longer wet but still slightly tacky. Why tacky? This helps the candy band adhere perfectly! Avoid moving them yet – patience, young wizard!
- Add the Spellbinding Band: Cut candy belts/strips to fit snugly around the base of the cone (where it meets the cookie). Wrap and press the ends together. Chef’s Hack: Use a tiny dab of leftover melted chocolate to “glue” the belt ends if needed. For frosting bands: Pipe a thick band using a star tip or simply smear with a knife!
- Bedazzle with Pixie Dust: Immediately after adding the band, shower on sprinkles or edible glitter! They’ll stick best to any residual tackiness on the chocolate or candy band. Go wild – more is more magic!
- Chill for Charm: Pop the tray into the fridge for 10-15 minutes to fully set the chocolate. Chef’s Note: This ensures your hats are sturdy for serving. But hey, if you can’t wait? Gobble one up gooey – it’s divine!
Presenting Your Coven of Cones
These hats deserve a show-stopping stage! Arrange them upright on a spooky cake stand draped with black cheesecloth. Scatter edible “eyeballs,” candy corn, or plastic spiders around the base. For individual whimsy, place each hat in a black or purple cupcake liner. Feeling extra? Add a tiny puff of “smoke” (cotton candy) under each hat right before serving! They’re perfect as a haunting centerpiece or as a spellbinding party favor wrapped in clear cellophane tied with orange ribbon. ✨
Brew Up Some Twists! Magical Variations
Don’t be afraid to personalize your potion! Here are 5 enchanting spins:
- Mystic Mint: Use Andes mint pieces in the chocolate or add a drop of peppermint extract before melting.
- Gluten-Free Ghouls: Swap in GF sugar cones and GF cookies (Glutino makes great rounds!).
- Vegan Witches’ Delight: Use vegan chocolate chips, GF cookies (check labels!), and sour vegan candy belts.
- Pumpkin Spice Enchantment: Stir 1/2 tsp pumpkin pie spice into the melted chocolate. Use orange candy melts for the band!
- Birthday Wizard Hats: Skip Halloween! Use colorful sprinkles, dip cones in rainbow candy melts, and place on funfetti cookies for a magical birthday treat.
Emily’s Cauldron Confessions & Tips
Okay, truth time: My first batch of these was a hot mess! I used waffle cones (too bumpy!), skipped the coconut oil (hello, lumpy chocolate!), and tried attaching the cones AFTER the chocolate hardened. Cue hats rolling everywhere like tipsy witches! 🤦♀️ But that’s the joy of kitchen magic – sometimes the “oops” moments lead to the best discoveries (like realizing a tiny smear of extra chocolate works as glue!). Over the years, I’ve made these with nieces, nephews, and even my book club (yes, grown women giggling over sprinkles!). The evolution? Embracing the chaos! Let kids decorate wildly – lopsided sprinkles add charm! Pro tip: Double the recipe. Always. These vanish faster than a ghost in sunlight! And that peanut butter surprise inside? Inspired by my husband sneaking PB into everything. Pure gold. Remember, it’s not about perfection; it’s about the laughter, the chocolate smudges, and the shared magic. Now go make some (slightly messy) memories!
Witch Hat Wisdom: FAQs & Fixes
Got questions? I’ve brewed up answers! Here’s how to handle common hat hiccups:
Q: Help! My chocolate is thick and clumpy! How do I fix it?
A: Don’t panic! Your chocolate might be overheated or need more fat. Try adding ½ tsp more coconut oil (or shortening) and stir vigorously. If it’s seized (grainy), add 1 tsp very hot water or vegetable oil and stir like crazy until smooth again. Low-and-slow melting is key!
Q: Why won’t my cone stick to the cookie? It keeps falling off!
A: Timing is everything! Attach the cone immediately after dipping while the chocolate is still wet and molten. If it’s already set, dab a tiny bit of extra melted chocolate onto the cookie’s center, then press the cone base into it. Hold for a few seconds until it grips.
Q: My candy belt won’t stay on! What’s the trick?
A: Use the chocolate like glue! Brush or dab a thin layer where the belt will sit, then press it gently in place. If you’re using frosting, pipe it thick enough to act as an adhesive.
Q: Can I make these ahead of time?
A: Absolutely! These keep beautifully for 2–3 days at room temp in an airtight container. For longer storage, refrigerate them (just know the chocolate may lose a little of its shine).
Q: How do I keep the chocolate from smudging when serving?
A: Make sure they’re fully set before handling—at least 15 minutes in the fridge after decorating. Serve on cupcake liners or mini parchment squares to protect fingers.
Q: Can I freeze Witch Hat Cookie Cones?
A: Technically yes, but the texture of the cookie and cone may soften when thawed. Best enjoyed fresh for that perfect crunch.

Witch Hat Cookie Cones
- Total Time: 40 minutes
- Yield: 12 hat cones 1x
Description
Cast a sweet spell with these enchanting Witch Hat Cookie Cones! Crispy sugar cones dipped in chocolate, set upside down on a cookie base, and finished with a magical candy band. Whether it’s for Halloween or a whimsical party, they’re spooky-cute, no-bake, and fun to assemble with kids or friends.
Ingredients
12 sugar cones
12 large round cookies (like Oreos, fudge rounds, or homemade sugar cookies)
1 ½ cups semi-sweet chocolate chips (or candy melts)
2 tsp coconut oil (optional, for smoother dipping)
Decorative candy belts or frosting (for the hat band)
Sprinkles or edible glitter (optional, for flair)
Instructions
Melt chocolate: In a microwave-safe bowl, melt chocolate chips with coconut oil in 30-second bursts until smooth.
Dip cones: Coat the entire outer surface of each sugar cone in melted chocolate. Let excess drip off.
Attach to cookies: Place each dipped cone upside down on the center of a cookie, forming a witch hat. Let set slightly before moving.
Decorate: Once the chocolate sets, wrap a candy belt or pipe colored frosting around the base of the cone for a hat band. Add sprinkles or edible glitter if desired.
Chill: Refrigerate for 10–15 minutes to firm up, or serve immediately for a gooey, magical treat!
- Prep Time: 25 minutes
- Chill Time: 15 min
Nutrition
- Calories: 260 / Cone
- Sugar: 23g / Cone
- Sodium: 100mg / Cone
- Fat: 13g / Cone
- Saturated Fat: 8g / Cone
- Carbohydrates: 36g / Cone
- Fiber: 2g / Cone
- Protein: 3g / Cone
- Cholesterol: 5mg
Nutrition (Per Hat):
-
Calories: ~260
-
Total Fat: 13g
-
Saturated Fat: 8g
-
-
Cholesterol: 5mg
-
Sodium: 100mg
-
Total Carbohydrates: 36g
-
Dietary Fiber: 2g
-
Total Sugars: 23g
-
-
Protein: 3g
Note: Values are estimates and will vary depending on the exact brands, toppings, and fillings you choose.
Final Thoughts
Witch Hat Cookie Cones aren’t just a recipe—they’re a ticket to giggles, sticky fingers, and pure Halloween magic. They’re proof that you don’t need hours in the kitchen or fancy baking skills to create something show-stopping and joy-sparking. Whether you’re making them with kids who think more sprinkles equals more magic, serving them as the whimsical centerpiece at your Halloween bash, or sneaking one with your afternoon coffee, these little hats deliver big smiles every single time.
So dust off your apron, gather your “potions,” and let the chocolate fly. The best part? Even if your hats come out a little crooked or your belts aren’t perfectly straight, they’ll still look—and taste—absolutely enchanting. After all, the most memorable kitchen spells are the ones made with laughter. 🧙♀️✨