Graveyard Dirt Cups: Spooky-Sweet Fun That’ll Haunt Your Taste Buds!
Hey, spooky snackers! 👋 Emily here, your apron-clad partner-in-crime for all things deliciously creepy. Can you feel it? That crisp October air, the rustle of fallen leaves, and the giddy excitement that only Halloween brings? It’s my absolute favorite season for kitchen mischief! If you’ve been scrolling endlessly for a treat that’s equal parts adorable, eerie, and easy enough to make between pumpkin carving sessions—congrats, you’ve struck edible gold. These Graveyard Dirt Cups are about to become your Halloween MVP.
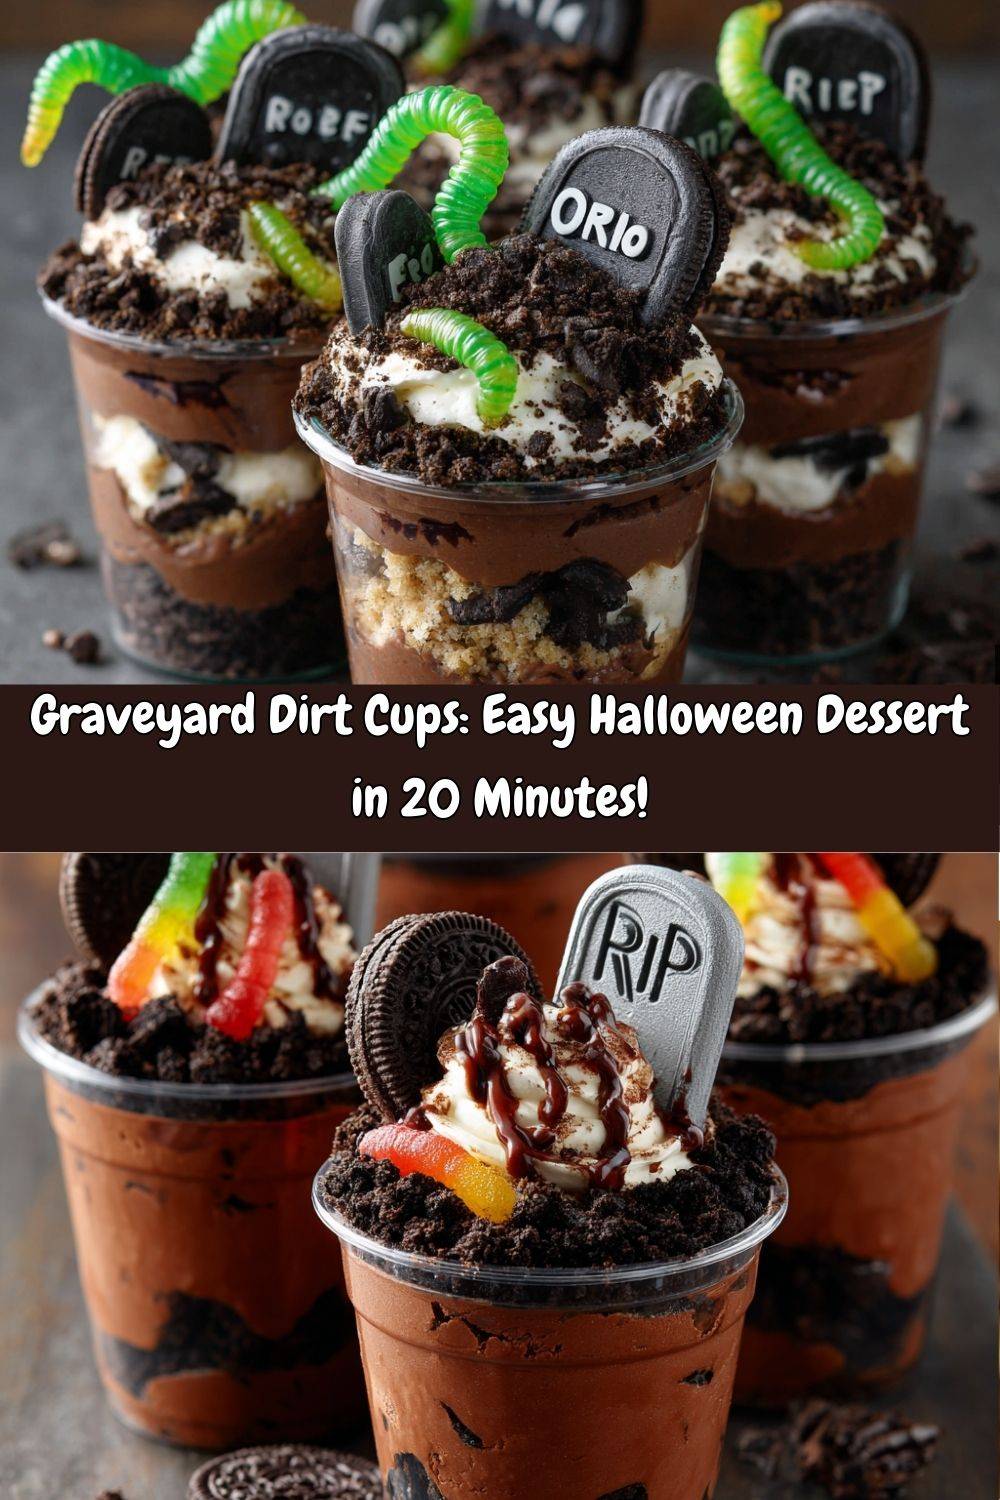
Picture this: velvety chocolate pudding layered with crunchy “dirt” (aka crushed Oreos), gummy worms wriggling to the surface, and cheeky cookie tombstones marking the spot. They’re playful, portable, and guaranteed to make both kids and adults shriek with delight (the good kind!). No fancy skills needed—just a rolling pin, some enthusiasm, and maybe a spooky playlist. Whether you’re hosting a monster mash or just craving a festive pick-me-up, these cups are your ticket to Halloween happiness. So grab your cauldron—er, mixing bowl—and let’s dig in!
Ghosts of Halloween Past: My First Graveyard Disaster
Confession time: my first attempt at dirt cups? A grave miscalculation. 😂 Picture 8-year-old me, determined to impress my cousins at our family Halloween bash. I’d seen a magazine photo of perfect dirt cups with cookie headstones… but I used vanilla pudding (rookie move!), crushed chocolate animal crackers (they tasted like cardboard), and wrote “RIP” on the tombstones with red glitter glue (non-edible, obviously). The worms looked downright apocalyptic. My grandma took one bite and whispered, “Sweetheart, these taste like craft supplies.”
But you know what? My cousins DEVOURED them. Why? Because kids (and let’s be real, adults too!) care more about fun than perfection. That messy, glitter-flecked disaster taught me that Halloween treats are about joy, not Pinterest-worthy precision. Now, every time I make these, I channel that little girl in a witch costume, beaming with pride over her “haunted” cups. It’s become my edible love letter to the holiday—imperfections and all!
Your Spooky Shopping List
Gather these simple ingredients—and remember, substitutions are your ghostly allies!
- 1 (3.9 oz) box instant chocolate pudding mix – The rich “earth” layer! Swap for vanilla if you prefer, but chocolate mimics dirt perfectly. Chef’s hack: Use dark chocolate pudding for extra depth!
- 2 cups cold milk – Whole milk = creamiest results. Almond milk works too, but pudding may set softer.
- 1 cup whipped topping (Cool Whip or similar) – Fluffy clouds in our edible graveyard! Thawed frozen or homemade whipped cream both work.
- 20 Oreo cookies, crushed – The star “dirt”! Gluten-free? Use GF chocolate sandwich cookies. Pro tip: Leave the cream in! It adds moisture and flavor.
- 6–8 gummy worms – The wriggly residents! Sour worms or neon colors up the creepy factor.
- 6–8 Milano cookies (or similar) – Tombstones! Pepperidge Farm Pirouettes or shortbread rectangles also stand tall.
- Black gel icing or edible marker – For “RIP” scrawls. No icing? Melt chocolate chips and pipe with a toothpick!
- Clear plastic cups or small jars – Show off those layers! Mason jars feel rustic, stemless wine glasses add elegance.
Let’s Build a Graveyard! (Step-by-Step)
Step 1: Make the Pudding “Earth”
Whisk pudding mix and cold milk in a bowl for 1-2 minutes until smooth. No lumps allowed! Let it sit 5 minutes (set a timer—patience is key!). Gently fold in whipped topping with a spatula until marbled. Why fold? Whisking deflates the fluff! This creamy base is like edible velvet.
Step 2: Create Oreo “Dirt”
Place Oreos in a zip-top bag (double-bag if it’s flimsy!). Crush with a rolling pin, meat mallet, or even a wine bottle. Want texture? Leave some pea-sized chunks! No rolling pin? Pulse in a food processor, but don’t turn to dust.
Step 3: Assemble Your Graves
Spoon pudding into cups until ¾ full. Tap cups lightly on the counter to settle. Generously top with crushed Oreos—press down lightly so worms can “burrow” later. Layer pro tip: Add crushed Oreos halfway for a “strata” effect!
Step 4: Decorate with Spooky Flair
Write “RIP” or spooky symbols (bats! ghosts!) on Milano cookies with gel icing. Let dry 2 minutes. Press cookies vertically into the dirt. Add gummy worms: half-buried, crawling up tombstones, or coiled on top. For extra drama, drizzle with chocolate syrup “mud”!
Step 5: Chill or Devour!
Refrigerate 30 minutes if you prefer firm pudding. But honestly? Digging in immediately while the pudding is gloriously soft and the cookies crisp? *Chef’s kiss*.
Serving Your Masterpiece
Line these cuties up on a black platter with dry ice “fog” for drama! Or place single cups at each table setting—add mini plastic shovels as spoons. For parties, set up a DIY dirt cup bar: let guests layer pudding and Oreos themselves, then pick their own tombstone inscriptions and worms! Pair with apple cider or a caramel latte for cozy contrast.
Bury the Boring: 5 Twists to Try
- Zombie Apocalypse: Swap chocolate pudding for lime Jell-O layered with crushed vanilla wafers. Use sour gummy brains instead of worms!
- Peanut Butter Cemetery: Mix ½ cup peanut butter into pudding. Top with crushed Nutter Butters and Reese’s Pieces “rocks.”
- Vegan Vault: Use coconut milk + vegan pudding mix, coconut whipped cream, and gluten-free cookies. Black cocoa powder makes Oreo dirt extra dark!
- Coffin Cups: Serve in chocolate graham cracker “coffins” (mold rectangles in a muffin tin!).
- Bone Yard: Add candy skeleton bones buried in the layers. White chocolate chips = ghostly pebbles!
Emily’s Spooky Scribbles
These cups have evolved SO much since my glitter-glue days! My kids now demand I hide “buried treasure” like mini M&Ms or gummy spiders in the pudding layer—it’s become a Halloween tradition. One year, my toddler “helped” by adding carrot sticks as “roots.” (We rolled with it). The beauty? They’re forgiving. Pudding too runny? Add more Oreo dirt! Tombstones snap? Glue with icing and call it a “cracked grave.” Remember: messy = spooky charm. Pro tip: Make extras. These vanish faster than ghosts at sunrise!
Dirt Cup Dilemmas? We’ve Got Answers!
Q: Can I make these ahead?
A: Absolutely! Assemble cups (without worms/tombstones) 1 day ahead. Add decorations 1 hour before serving so cookies stay crisp.
Q: My pudding won’t set! Help!
A: Did you use warm milk? Always use cold milk. If it’s still runny, whisk in 1 tbsp cornstarch dissolved in 2 tbsp milk and chill 15 extra minutes.
Q: Tombstones keep sinking! Any fixes?
A: Anchor them! Insert cookies after adding the top Oreo layer (press dirt firmly around the base). Or attach Milano to a toothpick “stake” hidden in the cup.
Q: Can I use homemade pudding?
A: Sure! Cooked pudding tastes richer but must be fully chilled before layering. Instant = speed, homemade = decadence.
Graveyard Dirt Cups
- Total Time: 50 minutes
- Yield: 6 - 8 cups 1x
Description
Dig into spooky sweetness with these Graveyard Dirt Cups — layers of creamy chocolate pudding, crushed Oreos, and creepy-crawly gummy worms, all topped with edible tombstones. Perfect for Halloween parties or a playful treat that’s more fun than fright!
Ingredients
1 (3.9 oz) box instant chocolate pudding mix
2 cups cold milk
1 cup whipped topping (Cool Whip or similar)
20 Oreo cookies, crushed
6–8 gummy worms
6–8 Milano cookies (or similar), for tombstones
Black gel icing or edible marker (to write “RIP”)
Clear plastic cups or small jars
Instructions
Make pudding: Whisk pudding mix and cold milk until smooth. Let sit for 5 minutes, then fold in whipped topping.
Crush cookies: Place Oreos in a zip-top bag and crush into “dirt” with a rolling pin.
Assemble cups: Spoon pudding into cups (about ¾ full). Top with crushed Oreos.
Decorate: Press a Milano cookie into each cup as a tombstone. Use gel icing to write “RIP” if desired. Add gummy worms crawling out of the “dirt.”
Chill & serve: Refrigerate for 30 minutes to set — or enjoy right away for gooey graveyard fun.
- Prep Time: 20 minutes
- Chill Time: 30 minutes
Nutrition
- Calories: 250 / cup
- Fat: 10g / cup
- Carbohydrates: 38g / cup
- Protein: 4g / cup
Nutritional Boo-notes (Per Cup)
Calories: ~250 | Fat: 10g | Carbs: 38g | Protein: 4g
Note: Stats vary based on ingredients used. For lighter versions, try sugar-free pudding + light whipped topping!
Final Thoughts
Graveyard Dirt Cups are proof that Halloween desserts don’t have to be fussy to be festive. They’re quick, budget-friendly, and endlessly customizable—perfect for whipping up before a party, packing into school treat bags, or making with the kids on a cozy October afternoon. With every spoonful, you get that perfect mix of creamy pudding, crunchy cookie “dirt,” and playful toppings that make people smile before they even take a bite.
The best part? You can lean into the messy, slightly chaotic look—because in the Halloween kitchen, imperfections only add to the charm. So go ahead, pile on those worms, scribble your tombstones without worrying about perfect penmanship, and make it your own. Whether you’re crafting six cups for family movie night or thirty for a neighborhood bash, these little graves are guaranteed to rise to the occasion. 🪦🍫👻