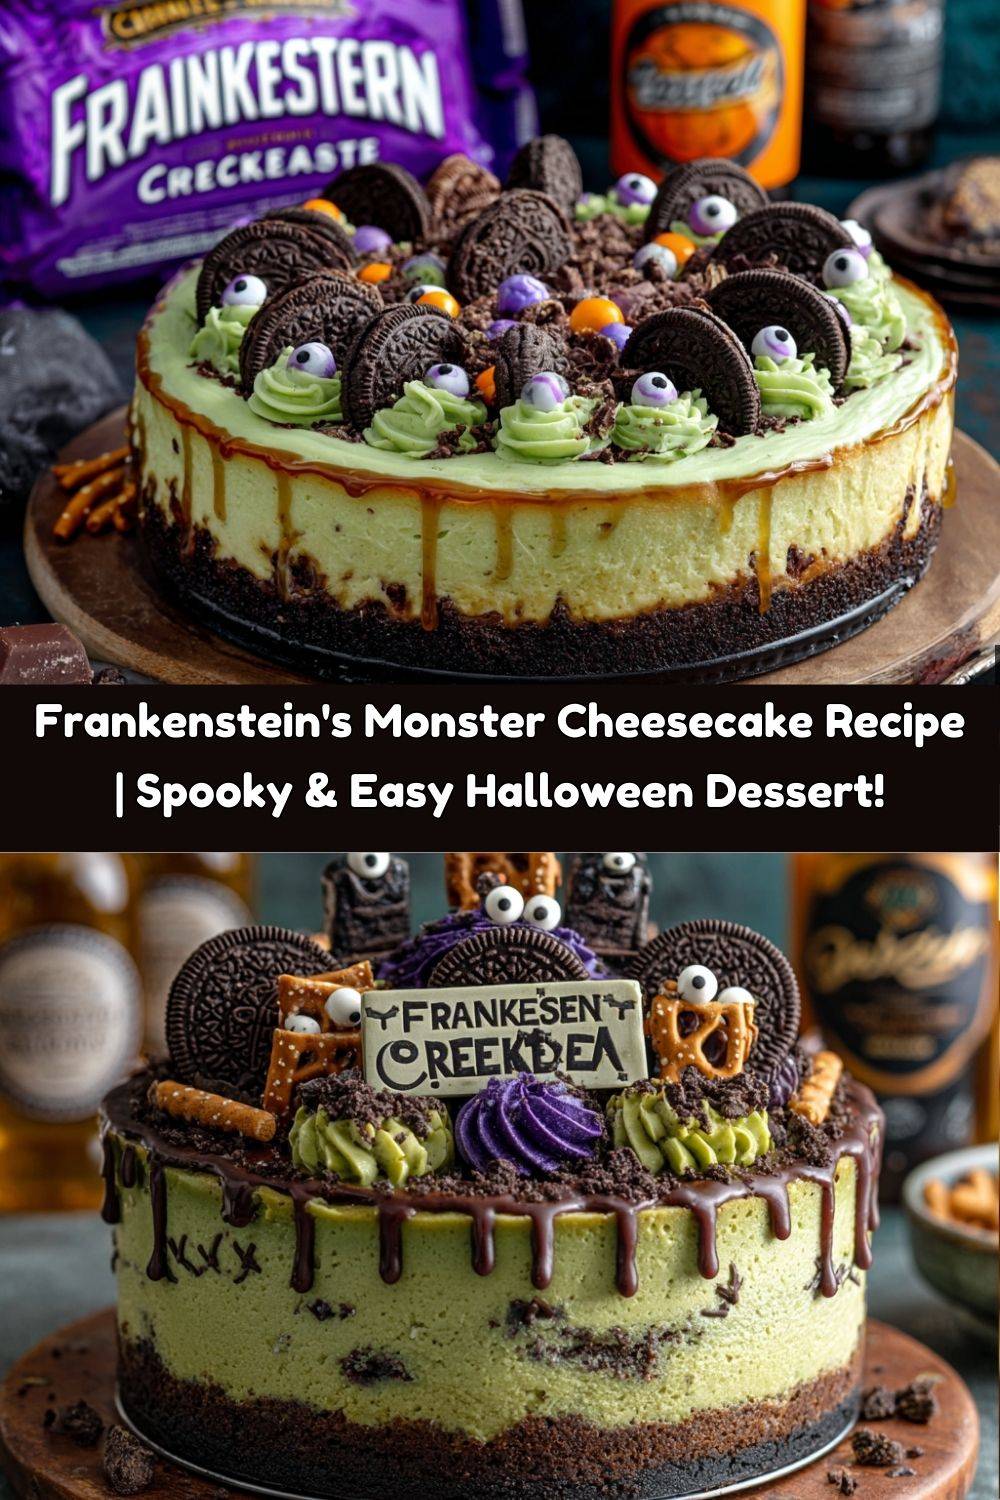
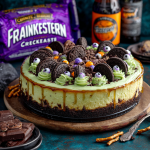
Frankenstein’s Monster Cheesecake: Your New Halloween Showstopper!
Hey, my fellow kitchen adventurers! It’s Emily, your messy-apron-wearing cheerleader from Tasty Chow, and ohhh boy – do I have a monstrously good treat for you today. Picture this: a double-batch cheesecake so vibrantly green it’d make Dr. Frankenstein swoon, with chocolate cookie crumbs clinging to its edges like spooky soil, candy eyes peering out with mischievous charm, and edible “bolts” hinting at deliciously mad science. This Frankenstein’s Monster Cheesecake isn’t just dessert – it’s a conversation starter, a Halloween party hero, and proof that playful food tastes even better. I know cheesecakes can feel intimidating, but trust me – this one’s designed for fun, not fuss. We’re talking creamy texture, a sneaky cookies-and-cream twist in every bite, and decorations simple enough for kitchen newbies (no culinary degree required!). Whether you’re hosting a monster mash or just craving something joyfully over-the-top, this recipe is your ticket to edible magic. So grab your mixing bowl and that slightly-too-loud laugh of yours – we’re about to bring a delicious monster to life!
That Time My “Zombie Cupcakes” Became a Graveyard Smash
This cheesecake monster madness? It totally reminds me of my early culinary school days when I attempted “Graveyard Zombie Cupcakes” for a Halloween potluck. Picture me, 20 years old, armed with ambition and cheap green food dye. I envisioned elegant fondant tombstones… but got crumbling, lopsided disasters instead. My zombie faces looked less “walking dead” and more “startled pigeon.” I was mortified! But you know what? When I sheepishly brought them out, my classmates devoured them. The messy, lopsided treats became the hit of the party because they were made with heart (and extra sprinkles). That’s when I truly learned: Imperfect food with personality beats “perfect” every time. This Frankenstein cheesecake embodies that spirit – it’s meant to be gloriously ghoulish, not flawless. Those crooked candy eyes? They’re not mistakes, they’re *character*! Every stitch drawn with wobbly icing tells a story. So channel your inner mad scientist and embrace the fun. Your kitchen, your rules!
Gathering Your Monster-Making Kit
Here’s everything you’ll need to create your delicious beast. Remember, baking is part science, part art – so don’t stress about exact perfection!
- Crust:
- 3 cups chocolate cookie crumbs (Oreos work brilliantly! Keep the filling for extra richness. No chocolate cookies? Graham crackers + 2 tbsp cocoa powder work.)
- ½ cup melted butter (This is the glue! Salted butter adds depth, unsalted lets you control salt.)
- Optional: 1 tbsp brown sugar (My grandma’s trick! Deepens the chocolate flavor like a cozy hug.)
- Filling:
- 48 oz cream cheese, softened (CRUCIAL! Let blocks sit at room temp for 2 hours. Cold cheese = lumpy monster. Full-fat for ultimate silkiness.)
- 2 cups sugar (Granulated is classic. For less sweetness, try 1 ¾ cups.)
- 6 large eggs (Add one at a time! Room temp eggs blend smoother, preventing cracks.)
- 2 tsp vanilla extract (Pure vanilla is the flavor backbone. A splash of almond extract adds fun dimension!)
- Green food coloring (go vibrant!) (Gel paste is KING. Liquid dye makes filling runny. Start with ½ tsp gel, build to electric Frankenstein green!)
- 1 cup crushed chocolate sandwich cookies (The “cookies & scream” twist! Adds texture and spooky dark flecks. Pulse gently – you want chunks, not dust.)
- Optional: ½ cup sour cream (My secret weapon! Adds tang, creaminess, and helps prevent cracks. Greek yogurt works too.)
- Decorations:
- Candy eyes (24–30) (Buy extra! Kids love “helping” place these. No eyes? White chocolate chips + mini chocolate chips!)
- Black gel icing (Essential for stitches! Gel holds sharp lines. Piping bag + small tip = pro results.)
- Mini pretzel sticks or chocolate wafers (For iconic neck bolts! Snap pretzels or use flat wafers.)
- Optional: purple or black frosting for spiked “hair” (Store-bought is fine! Or tint leftover cream cheese frosting.)
Building Your Delicious Beast: Step-by-Step!
Alright, mad scientists – let’s assemble our masterpiece! Preheat that oven to 325°F (165°C) now. Pro Tip: Place a baking sheet on your oven rack before preheating – it prevents butter leaks!
- Craft the Chocolatey “Ground”: Blitz cookies into crumbs (food processor or zip-top bag + rolling pin!). Mix crumbs, melted butter, and brown sugar (if using) in a bowl. It should feel like wet sand. CHEF HACK: Press mixture firmly into two 9-inch springform pans using a flat-bottomed cup for an even base. Bake for 8 minutes. Cool completely on a rack. (Why bake? It sets the crust so it won’t get soggy!)
- Wake the Filling Beast: Beat softened cream cheese and sugar in a huge bowl with an electric mixer (paddle attachment if using stand mixer) on medium until silky smooth (2-3 mins). Scrape bowl! CRITICAL TIP: Add eggs ONE at a time, mixing just until yellow disappears after each. Over-beating eggs = cracks! Mix in vanilla and sour cream (if using) on low speed.
- Bring on the Green! Add gel food coloring. Start modestly – you can always add more! Aim for a bold, electric Frankenstein green. (Remember my cupcake story? Go vibrant!)
- Fold in the “Scream”: Gently fold in crushed chocolate cookies with a spatula. Don’t overmix! We want visible cookie chunks for that monstrous texture.
- Bake with Love (and Steam!): Wrap outside of springform pans tightly in heavy-duty foil to prevent water bath leaks. Place pans in a large roasting pan. Pour filling evenly over cooled crusts. Place roasting pan in oven, then carefully pour boiling water into roasting pan until halfway up sides of springforms. HACK ALERT: This steam bath is your crack-prevention shield! Bake 55-65 mins. Centers should be slightly jiggly (like Jell-O), not liquid. Edges will be slightly puffed.
- Cool Like a Pro (No Shocks!): Turn oven off. Crack oven door open 1 inch. Let cheesecakes cool inside for 1 hour. This gradual cooling prevents sinking and cracks. Remove from oven/water bath. Run a thin knife around edges. Cool completely on rack (2 hours). Chill uncovered in fridge for at least 4 hours (overnight is BEST!).
- Unleash Your Inner Artist: Remove springform rings. Place cakes on serving platters. Pipe black gel icing for stitches, scars, and a goofy grin. Press in candy eyes. Add pretzel/chocolate wafer “bolts” to the sides. Pipe on wild purple/black frosting “hair.” FUN TIP: Let kids decorate one cake – their creativity is hilarious!
Presenting Your Masterpiece
This monster deserves a dramatic entrance! Place each cheesecake on a stark black or slate gray cake stand for maximum impact. Scatter crushed chocolate cookies or Halloween sprinkles around the base like “dirt.” Add plastic spiders or miniature tombstones nearby for extra spooky vibes (just remind guests they’re not edible!). Slice with a sharp knife dipped in hot water and wiped clean between cuts for picture-perfect pieces. Serve chilled with a cackle and maybe a glass of cold milk – your electrifying creation is ready to steal the show!
Give Your Monster New Life: Fun Twists!
- Minty Monster: Swap vanilla for 1 tsp peppermint extract + green food coloring. Crush mint-chocolate cookies instead of chocolate sandwiches. Feels like a cool monster breeze!
- Gluten-Free Ghoul: Use certified GF chocolate cookies for crust and filling. Ensure candy decorations are GF. Same spooky spirit, no gluten!
- Berry Blood Splatter: Before serving, drizzle with vibrant raspberry or strawberry sauce “blood” pooling around the base. Deliciously gruesome!
- Nutty Igor: Fold ¾ cup chopped toasted pecans or walnuts into filling with cookies. Adds crunch and Igor-approved nuttiness.
- Mini Monsters: Use a muffin tin! Make mini crusts in liners, fill ¾ full, bake 20-25 mins. Decorate individually – perfect for lunchboxes!
Emily’s Kitchen Confessions: Monster Evolution
Okay, truth bomb: The first time I tested this, it looked less “iconic monster,” more “vaguely ill avocado.” The green was SO muted! I learned the hard way: gel food coloring is non-negotiable. Then there was the Great Crack Incident of 2020 – I rushed the cooling, and poor Frankie looked like he’d been through a thunderstorm! That’s how the foolproof steam bath + gradual cooling method was perfected. My favorite evolution? The cookies-and-cream twist! Originally just green, adding those cookie chunks gave it texture and visual “guts” – plus, my nephew declared it “monster brains,” which was a grisly win. Now, I deliberately make the stitches a little crooked and encourage wild “hair.” Perfection is boring; personality is delicious! This cheesecake has become my Halloween love letter to joyful imperfection.
Frankenstein Cheesecake FAQs: Taming Your Beast
Q: Help! My cheesecake cracked! Did I ruin it?
A: First, deep breaths! Cracks are purely cosmetic (tastes just as amazing!). Cover them with extra “stitches,” “hair,” or strategically placed candy eyes. Next time: Ensure ingredients are truly room temp, don’t overbeat after adding eggs, use the water bath, and cool gradually inside the oven. Adding sour cream also helps prevent cracks!
Q: Can I make this ahead of time? How do I store the monster?
A: Absolutely! This cheesecake LOVES chilling. Bake and cool completely. Wrap tightly in plastic wrap (press it directly onto the surface) and foil. Store undecorated in the fridge for up to 3 days. Decorate within a few hours of serving. Leftovers (ha!) keep covered in the fridge for 4-5 days. Freezing? Wrap slices well for up to 2 months. Thaw overnight in the fridge.
Q: I don’t have gel food coloring. Can I use liquid?
A: You *can*, but be super cautious! Liquid dye adds moisture. Start with just a few drops and expect a paler green. You’ll need A LOT more for vibrancy, risking a runny filling. For the best texture and monster-worthy color, gel paste is worth hunting down (find it at baking supply stores or online).
Q: My filling seems lumpy. What went wrong?
A: Lumps usually mean the cream cheese was too cold! Ensure it’s truly softened (room temp for 2+ hours). Beat it thoroughly with the sugar before adding eggs. If lumps persist, run the finished filling through a fine-mesh sieve before adding cookies – it’s a lifesaver!
Frankenstein’s Monster Cheesecake
- Total Time: 5+ hours
- Yield: 24 1x
Description
It’s alive—and it’s delicious! This double-batch Frankenstein Cheesecake is a frightfully fun dessert, bursting with creamy green cheesecake, chocolatey crust, and ghoulish charm. With candy eyes, bold details, and a surprise cookies-and-cream twist, this monster is more treat than terror.
Ingredients
Crust:
3 cups chocolate cookie crumbs
½ cup melted butter
Optional: 1 tbsp brown sugar for extra depth
Filling:
48 oz cream cheese, softened
2 cups sugar
6 large eggs
2 tsp vanilla extract
Green food coloring (go vibrant!)
1 cup crushed chocolate sandwich cookies (for a cookies & scream effect)
Optional: ½ cup sour cream for added smoothness
Decorations:
Candy eyes (24–30 for multiple expressions)
Black gel icing (for stitches, scars, mouth)
Mini pretzel sticks or chocolate wafers (for “neck bolts”)
Optional: purple or black frosting for spiked “hair”
Instructions
Preheat oven to 325°F (165°C).
Mix cookie crumbs, brown sugar, and butter. Press into two springform pans and bake for 8 minutes. Cool.
Beat cream cheese and sugar until smooth. Add eggs one at a time, then mix in vanilla and sour cream.
Add green food coloring until you reach a bold Frankenstein shade.
Fold in crushed cookies for texture and color contrast.
Pour filling evenly into pans. Bake for 55–65 minutes until centers are just set. Cool, then chill 4+ hours.
Once chilled, decorate with candy eyes, black gel “stitches,” frosting “hair,” and edible bolts for full monster effect.
- Prep Time: 30 minutes
- Chill Time: 4+ hours
- Cook Time: 1 hour
Nutrition
- Calories: 405 / serving
- Sugar: 25g / serving
- Sodium: 220mg / serving
- Fat: 30g / serving
- Carbohydrates: 31g / serving
- Protein: 7g / serving
Nutritional Info (Per Slice, Approximate)
Calories: ~405 kcal | Fat: 30g | Carbohydrates: 31g | Sugar: 25g | Protein: 7g | Sodium: 220mg
(Note: Values include crust, filling, and decorations. Optional ingredients like extra frosting or brown sugar will alter this.)
Final Thoughts: Embrace the Imperfect Monster 🎃
At the end of the day, this Frankenstein’s Monster Cheesecake is about more than just cheesecake—it’s about fun, creativity, and letting go of perfection. Halloween isn’t polished or prim; it’s delightfully messy, a little spooky, and full of laughter. That’s exactly what this dessert brings to the table.
Whether your stitches zigzag like a toddler’s drawing, your candy eyes are slightly lopsided, or your monster’s “hair” goes wild, your cheesecake will still be the life of the party. In fact, those quirks make it even better. Because food that tells a story—especially a story sprinkled with humor and nostalgia—always tastes the sweetest.
So this Halloween, channel your inner mad scientist, laugh at the little mishaps, and serve up a cheesecake that’s gloriously green, deliciously creamy, and monstrously memorable. Your guests won’t just eat dessert—they’ll experience it. And that, my fellow kitchen adventurers, is the true magic of cooking.
Happy haunting and happy baking,
Emily 🖤👻