The Only Pumpkin Pie Recipe You’ll Ever Need (I Promise!)
Hey there, my fellow food lovers! Chef Emily here, coming to you from my flour-dusted kitchen, where the scent of cinnamon and nutmeg is practically woven into the walls this time of year. Is there anything that screams “autumn” more than the warm, spicy aroma of a pumpkin pie baking in the oven? It’s the edible equivalent of your favorite cozy sweater—a hug from the inside out.
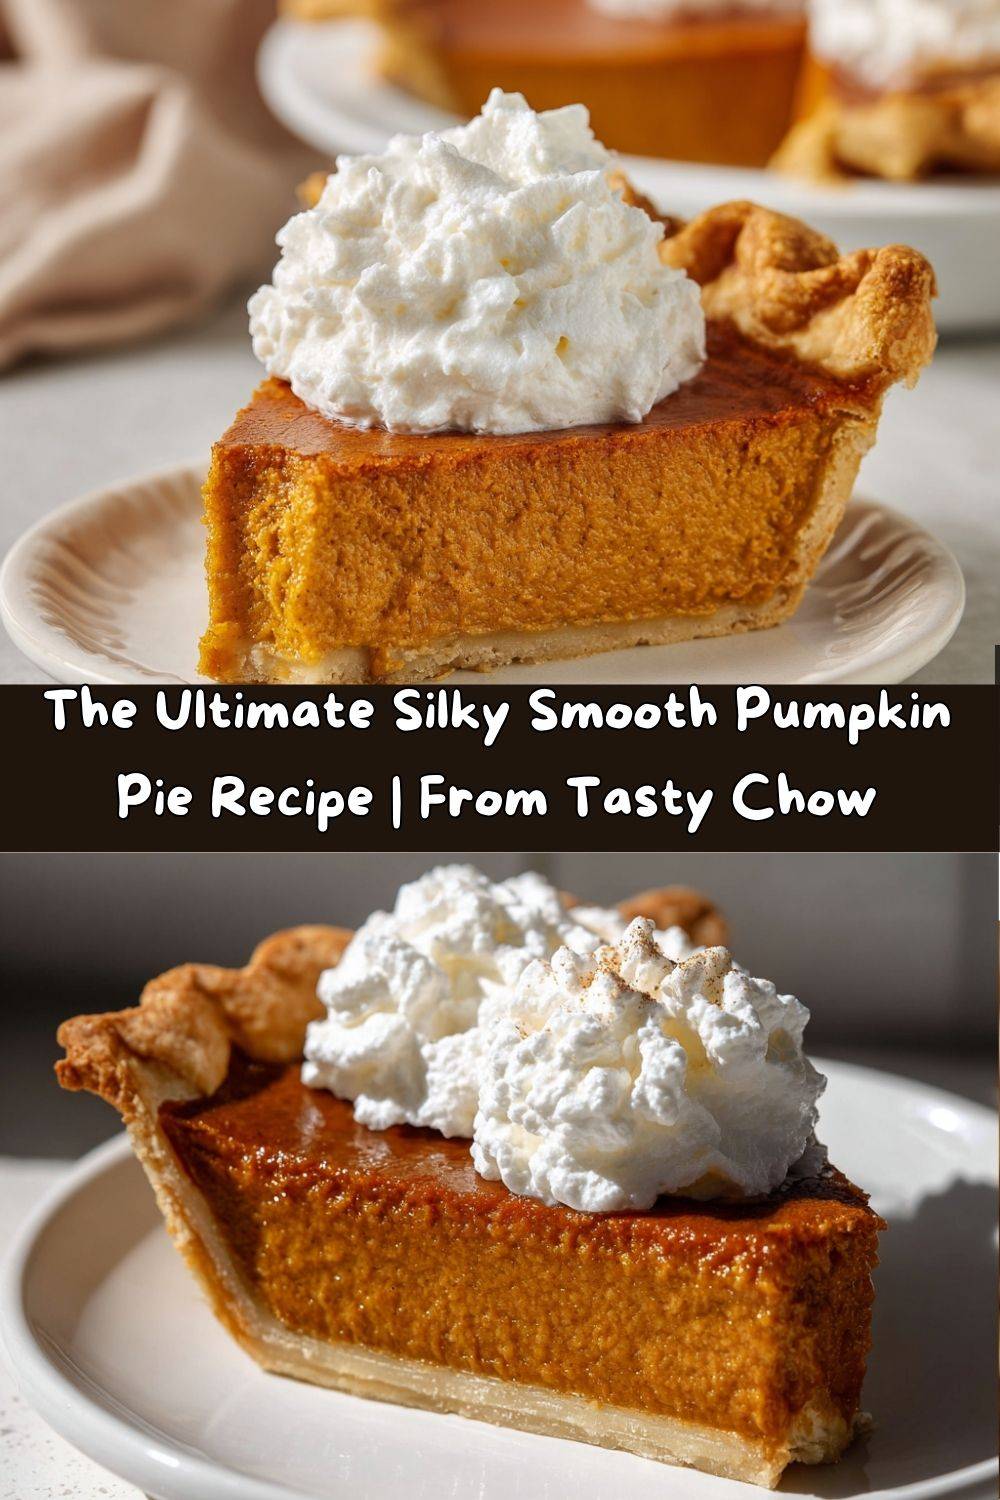
I’m a firm believer that every home cook deserves a go-to, no-fail, absolutely spectacular pumpkin pie recipe in their back pocket. This isn’t just a dessert; it’s the grand finale of Thanksgiving dinner, the star of the potluck, the treat that makes a regular Tuesday feel like a celebration. We’re talking about a silky-smooth, perfectly spiced custard that doesn’t weep or crack, cradled in a buttery, flaky crust, and topped with clouds of freshly whipped cream that melt over every warm bite. Are you swooning yet? I know I am.
This recipe is my pride and joy. It’s the culmination of years of tweaking, tasting, and (let’s be real) a few happy accidents. It’s simple enough for a baking newbie but impressive enough to earn you rave reviews from your toughest food critics (you know, Aunt Carol who claims her pie is *always* better). So, tie on your favorite apron—the one with the cute little cherries or the questionable gravy stain—and let’s make a memory together. This is more than just pie; it’s a delicious little piece of home.
A Slice of Memory: My Grandma’s Wooden Spoon
My love affair with pumpkin pie didn’t start in culinary school. It started in my Grandma Eleanor’s kitchen, a wonderfully chaotic space that always smelled of yeast and unconditional love. I was her official “taste-tester,” a job I took very seriously. Every Thanksgiving, she’d let me stand on a wobbly wooden stool next to her, and with her hands guiding mine, we’d mix the filling.
She didn’t use fancy electric mixers. It was just her trusty wooden spoon, a big yellow bowl, and a whole lot of elbow grease. I remember the *thwack-thwack-thwack* of the spoon against the bowl as we beat the eggs, and the way she’d let me sprinkle in the spices from little glass jars, telling me stories about her own mother’s pie. The best part, though, was sneaking a fingerful of the raw filling when she wasn’t looking. She always was, of course, and she’d playfully swat my hand with a dish towel, her eyes twinkling.
That pie wasn’t just about the ingredients. It was about the ritual, the stories, and the love stirred into every single bite. To this day, whenever I make this pie, I can still hear that *thwack-thwack-thwack* and feel her presence. It’s my little kitchen magic, and now, I’m so excited to share it with you.
Gathering Your Pumpkin Pie Squad: The Ingredients
Great pies start with great ingredients! Here’s your shopping list, complete with a few of my chef-y insights and easy swaps to make this pie your own.
For the Pie Filling:
- 1 (15 oz) can pumpkin purée: Not pumpkin pie filling! We want 100% pure pumpkin here. Libby’s is the classic for a reason—its consistency is perfect. If you’re using fresh pumpkin, make sure to roast and purée it until it’s super smooth to avoid a watery filling.
- 3/4 cup packed brown sugar: The molasses in brown sugar gives our pie a deeper, caramel-like flavor and that beautiful dark color. Light or dark brown works great!
- 2 tsp pumpkin pie spice: The heart and soul of the pie! If you’re out, make your own with 1 ½ tsp cinnamon, ¼ tsp nutmeg, ¼ tsp ginger, and ⅛ tsp cloves or allspice. Freshly grated nutmeg is a game-changer!
- 1/2 tsp salt: Crucial for balancing all the sweetness and making the flavors pop. Don’t skip it!
- 2 large eggs: Our binding agents that give the custard its structure. Make sure they’re at room temperature for a smoother, more even filling.
- 1 (12 oz) can evaporated milk: This is the secret to an ultra-creamy, rich texture without being too heavy. It’s concentrated, so it gives us more milk protein and sugar without adding extra water.
- 1 unbaked 9-inch pie crust: Use your favorite homemade all-butter crust or a good-quality store-bought one. I won’t tell! Just make sure it’s chilled until you’re ready to fill it.
For the Whipped Cream:
- 1 cup heavy cream (or heavy whipping cream): Chill the bowl and beaters for 10 minutes first! Cold cream whips up faster and higher.
- 2 tbsp powdered sugar: Dissolves instantly and won’t give you a grainy texture. You can add more if you like it sweeter!
- 1/2 tsp vanilla extract: A little flavor boost that makes it taste like true, homemade whipped cream, not the stuff from a can.
Let’s Get Baking: Your Foolproof Step-by-Step Guide
Ready to create some magic? Follow these steps, and you’ll have a perfect pie. I’ve sprinkled in all my best tips and hacks to ensure your success!
- Preheat and Prepare: Preheat your oven to 425°F (220°C). This initial high heat is key to getting that beautiful, puffed-up custard and a crisp crust. Chef’s Hack: Place a baking sheet on the middle rack while the oven preheats. You’ll place your pie dish on this hot sheet later, which helps cook the bottom crust perfectly and catches any potential drips!
- Whisk the Foundation: In a large bowl, whisk together the pumpkin purée, brown sugar, pumpkin pie spice, and salt. Whisk it until it’s completely smooth and no lumps of brown sugar remain. This is your flavor base—give it some love! Chef’s Tip: If you have a few stubborn sugar lumps, press them against the side of the bowl with the back of a spoon to break them up.
- Incorporate the Eggs: Crack in the two eggs. Now, whisk vigorously! You want the eggs to be fully incorporated into the pumpkin mixture. This is where you’ll build the structure of your custard.
- Stream in the Milk: Gradually pour in the evaporated milk while whisking constantly. Keep going until the entire mixture is smooth, homogenous, and gorgeous. Chef’s Hack: For the absolute silkiest filling, pour the mixture through a fine-mesh sieve into another bowl. It catches any little bits of pumpkin or egg, guaranteeing a texture that’s smoother than a jazz playlist.
- Fill the Crust: Place your pie crust in its dish on the counter. Give your filling one last stir, then slowly pour it into the unbaked crust. Leave about a ¼-inch space from the top to prevent bubbling over.
- The Two-Temperature Bake (This is Important!): Carefully place your pie on the preheated baking sheet in the oven. Bake at 425°F for 15 minutes. This blast of heat sets the crust and starts the cooking process. Then, without opening the oven door, reduce the heat to 350°F (175°C) and continue baking for 35-40 minutes. Chef’s Tip: Set a timer for the second half! Peeking too early can cause the temperature to fluctuate and lead to a sunken center.
- The Jiggle Test: How do you know it’s done? The edges of the filling will be set, but the center should still have a slight jiggle—like Jell-O—when you gently shake the pan. It will firm up as it cools. An instant-read thermometer inserted near the center should read 175°F. If it looks puffed and cracked, don’t panic! It will settle as it cools.
- Cool Completely: This is the hardest part: patience! Transfer the pie to a wire cooling rack and let it cool completely for at least 4 hours, or ideally, overnight in the fridge. This allows the custard to fully set, making it sliceable and deliciously creamy.
- Make the Whipped Cream: Just before serving, make your whipped cream. In that chilled bowl, beat the heavy cream, powdered sugar, and vanilla on medium-high speed until soft peaks form. That means when you lift the beaters, the peaks gently curl over. Don’t overbeat, or you’ll start making butter! Chef’s Hack: A tablespoon of room-temperature mascarpone cheese whipped in with the cream makes it impossibly rich and stable.
How to Serve Your Masterpiece
Presentation is part of the fun! For beautiful, clean slices, dip your sharp knife in hot water and wipe it dry between each cut. Slide your pie server underneath to lift out each perfect piece. Plop a generous dollop of that homemade whipped cream on top—none of that skimpy stuff! For a final touch of elegance, I love a light dusting of cinnamon or a tiny grate of fresh nutmeg over the cream. Serve it up on your favorite festive plate and watch those smiles appear.
Mix It Up! Delicious Recipe Variations
Feel like playing? Here are a few of my favorite ways to twist this classic:
- Ginger Snap Crust: Swap the traditional pie crust for one made from crushed ginger snap cookies and butter. It adds a wonderful spicy crunch!
- Bourbon Maple: Replace the brown sugar with ½ cup of maple syrup and add 2 tablespoons of bourbon to the filling for a deep, grown-up flavor.
- Dairy-Free Delight: Use full-fat canned coconut milk instead of evaporated milk. The result is incredibly creamy with a very subtle coconut note that pairs beautifully with the spices.
- Chocolate Swirl: Melt ½ cup of chocolate chips with a splash of cream and drizzle it over the filled pie crust. Use a knife to swirl it into the pumpkin filling before baking.
- Streusel Topped: Skip the whipped cream and top your pie with a crunchy streusel made from oats, flour, brown sugar, and cold butter before baking. Bake as directed!
Chef Emily’s Notebook: Extra Thoughts & Stories
This recipe has been on quite a journey with me. I once, in a frantic pre-Thanksgiving hurry, accidentally used a whole can of sweetened condensed milk instead of evaporated milk. It was… aggressively sweet and set like concrete, but my friends still ate it! (Thanks, guys). Lesson learned: always read the labels!
The biggest evolution was mastering the two-temperature bake. For years, I baked my pies at a constant 350°F and could never figure out why my crust was sometimes soggy. That initial high heat is the absolute key to a crisp bottom. Don’t be afraid of it!
Most importantly, remember that pie is meant to be shared. It’s okay if your crust isn’t perfectly crimped or if you get a tiny crack. That just shows it’s homemade with love. The best ingredient you can add is joy.
Pumpkin Pie FAQs: Your Questions, Answered!
Q: Why did my pie crack? How can I prevent it?
A: Cracking usually happens from overbaking. The eggs in the custard tighten up too much and squeeze out moisture, causing cracks. The best prevention is the “jiggle test”! Remember, the center should still be a little wobbly when it comes out—it will set as it cools. Also, avoid overmixing the filling once you add the eggs, as this can incorporate too much air.
Q: Can I make this pie ahead of time?
A: Absolutely! In fact, I highly recommend it. Pumpkin pie is the perfect make-ahead dessert. Bake it, let it cool completely, cover it loosely with plastic wrap or foil, and store it in the refrigerator for up to 2 days. The flavors meld and get even better! Make the whipped cream the day you plan to serve it.
Q: My crust is getting too dark. What should I do?
A: This is a common issue. If you notice the edges of your crust browning too quickly, fashion a “pie crust shield.” Simply take a long strip of aluminum foil and gently fold it over the crust edges, exposing the center. This will protect the delicate crust while the center continues to bake.
Q: Is my pie done if a knife inserted comes out clean?
A> Not necessarily! A perfectly baked custard pie will still have a little residue on a knife inserted near the center. If it comes out completely clean, the pie is likely overbaked. Trust the jiggle more than the knife. For precision, use an instant-read thermometer—175°F is your target.
Nutritional Information*
Prep Time: 15 min | Cook Time: 55 min | Total Time: 1 hr 10 min + cooling | Serves: 8
*This is an estimate provided for informational purposes only. Actual values may vary based on specific ingredients used.
Per Slice (with whipped cream): ~320 calories | 16g fat | 39g carbs | 6g protein
Print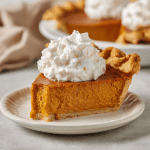
Pumpkin Pie with Whipped Cream
- Total Time: 1 hr 10 min
- Yield: 8 1x
Description
Silky, spiced pumpkin custard baked in a flaky crust and topped with clouds of freshly whipped cream—this iconic dessert is the taste of the season. Simple, comforting, and absolutely essential for fall gatherings.
Ingredients
For the Pie:
1 (15 oz) can pumpkin purée
3/4 cup brown sugar
2 tsp pumpkin pie spice
1/2 tsp salt
2 large eggs
1 (12 oz) can evaporated milk
1 unbaked 9-inch pie crust
For the Whipped Cream:
1 cup heavy cream
2 tbsp powdered sugar
1/2 tsp vanilla extract
Instructions
Preheat oven to 425°F (220°C).
In a bowl, whisk together pumpkin, sugar, spice, salt, and eggs. Stir in evaporated milk until smooth.
Pour filling into pie crust.
Bake for 15 minutes, then reduce temperature to 350°F (175°C) and bake for 35–40 minutes more, or until the center is just set.
Cool completely before slicing.
For whipped cream: beat cream, sugar, and vanilla until soft peaks form.
Serve pie slices topped generously with whipped cream.
- Prep Time: 15 minutes
- Cook Time: 55 minutes
Nutrition
- Calories: 320/ Serving
- Fat: 16g / Serving
- Carbohydrates: 39g / Serving
- Protein: 6g / Serving
Final Thoughts
Pumpkin pie isn’t just dessert—it’s a tradition, a memory, and a little piece of joy baked into a crust. Every time I make it, I’m reminded that the magic of cooking isn’t about perfection; it’s about the laughter in the kitchen, the stories passed down, and the moments shared around the table.
This recipe gives you a pie that’s silky, spiced just right, and endlessly adaptable—whether you stick with the classic or venture into fun twists like bourbon-maple or a ginger snap crust. And here’s the best part: once you’ve mastered this one, you’ll never need another pumpkin pie recipe again.
So, the next time fall calls or Thanksgiving comes knocking, you’ve got the ultimate crowd-pleaser in your back pocket. Bake it with love, serve it with pride, and don’t forget that extra dollop of whipped cream. Because life’s too short for skimpy slices of pie.