Pumpkin Patch Oreo Bites: Your New Halloween Tradition Starts Here!
Hey there, my fellow foodie friend! Can you feel it? That crisp, autumn air that smells like bonfires and possibility? Halloween is just around the corner, and my kitchen is buzzing with all things sweet, spooky, and spectacularly easy. If you’ve been scrolling through endless complicated dessert ideas that make you want to hide behind a mask, I’ve got your back. Let’s talk about these Pumpkin Patch Oreo Bites.
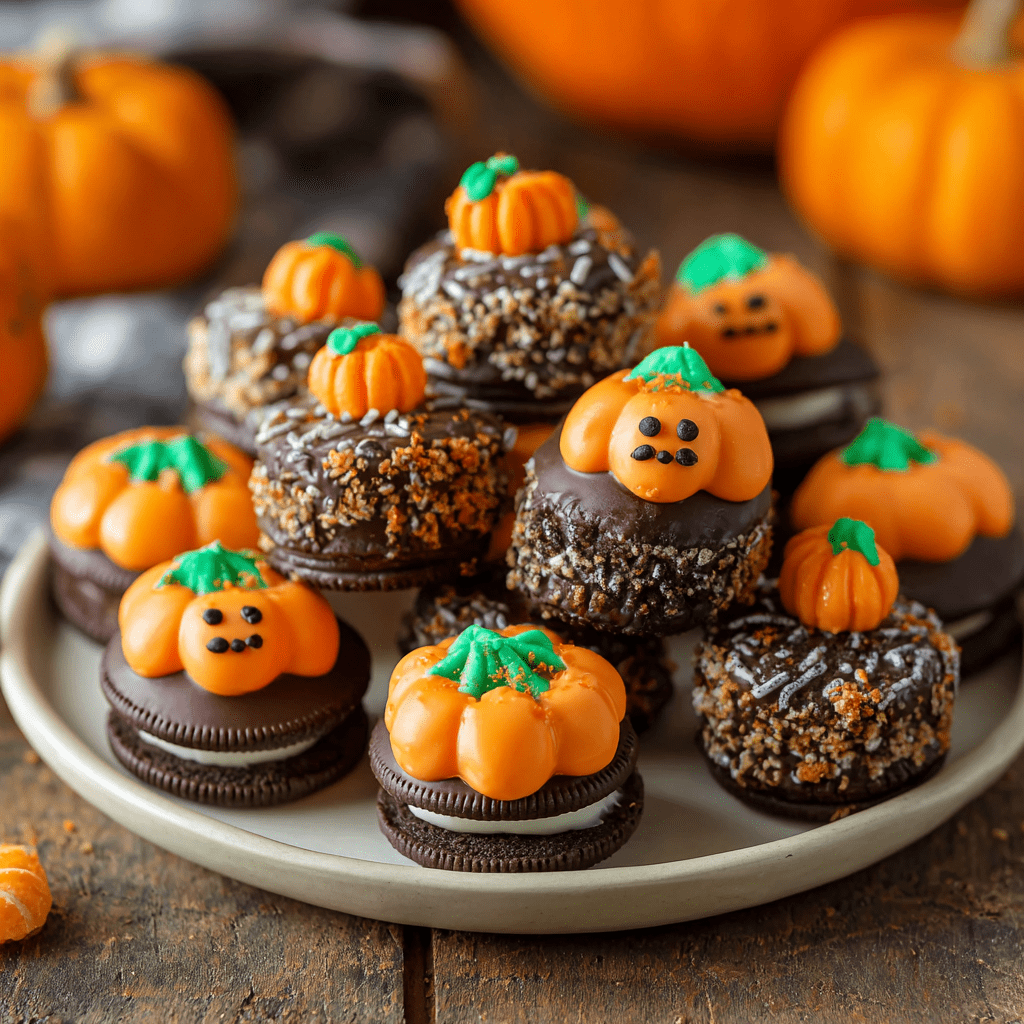
Imagine this: a classic Oreo, dunked in a pool of dreamy, orange-tinted chocolate, and crowned with a cheerful mellowcreme pumpkin. It’s a crunchy, creamy, sweet-and-salty bite of pure Halloween joy. The best part? There’s zero baking involved. I’m not kidding! These cuties come together in under 35 minutes, making them the ultimate last-minute lifesaver for class parties, potlucks, or when those little ghosts and goblins suddenly announce they need a treat to share… in an hour.
This is the kind of recipe that gets everyone involved. Kids love plopping the pumpkins on top, and adults love that they look like they fussed for hours. They’re the edible equivalent of a cozy, orange sweater—utterly comforting and always a hit. So, tie on your favorite messy apron (the one with the candy corn stains, you know the one), and let’s make a memory together. This is more than a recipe; it’s your ticket to being the undisputed Halloween hero.
The Little Pumpkin That Started It All
This recipe always takes me right back to my tiny first apartment kitchen. My now-husband, Sam, and I were broke, but we were determined to host our very first Halloween party. We decorated with cobwebs from a bag, carved lopsided jack-o’-lanterns, and I was desperate to make a treat that looked impressive but wouldn’t blow our $20 budget for snacks.
I had a sleeve of Oreos, some white chocolate chips from a failed baking attempt, and a bag of those classic pumpkin candies I’d picked up on a whim. In a moment of “what if?” I melted the chocolate, stirred in some food coloring, and started dipping. The result was… hilariously messy. The first few looked more like orange blobs than pumpkins! But by the third one, I got the hang of it. When our friends arrived and saw that platter of homemade, chocolate-dipped Oreo “pumpkins,” their faces lit up. They couldn’t believe I’d made them. That party, fueled by silly costumes, spooky music, and these ridiculously simple bites, is one of my all-time favorite memories. It taught me that the best recipes aren’t about perfection; they’re about the joy you share along the way.

Gathering Your Pumpkin Patch
Here’s the beautiful part: you only need a handful of simple ingredients to create pure magic. This is a great time to raid your pantry!
- 36 Oreos: The sturdy, classic chocolate kind are my go-to. Their dark color makes a fantastic contrast with the bright orange coating. Chef’s Insight: For a fun twist, try the Golden Oreos! They taste like a little shortbread cookie disguised as a pumpkin.
- 16 oz white melting chocolate (or white chocolate baking bars, chopped): This is your canvas! I highly recommend using candy melts or melting wafers instead of pure white chocolate chips. They’re formulated to melt smoothly and set with a perfect snap. Substitution Tip: If you must use chips, adding that 1 tbsp of coconut oil is non-negotiable to thin it out.
- Orange gel food coloring: Gel is key here, folks! Liquid food coloring can cause your beautiful melted chocolate to seize up and turn into a grainy mess. Gel coloring is highly concentrated, so you only need a tiny dab to achieve that vibrant, perfect pumpkin hue without altering the consistency.
- 36 mellowcreme pumpkin candies: The star of the show! You’ll find these everywhere during the fall season. They’re the iconic, sweet little pumpkins that taste like Halloween.
- ¼ cup crushed pretzels (optional): My favorite “chef’s hack” for balancing sweetness. That tiny sprinkle of salty crunch on top takes these bites to a whole new level. It’s a surprise element that people will love but won’t quite be able to place.
- 1 tbsp coconut oil (optional): A little secret for achieving a luxuriously smooth, dippable chocolate consistency. It helps thin the chocolate just enough for a perfect coating.
- Halloween sprinkles or edible glitter (optional): Because why not? Let your inner artist shine! Black and orange jimmies, little ghost sprinkles, or even a dusting of edible orange glitter makes these extra special.
Let’s Build Your Edible Pumpkin Patch!
Ready to create some kitchen magic? This process is so simple and fun. Let’s do it step-by-step, together.
- Prep Your Station. Line a large baking sheet with parchment paper or a silicone baking mat. This is your landing pad for your beautiful, chocolate-dipped creations and ensures nothing sticks. Do this first! There’s nothing worse than having a dripping Oreo in one hand and scrambling for parchment paper with the other.
- Melt the Chocolate. Place your white melting wafers (and coconut oil, if using) in a microwave-safe bowl. I like to use a deeper, narrower bowl rather than a wide, shallow one—it gives you a deeper pool of chocolate for easier dipping. Microwave on high in 30-second intervals, stirring well between each burst. Do not over-microwave! The residual heat will continue to melt the wafers. Stir until it’s completely smooth and silky.
- Get Your Pumpkin On (The Color, That Is!). Now, for the transformation! Using a toothpick, add a very small amount of orange gel food coloring to the melted chocolate. Start with a little; you can always add more. Stir vigorously until the color is fully incorporated and you’ve reached your ideal shade of pumpkin perfection. Isn’t that color just happy-making?
- The Dip. Here’s the fun part. Hold an Oreo by its edge and dip it halfway into the orange chocolate. Swirl it gently to coat it evenly. Gently tap your wrist against the side of the bowl to let any excess chocolate drip off. This prevents a big chocolate puddle from forming around your base. You can fully coat them too for a more dramatic look! Place the dipped Oreo gently onto your prepared baking sheet. Repeat, repeat, repeat!
- Top It Off. Work relatively quickly here before the chocolate sets. Immediately after placing a dipped Oreo on the sheet, press one mellowcreme pumpkin candy right into the center. This is the perfect job for little helpers!
- Add Your Flair. While the chocolate is still wet, sprinkle on your optional toppings! A pinch of crushed pretzels for that salty-sweet vibe, or a fun shower of Halloween sprinkles. This is your chance to get creative.
- Chill Out. Once your baking sheet is filled with your future pumpkin patch, carefully transfer it to the refrigerator. Let them chill for 15-20 minutes, or until the chocolate coating is completely firm to the touch. This setting time is crucial for that satisfying snap when you bite into one.
How to Serve Your Spooky Masterpieces
Presentation is part of the fun! For a real “wow” factor, arrange these Pumpkin Patch Oreo Bites on a large platter or a rustic wooden board. Scatter a few extra pumpkin candies and pretzel pieces around them to fill in the gaps. You could even create a little path out of crushed chocolate cookies to look like dirt! Stack them high on a cake stand for a dramatic centerpiece, or pack them into little Halloween-themed cellophane bags tied with ribbon for the most adorable party favors or trick-or-treat handouts. However you serve them, be prepared for recipe requests!
Make It Your Own! Fun Recipe Twists
The beauty of this recipe is its versatility. Don’t be afraid to play with it!
- Peanut Butter Pumpkin: Use Peanut Butter Oreos for a nutty, delicious twist that pairs amazingly with the chocolate.
- “Dirt” Patch: After dipping, sprinkle the wet chocolate with crushed chocolate cookies (like Oreo crumbs) instead of pretzels to create a “dirty” pumpkin patch look.
- Boo-tiful Ghosts: Make a non-pumpkin version for Halloween! Dip Oreos in plain white chocolate, then use a dot of melted dark chocolate to make two little eyes and a spooky mouth, creating adorable edible ghosts.
- Vegan/Veggie Friendly: Use accidentally vegan Oreos (check the package!), vegan white chocolate melting wafers, and a vegan candy pumpkin alternative. It’s an easy swap that makes everyone feel included.
- Minty Fresh Patch: Try Mint Oreos for a cool, refreshing flavor that cuts through the sweetness beautifully.
Chef Emily’s Notes from My Kitchen to Yours
Over the years, this recipe has become a staple in my home, and it’s evolved in the silliest ways. One year, I was so excited to make them I accidentally used oil-based food coloring instead of gel. Let’s just say I ended up with a bowl of thick, orange-scented play-doh instead of dippable chocolate! We had to run to the store for a last-minute save. It’s now a running joke in our house—”Mom, did you check the coloring?!”
I’ve also learned that doubling the recipe is always a good idea. They disappear faster than you can say “Boo!” I often set up a DIY decorating station with bowls of different sprinkles, crushed candies, and pretzels so everyone can customize their own. It turns treat-making into a party itself. Remember, if your chocolate coating isn’t perfectly smooth on every single bite, it doesn’t matter. The love and fun you put into them are the most important ingredients.
Your Questions, Answered!
Q: My chocolate got thick and clumpy after I added the coloring! What happened?
A: Ah, the dreaded “seizing.” This almost always happens if you use liquid food coloring, as the water content makes the chocolate tighten up. That’s why I’m such a stickler for gel-based coloring! If it does happen, you can sometimes save it by vigorously stirring in a teaspoon of coconut oil to try and bring it back. Prevention is the best medicine here!
Q: Can I make these ahead of time?
A: Absolutely! These are a fantastic make-ahead treat. Once set, store them in a single layer in an airtight container in the refrigerator for up to 5 days. You can also freeze them for up to a month! Just thaw in the fridge before serving.
Q: I can’t find candy melts. What can I use instead?
A: No problem! You can use high-quality white chocolate baking bars (like Ghirardelli or Baker’s), chopped finely. Just be sure to add that tablespoon of coconut oil to help it melt to a dip-able consistency. The coating might be a bit softer after setting, but it will still be delicious.
Q: My toppings are sliding off! How do I make them stick?
A: The key is timing. You have to add your sprinkles and pumpkin candy while the chocolate is still wet and tacky. If the chocolate has already started to set, the toppings won’t adhere properly. Work in small batches—dip 4-5 cookies, then immediately top them before moving on to the next batch.

Pumpkin Patch Oreo Bites
- Total Time: 35 minutes
- Yield: 36 Bites 1x
Description
Sweet, spooky, and ridiculously easy—these no-bake Pumpkin Patch Oreo Bites are the cutest treat on the Halloween table. Crunchy, creamy, and dipped in orange-tinted chocolate, they’re topped with mellowcreme pumpkins and a little creative flair. Doubled up and leveled up, they’re perfect for parties, trick-or-treat trays, or edible crafts with kids.
Ingredients
36 Oreos (chocolate or golden)
16 oz white melting chocolate (or baking bars, chopped)
Orange gel food coloring
36 mellowcreme pumpkin candies
¼ cup crushed pretzels (optional, for a salty crunch topping)
1 tbsp coconut oil (optional, for smoother chocolate)
Halloween sprinkles or edible glitter (optional, for fun garnish)
Instructions
Line a baking sheet with parchment paper.
Melt white chocolate with coconut oil (if using) in a microwave-safe bowl in 30-second intervals, stirring until smooth.
Stir in orange food coloring until you reach your desired pumpkiny hue.
Dip each Oreo halfway (or fully) into the orange chocolate. Let excess drip off.
Place dipped Oreos on the baking sheet and top each with a mellowcreme pumpkin.
Sprinkle with crushed pretzels or Halloween sprinkles while the chocolate is still wet.
Chill in the fridge for 15–20 minutes until set.
- Prep Time: 15 minutes
- Cook Time: 20 minutes
Nutrition
- Calories: 160 / Serving
- Sugar: 17g / Serving
- Fat: 7g / Serving
- Carbohydrates: 24g / Serving
Nutritional Information (Per Bite)
Please note: This is an estimate provided for informational purposes only. Calculations will vary based on specific ingredients and portion sizes.
- Calories: ~160 kcal
- Fat: 7g
- Carbohydrates: 24g
- Sugar: 17g
Final Thoughts
The Pumpkin Patch Oreo Bites are one of those rare treats that check all the boxes: festive, easy, adorable, and undeniably delicious. They’re proof that you don’t need hours of baking or fancy decorating skills to create something that looks straight out of a Pinterest board. With just a handful of pantry staples and a little food coloring magic, you’ve got yourself a Halloween centerpiece that makes both kids and adults light up.
I love that this recipe doubles as an edible craft. Little hands can help with dipping, sprinkling, and plopping pumpkins on top, which turns the process into an event of its own. And for the grown-ups? They’ll appreciate that salty-sweet crunch, that creamy chocolate shell, and the nostalgia of biting into a candy pumpkin perched on top of an Oreo.
Whether you’re hosting a Halloween bash, need a last-minute classroom treat, or just want to bring a little pumpkin-patch cheer into your week, these Oreo bites deliver every single time. They’re the kind of treat that disappears as fast as you set them out—so yes, doubling the recipe really is a good idea. 🎃