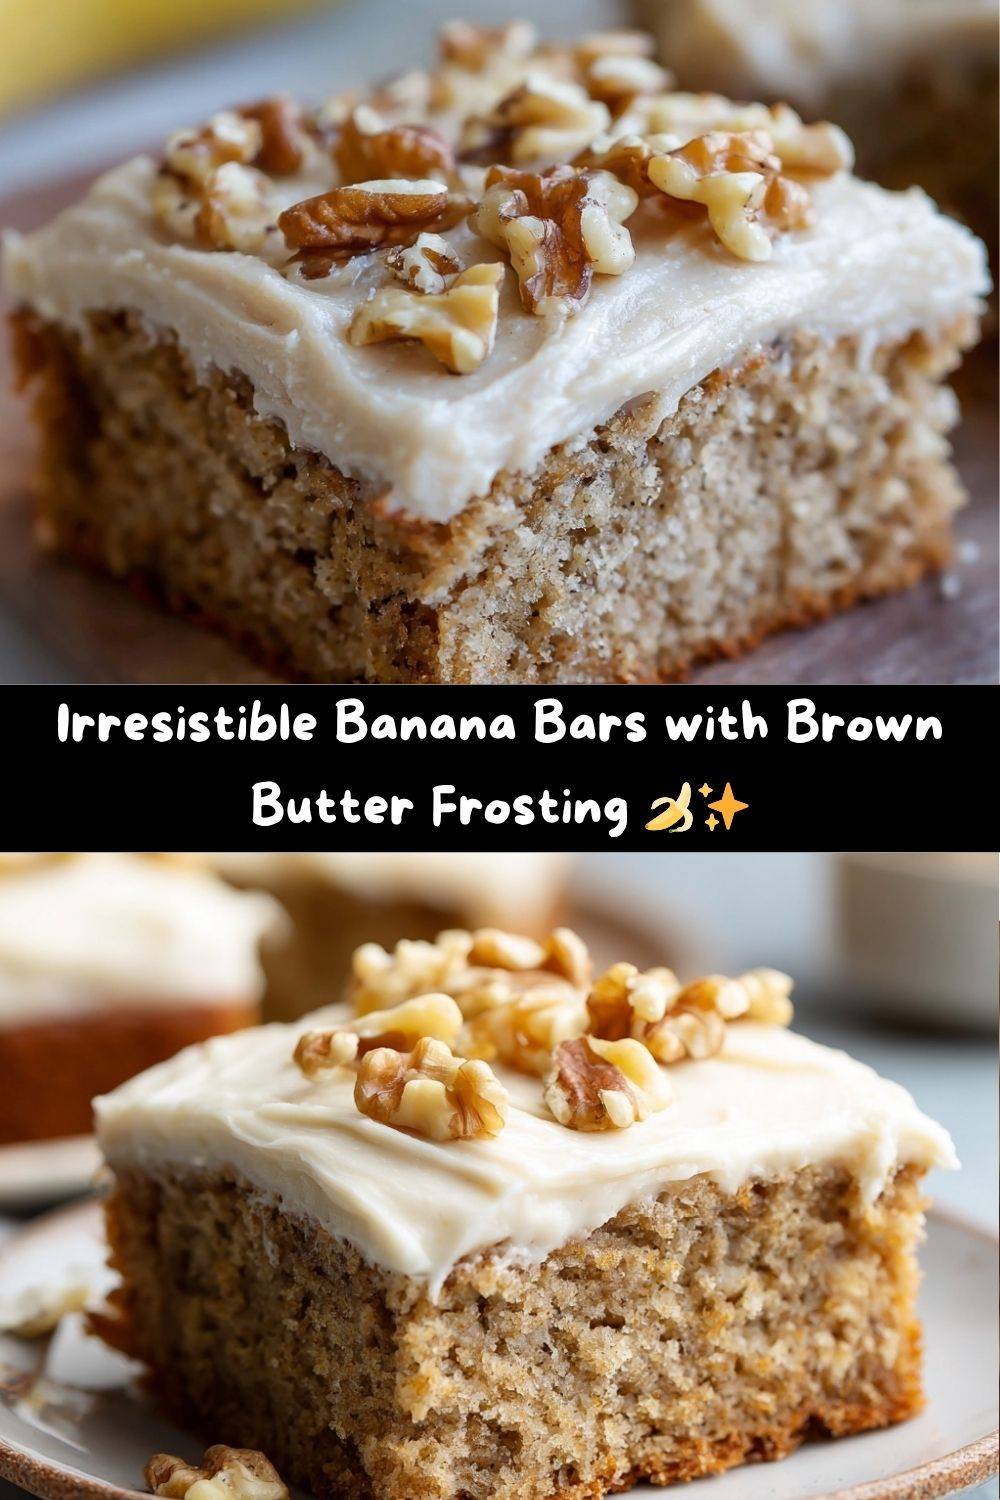
Banana Bars with Brown Butter Frosting: Your New Favorite Recipe for Ripe Bananas!
Hey there, friend! Let’s talk about that sad, spotty bunch of bananas sitting on your counter. You know the ones. You bought them with the best intentions for a healthy week, but now they’re looking a little… dramatic. A little *too* ripe for your morning smoothie. Before you even think about tossing them, I’m here to tell you: you are not looking at a fruit tragedy. You are looking at destiny. You are moments away from creating the most incredibly moist, rich, and soul-satisfying Banana Bars with Brown Butter Frosting you’ve ever tasted.
This isn’t just another banana bread recipe. Oh no. This is its more elegant, shareable, and downright irresistible cousin. Imagine a bar that’s soft and dense, packed with real, honest-to-goodness banana flavor, with just a hint of cozy warmth. Now, picture it slathered with a frosting that tastes like liquid gold—a nutty, deeply caramel-like brown butter frosting that will make you close your eyes and sigh with happiness. This is the kind of dessert that turns a regular Tuesday into a celebration and makes you the undisputed hero of the potluck. So, tie on your favorite apron (the messy one is always the best), and let’s make something truly delicious together.
The Messy Magic of My Grandma’s Kitchen
This recipe always takes me right back to my Grandma Eleanor’s kitchen. It was a wonderfully chaotic place, always smelling of something warm and sweet. She had a steadfast rule: no banana left behind. A ripe banana was a sacred ingredient, never wasted. I can still see her, with her flour-dusted hands, mashing those bananas in a chipped yellow bowl with a focus I found mesmerizing. She’d let me “help” by creaming the butter and sugar, and I’d always sneak a taste of the vanilla extract when she wasn’t looking (a habit I’ve happily never broken).
Her version was simpler, a straightforward sheet cake, but the spirit is the same. It was never about perfection; it was about the joy of creating something from nothing. It was about the love and the stories shared over a simple, homemade treat. Every time I make these bars, I feel that same magic. It’s my little way of keeping her kitchen, and that wonderful, messy love, alive in my own.
Gathering Your Ingredients: A Chef’s Guide
Here’s your shopping list! But before you start, let’s chat about a few key players. Using high-quality, room-temperature ingredients will make a world of difference in creating a beautifully smooth, well-risen bar.
For the Banana Bars:
- 1½ cups sugar: We’re using regular granulated sugar here for that classic sweet flavor and tender crumb.
- 1 cup sour cream: This is our SECRET WEAPON for ultimate moisture! The tang also balances the sweetness perfectly. Chef’s Tip: No sour cream? Full-fat plain Greek yogurt is a fantastic substitute.
- ½ cup butter, softened: Use unsalted butter so we can control the salt. “Softened” means it should give slightly when you press it, but not be oily or melted.
- 2 eggs: They provide structure and richness. Make sure they’re at room temperature to blend seamlessly into the batter.
- 1¾ cups mashed ripe bananas (about 3–4): The browner and spottier, the better! They have more natural sugar and a stronger, sweeter banana flavor. Mash them well with a fork until no major lumps remain.
- 2 tsp vanilla extract: Pure vanilla extract adds a beautiful depth of flavor. Don’t be shy with it!
- 2 cups all-purpose flour: The foundation of our bars. For a lighter texture, you can fluff your flour with a spoon before measuring, then level it off.
- 1 tsp baking soda: Our leavening agent, giving these bars their perfect lift.
- ¾ tsp salt: Crucial for enhancing all the other flavors. It makes the sweet taste sweeter and the banana flavor pop!
- ½ cup chopped walnuts (optional): I love the textural contrast they provide, but if you’re not a nut person, feel free to leave them out or swap for chocolate chips!
For the Brown Butter Frosting:
- ½ cup butter: We’re browning this butter, so unsalted is a must. We want to taste the nutty butter, not salt.
- 4 cups powdered sugar: Creates that smooth, spreadable frosting consistency.
- 1½ tsp vanilla extract: A second hit of vanilla in the frosting ties the whole dessert together beautifully.
- 3 tbsp milk: Whole milk is ideal for richness, but any milk you have on hand will work to achieve the perfect spreading consistency.
Let’s Bake! Your Step-by-Step Guide to Perfect Banana Bars
Ready? Let’s do this! I’ll walk you through every step, sharing my favorite kitchen hacks along the way. You’ve got this!
- Preheat and Prep: First things first, get that oven heating to 375°F (190°C). Now, grab your 15×10-inch jelly roll pan (that’s a baking sheet with a small lip around the edge). Grease the entire inside with a little butter or non-stick spray, then dust it lightly with flour, tapping out the excess. This little “insurance policy” ensures your bars will release perfectly. Chef’s Hack: You can also line the pan with parchment paper, leaving a little overhang on two sides. This creates handy “handles” to lift the entire slab of bars out for super easy cutting!
- Combine the Wet Ingredients: In a large bowl, add the sugar, sour cream, softened butter, and eggs. Using an electric mixer (or some serious elbow grease with a wooden spoon!), beat everything together on medium speed until the mixture is smooth, pale, and beautifully creamy. This should take about 2 minutes. Now, mix in your mashed bananas and that glorious 2 teaspoons of vanilla extract until just combined.
- Incorporate the Dry Ingredients: It’s time to add the flour, baking soda, and salt. I like to add them all at once. Start your mixer on low speed! We only want to blend until the flour streaks disappear, about 1 minute. Do not overmix! Overmixing develops gluten and can make the bars tough. A few tiny lumps are totally fine. Finally, switch to a spatula and gently fold in the chopped walnuts, if you’re using them.
- Bake to Golden Perfection: Pour that lovely, fragrant batter into your prepared pan. Use a spatula to spread it into an even layer, making sure you get it into all the corners. Slide the pan into your preheated oven and bake for 20-25 minutes. You’ll know they’re done when the top is a lovely golden brown, the edges are just starting to pull away from the pan, and a toothpick inserted into the center comes out clean or with a few moist crumbs. Chef’s Tip: Ovens can vary, so start checking at the 20-minute mark!
While the Bars Bake, Make the MAGIC (a.k.a. The Brown Butter Frosting)
- Brown the Butter: Place the ½ cup of butter in a light-colored saucepan (so you can see the color change easily!) over medium heat. Let it melt, then it will begin to foam and sizzle. Keep swirling the pan occasionally. After a few minutes, you’ll notice little brown specks forming at the bottom and it will smell incredibly nutty and aromatic. This is the magic! Once it turns a beautiful amber color, immediately remove it from the heat and pour it into a heatproof bowl to stop the cooking. Let it cool for about 10-15 minutes. You want it warm, but not hot enough to melt the powdered sugar into a puddle.
- Whisk the Frosting Together: To the slightly cooled brown butter, add the powdered sugar, vanilla, and milk. Whisk vigorously by hand until everything is smooth, creamy, and lump-free. The consistency should be thick but spreadable—like a dreamy, cloud-like paste. If it’s too thick, add a teaspoon of milk at a time. If it’s too thin, add a little more powdered sugar.
- The Grand Finale: As soon as the bars come out of the oven, let them cool in the pan for about 10-15 minutes. They should still be slightly warm (but not piping hot) when you spread the frosting. This allows the frosting to set up beautifully and makes it easier to slice later. Pour that brown butter goodness over the warm bars and spread it into an even, swoop-y layer with an offset spatula or the back of a spoon.
How to Serve These Heavenly Bars
Now for the best part! I love serving these bars a few different ways. For a classic, homey feel, just slice them right in the pan into generous squares and serve them on a plate. They are absolutely perfect with a tall glass of cold milk or a hot cup of coffee.
If I’m feeling a little fancy (or serving them to guests), I’ll use that parchment paper to lift the entire slab onto a cutting board. Then, I use a sharp knife to slice them into clean, neat rectangles. A little extra sprinkle of chopped walnuts or even a few flakes of sea salt on top of the frosting just before it sets takes the presentation to a whole new level. For a special treat, serve them slightly warm with a small scoop of vanilla bean ice cream. The combination of the warm, soft bar and the cold, creamy ice cream is pure bliss.
Make It Your Own! Fun Recipe Variations
One of the best things about this recipe is how adaptable it is! Don’t be afraid to play and make it suit your cravings.
- The Chocolate Lover’s Dream: Fold ½ cup of semi-sweet or milk chocolate chips into the batter along with (or instead of) the walnuts. You could even add a tablespoon of cocoa powder to the dry ingredients for a chocolate-banana twist.
- Nut-Free & Fruity: Skip the walnuts and add ½ cup of shredded sweetened coconut or even some dried cranberries for a chewy, tart surprise.
- Spiced &> Cozy: Add 1 teaspoon of ground cinnamon and ¼ teaspoon of nutmeg to the dry ingredients. It gives the bars a warm, spiced flavor that’s perfect for fall.
- Cream Cheese Swirl: Before baking, drop spoonfuls of sweetened cream cheese mixture (4 oz softened cream cheese, ¼ cup sugar, 1 egg yolk) over the batter and swirl it in with a knife for a gorgeous marbled effect.
- Gluten-Free Goodness: You can easily substitute the all-purpose flour with a 1:1 gluten-free baking blend. I’ve had great success with this swap!
A Few Chef’s Notes from My Kitchen to Yours
This recipe has been a staple in my recipe box for years, and it’s evolved in little ways. I used to make it with a standard buttercream, but the first time I tried it with brown butter frosting? Game. Changer. It was one of those happy kitchen accidents that turned into a permanent upgrade.
I also have a funny story about the first time I made these for a party. I was so excited about the brown butter that I poured it, still scalding hot, right into the powdered sugar. Let’s just say I ended up with a melty, soupy mess and had to start the frosting all over again! So learn from my mistake: let that beautiful brown butter cool down just a bit. The patience is worth it, I promise.
Your Questions, Answered! (FAQs & Troubleshooting)
I’ve made these bars a million times, and I’ve heard all your questions! Here are the answers to the most common ones.
Q: My bars turned out dense and gummy. What happened?
A: This is almost always a case of overmixing! Once you add the flour, mix only until it’s *just* combined. Overmixing develops the gluten in the flour, leading to a tougher, denser texture. Also, double-check that your baking soda is fresh.
Q: Can I make these banana bars ahead of time?
A: Absolutely! They are actually even better the next day. Once cooled and frosted, cover the pan tightly with plastic wrap or store slices in an airtight container at room temperature for up to 2 days, or in the fridge for up to 5 days.
Q: My brown butter burned! What do I do?
A> Oh no! Unfortunately, there’s no saving burned butter—it will taste bitter. Toss it and start over. Remember, medium heat is your friend, and watch it like a hawk. It goes from perfectly nutty to burnt surprisingly fast.
Q: Can I freeze these banana bars?
A: You can! I recommend freezing them without the frosting for the best texture. Wrap the cooled, unfrosted bar slab tightly in plastic wrap and then foil. It will keep for up to 3 months. Thaw overnight in the fridge and make the fresh brown butter frosting before serving.
A Quick Note on Nutrition
I’m a firm believer that joy is an essential nutrient, and these bars are packed with it! While they are a dessert meant to be enjoyed as a treat, here’s a general breakdown per serving (1 bar), keeping in mind that values can vary based on specific ingredients used. Using ripe bananas adds natural sweetness and nutrients like potassium, and the walnuts (if you use them) provide healthy fats and a bit of protein. The sour cream adds a touch of calcium and keeps the bars incredibly moist without being overly heavy. As with all good things, savor and enjoy!
Estimated Per Serving:
Calories: 270 | Fat: 12g | Carbs: 38g | Sugar: 28g | Protein: 3g
Final Thoughts from My Kitchen
Well, my friend, we’ve done it! You are now the proud creator of what I truly believe are the world’s best Banana Bars. This recipe is more than just a way to use up fruit; it’s a vessel for creating your own kitchen memories. It’s about the smell of brown butter wafting through your home, the satisfaction of spreading that frosting, and the joy of sharing something made with your own two hands.
I hope this recipe finds a happy home in your kitchen, becoming a go-to for years to come. I’d love to hear how it turns out for you! Tag me on social @TastyChow so I can see your beautiful creations. Now, go forth and chow down!
With love and a full belly,
Emily