Your New Favorite Party Trick: Mini Cheesecake Bites
Hey there, friend! Emily here, from my flour-dusted kitchen to yours. You guys know the feeling: you’re craving that luxurious, creamy slice of cheesecake, but you don’t want to commit to a whole giant cake. Or maybe you’re hosting a gathering and need a dessert that’s as easy to eat while mingling as it is to make. Enter the hero of today’s story: Mini Cheesecake Bites.
These little guys are the absolute best of all worlds. They pack every bit of that classic, velvety vanilla cheesecake flavor and that irresistible buttery graham cracker crunch into a perfect, poppable, one-bite package. No slicing, no mess, just pure, unadulterated joy. They’re the ultimate crowd-pleaser for holidays, baby showers, game day, or just a Tuesday night when you deserve a treat. And the best part? They’re surprisingly simple. We’re talking minimal ingredients, straightforward steps, and a result that looks like you spent all day in the kitchen. So, tie on your favorite apron (the messy one is totally welcome here), and let’s make something delicious that will have everyone asking, “Can I have the recipe?”
The Cheesecake That Started It All
My love affair with cheesecake began, like so many of my food obsessions, in my grandma’s kitchen. She wasn’t a fancy chef, but she was a master of comfort. Every summer, she’d make one glorious, towering New York-style cheesecake for the family reunion. It was an event. We’d all watch with bated breath as she’d perform the infamous “jiggle test,” and the celebration when it came out of the oven crack-free was almost as big as the one for the Fourth of July fireworks.
One year, my job was to hand out the slices. I was maybe eight, wielding a pie server twice the size of my hand, and I was terrible at it. My slices were lopsided, crumbs went everywhere, and my cousin cried because hers had “less crust.” That’s when the lightbulb went off. What if every piece was already perfect? What if it was its own little self-contained universe of crust and filling? The idea for “cheesecake bites” was born in my little-kid brain that day, though it took culinary school and a few (dozen) kitchen experiments to perfect it. This recipe is that dream come true—all the magic of my grandma’s classic, but in a form that’s foolproof, shareable, and guaranteed to leave no one arguing over who got the bigger slice.
Gathering Your Flavor Arsenal
Here’s what you’ll need to create these little bites of heaven. I’ve included my favorite tips and swaps so you can make this recipe work with what you’ve got!
For the Buttery Graham Cracker Crust:
- 1 cup graham cracker crumbs – This is about 8-9 full sheets. The classic flavor is unbeatable, but feel free to get creative! Chef’s Insight: You can blitz them in a food processor or place them in a zip-top bag and roll with a rolling pin. Therapeutic and effective!
- 2 tablespoons granulated sugar – Just a touch to sweeten and help the crust caramelize slightly. For a deeper flavor, try brown sugar.
- 4 tablespoons (1/4 cup) unsalted butter, melted – The glue that holds our crust together. Substitution Tip: If using salted butter, just omit any added pinch of salt later. Vegan butter works great here too for a dairy-free crust.
For the Luxuriously Creamy Filling:
- 2 (8 oz) blocks full-fat cream cheese, softened – Non-negotiable tip: Let it sit on the counter for at least 1-2 hours. Room temp cream cheese is the #1 secret to a smooth, lump-free filling. Trust me on this!
- 1/2 cup plain Greek yogurt or sour cream – This is my secret weapon! Yogurt or sour cream adds a wonderful tang and helps prevent the filling from cracking. Greek yogurt also adds a protein boost. Chef’s Choice: I usually go with full-fat Greek yogurt for the creamiest result.
- 1/2 cup pure maple syrup or honey (or 1/2 cup granulated sugar) – I love the subtle, complex sweetness maple syrup adds. Honey works beautifully too. For a traditional taste, granulated sugar is perfect. Pick your fighter!
- 2 large eggs, at room temperature – Another room-temp MVP! They incorporate much more evenly, leading to a uniform texture. Just pop them in a bowl of warm water for 5 minutes if you forgot to take them out.
- 1 teaspoon pure vanilla extract – The soul of the filling. Use the good stuff if you have it!
- A tiny pinch of salt – This might seem odd, but salt is a flavor enhancer. It makes the sweet and tangy flavors pop!
For the Fun Part (Optional Toppings):
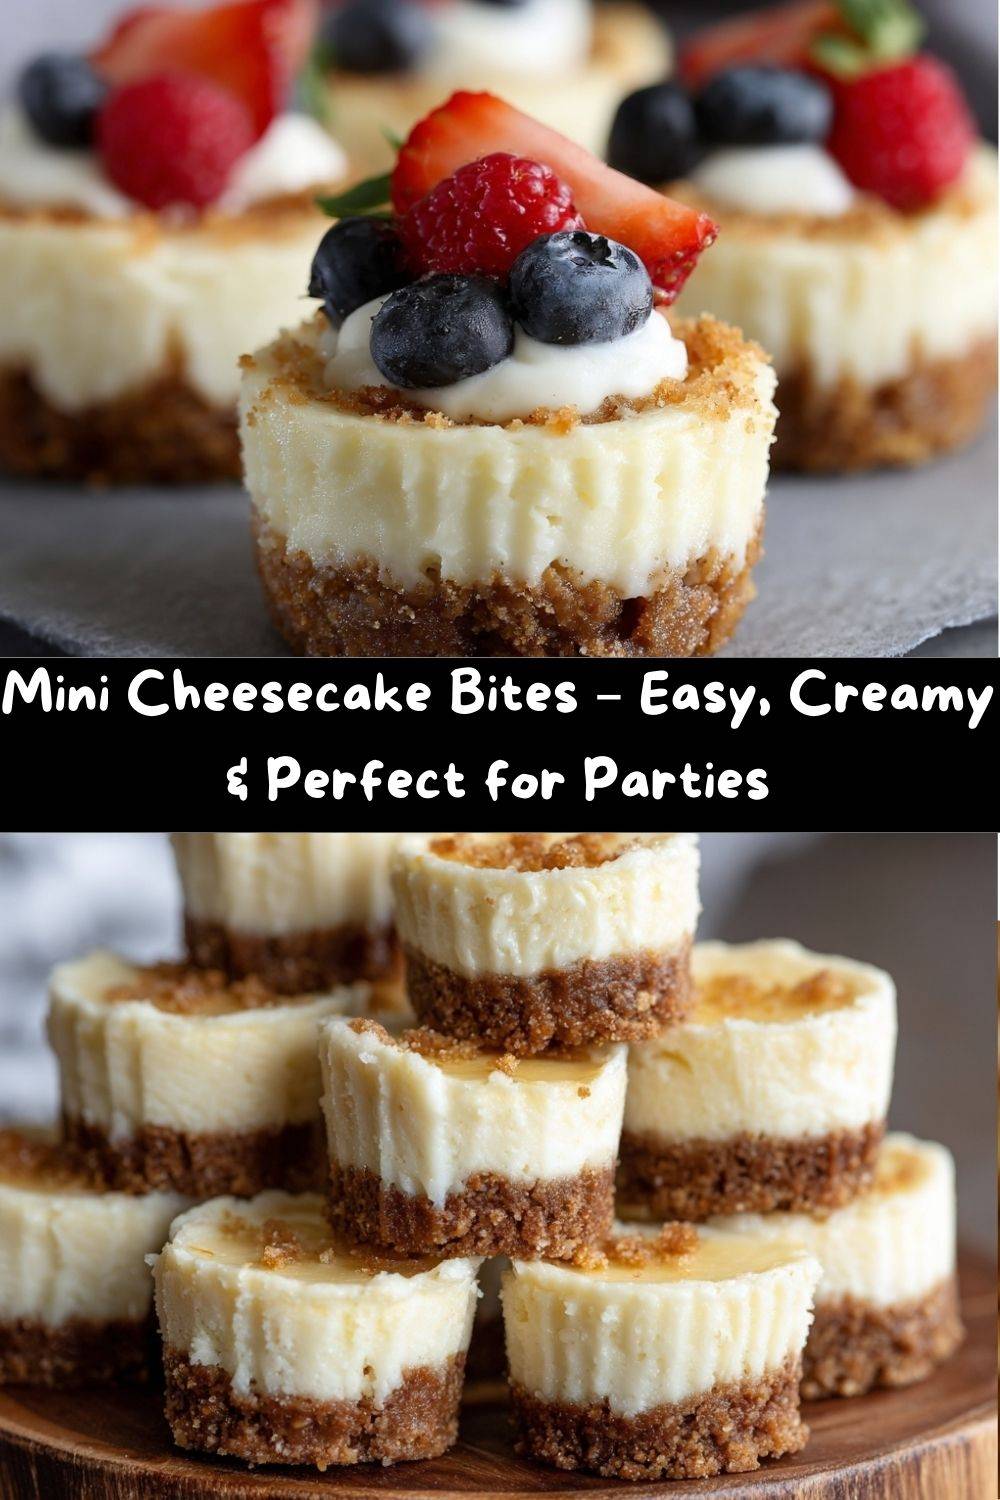
- Fresh berries (strawberries, raspberries, blueberries)
- A dollop of homemade whipped cream
- A quick berry compote (just simmer berries with a little sugar and lemon juice)
- A drizzle of melted chocolate or caramel sauce
- A sprinkle of lemon zest or crushed cookies
Let’s Build Some Bites! Your Step-by-Step Guide
Follow these simple steps, and you’ll be a mini cheesecake pro in no time. I’m walking you through every detail!
- Prep Your Stage. Preheat your oven to 325°F (160°C). Line a 24-cup mini muffin pan with paper liners or give each cup a very light spray with non-stick spray. The liners make for super easy removal and a cute presentation. Chef’s Hack: If you only have a standard muffin pan, that’s okay! You’ll just get fewer, slightly larger cheesecakes, and will need to increase the bake time by 5-10 minutes.
- Create the Crust. In a medium bowl, stir together the graham cracker crumbs, sugar, and melted butter until it resembles wet sand. It should hold together when you pinch it. Pro Tip: I use a small cookie scoop or a measuring tablespoon to portion it evenly. Press about 1 firm, packed tablespoon of the mixture into the bottom of each prepared muffin cup. A small shot glass or the bottom of a spice jar is the perfect tool to press it down flat and compact. Bake the crusts alone for 5 minutes, then let them cool on a rack while you make the filling. This pre-bake helps the crust stay crisp and not soggy.
- Whip Up the Dreamy Filling. In a large bowl, using a hand mixer or stand mixer fitted with the paddle attachment, beat the softened cream cheese on medium speed for 1-2 minutes until it’s completely smooth and creamy. Scrape down the bowl. This is crucial—no lumps allowed! Add the Greek yogurt (or sour cream) and your chosen sweetener (maple syrup, honey, or sugar). Beat again until fully combined and smooth. Scrape down the bowl again. Add the eggs, one at a time, beating on low speed after each addition just until the yolk disappears. Finally, beat in the vanilla and salt. Key Tip: Don’t over-mix once the eggs are in! Over-beating incorporates too much air, which can cause the cheesecakes to puff up and then sink or crack. We want a silky, dense, creamy texture.
- Fill ‘Er Up! Spoon or pipe the filling over the slightly cooled crusts, filling each cup just to the top. I like to use a cookie scoop or a piping bag for neatness, but a spoon works perfectly. Give the pan a gentle tap on the counter to release any air bubbles.
- Bake to Perfection. Bake for 15-18 minutes. The cheesecakes are done when the edges are set, and the centers still have a very slight jiggle (like Jell-O) when you gently shake the pan. They will firm up as they cool. Watch closely! Oven times can vary. Over-baking is the main cause of dryness and cracks.
- The Patient Part: Cooling. This step is vital! Let the cheesecakes cool completely in the pan on a wire rack. Then, transfer the pan to the refrigerator and chill for at least 2 hours, preferably overnight. This sets the structure and develops that perfect cheesecake texture. I know it’s hard to wait, but it’s worth it!
- Top & Serve! Once thoroughly chilled, gently pop them out of the pan. Add your favorite toppings right before serving for the freshest look.
How to Serve These Show-Stoppers
Presentation is half the fun! Arrange these mini bites on a beautiful platter or a tiered dessert stand for a real “wow” factor. For a rustic look, use a simple wooden board. I love creating a topping bar—set out small bowls of fresh berries, whipped cream, chocolate sauce, and chopped nuts, and let your guests build their own perfect bite. They’re also fantastic packaged in little clear treat boxes as sweet party favors or gifts for neighbors. Pair them with a cup of strong coffee, a glass of cold milk, or even a sweet dessert wine for the adults. The possibilities are endless!
Mix It Up! 5 Fun Flavor Twists
Once you’ve mastered the classic, the world is your cheesecake oyster! Here are a few of my favorite riffs:
- Chocolate Lover’s Dream: Replace 1/4 cup of the graham crumbs with cocoa powder for a chocolate crust. Fold 1/2 cup of mini chocolate chips into the filling before baking. Top with a chocolate ganache drizzle.
- Lemon Berry Bliss: Add 2 tablespoons of fresh lemon juice and 1 tablespoon of lemon zest to the filling. Top each baked bite with a single fresh raspberry or a dollop of blueberry compote.
- Cookie Dough Delight: Use crushed Oreos (filling and all) instead of graham crackers for the crust. Fold 1/3 cup of mini chocolate chips and 2 tbsp of flour into the cheesecake filling for a safe-to-eat “cookie dough” vibe.
- Salted Caramel Swirl: After filling the cups, dollop a teaspoon of good-quality salted caramel sauce on top of each and use a toothpick to swirl it gently into the filling before baking.
- Dietary Swaps: For gluten-free, use certified GF graham crackers or almond flour. For a lower-sugar option, use a sugar substitute formulated for baking in both the crust and filling (and lean on those fruity toppings!).
From My Kitchen to Yours: Chef Emily’s Notes
This recipe is my kitchen workhorse, and it’s evolved over countless batches. The biggest game-changer was switching from all sour cream to Greek yogurt—it gives such a lovely, clean tang and a protein boost I feel good about. I’ve also learned that patience truly is a virtue here. That long chill in the fridge? It’s not optional if you want the perfect texture. I once tried to serve them after just an hour because I was too eager… let’s just say they were delicious but messy! Now I always make them the day before a party. It’s one less thing to worry about, and they taste even better. Food, like good stories, often gets better with a little time.
Your Questions, Answered!
Q: My cheesecakes cracked! What did I do wrong?
A: Don’t worry, they’ll still taste amazing! Cracking usually happens from over-mixing the batter (incorporating too much air) or over-baking. Next time, mix on low speed once the eggs are added, and pull them out when the centers still have a slight jiggle. The topping will hide any cracks anyway!
Q: Can I freeze mini cheesecake bites?
A> Absolutely! They freeze beautifully. Place the chilled, unfrosted bites on a parchment-lined baking sheet and freeze until solid (about 2 hours). Then, transfer them to a freezer-safe bag or container for up to 2 months. Thaw in the fridge overnight before topping and serving.
Q: The middles sank a little after cooling. Is that normal?
A> A slight dip in the center is totally normal and actually desirable for holding toppings! A dramatic sinkhole usually means the batter was over-beaten or there was a drastic temperature change during cooling. Letting them cool gradually at room temperature first helps prevent this.
Q: Can I use low-fat cream cheese?
A> You can, but the texture won’t be as rich and creamy. Full-fat cream cheese gives the best structure and classic cheesecake mouthfeel. For the best results, I recommend sticking with the full-fat blocks.
Nutritional Information*
*Please note: This is an estimate for 1 mini cheesecake bite without toppings, using the ingredients listed with granulated sugar and full-fat dairy. Values will change with substitutions.
- Calories: ~120
- Total Carbohydrates: 9g
- Protein: 3g
- Total Fat: 8g
- Prep Time: 15 minutes
- Cook Time: 18-20 minutes
- Chill Time: 2 hours (minimum)
- Yield: About 24 perfect mini cheesecakes
Final Thoughts Before You Bake
And there you have it, my friend! Your complete guide to the most adorable, delicious, and shareable Mini Cheesecake Bites. This recipe is built on love, a few hard-learned kitchen lessons, and the desire to create something that brings people together with zero stress. Remember, cooking is about joy, not perfection. So if your crust isn’t perfectly even or your swirl isn’t Instagram-worthy, it doesn’t matter. What matters is the smile on your face when you pull them out of the oven and the happy murmurs from anyone lucky enough to taste one.
I hope this recipe becomes a trusted favorite in your home, just like it is in mine. Now, go preheat that oven, and let’s make some memories (and maybe a little mess) together. Don’t forget to tag me @TastyChow if you share your creations—I love seeing your kitchen wins!
With love