Brunch Sliders Trio: The Ultimate Crowd-Pleasing Feast!
Hey there, brunch bestie! Raise your hand if you’ve ever faced the ultimate weekend dilemma: you want to whip up something utterly delicious and impressive for your crew, but you also really, really want to actually enjoy the morning with them instead of being chained to the stove. 🙋♀️ I feel you so deeply. That exact struggle is what sparked the creation of these iconic Brunch Sliders.
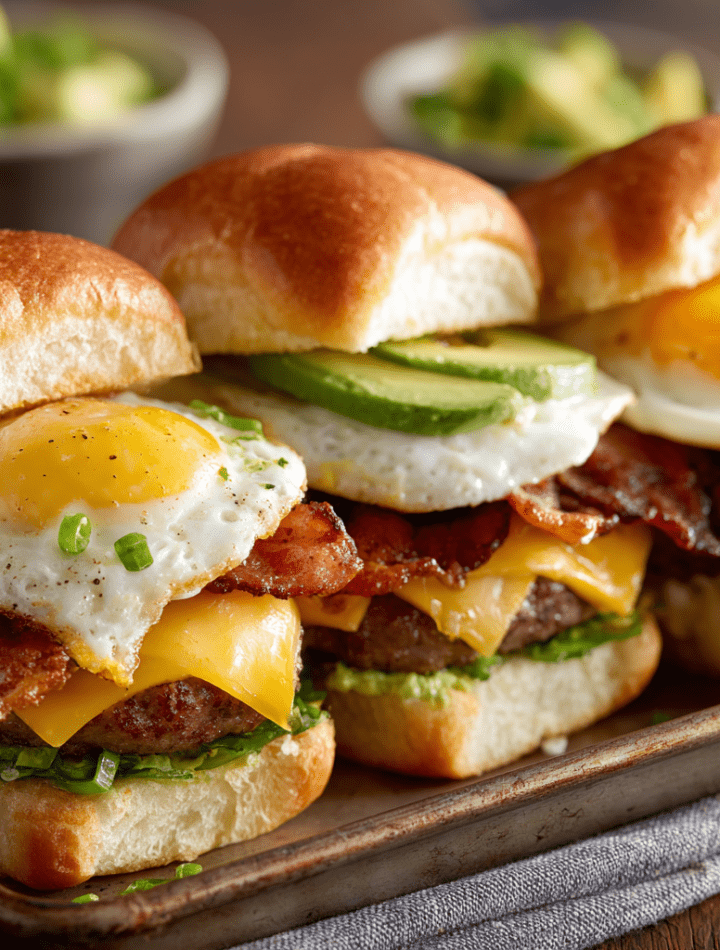
Imagine this: a single, glorious baking tray, emerging from the oven smelling like heaven. On it, a dozen perfectly golden, butter-brushed mini buns, each one hiding a secret pocket of joy. Some are stuffed with crispy bacon and melty cheddar, others with savory sausage patties, and a few bright, creamy ones with fresh avocado. It’s a brunch trio that has something for everyone, and the best part? You assemble it ahead, pop it in the oven, and by the time the coffee is brewed and the mimosas are poured, you have a hot, satisfying, and seriously fun meal ready to go.
This isn’t just a recipe; it’s my favorite hack for hosting without the stress. Whether it’s a holiday morning, a game day brunch, or just because Saturday deserves something special, these sliders are my go-to. They’re mini, mighty, and guaranteed to make you the hero of the breakfast table. So, tie on your favorite apron (the messy one is totally welcome here), and let’s make a tray of magic together!

The Slider That Started It All: A Tale of Happy Chaos
This recipe was born from a beautiful, chaotic family reunion at my place a few years back. My uncle wanted bacon, my cousin was vegetarian, my niece only ate “plain egg things,” and my dad was eyeing the sausage links. I stood in my kitchen, surveying the friendly breakfast demands, and had a lightbulb moment. What if I could make one dish that catered to all these cravings, all at once?
I grabbed my trusty pack of Hawaiian rolls, a carton of eggs, and every brunch topping I had. I started layering like a mad scientist—a little bacon here, a sausage patty there, some avocado slices for the veggie lovers. I brushed the whole tray with garlic-herb butter, said a little prayer, and slid it into the oven. The aroma that filled my house was incredible. When I pulled out that tray of unified, golden-brown sliders and cut them apart, the reaction was pure joy. Everyone could grab their favorite, and the happy, muffled “mmms” around the table were my best reward. That’s the heart of Tasty Chow: food that brings people together, without the fuss. This Brunch Sliders Trio is a direct result of that delicious, chaotic morning love.
Gathering Your Slider Squad: Ingredients & Insights
Here’s everything you’ll need to build your brunch masterpiece. Don’t stress about perfection—cooking is about flavor and joy, not rigid rules! I’ve included my favorite tips and swaps so you can make this recipe your own.
- 12 slider buns or Hawaiian rolls: The foundation! I love Hawaiian rolls for their hint of sweetness and incredibly soft texture, but any soft dinner rolls or slider buns work. Chef’s Insight: Keeping them connected makes assembly and butter-brushing a breeze!
- 12 eggs, scrambled: The protein-packed glue that holds it all together. Scramble them gently until just set—they’ll cook more in the oven. Sub Tip: Short on time? Use pre-cooked frozen scrambled eggs, thawed. Or, bake a sheet of eggs and cut them into squares for super neat layers!
- 6 slices cheddar or American cheese: Melty, gooey goodness. Tear each slice in half to cover four sliders perfectly. Flavor Twist: Pepper Jack for a kick, Swiss for a nutty note, or Gouda for extra creaminess!
- 2 tbsp melted butter (for brushing): The golden secret. Brushing the tops gives you that irresistible, bakery-style finish. Pro Hack: Add a minced garlic clove, a pinch of onion powder, or a sprinkle of everything bagel seasoning to the melted butter for a next-level flavor boost.
- For the Bacon-Egg-Cheese Sliders: 4 slices cooked bacon. Cook until crisp! Thick-cut is fantastic for substance. Make-Ahead Tip: Cook the bacon a day or two before and store it in the fridge.
- For the Sausage-Egg-Cheese Sliders: 4 sausage patties (or split links). Use your favorite—mild, spicy, or even chicken sausage. Cook them through before assembling. Healthier Swap: Turkey or plant-based sausage patties work beautifully here.
- For the Avocado-Egg Sliders: 1 large avocado, sliced or mashed + pinch of salt & lime. The fresh, creamy element! Chef’s Note: If mashing, mix in a squeeze of lime juice and a pinch of salt to keep it bright green and flavorful. Add these after baking if you prefer a cool, fresh contrast.
Let’s Build & Bake: Your Step-by-Step Guide
Follow these simple steps, and you’ll have a tray of brunch perfection in no time. I’ve tucked my favorite kitchen hacks right into the instructions!
- Prep Like a Pro: Preheat your oven to 350°F (175°C). Grab a 9×13 baking dish or a rimmed baking sheet and give it a light spray with cooking oil. This is your slider canvas! Now, take your whole package of rolls and, without separating them, slice the entire block in half horizontally so you have one giant “top” and one giant “bottom.” Place the bottom half, cut side up, in your prepared dish. My Hack: Use a long serrated bread knife for a clean, easy cut through all the rolls at once.
- Scramble Your Eggs: While your oven heats, scramble those dozen eggs. Whisk them well with a splash of milk or water (this makes them fluffier!) and a good pinch of salt and pepper. Cook them in a non-stick skillet over medium-low heat, gently pushing the curds around until they’re just set but still slightly moist. They’ll finish cooking in the oven. Spread this glorious, fluffy egg blanket evenly over all the roll bottoms.
- Create Your Flavor Rows: This is the fun, assembly-line part!
- Row 1 – Bacon Bliss: Over the first third of the egg-covered buns, lay down your half-slices of cheese, then top with the crispy bacon strips.
- Row 2 – Sausage Savory: Over the middle third, add cheese, then your cooked sausage patties. Press them down gently so they sit nice and flat.
- Row 3 – Avocado Fresh: Leave the last third with just egg for now. We’ll add the avocado later to keep it fresh. If you *love* warm avocado, you can add thin slices now, but I prefer adding it post-bake.
- Top, Butter, & Bake: Carefully place the top half of the rolls over your filled masterpiece. Take your melted butter (garlic-infused if you’re fancy!) and brush it generously over the top of every roll. This is what gives you that gorgeous, golden, slightly crisp top. Now, cover the entire dish tightly with aluminum foil. This step is crucial—it traps steam and melts the cheese without over-toasting the buns. Bake, covered, for 12-15 minutes.
- The Grand Finale: After 15 minutes, the sliders should be heated through and wonderfully melty. Remove the foil. If you like a bit more color on top, you can pop them back in for 2-3 minutes uncovered. Pull the tray out and let it rest for 5 minutes. This rest time lets everything settle, making them much easier to cut. Use a large, sharp knife to slice along the roll lines into 12 individual sliders. If you made the avocado row, now’s the time to open those tops, add your mashed or sliced avocado, and close them back up. Serve immediately and watch them disappear!
How to Serve Your Slider Spread
Presentation is part of the fun! I love keeping the sliders piled high on a big wooden board or a platter lined with a cute kitchen towel. It feels rustic, inviting, and totally Instagram-worthy. For a full brunch spread, pair them with:
- A big, vibrant fruit salad or a bowl of fresh berries for a sweet, juicy contrast.
- A pitcher of classic OJ for mimosas or a pot of strong, excellent coffee.
- Small bowls of extra toppings for DIY customization: hot sauce, ketchup, salsa, or a quick herby mayo.
The beauty is that these sliders are handheld, so plates aren’t even strictly necessary (though napkins definitely are!). They’re perfect for casual, standing-around-the-kitchen gatherings where the vibe is easy and the food is the star.
Mix It Up! 5 Delicious Slider Twists
Once you master the basic formula, the world is your brunch oyster! Here are some of my favorite riffs on this recipe:
- Everything Bagel Sliders: Swap the cheese for a schmear of plain cream cheese on the bottom bun. Top the egg with smoked salmon or ham, red onion slices, and capers. Brush the tops with butter mixed with everything bagel seasoning before baking.
- Southwest Fiesta: Add a layer of black beans and corn to the egg. Use pepper jack cheese. Top with a spoonful of pico de gallo or a drizzle of chipotle mayo after baking.
- Veggie Lover’s Delight: Sauté sliced mushrooms, spinach, and bell peppers until soft, and use that as a layer instead of (or with!) the meat. Goat cheese crumbles are amazing here.
- Ham & Swiss Classic: A timeless combo! Use thinly sliced deli ham and Swiss cheese. Add a drizzle of honey mustard or a smear of Dijon on the bottom bun before assembling.
- “Leftover” BBQ Slider: Got leftover pulled pork or shredded chicken? Toss it in a bit of BBQ sauce and use that as your hearty layer with a slice of cheddar. Unreally good.
Chef Emily’s Kitchen Notes
This recipe has evolved into my most-requested brunch dish, and I’ve learned a few things along the way. First, don’t fear the make-ahead! You can fully assemble the sliders (minus the butter brush and avocado) the night before, cover tightly, and refrigerate. In the morning, let the tray sit at room temp for 20 minutes, then butter, cover, and bake—you might need to add 3-5 extra minutes. Second, the “one-tray” method is sacred to me, but if you have a crowd with very distinct diets, you can absolutely split the ingredients and make separate mini-trays. Finally, the biggest lesson? Always make more than you think you need. These sliders have a funny way of vanishing into happy stomachs faster than you can say “second helping.”
Your Slider Questions, Answered!
Q: Can I use frozen sausage patties or bacon?
A: Absolutely! Just make sure to cook them according to package directions and let them cool/drain before assembling. You don’t want extra grease making the buns soggy.
Q: My buns got a bit soggy on the bottom. How can I prevent that?
A> Great question! A light shield can help. You can spread a very thin layer of mayonnaise or softened butter on the cut side of the bottom bun before adding the eggs. This creates a moisture barrier. Also, ensure your scrambled eggs are well-drained and not watery.
Q: How do I store and reheat leftovers?
A> They store surprisingly well! Let them cool, then place in an airtight container in the fridge for up to 3 days. Reheat in the microwave for 30-45 seconds, or better yet, wrap in foil and warm in a 300°F oven for 10-15 minutes to recrisp the bun.
Q: Can I make these vegetarian or vegan?
A> For sure! For a vegan version, use plant-based rolls, a tofu scramble, vegan cheese slices, and your favorite meat alternatives (vegan bacon, sausage). The avocado row is naturally vegan-friendly! Brush the tops with vegan butter or olive oil.
Nutritional Information (Approximate, Per Slider)
Please note: This is a general estimate based on the primary ingredients. Values will vary significantly based on your specific ingredient choices (type of bun, cheese, meat, etc.).
- Calories: 280-320
- Protein: 14g
- Carbohydrates: 20g
- Fat: 18g
- Fiber: 1-2g
These sliders are a balanced mix of protein, carbs, and fats, making them a satisfying meal. To lighten them up, consider using whole wheat slider buns, egg whites, reduced-fat cheese, and turkey bacon or sausage. Remember, food is about nourishment and joy—so enjoy every delicious bite!
Final Thoughts from My Kitchen to Yours
And there you have it, friend—my all-in-one secret weapon for the best brunch ever. What I love most about this Brunch Sliders Trio isn’t just the incredible flavor (though that’s a huge plus!), but the way it gathers people. It’s interactive, customizable, and full of love. It’s the recipe I pull out when I want to see smiles, hear laughter, and fill bellies with goodness without spending the whole morning in the kitchen.
So next time you’re planning a get-together, or even just treating your own family to a special weekend morning, remember this tray. It’s proof that the best meals are often the simplest, most shareable ones. Thank you for letting me share my kitchen stories with you. Now, go make something delicious, and don’t forget to tag #TastyChow if you do—I love seeing your creations!
With love and a well-buttered spatula,
Emily 🧡