Hey There, Sweet Friend! Let’s Make Some Magic
Is there anything that screams “FALL IS HERE!” more than the smell of caramel apples wafting through your kitchen? I’m talking about that incredible, buttery, sugary scent that wraps you up like a cozy flannel blanket and makes everyone in the house magically appear, asking, “What smells so good?” If you’ve ever thought about making your own caramel apples but felt a little intimidated by the process, I’m here to tell you to grab your favorite apron and let out a happy sigh. We’re ditching the stress and creating the most fun, interactive, and downright delicious treat you can serve at any gathering: a DIY Caramel Apple Bar!
This isn’t just a recipe; it’s an experience. It’s the centerpiece of your next game night, the star of your Halloween party, and the reason your kids will think you’re the coolest parent on the block. The best part? It’s incredibly simple. We’re talking melt, dip, roll, and devour. No fancy candy thermometer skills required. Just pure, unadulterated fun. So, let’s channel that inner child, embrace the mess (because it’s totally worth it), and create a spread that’s as beautiful as it is tasty. Get ready to make some memories and some seriously delicious caramel apples!
A Sticky, Sweet Memory
This recipe takes me right back to my grandma’s kitchen table, covered in newspapers to catch the inevitable drips of caramel. Every October, it was our tradition. My brother and I would jostle for position, eager to be the first to dunk our perfectly polished Granny Smith apple into the pot of molten gold my grandma would stir on the stovetop. The air was thick with anticipation and the scent of melting caramel. I was always in charge of the sprinkles, a job I took very seriously, often applying them with such enthusiasm that my apple looked more like a festive holiday ornament than a snack.
One year, my brother, in his infinite nine-year-old wisdom, decided to put his freshly dipped apple directly on the newspaper to roll it in peanuts. Let’s just say he got a little extra fiber with his treat from the newsprint that stuck to the caramel! We still laugh about his “Headline Apple” to this day. It’s those messy, imperfect, and heartwarming moments that food is all about. This caramel apple bar is designed to create exactly that kind of joy and connection. It’s not about perfection; it’s about laughter, creativity, and sharing something wonderful together.
Gathering Your Sweet Arsenal
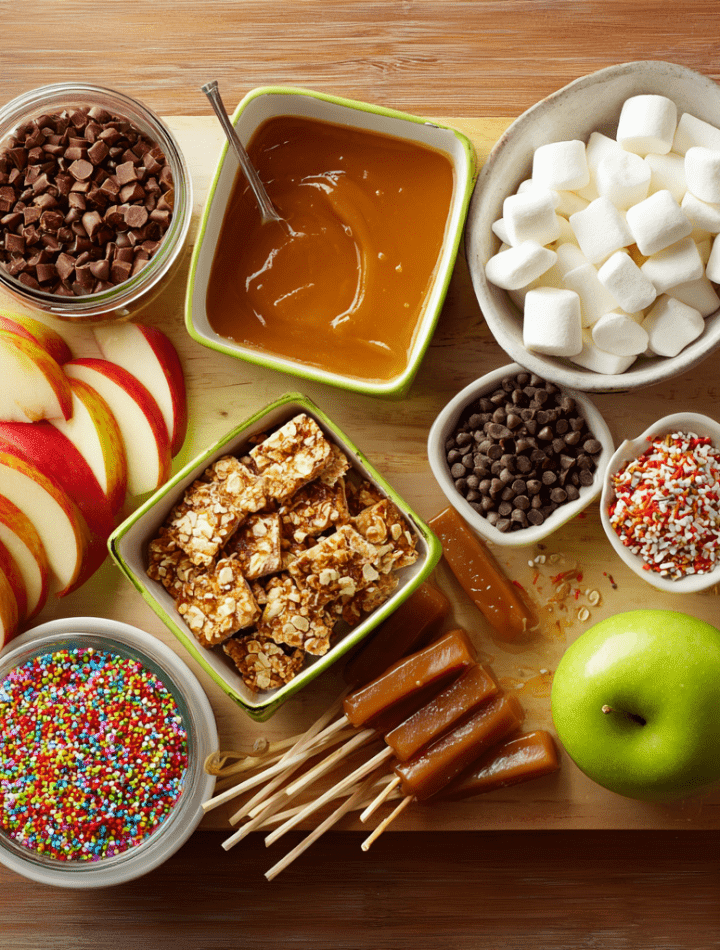
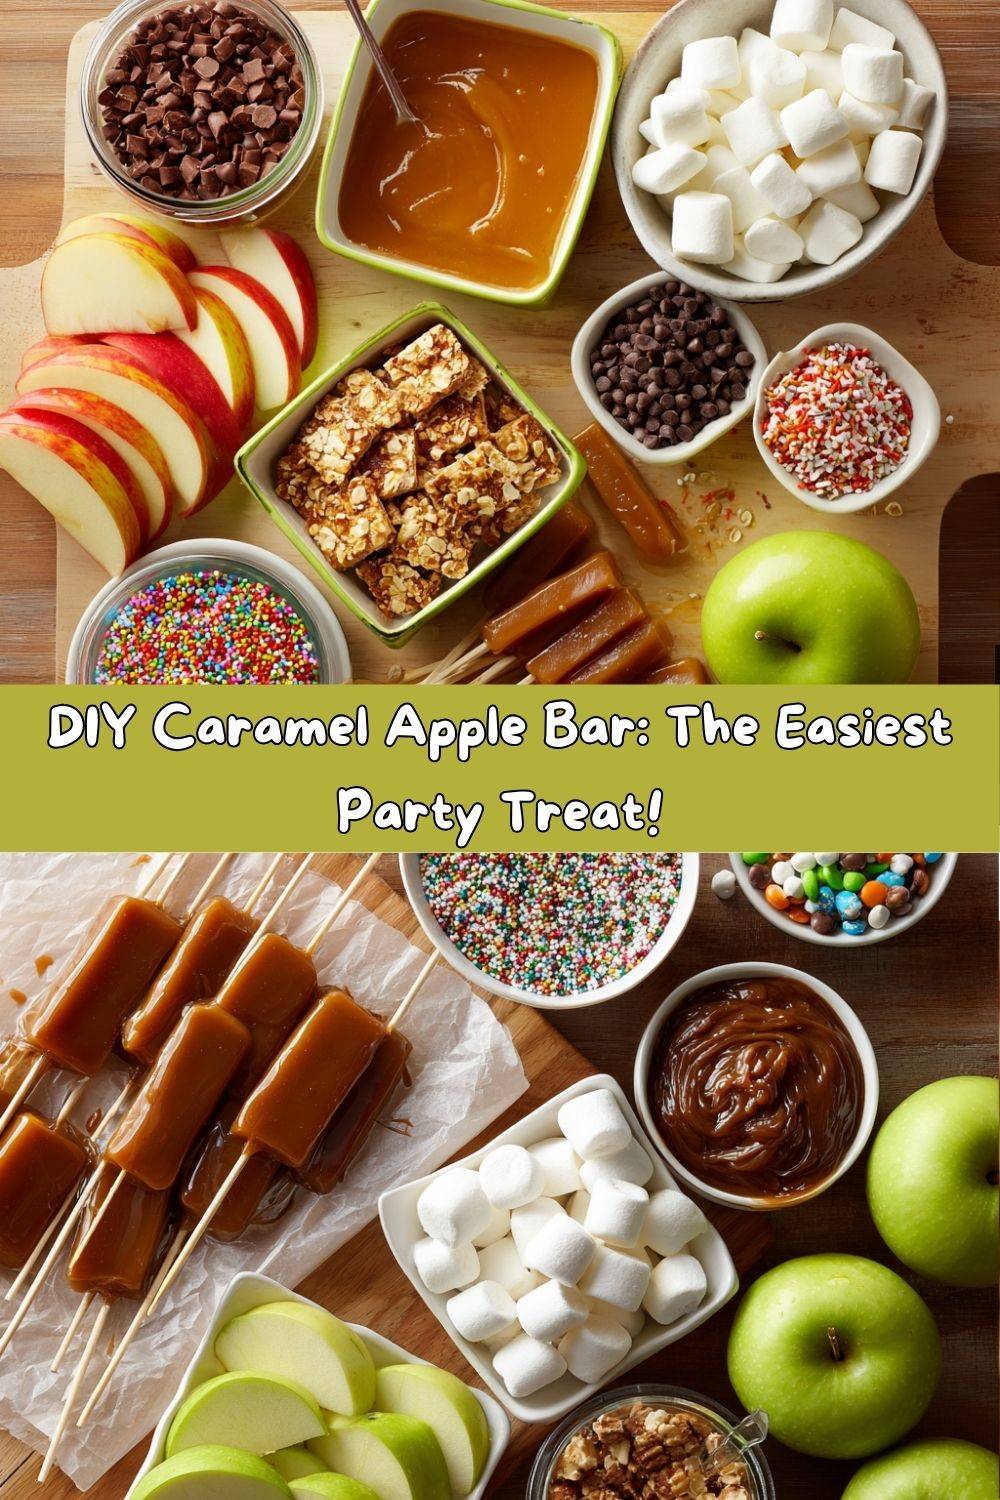
Here’s your shopping list for sweet success! The beauty of this setup is its flexibility. Don’t like peanuts? No problem! Got a bag of toffee bits burning a hole in your pantry? Toss ’em in a bowl! Here’s what you’ll need for the base recipe and a whole world of possibilities.
- 12 oz Kraft Caramels, unwrapped: This is our MVP. Kraft caramels are my go-to because they melt like a dream and have that classic, nostalgic flavor we all love. Chef’s Insight: Unwrapping them is the most tedious part—enlist help! Make it a party activity. For a richer flavor, you can swap in a high-quality vanilla caramel or even a salted caramel variety.
- 2 tbsp Water: Just a couple of tablespoons is all you need to help the caramels melt down into a smooth, dip-able consistency. It prevents them from seizing up or burning.
- 4 large Honeycrisp Apples: I adore Honeycrisp for their perfect sweet-tart balance and incredible crunch that holds up against the caramel. Substitution Tip: Granny Smith are a fantastic tart alternative, and Fuji or Gala apples bring a sweeter, softer crunch. The key is to use a firm apple!
- Toppings of Your Choice: This is where your inner artist gets to play! I’m listing my classics, but your imagination is the limit.
- Graham Cracker Crumbs: Adds a lovely, sandy texture and that iconic “s’mores” flavor.
- Mini Marshmallows: For a pillowy, sweet surprise. Toasting them lightly first is a next-level move!
- Chocolate Jimmies & Festive Sprinkles: For color, crunch, and pure joy. Jimmies have a great chocolate hit, while sprinkles are all about the visual fun.
- Mini Chocolate Chips: They stick easily and deliver those satisfying little bursts of chocolate.
- Crushed Peanuts: The classic salty-sweet combo. For a nut-free option, try crushed pretzels!
Let’s Get Dipping: Your Foolproof Plan
Follow these steps, and you’ll be a caramel apple pro in no time. I’ve sprinkled in my favorite chef hacks to make everything even smoother.
- Prep Your Apples: Wash and thoroughly dry your apples. Any water on the skin will prevent the caramel from sticking! Then, slice them into sturdy wedges or chunks. Chef’s Hack: I love serving wedges instead of whole apples because they’re infinitely easier to eat—no wrestling with a giant sphere on a stick! If you do want the classic look, insert popsicle sticks or sturdy skewers into the stem end of whole apples before you start.
- Create Your Topping Station: Before you even think about melting the caramel, get your toppings ready. Pour each one into its own small bowl or onto a small plate with a rim. Arrange them in a line or a pretty circle on your table. This is called “mise en place” (everything in its place), and it makes the dipping process a seamless, fun flow instead of a chaotic scramble.
- Melt the Caramel: Unwrap all those caramels (remember, recruit your friends/kids/partner for this job!) and place them in a medium, microwave-safe bowl. Add the two tablespoons of water. Microwave on high for 1 minute. Remove the bowl (it will be hot!) and give the caramels a good stir. They will only be partially melted. Pop them back in for another 1-2 minutes, stopping to stir every 30 seconds, until the mixture is completely smooth and lava-like. Chef’s Tip: Do NOT walk away during this process. Microwaves vary in power, and caramel can go from perfect to a burnt, sticky mess in seconds. Low and slow, with frequent stirring, is the key.
- The Dip & Roll: Now for the main event! Working quickly with one apple piece at a time, dip it into the warm caramel, swirling to coat it on all sides. Let the excess caramel drip back into the bowl for a second. Then, immediately roll the dipped apple in your topping of choice, pressing gently to make sure the goodies adhere. Chef’s Hack: If your caramel starts to thicken and become difficult to dip, just pop it back in the microwave for 15-20 seconds and give it another stir.
- Set and Serve: Place your finished masterpiece on a sheet pan or plate lined with parchment or wax paper. You can let them set at room temperature for about 15 minutes until the caramel firms up, or pop them in the fridge for 5-10 minutes if you’re in a hurry. They are best enjoyed the same day for maximum apple crunch.
How to Serve Your Creations
Presentation is part of the fun! Don’t just plop these on a plate. Make your caramel apple bar an Instagram-worthy spectacle.
Grab a large wooden board, a pretty platter, or even a tiered stand. Arrange the set caramel apples in the center. Scatter a few extra toppings artistically around the board for a lush, abundant feel. If you have any whole apples left over, tuck them around the edges as decoration. For an extra special touch, provide small, cute paper liners or mini parchment squares for guests to place their apples on. This makes it easy to hold and contains any sticky drips. Offer small skewers or forks for spearing the apple wedges if you didn’t put sticks in them. The goal is to make it easy, elegant, and incredibly inviting. Watch your guests’ eyes light up as they approach this beautiful, customizable dessert station!
Mix It Up! Endless Flavor Combinations
The basic recipe is just the beginning. Here are a few of my favorite themed twists to keep things exciting.
- The S’mores: Roll your caramel-dipped apple in graham cracker crumbs, then press on mini marshmallows and mini chocolate chips. For the ultimate experience, give them a very quick pass with a kitchen torch to toast the marshmallows!
- The Turtle: A decadent dream. Dip in crushed pecans, then drizzle with melted chocolate and a tiny sprinkle of flaky sea salt after they’ve set.
- The Candy Craver: Chop up your favorite candy bars—Snickers, Butterfingers, or Reese’s Cups—and use those as your rolling topping. It’s a candy shop explosion!
- Lighter Twist: Use a light caramel or yogurt dip instead of traditional caramel. Roll in crushed granola, unsweetened coconut flakes, and a few dark chocolate chips for a healthier but still delicious treat.
- Festive Fun: Match your toppings to the holiday! Orange and black sprinkles for Halloween, red and green for Christmas, or pastel nonpareils for Easter.
Emily’s Chef Notes
This recipe has evolved so much from my grandma’s stovetop method. The microwave trick is my ultimate hack for a no-fuss, party-friendly version. I’ve learned a few things along the way: First, drying the apples is non-negotiable. I once tried to shortcut this and ended up with a plate of naked apples and a bowl of sad, sliding caramel. Second, embrace the mess! Lay down parchment paper under your entire workstation. It makes cleanup a five-second job. And finally, the best caramel apples are the ones made with laughter. Don’t stress about them being perfectly round or evenly coated. The lopsided one with a mountain of peanuts is always the one made with the most love.
Your Questions, Answered!
Q: My caramel is too thick and clumpy. What did I do wrong?
A: This usually means it was overheated or cooked for too long. Caramel can seize up quickly. Try adding another teaspoon of water and microwaving for 15-second intervals, stirring vigorously in between, until it smooths back out.
Q: Can I make these ahead of time?
A: You can prep the components ahead of time! Slice the apples and keep them in a bowl of lemon water (1 tbsp lemon juice to 1 cup water) in the fridge to prevent browning for up to 4 hours. Dry them VERY well before dipping. The toppings can be pre-portioned. But I highly recommend dipping the day you plan to serve them for the best texture.
Q: The toppings won’t stick to my caramel. Help!
A: This means the caramel layer might have cooled and started to set already. Make sure you’re rolling immediately after dipping, while the caramel is still warm and tacky. If needed, you can also give the caramel a quick drizzle over the topped apple to “glue” any stray pieces on.
Q: Is there a way to make this vegan?
A> Absolutely! Look for vegan caramels ( brands like Cocomel are great) and use a plant-based butter to thin it if needed. For toppings, ensure your chocolate chips are dairy-free and skip any milk-based products.
Caramel Apple Bar
- Total Time: 7 minutes
- Yield: 8
Description
A quick, crowd-pleasing treat that’s as fun to make as it is to eat! This DIY caramel apple bar is perfect for parties, family nights, or fall-themed get-togethers. Just melt, dip, and roll—kids and adults alike will love customizing their own creations.
Ingredients
• 12 oz Kraft caramels, unwrapped
• 2 tbsp water
• 4 large honeycrisp apples, sliced into wedges or chunks
• Toppings of your choice:
– Graham cracker crumbs
– Mini marshmallows
– Chocolate jimmies
– Festive sprinkles
– Mini chocolate chips
– Crushed peanuts
Instructions
In a microwave-safe bowl, combine caramels and water.
Microwave for 2 minutes, stirring after each minute until smooth and fully melted.
Set up your topping bar in small bowls or plates.
Dip apple slices into warm caramel, then into your toppings of choice.
Serve immediately or place on wax paper to set.
- Prep Time: 5 minutes
- Cook Time: 2 minutes
Nutrition
- Calories: 160 / Serving
- Sugar: 24g / Serving
- Fat: 4g / Serving
- Carbohydrates: 30g / Serving
- Fiber: 2g / Serving
- Protein: 1g / Serving
Nutritional Information (Approximate, per serving)
Disclaimer: This is a rough estimate based on the base recipe with one topping and can vary greatly depending on your chosen toppings.
Calories: ~160 | Fat: 4g | Carbohydrates: 30g | Sugar: 24g | Fiber: 2g | Protein: 1g
While this is certainly a treat, apples bring fiber and vitamins to the party! To lighten it up, focus on nut-based toppings for healthy fats and protein, or use a lighter drizzle of caramel. Remember, it’s all about balance and enjoyment.
Go Forth and Create!
Well, my friend, you are now officially equipped to throw the most epic caramel apple party your kitchen has ever seen. This is more than just a recipe—it’s a ticket to fun, a catalyst for connection, and a guaranteed way to make everyone smile. I hope you embrace the creative process, get a little messy, and most importantly, share something delicious with the people you love.
I’d love to see your beautiful creations! Tag me on social @TastyChow with your caramel apple bar photos. Tell me, what was your favorite topping combination? Hearing your kitchen stories is my absolute favorite thing.
Now, go grab those apples and get rolling! Until next time, happy cooking!
— Emily