Your New Secret Weapon for Crazy Busy Nights
Hey there, friend! Let me paint a picture for you. It’s 5:30 PM. The kids are hangry, your to-do list is laughing at you, and the last thing you want to do is wrestle with a mountain of pots and pans. The siren song of takeout is strong, but your wallet and your desire for something actually satisfying are putting up a fight. Sound familiar? Oh, believe me, I’ve been there more times than I can count.
But what if I told you that in the time it takes to scroll through a delivery app, you could have a hot, comforting, and downright delicious meal on the table? A meal that tastes like a juicy, cheeseburger… but in a cozy, scoopable, one-pan form? Enter the hero of your weeknight: the Cheeseburger Rice Skillet.
This isn’t just another recipe; it’s a lifesaver. We’re taking everything we love about an all-American cheeseburger—the savory ground beef, the melty cheddar, that iconic ketchup and mustard tang—and we’re tossing it with fluffy rice right in one single skillet. The result is pure magic: cheesy, hearty, and packed with flavor that will have everyone asking for seconds. And the best part? It’s ready in just 15 minutes, start to finish. No flipping patties, no fussy assembly. Just one pan, a handful of simple ingredients, and a whole lot of yum. So, tie on that apron (the messy one is always the best), and let’s make something amazing together.

The Night This Skillet Saved My Sanity
This recipe was born out of pure, unadulterated chaos. Picture this: It was a rainy Tuesday, my recipe testing for a fancy layered cake had gone comically wrong (we’re talking buttercream on the ceiling, folks), and my dog was gleefully tracking flour-paw prints across the entire house. My husband texted, “On my way home, what’s for dinner?” and I looked into my empty soul and my even emptier fridge.
But then, I saw it. A lone pound of ground beef in the freezer, some leftover rice from last night’s stir-fry, and a block of cheddar cheese. In a moment of what I can only describe as kitchen genius (or desperation!), I thought, “What if I just… cooked it all together? Like a deconstructed cheeseburger?” Fifteen minutes later, we were sitting at the table, shoveling this gloriously cheesy, messy, comforting skillet into our mouths. It was a silent meal, punctuated only by the sounds of happy chewing and the rain against the window. No one missed the bun. No one asked for ketchup. It was perfect. It was a reminder that the best meals aren’t always the most complicated—they’re the ones that bring you together, even on the most chaotic of days.
Gather Your A-Team: The Ingredients
Here’s the beautiful part: you probably have most of this in your kitchen right now. This is a no-judgment zone, so use what you’ve got!
- 1 lb Ground Beef: I like an 80/20 blend for the best flavor, but leaner 90/10 or even 93/7 works great, too! Chef’s Insight: For a fun twist, try ground turkey, chicken, or even a plant-based ground “meat” – they all work wonderfully here.
- 2 cups Cooked White Rice: This is your chance to be a kitchen eco-hero! Use up that leftover takeout rice or a bag of pre-cooked rice from the store. Pro-Tip: Day-old, cold rice works BEST because it doesn’t get mushy. If you’re cooking fresh, spread it on a baking sheet to cool quickly so it stays fluffy.
- ¼ cup Ketchup: This is our “burger sauce” base, bringing a touch of sweet tomato-y goodness. Don’t be shy!
- 1 tbsp Yellow Mustard: The classic partner to ketchup! It adds that essential tangy zip that makes this taste unmistakably like a cheeseburger.
- 1 cup Shredded Cheddar Cheese: The glorious, melty crown! I love a sharp cheddar for a bigger flavor punch, but mild cheddar or a Monterey Jack blend is also fantastic. Chef’s Secret: Always shred your own cheese if you can! The pre-shredded stuff is coated to prevent clumping, which means it doesn’t melt as beautifully and smoothly.
Let’s Get Cooking: Your Foolproof Steps
Ready? This is so easy, you’ll have it memorized after one try. Grab your favorite large, oven-safe skillet—we’re doing this in one pan!
- Brown the Beef: Place your skillet over medium-high heat and add the ground beef. Use your wooden spoon or spatula to break it up into crumbles as it cooks. We’re looking for a nice, even brown here, no pink left! This should take about 5-7 minutes. Chef’s Hack: If you’re using a higher-fat beef, you can drain off the excess grease now. I sometimes leave a tablespoon or two in for extra flavor—your call!
- Create the “Burger” Sauce: Reduce the heat to medium-low. Now, for the magic! Scoot the beef to one side of the pan and add the ketchup and mustard right onto the hot surface for just 10 seconds. This quick “toasting” wakes up the flavors and makes your kitchen smell incredible. Then, stir everything together until the beef is perfectly coated in that iconic red-and-yellow sauce.
- Bring in the Rice: Dump in your cooked rice and give it a massive, thorough stir. You want every single grain to get acquainted with the saucy beef. Make sure there are no dry pockets of rice hiding at the bottom! Let it heat through for about 2-3 minutes, stirring occasionally.
- The Cheesy Blanket: This is the best part. Turn the heat down to low. Sprinkle that glorious mountain of shredded cheddar cheese evenly over the entire surface of the beef and rice mixture. It should look like a delicious, cheesy snowcap.
- Melt to Perfection: Pop a lid on the skillet (if you don’t have one, a large baking sheet or even foil works in a pinch!) and let it hang out for 2-3 minutes. Don’t peek! We’re creating a steamy environment to melt that cheese into a gooey, irresistible blanket. Once it’s perfectly melted, you’re done!
Let’s Make It a Meal! Serving Ideas
This skillet is a superstar all on its own, but a few simple sides can turn it into a full-on feast. Here’s how I love to serve it:
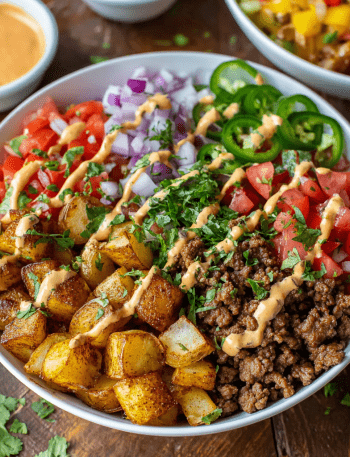
The Classic Diner Style: Scoop a generous portion into a bowl and go for the full burger-topping experience! I love a generous sprinkle of diced dill pickles (a non-negotiable for me!), some diced fresh tomatoes, a handful of crispy shredded lettuce, and a few thinly sliced red onions for a bit of a bite. A drizzle of extra ketchup or a dollop of mayo? Yes, please!
The Cozy Night In: Keep it simple. Serve it right from the skillet at the table (less dishes!) with a side of simple, steamed green beans, roasted broccoli, or a light, crunchy salad with a tangy vinaigrette to cut through the richness. It’s the perfect comfort food balance.
For the Kids (and Kids-at-Heart): Let everyone build their own “bowl burger” with a toppings bar! Set out small bowls of pickles, tomatoes, crispy bacon bits, and even a few sesame seeds for that authentic burger feel. It makes dinner fun and interactive!
Make It Your Own: Delicious Twists & Swaps
Once you’ve mastered the basic recipe, the world is your cheeseburger! Here are a few of my favorite ways to mix it up:
- Bacon Cheeseburger Skillet: Because everything is better with bacon! Chop up 4-6 slices of cooked bacon and stir it in with the rice. You can also use a tablespoon of the bacon grease to cook your beef for an extra smoky flavor.
- “Big Mac” Style: Craving that special sauce? Swap the ketchup and mustard for ¼ cup of Thousand Island dressing. Stir in a tablespoon of sweet pickle relish and a pinch of onion powder. Top with shredded lettuce and a sprinkle of sesame seeds after cooking.
- Spicy Southwest Skillet: Add a kick! When you’re browning the beef, toss in a diced jalapeño (seeds removed for less heat, left in for more!). Use pepper Jack cheese instead of cheddar, and stir in a ½ cup of frozen corn and a can of drained, rinsed black beans with the rice.
- Lower-Carb “Cauli-Burger” Skillet: For a lighter option, swap the white rice for 4 cups of riced cauliflower. Sauté it with the beef for the last 5-6 minutes of cooking to soften it up before adding your sauces.
- Mushroom Swiss Skillet: A gourmet twist! Sauté 8 oz of sliced mushrooms with the ground beef. Swap the cheddar for 1 cup of shredded Swiss cheese and use a hearty brown mustard instead of yellow mustard.
From My Kitchen to Yours: Chef’s Notes
This recipe has become a cornerstone in my own home, and it’s evolved in so many fun ways. The first time I made it, I was so frazzled I almost forgot the cheese—can you imagine the tragedy! Now, I always keep a block of cheddar in the fridge just for this dish. I’ve learned that the type of rice really matters. While white rice is classic, I adore using leftover brown rice for a nuttier flavor and chewier texture. It holds up beautifully. And a little confession: sometimes, when no one is looking, I’ll sprinkle a little garlic powder and a dash of Worcestershire sauce into the beef while it’s browning. It adds a deep, savory “umami” layer that is just *chef’s kiss*. Don’t be afraid to play and make it yours!
Your Questions, Answered!
I’ve gotten so many messages about this recipe over the years. Here are the most common questions and how to fix any little hiccups.
- Q: My rice is turning out mushy. What did I do wrong?
A: This is almost always because the rice was too warm or moist when you added it. The key is using cooled, day-old rice. If you’re cooking rice fresh, spread it on a baking sheet and pop it in the fridge for 15-20 minutes to cool down and dry out a bit before adding it to the skillet. - Q: Can I make this ahead of time?
A: Absolutely! You can brown the beef and mix it with the sauce ahead of time. Store it in the fridge. When you’re ready to eat, reheat the beef mixture, stir in the cooked rice until hot, and then proceed with adding the cheese. It might take a few extra minutes to heat through from cold. - Q: My cheese isn’t melting smoothly. Help!
A: This is likely due to pre-shredded cheese, which has anti-caking agents. For the dreamiest, smoothest melt, buy a block of cheese and shred it yourself. It makes a world of difference! Also, make sure your lid is on tight to trap the steam. - Q: Can I freeze the cheeseburger rice?
A: You can, but with a caveat. The texture of the rice can become a bit soft upon reheating. For best results, freeze it without the cheese. Thaw in the fridge overnight, reheat in a skillet, and *then* add the fresh cheese to melt.
Nutritional Information (Approximate)
I’m all about balance and enjoying the foods you love! Here’s a general breakdown of what you’re getting in one serving of this deliciousness. Remember, these numbers can vary based on the specific ingredients you use (like the leanness of your beef or the type of cheese).
Per Serving (approx. 1/4 of the recipe):
Calories: 420 | Protein: 25g | Fat: 22g | Carbohydrates: 32g
This dish is a fantastic source of protein, thanks to the ground beef and cheese, which will help keep you full and satisfied. To lighten it up, you can easily use a leaner beef (93/7), reduce the cheese slightly, or swap in riced cauliflower as mentioned in the variations. It’s a wonderfully adaptable recipe that fits into a balanced lifestyle!
You’ve Got This!
And there you have it, my friend! Your new go-to recipe for those nights when you need a win. This Cheeseburger Rice Skillet is more than just food; it’s a reminder that a happy, home-cooked meal doesn’t have to be complicated or time-consuming. It’s about gathering around the table, sharing stories from your day, and filling your belly with something made with love (and a little bit of cheesy goodness).
I truly hope this recipe becomes a beloved favorite in your home, just like it is in mine. If you make it, I’d be absolutely thrilled if you tagged me on social @TastyChowEmily so I can see your beautiful creations! Now, go forth and conquer dinnertime. You’re a weeknight warrior, and you’ve totally got this.
With a full heart and a happy skillet,
— Emily