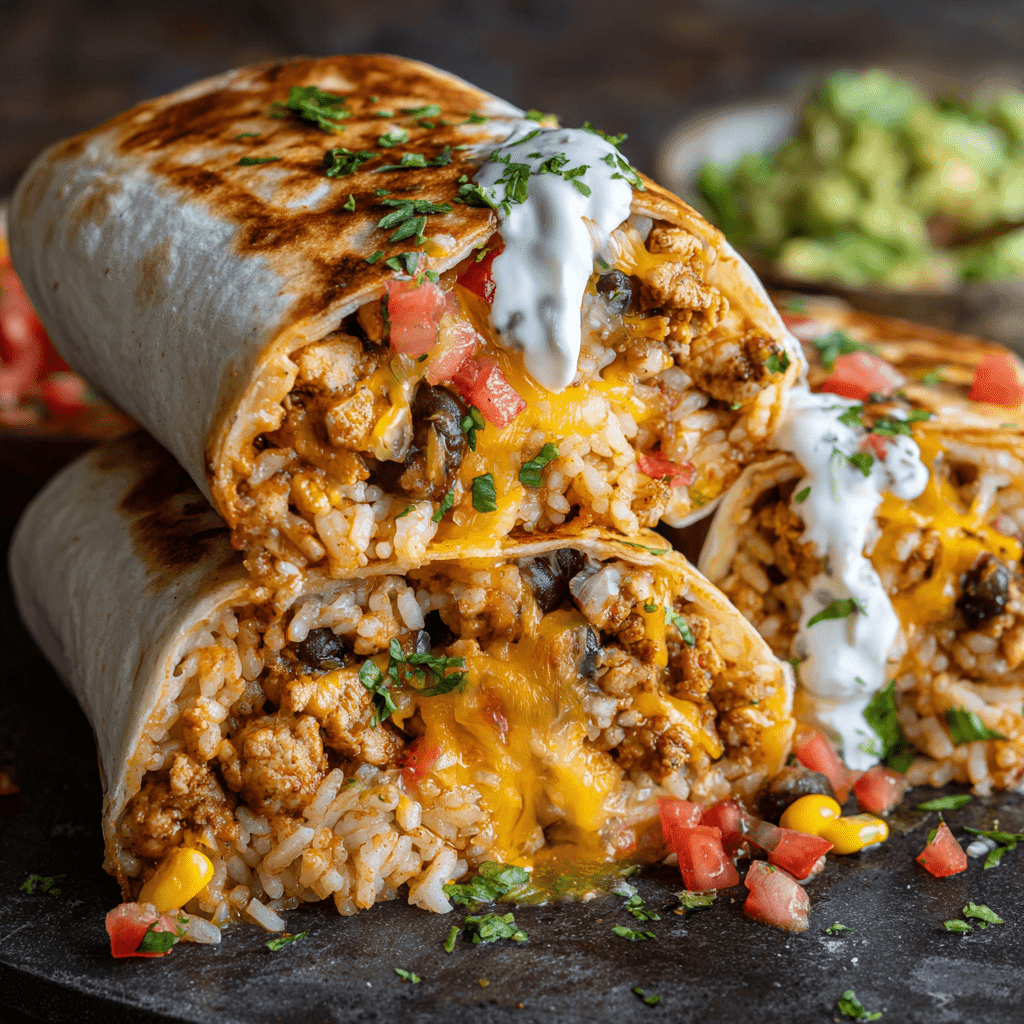
Cheesy Ground Chicken & Rice Burritos: Your New Weeknight BFF
Hey there, friend! Let’s talk about the universal sign for a really, *really* good day: a warm, slightly crispy tortilla wrapped around a seriously generous filling of savory, spiced meat, fluffy rice, and an absolutely scandalous amount of melty, gooey cheese. Are you nodding? Are you already a little hungry? I knew it. We’re on the same wavelength.
These Cheesy Ground Chicken & Rice Burritos are the undisputed champions of my kitchen. They’re the meal I make when I need something that everyone—and I mean *everyone*, from the picky eater to the always-hungry teenager—will devour with zero complaints. They’re my secret weapon for busy weeks, my go-to for filling the freezer with “future me thanks past me” meals, and honestly, they’re just a downright delicious vehicle for getting more cheese into my life.
This isn’t just a recipe; it’s a blueprint for happiness. It’s forgiving, flexible, and so darn easy. So, tie on your favorite apron (the one with the questionable stains that prove it’s well-loved), and let’s make a mess. Let’s make some memories. Let’s make some absolutely epic burritos.
The Burrito That Built a Friendship
I’ll never forget the first time I truly understood the power of a great burrito. It was my first year of culinary school, and my roommate, Sarah, was from San Diego. She’d spent a solid month listening to me wax poetic about Midwest casseroles, and she finally decided it was time for an intervention. “Emily,” she said, with the seriousness of a surgeon, “you need a proper burrito education.”
We commandeered our tiny, ill-equipped dorm kitchen. We used a questionable non-stick pan for everything, our “seasoning” was a haphazard mix of salt, pepper, and whatever spice jars weren’t empty, and our “rolling” technique was… optimistic. The result was a leaky, overstuffed, beautifully imperfect monstrosity. But when we took that first bite? Pure magic. It was more than just food; it was a moment of connection, of shared laughter, of flour on our noses and joy in our hearts. That’s what I want for you with this recipe. Don’t worry about perfection. Worry about having fun and making something delicious to share.
Gather Your Delicious Arsenal
Here’s everything you’ll need to create this masterpiece. Remember, cooking is an adventure, not a strict science—so see my notes for easy swaps!
- 1 lb ground chicken: I love chicken for its lean profile and ability to soak up all the amazing flavors. Feel free to swap for ground turkey, beef, or even a plant-based crumble!
- 1 tbsp olive oil: Our trusty cooking fat to get those onions and garlic sizzling.
- 1 small onion, diced: The sweet, aromatic foundation of our filling. No onion? A teaspoon of onion powder can work in a pinch.
- 2 garlic cloves, minced: Non-negotiable for flavor! Jarred minced garlic is a totally acceptable time-saver here.
- 1 packet taco seasoning: The flavor shortcut hero! I love a good store-bought packet, but if you’re feeling fancy, my homemade mix is 1 tbsp chili powder, 1 tsp each of cumin, paprika, and oregano, and ½ tsp each of garlic powder, onion powder, and a pinch of cayenne.
- 2 cups cooked rice: White, brown, jasmine, or cauliflower rice—it all works! Using day-old rice that’s a tiny bit dry is actually perfect here, as it soaks up the saucy filling without getting mushy.
- 1 cup salsa: This is our secret weapon for moisture and a big punch of flavor. Choose your heat level! I’m a medium girl, myself.
- 1 can (15 oz) black beans, drained & rinsed: For fiber, protein, and that wonderful creamy texture. Pinto beans are a great alternative.
- 1 cup corn: A little pop of sweetness that balances the spices beautifully. Frozen, canned, or fresh off the cob!
- 2 cups shredded Mexican blend cheese: The glorious, melty glue that holds our happiness together. Buy pre-shredded for ease, or shred a block of Monterey Jack or Pepper Jack for next-level creaminess.
- 6–8 large flour tortillas: The bigger, the better! The 10-inch burrito-size tortillas are ideal. Pro Chef Tip: Warm them up! It makes them pliable and prevents cracking. A quick 15 seconds per side in a dry skillet or 30 seconds in the microwave between damp paper towels does the trick.
- Optional Toppings: The finishing touches! Sour cream, guacamole, shredded lettuce, extra salsa, a squeeze of lime, hot sauce… go wild!
Let’s Build Some Burrito Magic!
Follow these steps, and you’ll be a burrito-rolling pro in no time. I’ve sprinkled in all my best kitchen hacks for you.
- Brown the Goodness: In a large skillet, heat your olive oil over medium-high heat. Add the diced onion and cook for 3-4 minutes until it starts to turn translucent. Add the garlic and cook for just 30 seconds more until fragrant—don’t let it burn! Now, add the ground chicken. Use your spoon to break it up as it cooks until it’s no longer pink, about 5-7 minutes. Chef’s Hack: I like to season the chicken with a little pinch of salt and pepper at this stage, even before the taco seasoning, to build layers of flavor.
- Create the Filling: Reduce the heat to medium. Sprinkle the taco seasoning over the cooked chicken. Give it a good stir to coat every little piece. Now, pour in the salsa, and add the drained black beans and corn. Stir everything together and let it simmer for 3-4 minutes. You’ll see it thicken slightly and become incredibly aromatic.
- Bring It All Together: Take the skillet off the heat. Now, add your cooked rice to the skillet. Gently fold it into the chicken and bean mixture until everything is evenly distributed. Taste it! This is your moment. Does it need more salt? A squeeze of lime? Adjust to your liking. Let this filling cool for a few minutes—this is a sneaky-important step! A hot filling will make your tortillas soggy and hard to roll.
- The Art of the Roll: Lay a warmed tortilla flat on a cutting board or plate. Spoon a generous amount of the filling (about ¾ cup) onto the lower third of the tortilla, shaping it into a log but leaving a 1-inch border on the sides. Sprinkle a hearty handful of cheese directly on top of the filling. Chef’s Hack: Placing the cheese directly against the hot filling helps it melt perfectly inside the burrito. Now, fold the sides of the tortilla inward over the ends of the filling. Then, lift the bottom edge up and over the filling, tucking it in tightly. Continue rolling forward, keeping it snug, until you have a perfect, sealed burrito. Repeat with love!
- Toast to Perfection (Optional but Highly Recommended): For the ultimate experience, give your burritos a toast. You can do this in a dry non-stick skillet over medium heat for 2-3 minutes per side until golden brown and crispy. Or, place them seam-side down on a baking sheet and bake at 400°F for 10-15 minutes. This step transforms them from great to LEGENDARY.
How to Serve These Beauties
Presentation is part of the fun! I love serving these burritos seam-side down on a plate, with a knife and fork for those who want to be civilized. But let’s be real, they’re also meant to be eaten handheld, with a pile of napkins nearby. Plate them alongside a vibrant array of your chosen toppings: a dollop of cool sour cream, a generous spoonful of chunky guacamole, a sprinkle of fresh cilantro, and a wedge of lime for squeezing. A simple side of tortilla chips and a quick black bean and corn salad turns it into a full fiesta!
Make It Your Own! Endless Variations
The beauty of this recipe is its flexibility. Here are a few ways to mix it up:
- Southwest Style: Add a 4oz can of diced green chiles and swap the black beans for pinto beans.
- Buffalo Chicken: Replace the salsa and taco seasoning with ½ cup of buffalo sauce and a packet of ranch seasoning mix. Use Monterey Jack cheese.
- Spanish Rice Version: Use a prepared Spanish rice packet instead of plain cooked rice for an even bigger flavor punch.
- Low-Carb/Keto: Swap the rice for 2 cups of riced cauliflower and use low-carb tortillas or make burrito bowls instead!
- Fully Loaded: Stir in a cup of cooked, crumbled bacon and use a Pepper Jack cheese blend for a smoky, spicy kick.
Chef Emily’s Kitchen Confidential
This recipe has evolved so much since that first messy attempt in my dorm kitchen. I’ve learned that the cooling step for the filling is non-negotiable if you want a burrito that holds its shape. I’ve also learned that my husband will unabashedly eat three of these in one sitting if I don’t hide a few for tomorrow’s lunch. One of my favorite kitchen fails involved trying to use a smaller “fajita-size” tortilla out of desperation. Let’s just say it was less of a burrito and more of a flavorful, cheesy explosion all over the pan. A delicious mess, but a mess nonetheless. Always go for the big tortillas! This recipe is a testament to the idea that the best food doesn’t have to be complicated; it just has to be made with a little bit of love (and a lot of cheese).
Your Burrito Questions, Answered!
Q: My burritos keep falling apart when I roll them! What am I doing wrong?
A: Oh, I’ve been there! This usually boils down to three things: 1) The filling is too hot, making the tortilla steam and tear. Let it cool! 2) You’re overstuffing. Show restraint, young Jedi. 3) You didn’t warm the tortillas. A cold tortilla will crack every time. Warm them up until they are soft and pliable.
Q: Can I make these ahead of time for meal prep?
A: Absolutely! They are meal prep royalty. Let the cooked burritos cool completely, then wrap each one tightly in foil or plastic wrap. They’ll keep in the fridge for 3-4 days. Reheat in the oven (still wrapped in foil) at 350°F for 20-25 minutes, or unwrap and microwave for 2-3 minutes. For the freezer, wrap them tightly and store for up to 3 months. Reheat from frozen in the oven for 35-40 minutes.
Q: The filling is a bit watery. How can I fix it?
A> No worries! This can happen if your salsa is particularly liquidy. The best fix is to simmer the filling a bit longer without the lid on, allowing the excess moisture to evaporate. Also, using day-old, drier rice is a great preventative measure.
Q: Can I bake a whole batch at once?
A: You bet! Assemble all your burritos and place them seam-side down on a parchment-lined baking sheet. Brush them lightly with olive oil or spray with cooking spray for extra crispiness. Bake at 400°F for 15-20 minutes, flipping halfway through, until they’re golden brown and delicious.

CHEESY GROUND CHICKEN & RICE BURRITOS
- Total Time: 30 minutes
- Yield: 6 - 8 burritos 1x
Description
These burritos are stuffed with flavorful ground chicken, seasoned rice, melty cheese, and all your favorite fixings. Perfect for a quick weeknight dinner or freezer-friendly meal prep, they’re a cheesy, handheld comfort food that never disappoints.
Ingredients
1 lb ground chicken
1 tbsp olive oil
1 small onion, diced
2 garlic cloves, minced
1 packet taco seasoning (or homemade mix)
2 cups cooked rice (white or brown)
1 cup salsa (mild, medium, or hot)
1 can (15 oz) black beans, drained & rinsed
1 cup corn (frozen or canned)
2 cups shredded Mexican blend cheese
6–8 large flour tortillas
Optional Toppings: Sour cream, guacamole, shredded lettuce, hot sauce
Instructions
Heat oil in a skillet. Cook onion and garlic until fragrant, then add ground chicken. Cook until browned.
Stir in taco seasoning, salsa, beans, and corn. Simmer 3–4 minutes.
Add cooked rice and mix well. Remove from heat.
Warm tortillas, then fill each with chicken mixture and a generous sprinkle of cheese. Roll tightly into burritos.
Optional: toast burritos in a skillet or bake at 400°F for 10 minutes for a golden, crispy outside.
Serve with sour cream, guacamole, or your favorite toppings.
- Prep Time: 10 minutes
- Cook Time: 20 minutes
Nutrition
- Calories: 480 / Burrito
- Fat: 18g/ Burrito
- Carbohydrates: 50g / Burrito
- Fiber: 6g / Burrito
- Protein: 28g / Burrito
Nutritional Information
*This is an estimate for 1 burrito (based on 6 burritos total) using the ingredients listed. Values can vary greatly based on specific brands and ingredients used.
Calories: 480 | Protein: 28g | Carbs: 50g | Fat: 18g | Fiber: 6g
Prep Time: 10 min | Cook Time: 20 min | Total Time: 30 min
Final Thoughts
These Cheesy Ground Chicken & Rice Burritos aren’t just dinner—they’re comfort wrapped in a tortilla. They’re the kind of recipe that proves simple ingredients, when treated with love and a little cheese magic, can become something extraordinary. Whether you’re feeding a hungry family, stocking the freezer for busy weeks, or just craving that warm, handheld hug of a meal, these burritos have your back.
What I love most is how flexible they are. You can make them spicy, keep them mild, swap in different proteins, or even skip the tortillas for a burrito bowl. They’re endlessly adaptable and always delicious. Plus, the fact that they double as a meal-prep superhero means “future you” will always have a cheesy, satisfying meal within reach.
So, friend, the next time life feels hectic, remember: you can roll up a little happiness in just 30 minutes. These burritos are your new weeknight BFF—and once you taste them, you’ll wonder how you ever lived without them. 🌯✨