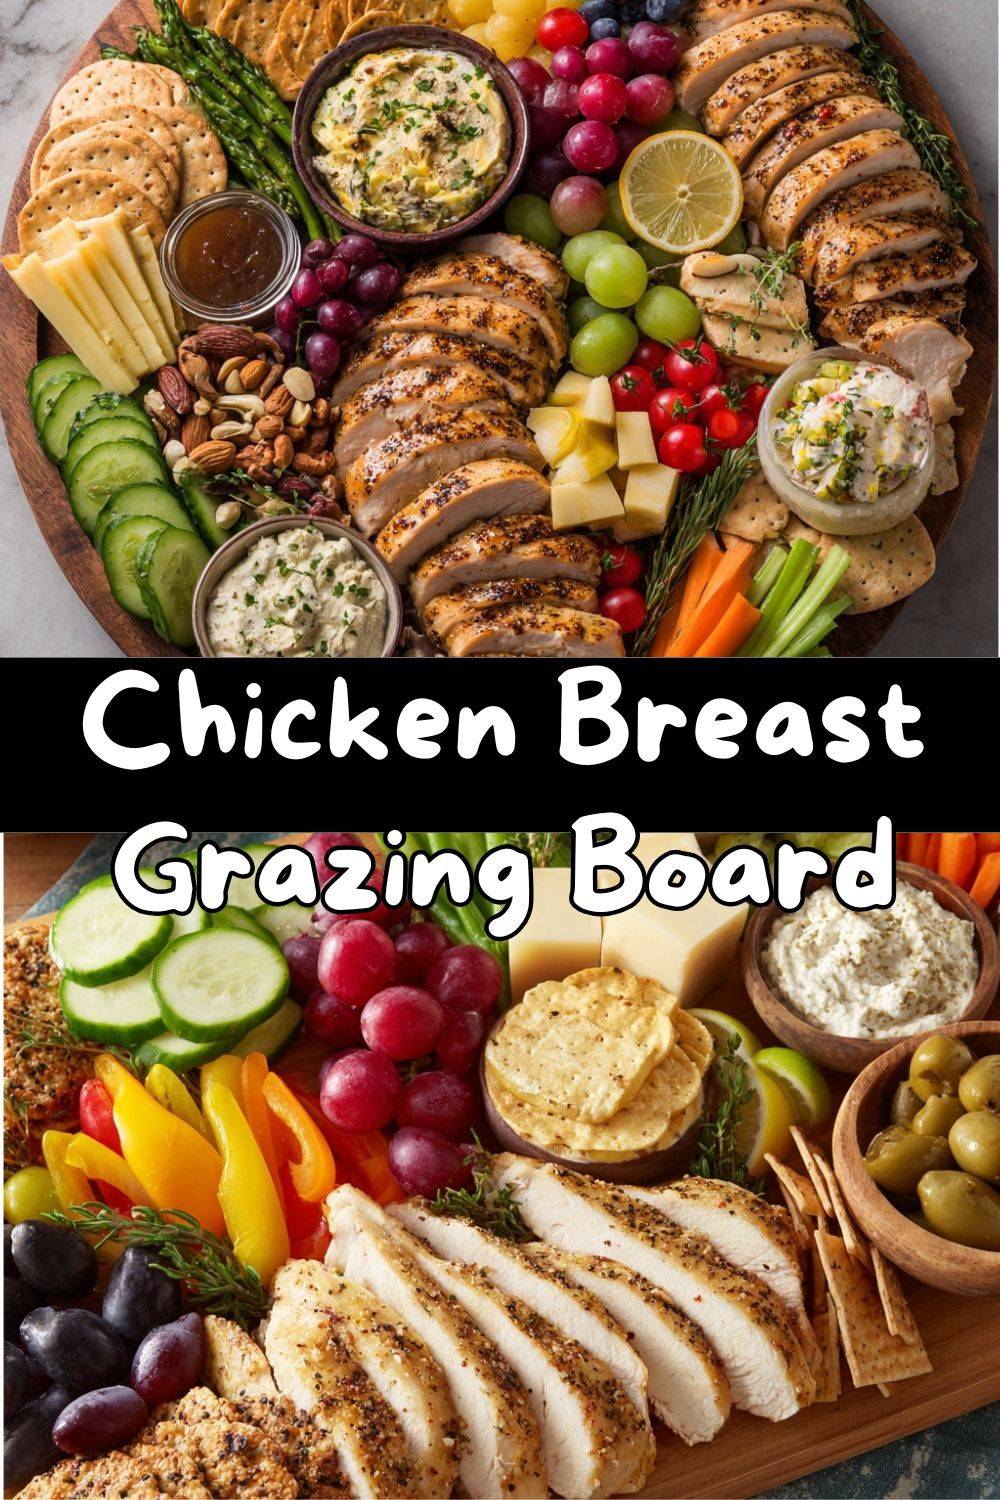
The Ultimate Guide to a Show-Stopping Chicken Breast Grazing Board
Hey, fellow foodies! Emily here. Let me paint a picture we all know too well: you’ve got friends coming over in an hour, and you’re staring into the fridge, willing a masterpiece to appear. You want something impressive, something everyone can gather around, but you also want it to be… actually satisfying. You know what I mean? Something more substantial than just crackers and a cheese block.
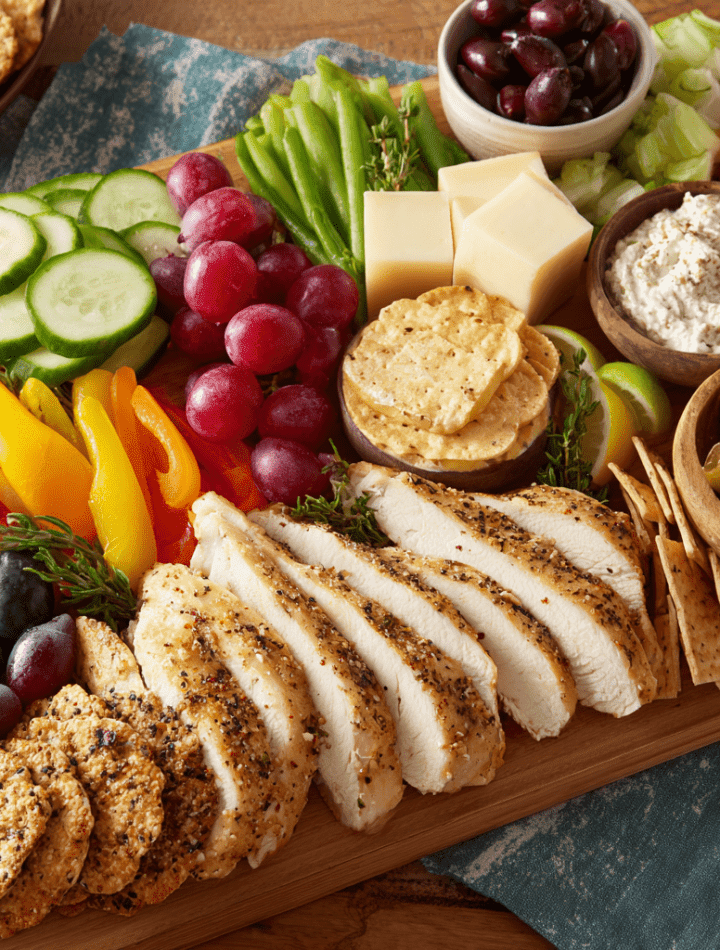
Enter the hero we didn’t know we needed: the Chicken Breast Grazing Board. This isn’t just another charcuterie plate. This is a protein-packed, flavor-loaded, colorful sprawl of deliciousness that turns humble chicken breast into the life of the party. It’s interactive, beautiful, and—dare I say—nutritious. Forget the fuss of a sit-down meal; this board is an invitation to graze, chat, laugh, and eat with your hands.
I built this concept for those busy weeknights, last-minute gatherings, and even for meal prep Sundays where you want your snacks to feel special. It’s a choose-your-own-adventure dinner, a snackable feast, and the centerpiece your table has been craving. So, roll up your sleeves, grab your favorite big board or platter, and let’s create something vibrant, delicious, and ridiculously easy together. Trust me, once you see how this brings people together, it’ll become your go-to move for any gathering.
My Grandma’s “Little Bit of Everything” Plates
This whole grazing board obsession? I can trace it straight back to my grandma’s kitchen table. After church on Sundays, she’d never make one big dish. Instead, she’d put out what she called “a little bit of everything.” A plate of cold roast chicken from last night’s dinner, some sharp cheddar she’d cubed, crisp apple slices, a handful of salty nuts, and always, always a small bowl of her famous sweet pickles.
It felt magical. We’d all sit around, building perfect little bites—a piece of chicken with a dot of mustard, a cracker with cheese and an apple slice on top. It was relaxed, it was communal, and it made an ordinary afternoon feel like a celebration. That’s the exact feeling I want to bottle up with this Chicken Breast Grazing Board. It’s not about perfection; it’s about abundance, choice, and the simple joy of sharing good food with good people. Every time I build one, I think of her, and I hope this recipe helps you create those same cozy, connected moments in your own home.
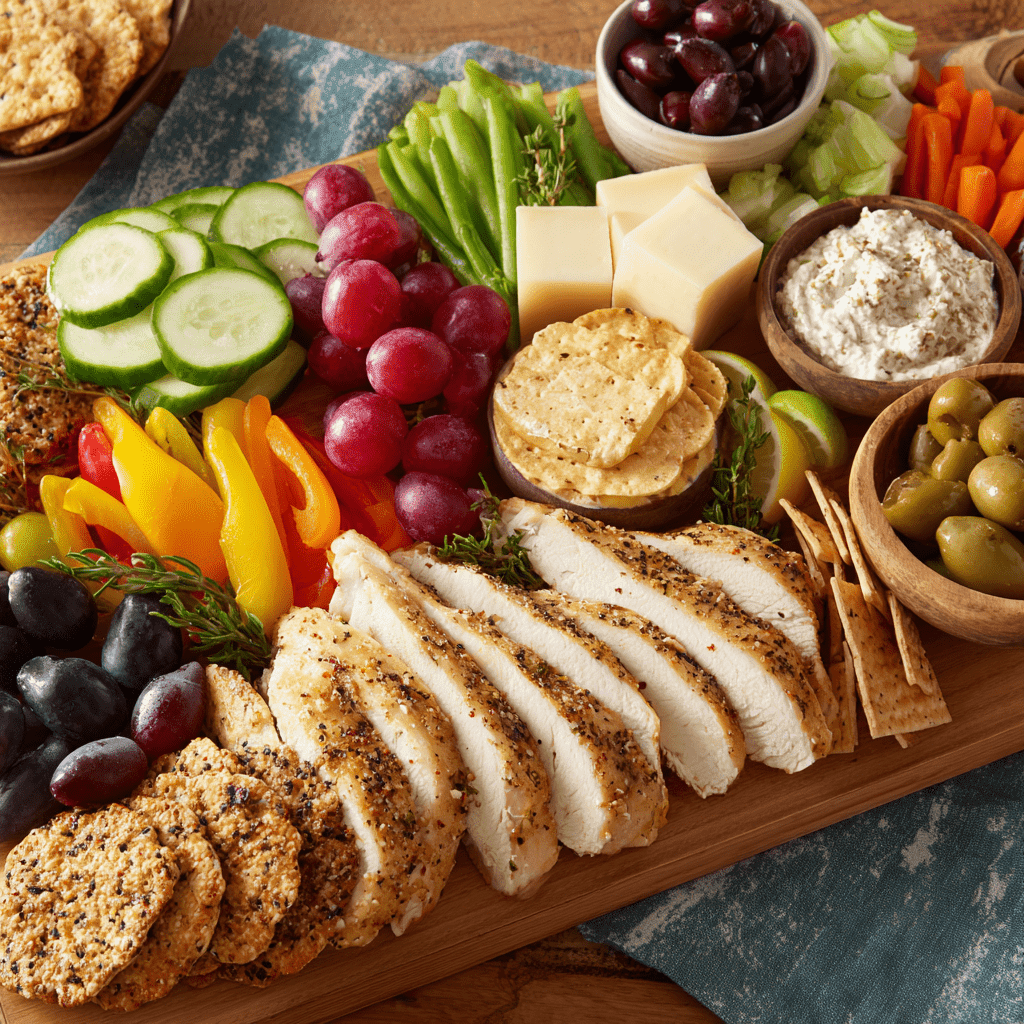
What You’ll Need: Building Blocks of Flavor & Fun
Here’s the beautiful part: this is a template, not a rigid recipe. Use what you love and what you have! This list is your inspiration starter pack.
For The Star: The Chicken
- 2–3 large boneless, skinless chicken breasts: Look for plump, even-sized breasts so they cook at the same rate. This is our protein anchor!
- 1 tablespoon olive oil: For a simple, flavorful coat. Avocado oil works great too.
- 1 teaspoon garlic powder: It gives a deeper, toastier flavor than fresh garlic here, which can burn. Chef’s Insight: Onion powder or smoked paprika are fabulous swaps!
- Salt & freshly ground black pepper: The fundamental duo. Don’t be shy!
- Optional garnish: lemon zest or fresh herbs: A sprinkle of lemon zest or chopped parsley/thyme after cooking brightens everything up.
For The Supporting Cast (The Board Itself!)
- Assorted Cheeses (pick 2-3): Think variety! A sharp cheddar (for familiarity), creamy goat cheese or brie (for spreadability), and fresh mozzarella balls (for a mild, soft bite).
- Fresh Fruits: For pops of sweetness. Red grapes (easy to grab), apple slices (toss in lemon water to prevent browning), berries, or figs.
- Veggie Crunch: For color and freshness. Cucumber slices, cherry tomatoes, snap peas, and rainbow carrot sticks are my go-tos.
- Carbs & Crunch: Assorted crackers, pita chips, or slices of toasted baguette. Have a mix of textures—some seedy, some plain, some crispbread.
- Dips & Spreads (pick 2): This is where magic happens! Hummus (classic), tzatziki (cool and herby), ranch (crowd-pleaser), or honey mustard (sweet and tangy).
- Salty Bits & Extras: Marinated olives, cornichons or pickles, boiled eggs (quartered), a small jar of jam or honey, and a handful of nuts like almonds or pistachios.
Let’s Build It: Step-by-Step to Grazing Glory
Follow these steps, and you’ll have a stunning board in no time. I’ve sprinkled in my best kitchen hacks to make it foolproof.
Step 1: Cook the Chicken to Juicy Perfection
Preheat your oven to 400°F (200°C). Pat the chicken breasts completely dry with paper towels—this is the #1 secret for a good sear (if pan-searing) and proper seasoning. Drizzle with olive oil and rub it all over. Sprinkle generously with garlic powder, salt, and pepper. You can bake them on a parchment-lined sheet for 20-25 minutes, or for more flavor, sear them in a hot oven-safe skillet for 3-4 minutes per side, then pop the whole skillet in the oven to finish for about 15 minutes. Chef’s Hack: The internal temperature should reach 165°F (74°C). Pull it out at 160°F, as the temp will rise while resting. Let it rest for 10 minutes before slicing thinly against the grain. This keeps it juicy!
Step 2: The “Mise en Place” (A.k.a. Get Everything Ready)
While the chicken rests, this is your prep window. Slice your cheeses, wash and dry fruits and veggies, slice apples (and give them that lemon water bath!), arrange dips in small bowls, and boil those eggs if using. Having everything prepped and in little bowls makes the assembly feel like a fun art project, not a scramble.
Step 3: Board Assembly – The Fun Part!
Grab your largest board, platter, or even a clean baking sheet. Start by placing your rested, sliced chicken in the center or slightly off-center. This is your anchor. Next, place your dip bowls on the board. They act as visual landmarks and keep runny dips contained. Now, work outwards from there! Create little clusters or “moments” of ingredients. Pile cheddar cubes in one area, fan out cucumber slices in another, pour nuts into a small empty spot. Chef’s Tip: Use the grapes or cherry tomatoes on the vine to fill large spaces beautifully. Don’t be afraid to let things spill over edges—it looks abundant and inviting!
Step 4: Fill Every Gap & Garnish
Look for empty spaces. This is where crackers, bread sticks, and small items like olives come in. Scatter them to fill the canvas. The goal is color and texture variety—something soft next to something crunchy, something green next to something red. Finally, garnish with a few sprigs of fresh rosemary, thyme, or edible flowers. A final drizzle of honey over some cheese or a crack of black pepper on the chicken adds a pro touch.
How to Serve & Savor Your Masterpiece
Place your finished board in the center of the table with a stack of small plates, napkins, and plenty of cocktail forks or toothpicks for easy grabbing. That’s it! The beauty is in the informal, interactive serving style. Encourage your guests to build their perfect bite: maybe a slice of chicken on a cracker with a smear of goat cheese and a dot of pepper jam, or a cucumber round topped with tzatziki and a piece of chicken. For a family dinner, it’s a fantastic way to let everyone customize their plate. I love pairing this with a crisp white wine, a light beer, or a big pitcher of sparkling water with citrus slices. The vibe is casual, colorful, and utterly shareable.
Mix It Up! Endless Board Variations
The template is yours to play with! Here are a few of my favorite twists:
- Mediterranean Mezze Board: Swap chicken for lemon-oregano grilled chicken strips. Surround with hummus, baba ganoush, feta cheese, kalamata olives, pepperoncini, pita bread, and dolmas.
- Asian-Inspired Board: Use teriyaki or sesame-ginger glazed chicken. Add edamame pods, seaweed salad, rice crackers, wasabi peas, pickled ginger, and a creamy sriracha mayo dip.
- Everything Bagel Board: Season chicken with everything bagel seasoning. Serve with scallion cream cheese, smoked salmon (if you’re fancy), capers, sliced red onion, tomato, cucumber, and mini bagels or bagel chips.
- BBQ Ranch Board: Use shredded BBQ chicken. Components include ranch dip, cheddar-jack cheese, cornbread muffins or squares, pickle spears, coleslaw, and crispy fried onions.
- Light & Lean Board: Focus on high-protein, lower-carb items. Add grilled shrimp, hard-boiled eggs, lots of veggies, Greek yogurt-based dips, and a few berries.
Chef Emily’s Notes & Kitchen Confessions
This recipe has evolved from many, many “testing” sessions (read: me feeding my hungry friends). The first time I made it, I used one tiny board and piled everything so high it was a delicious Jenga game. Lesson learned: go bigger than you think! I’ve also learned that a store-bought rotisserie chicken is your absolute best friend on crazy-busy days. No shame in that game—shred it, maybe give it a quick toss with those same seasonings, and you’re golden. The real secret isn’t in any single ingredient; it’s in the joyful, no-pressure vibe it creates. Some of the best conversations in my home have happened with our hands full, leaning over a board like this, trying to fit one more olive onto an already-overloaded cracker.
Your Questions, Answered
Q: My chicken always turns out dry. Help!
A: The twin sins of chicken are overcooking and not resting. Invest in a cheap digital meat thermometer. Cook to 160-165°F, then let it rest for a full 10 minutes before you even think about slicing. This allows the juices to redistribute. Also, slicing against the grain (across the muscle fibers, not parallel to them) makes it more tender.
Q: Can I make any parts ahead of time?
A: Absolutely! Cook and slice the chicken up to 2 days ahead; store it in an airtight container with a tiny splash of broth to keep it moist. Wash and chop veggies, make dips, and boil eggs 1 day ahead. Assemble the board just before serving (within an hour or two) to keep everything fresh and crisp.
Q: How do I arrange the board so it doesn’t look messy?
A: Think in groups and colors. Don’t just randomly scatter. Create little piles or rows of each item. Place opposite colors next to each other (green cucumbers next to red tomatoes). Use your bowls and the chicken as anchors, and let the smaller items fill in. A little organized chaos is the goal!
Q: What’s the best board to use?
A: Anything flat and large! A wooden cutting board, a marble slab, a large serving platter, or even a clean baking sheet lined with parchment paper. Size is more important than material.
A Note on Nourishment
While I’m all about the joy of eating first and foremost, I love that this board naturally encourages balanced eating. You’re getting a powerhouse of lean protein from the chicken and eggs, healthy fats from the nuts, olives, and cheeses, complex carbs from whole-grain crackers and fruits, and a ton of vitamins and fiber from the rainbow of veggies. Because you’re building your own bites, you can easily tailor it to your dietary needs—loading up on veggies, choosing a lighter dip, or enjoying that cheese in moderation. It’s a mindful, satisfying way to feed a crowd that leaves everyone feeling good, not just full. Estimated nutritional info per serving (based on 6) is around 350-400 calories, 30g protein, 18g fat, 20-25g carbs, 3g fiber, and 6g sugar, but this varies widely based on your specific ingredient choices.
Your New Go-To for Gathering
So there you have it, friends—my complete love letter to the Chicken Breast Grazing Board. It’s more than a meal; it’s an experience. It’s the solution to casual entertaining, the answer to “what’s for dinner?” on a tired night, and a guaranteed way to make everyday snacking feel special. I hope this guide gives you the confidence to grab that big board, raid your fridge, and create something truly wonderful. Remember, cooking is about connection and joy. Now go on, build something beautiful, gather your people, and chow down!
With love and a full board,
Emily 🧀🍓