Chocolate Chip Cookie Pizza – The Ultimate Shareable Dessert
Hey there, my fellow food lover! Let me paint you a picture. It’s Friday night, you’ve got friends coming over, or maybe it’s just you and the family settling in for a movie. You want a dessert that feels like a celebration, something fun, a little over-the-top, and absolutely guaranteed to make everyone’s eyes light up. You don’t want to fuss with layers or fancy techniques. You want pure, unadulterated joy on a plate.
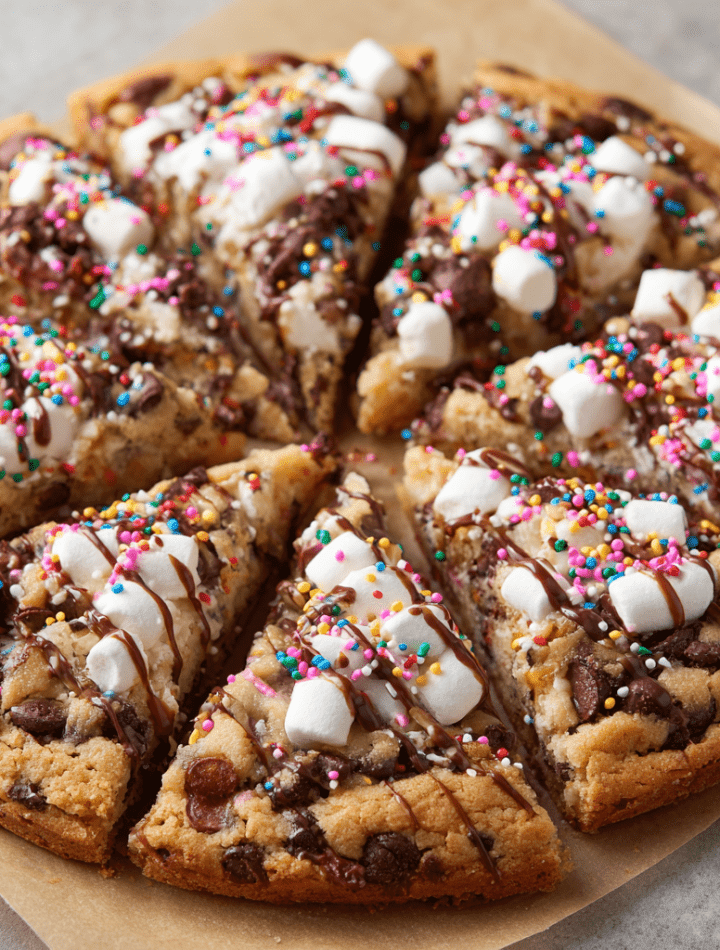
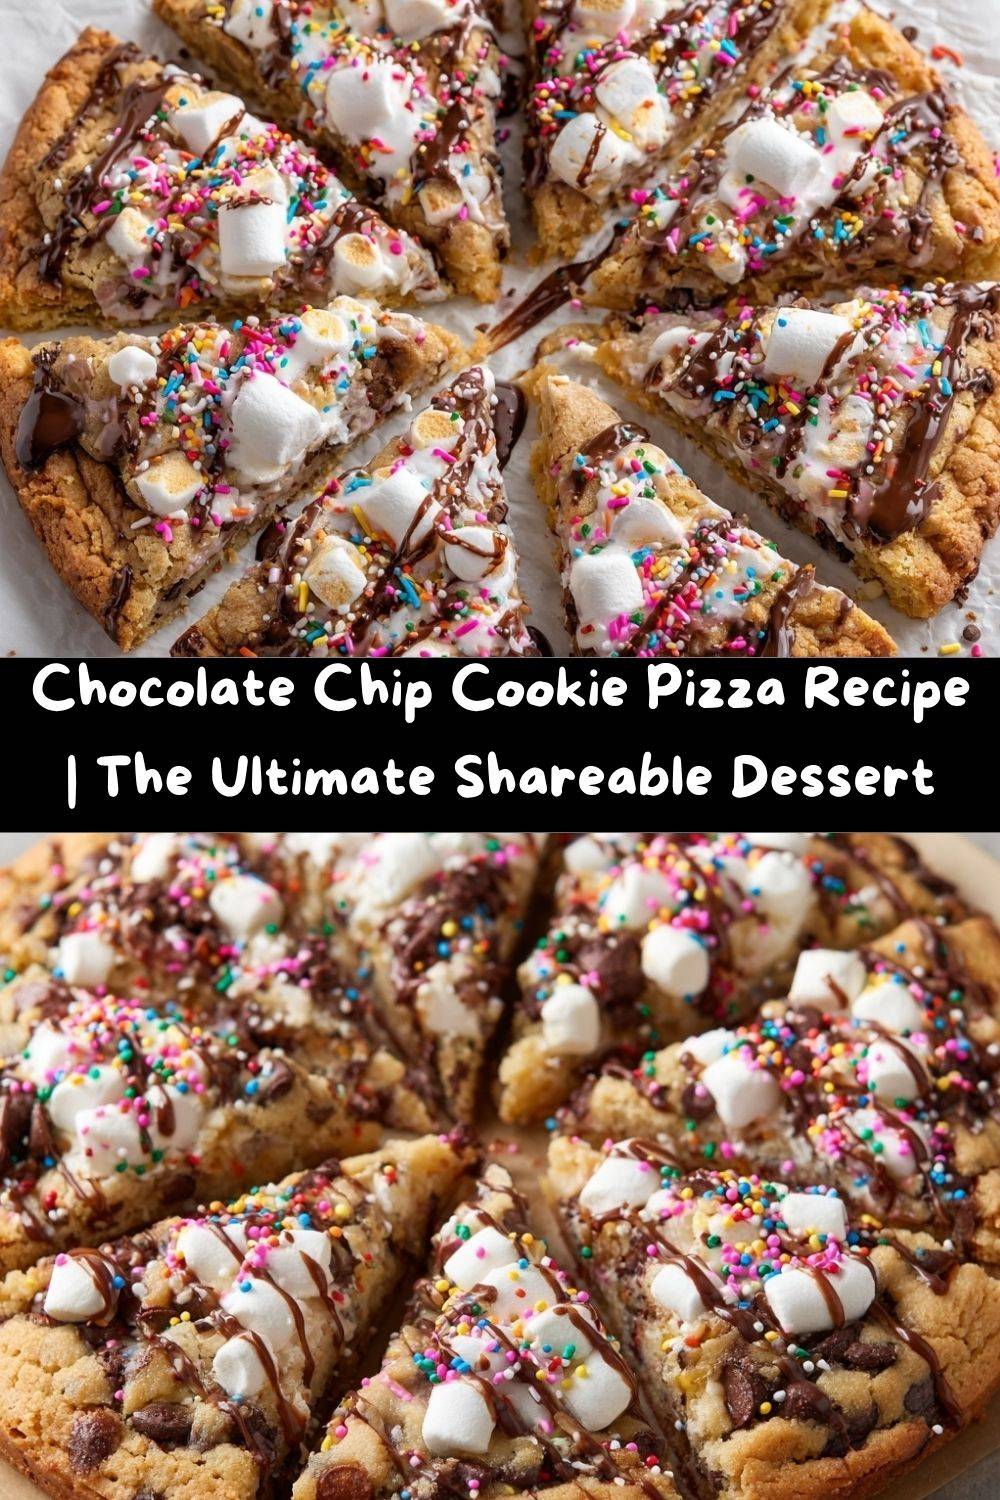
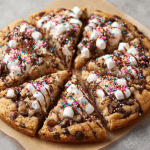
Well, my friend, you have just found your new go-to. This isn’t just a dessert; it’s an experience. We’re taking everything we adore about a classic, soul-warming chocolate chip cookie—the chewy edges, the soft center, the pools of melted chocolate—and we’re blowing it up to epic, shareable proportions. This Chocolate Chip Cookie Pizza is a show-stopping, conversation-starting, slice-of-heaven masterpiece. Golden-brown, studded with chocolate chips, dotted with delightfully gooey mini marshmallows, and finished with a glossy chocolate drizzle and a confetti of sprinkles. It’s the dessert that says, “Let’s have some fun!” and I cannot wait for you to make it.
The Night the Cookie Pizza Saved the Sleepover
This recipe takes me right back to my 12th birthday party. I had grand plans for a towering, elaborately decorated layer cake, but a last-minute kitchen disaster (involving a wobbly oven rack and my mom’s favorite ceramic bowl) left me with a crumbled mess and a very deflated ego. With six hungry friends waiting, my grandma, the wisest cook I know, looked at the cookie dough I’d already whipped up and said, “Why make two dozen small cookies when you can make one giant one?” We pressed that dough into a pizza pan, threw in some marshmallows we found in the pantry, and baked it. The result was pure magic. We cut it into wedges right there on the kitchen floor, laughing and pulling apart the gooey slices. It was a hit. That night taught me that the best recipes aren’t about perfection; they’re about connection, improvisation, and creating sweet, sticky, wonderful memories.
Gathering Your Delicious Ingredients
This is a simple, straightforward list, but each ingredient plays a key role in creating that perfect cookie texture and flavor. Let’s break it down!
- 2 cups unsalted butter, softened: This is the heart of our cookie! Using unsalted butter lets you control the salt level. Chef’s Tip: “Softened” means your butter should give slightly when pressed but still hold its shape. Don’t melt it! For a quick soften, cut sticks into tablespoons and let them sit at room temp for 20-30 minutes.
- 2 cups granulated sugar & 2 cups packed brown sugar: The dynamic duo! Granulated sugar gives us crisp edges, while the molasses in brown sugar is the secret to a chewy, moist center and that classic caramel-like flavor. Pack that brown sugar firmly into your measuring cup!
- 4 large eggs: Our binding agents, bringing the dough together and adding richness. Make sure they’re at room temperature to blend seamlessly with the butter and sugars.
- 2 teaspoons vanilla extract: The flavor enhancer! It adds a warm, aromatic depth that makes the chocolate taste even more chocolatey. Don’t be shy with it.
- 6 cups all-purpose flour: The structure of our pizza. I use all-purpose for a reliable, sturdy-yet-tender crumb.
- 2 teaspoons baking soda: Our leavening agent, giving the cookie pizza a little lift and a lovely, slightly craggy top.
- 1 teaspoon salt: Absolutely essential! Salt is the superhero that balances the sweetness and makes all the other flavors pop. Trust me on this.
- 4 cups chocolate chips: The star of the show! I use a mix of semi-sweet and milk chocolate for a perfect balance. Feel free to use your favorite—dark chocolate works wonderfully too!
- 1 cup mini marshmallows (optional, but HIGHLY recommended): My signature twist! They create little pockets of sweet, melty, gooey goodness that take this dessert to a whole new level.
For the Toppings & Drizzle:
- 1 cup chocolate chips (melted): For that gorgeous, professional-looking drizzle.
- Sprinkles, for garnish: Because sprinkles equal instant party! Use any color or shape you love.
Let’s Build Our Cookie Masterpiece!
Okay, apron on, let’s do this! It’s as easy as mixing, pressing, and baking. I’ll walk you through every step with my favorite kitchen hacks.
- Preheat and Prep: Fire up that oven to 350°F (175°C). Now, grab your two large round pizza pans. Grease them generously with butter or non-stick spray, or (my preferred method) line them with parchment paper. The parchment paper guarantees a flawless release and makes cleanup a dream. This little hack is a game-changer!
- Cream the Butter & Sugars: In a large bowl, use an electric mixer (or some serious elbow grease with a wooden spoon!) to cream together the softened butter, granulated sugar, and brown sugar. We’re not just mixing; we’re creaming. Beat it for a good 2-3 minutes on medium speed until it becomes light, pale, and wonderfully fluffy. This step incorporates air, which is key for a perfect texture.
- Incorporate the Eggs & Vanilla: Add the eggs one at a time, mixing well after each addition. This ensures each egg is fully emulsified into the batter, giving us a smooth, cohesive dough. Now, mix in that glorious vanilla extract. Your kitchen should already be smelling incredible.
- Combine the Dry Ingredients: In a separate bowl, whisk together the flour, baking soda, and salt. Why whisk? It evenly distributes the baking soda so you don’t get any bitter bites. Gradually add this dry mixture to your wet ingredients, mixing on low speed until just combined. Do not overmix! A few streaks of flour are okay—we’re about to fold in the good stuff.
- Fold in the Goodies: This is the fun part! Use a spatula to gently fold in the 4 cups of chocolate chips and that cup of mini marshmallows. Fold until they’re evenly distributed throughout the dough.
- Shape Your Pizza: Divide the dough evenly between your two prepared pans. Now, get your hands in there (lightly dampen them with water to prevent sticking)! Press the dough out into a circle, creating a thick, even layer that looks like a pizza crust. Leave about an inch of space around the edges—the cookie will spread a bit as it bakes, and this gives it room to grow into a perfect circle.
- Bake to Golden-Brown Perfection: Pop those pans into your preheated oven and bake for 22-26 minutes. Ovens vary, so start checking at 22 minutes. You’re looking for golden brown edges and a top that looks set, but the center will still look a little soft. That soft center is the key to a gooey, amazing cookie! It will firm up beautifully as it cools.
- The Grand Finale: Toppings! Let the cookie pizzas cool in the pan for at least 10-15 minutes. They need to set up a bit before you handle them. While they’re still warm, melt your remaining 1 cup of chocolate chips (30 seconds in the microwave, stir, then another 15 if needed). Use a spoon or a piping bag to drizzle the melted chocolate all over the top. Immediately shower it with your colorful sprinkles so they stick. This is your moment to be an artist!
How to Serve This Sweet Sensation
Presentation is part of the fun! I love placing the whole cookie pizza right in the middle of the table on a large cutting board or a cake stand. It becomes the centerpiece of your gathering. Slice it into wedges, just like a real pizza, using a pizza cutter for the cleanest cuts. For an extra-special touch, serve each warm, gooey slice with a scoop of vanilla bean ice cream on the side. The contrast of the cold, creamy ice cream with the warm, chewy cookie is nothing short of divine. A dollop of whipped cream and a drizzle of caramel sauce never hurt anybody, either!
Make It Your Own: Creative Twists & Swaps
The beauty of this recipe is its versatility. Once you master the base, the flavor world is your oyster!
- S’mores Lover’s Dream: Swap out 1 cup of the chocolate chips for crushed graham crackers. After baking and drizzling with chocolate, top with mini marshmallows and pop it under the broiler for 30-60 seconds to toast them to golden perfection.
- Peanut Butter Cup Explosion: Fold in 1-2 cups of chopped peanut butter cups along with (or instead of) some of the chocolate chips. Drizzle with melted peanut butter instead of chocolate for the ultimate peanut butter-chocolate combo.
- Birthday Cake Funfetti: Add 1-2 teaspoons of almond extract (it tastes just like cake batter!) along with the vanilla, and fold in ½ cup of rainbow sprinkles right into the dough. It’s a birthday party in every slice.
- Gluten-Free & Dairy-Free Friendly: You can easily adapt this! Use a 1:1 gluten-free flour blend and dairy-free butter sticks. Enjoy Life or a similar brand makes great dairy-free chocolate chips. The recipe works like a charm!
- Mint Chocolate Chip: Add 1 teaspoon of peppermint extract with the vanilla and use dark chocolate chips. It’s refreshing and decadent all at once.
From My Kitchen to Yours: A Few Extra Thoughts
Over the years, this recipe has seen it all. I’ve made it for baby showers, potlucks, and “I just need chocolate” Tuesdays. One time, I was so eager to get it in the oven I forgot the baking soda. Let’s just say we ended up with a very flat, very dense “cookie frisbee.” It was a hilarious reminder that baking is a science, but it’s also about laughing at our mistakes. The marshmallow addition was my grandma’s idea, and it’s stuck with me ever since. They create these incredible little sticky pockets that make the cookie extra special. Don’t skip them if you can help it!
Your Questions, Answered!
I’ve gotten a lot of questions about this recipe over the years. Here are the most common ones to ensure your success!
- Q: My cookie pizza spread too much and is thin. What happened?A: This usually means your butter was too warm or melted. Make sure it’s just softened, not greasy. Also, double-check that your baking soda is fresh! Old baking soda loses its potency and won’t provide the necessary lift.
- Q: Can I make the dough ahead of time?A: Absolutely! You can mix the dough, press it into the pans, cover tightly with plastic wrap, and refrigerate for up to 24 hours. You may need to add a minute or two to the bake time since it’s going into the oven cold.
- Q: My marshmallows disappeared/burned! Help!A: Marshmallows can melt and vanish into the dough, which still adds flavor! To keep them visible and prevent burning, try pressing a few extra onto the top of the dough right before you bake it. They’ll toast up nicely on the surface.
- Q: Can I bake this on a regular baking sheet?A: You can! Just shape it into a large circle or even a rectangle. The edges might be a little less defined, but it will taste just as delicious.
Chocolate Chip Cookie Pizza : The Ultimate Shareable Dessert
- Total Time: 40 minutes
- Yield: 2 cookie pizzas 1x
Description
This Chocolate Chip Cookie Pizza is everything you love about a classic cookie, but bigger, better, and built to share. Golden edges, gooey chocolate chips, and melty pockets of mini marshmallows all come together in one giant cookie masterpiece. Topped with a silky chocolate drizzle and colorful sprinkles, it’s the perfect treat for birthdays, parties, or spontaneous sweet cravings.
Ingredients
2 cups unsalted butter, softened
2 cups granulated sugar
2 cups packed brown sugar
4 large eggs
2 teaspoons vanilla extract
6 cups all-purpose flour
2 teaspoons baking soda
1 teaspoon salt
4 cups chocolate chips
1 cup mini marshmallows (optional, but recommended)
For the Chocolate Drizzle
1 cup chocolate chips (melted)
Sprinkles, for garnish
Instructions
Preheat oven to 350°F and grease two large round pizza pans or line with parchment.
In a large bowl, cream together butter, granulated sugar, and brown sugar until light and fluffy.
Add eggs one at a time, then mix in vanilla.
In a separate bowl, whisk together flour, baking soda, and salt. Gradually add to the wet mixture until just combined.
Fold in chocolate chips and mini marshmallows.
Divide the dough between the pans and press evenly into a thick pizza shape, leaving about an inch of space around the edges.
Bake for 22–26 minutes, or until golden brown with a soft center.
Cool slightly, then drizzle with melted chocolate and add sprinkles while warm for extra fun.
- Prep Time: 15 minutes
- Cook Time: 25 minutes
Nutrition
- Calories: 320 per Slice
- Fat: 15g per Slice
- Carbohydrates: 44g per Slice
- Fiber: 1g per Slice
- Protein: 3g per Slice
Nutritional Info (For Your Curiosity!)
Okay, let’s be real—this is a celebratory dessert, not a salad! But I know many of you like to keep track, so here’s a rough estimate. Remember, these values can vary based on the specific brands of ingredients you use.
Prep Time: 15 minutes | Cook Time: 25 minutes | Total Time: 40 minutes | Yield: 2 cookie pizzas (about 16 slices total)
Estimated Per Slice: Calories: 320 | Carbohydrates: 44g | Fat: 15g | Protein: 3g | Fiber: 1g
This is a rich treat, so a little slice goes a long way! Pair it with a glass of cold milk or a hot coffee for the perfect balance.
You Did It! Now, Go Enjoy the Rewards.
And there you have it! Your very own, homemade, absolutely incredible Chocolate Chip Cookie Pizza. I am so proud of you for stepping into the kitchen and creating something truly special. This recipe is more than just a list of ingredients; it’s an invitation to slow down, get a little messy, and share something made with love.
So, gather your people, slice up that warm, gooey masterpiece, and watch the smiles spread. This is what Tasty Chow is all about—creating those full-heart, hungry-belly moments, one giant cookie at a time.
Now, I’d love to hear from you! Did you add a fun twist? Did it become an instant family favorite? Tag me on social @TastyChow so I can see your beautiful creations! Happy baking, my friend!
— Emily 🍕🍪