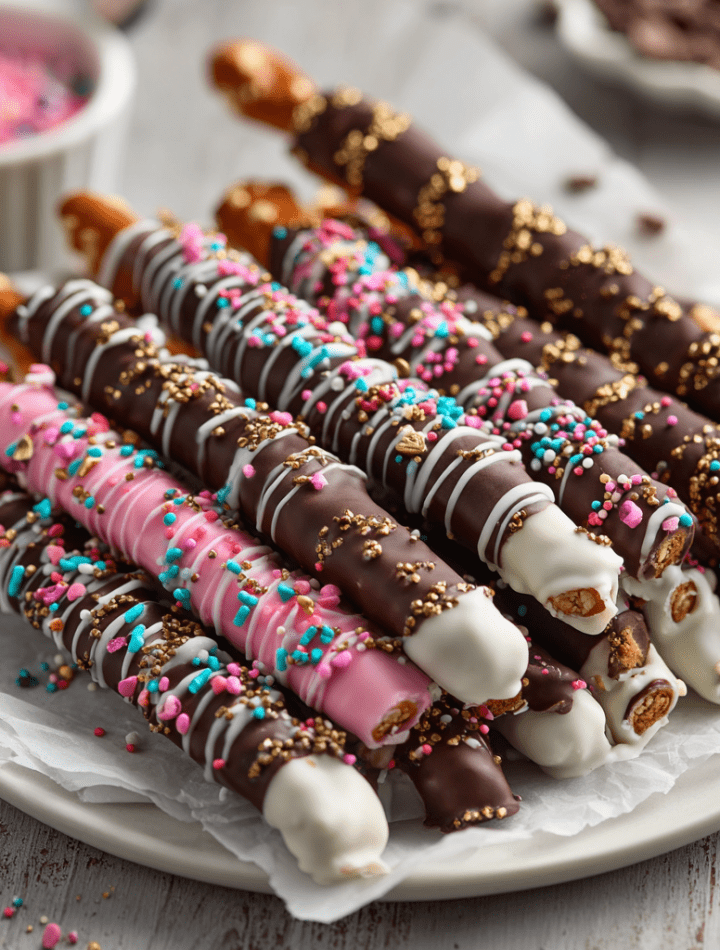
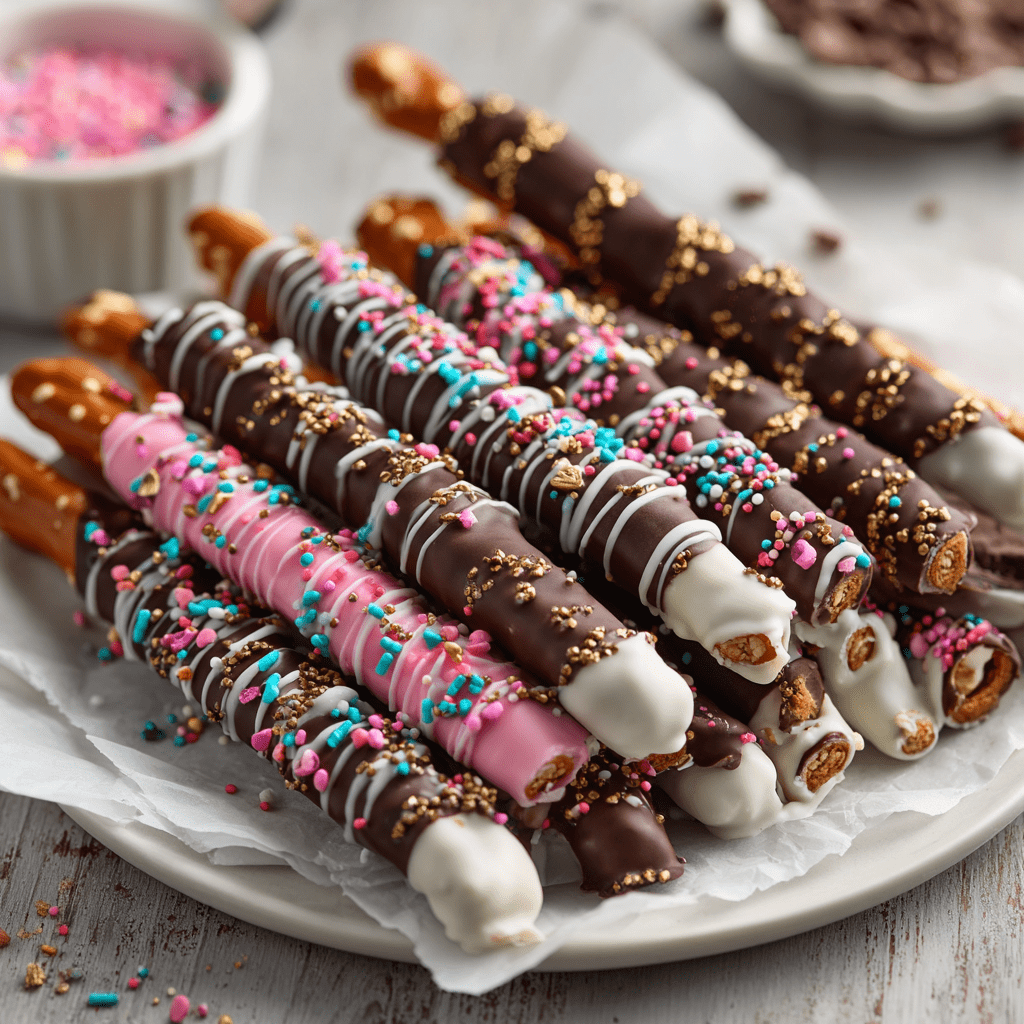
The Magic of Sweet, Salty, and Seriously Simple: Chocolate-Covered Pretzel Rods
Hey there, friend! Come on in and pull up a stool. Is there anything more universally delightful than the glorious crunch of a pretzel meeting the smooth, decadent cloak of chocolate? I don’t think so. Today, we’re throwing open the pantry doors and diving into one of my all-time favorite kitchen projects: Chocolate-Covered Pretzel Rods.
These aren’t just a snack; they’re a blank canvas for joy. They’re the treat you whip up when you need a last-minute party hero, a heartfelt homemade gift, or just a little edible sunshine on a rainy afternoon. The best part? You don’t need a fancy pastry degree or hours to spare. All you need is a handful of simple ingredients and a willingness to get a little chocolate on your fingers (which, in my book, is a sign of a life well-lived).
I love this recipe because it’s a gateway to creativity. Whether you’re a kitchen newbie looking for a confidence boost or a seasoned cook wanting a fun, relaxing activity, these pretzel rods meet you right where you are. We’re talking sweet, salty, crunchy, creamy perfection that looks like it came from a fancy chocolatier but is made with the same love and maybe a few more sprinkles. So, tie on your favorite apron—the messy one with stories sewn into the seams—and let’s make something deliciously fun together.
Grandma’s Counter and a Lesson in Simple Joy
This recipe always takes me back to my grandma’s linoleum-tiled kitchen. It wasn’t the chocolate-dipped pretzels themselves, but the spirit of them. She had this magical ability to turn the simplest ingredients—a bit of leftover dough, overripe fruit, a handful of nuts—into something that felt like a celebration. One chilly afternoon, when “there wasn’t a thing to eat in the house,” she pulled out a bag of pretzel sticks, a half-eaten chocolate bar, and some colored sugar from Christmas past.
What happened next wasn’t culinary genius; it was kitchen alchemy. She melted that chocolate in a makeshift double boiler (a bowl over a pot of simmering water), and we took turns dipping, swirling, and showering those pretzels with sugar. We made a glorious mess. But more importantly, we made a memory. She taught me that creating something special doesn’t require a complex recipe or exotic ingredients. It requires presence, a dash of creativity, and the understanding that the act of making something with your hands, no matter how small, is a gift. Every time I make these, I feel that same spark of simple, unadulterated joy. I hope they spark a little for you, too.
Gathering Your Pretzel Rod Toolkit
Here’s everything you need to create your own crunchy masterpieces. I’ve added my little chef-y notes to help you shop your pantry and understand the “why” behind each item!
- 12 Pretzel Rods: The sturdy foundation! I prefer the standard rod size for optimal dipping. Their robust crunch holds up against the chocolate without going soggy. Chef’s Insight: Give them a quick glance for any major broken bits or excess salt clusters you might want to gently knock off.
- ½ cup Dark Chocolate Chips or Melting Wafers: This is your rich, decadent base. Using high-quality chocolate (Ghiraidelli or Guittard are my go-tos) makes a noticeable difference in flavor and smoothness. Substitution Tip: Love milk chocolate? Swap it in! You can also use a chopped chocolate bar instead of chips.
- ½ cup White Chocolate Chips or Melting Wafers: For that beautiful contrast. White chocolate is trickier to melt. Chef’s Hack: Adding a tiny teaspoon of coconut oil to the chips as they melt creates a smoother, more dippable consistency and helps it set with a lovely snap.
- ½ cup Pink Candy Melts (or White Chocolate + Oil-Based Food Coloring): The fun factor! Candy melts are formulated to melt smoothly and hold color vibrantly, making them perfect for this. Substitution Tip: Any color you love works! Use purple for birthdays, orange for Halloween, or pastels for Easter.
- Toppings Galore (Optional but Highly Encouraged!): This is where your personality shines.
- Sprinkles: Jimmies, nonpareils, sanding sugar—any and all!
- Crushed Nuts: Toasted pecans, peanuts, or almonds add fantastic texture.
- Mini Chocolate Chips: Press them on for extra chocolate pockets.
- Crushed Candy Canes: A festive, pepperminty twist!
- Edible Glitter or Luster Dust: For a touch of magical shimmer.
- Flaky Sea Salt: A light sprinkle over dark chocolate is *chef’s kiss*.
- 1-2 tsp Coconut Oil or Vegetable Shortening: Your melting magic helper! A small amount thins the chocolate slightly for easier dipping and a glossier finish.
Let’s Get Dipping: Your Step-by-Step Guide to Pretzel Perfection
Ready to transform these simple ingredients into edible art? Follow these steps, and you’ll have a tray of gorgeous treats in no time. I’ve sprinkled in my best tips to ensure success!
- Prep Your Station: Before you even turn on the heat, this is the most crucial step. Line a large baking sheet with parchment or wax paper. Have your pretzel rods and all toppings measured and ready in shallow bowls or plates. Trust me, once the chocolate is melted, you’ll want to move quickly. Chef’s Hack: If your kitchen is warm, pop the lined sheet in the fridge for 10 minutes. A cold surface helps the chocolate set faster when you lay the rods down.
- Melt the Chocolate, One Color at a Time: I recommend working with one chocolate type per bowl to keep colors pure. You can use a microwave (in 20-second bursts, stirring vigorously in between) or a double boiler. My preferred method: Place a heatproof bowl over a saucepan with an inch of gently simmering water, ensuring the bowl doesn’t touch the water. Stir until just melted and smooth. Chef’s Commentary: The enemy of melted chocolate is steam and water! Keep your bowls and utensils completely dry. Even a drop of water can cause the chocolate to “seize” and become grainy. If this happens, stir in a tiny bit more coconut oil to try to bring it back.
- The Dip & Twirl: Take a pretzel rod and dip it about halfway into your first melted chocolate. Gently lift it out and, holding it over the bowl, slowly rotate it and let the excess chocolate drip off. A gentle tap on the side of the bowl can help. Pro Tip: Don’t submerge too far, or the chocolate can pool at the base and create a thick, clumsy “foot.” Aim for a clean, elegant line.
- Decorate with Abandon! This is the fun part! Immediately after dipping, while the chocolate is still wet, roll the rod in sprinkles or press on your chosen toppings. For a drizzle effect, let the base chocolate set first, then use a fork or a small piping bag to zig-zag a different colored chocolate over top. Chef’s Hack: To create professional-looking drizzles, dip the tines of a fork into the melted chocolate and wave it quickly back and forth over the rod.
- Set to Perfection: Carefully place your decorated rod onto the prepared baking sheet. Repeat with the remaining rods. Allow them to set at cool room temperature for about 30-45 minutes, or pop the whole tray in the fridge for 15 minutes for a quicker set. Final Thought: Patience is key here! Rushing this step might smudge your beautiful designs.
How to Serve & Share Your Crunchy Creations
Presentation turns these from a kitchen project into a show-stopping treat! Here are a few of my favorite ways to serve them:
The Classic Party Platter: Stand them upright in a tall glass, mug, or vase filled with decorative sugar or coffee beans for stability. It creates a stunning, edible centerpiece. Alternatively, lay them in a single layer on a beautiful platter or a rustic wooden board.
Gift-Giving Gold: These make the most heartfelt gifts. Bundle 3-5 rods together with a pretty ribbon or twine. For extra protection and polish, slide them into a clear cellophane treat bag tied with a tag. Tuck a few bundles into a gift basket with a mug and some coffee for the ultimate “cozy morning” gift.
The Kids’ Table Special: Let the kids decorate their own! Set up a “dipping station” with bowls of melted chocolate (slightly cooled) and tons of topping options. It’s a fantastic, low-mess activity that ends with a delicious reward.
However you choose to serve them, the reaction is always the same: pure delight. That satisfying snap of chocolate followed by the salty crunch is a combination that never, ever gets old.
Mix It Up! 5 Delicious Twists on the Classic
Once you’ve mastered the basic dip, the flavor world is your oyster! Here are a few of my favorite riffs to keep things exciting:
- The “Everything Bagel” Pretzel: Sweet, salty, savory perfection. Dip in white chocolate, then roll in a mix of everything bagel seasoning (sesame seeds, poppy seeds, garlic, onion, salt). It’s bizarrely addictive!
- S’mores Dream Rod: Dip in milk chocolate, then immediately roll in crushed graham cracker crumbs. Before it sets, press a few mini marshmallows along one side. You can even lightly toast the marshmallows with a kitchen torch for the full campfire effect.
- Peanut Butter Lover’s: Stir a spoonful of creamy peanut butter into your melted dark chocolate before dipping. Then, roll the wet chocolate in crushed peanuts. It’s like a crunchy peanut butter cup on a stick!
- Zesty & Bright: For a more adult twist, dip in dark chocolate and sprinkle with a little flaky sea salt and finely grated orange or lime zest. The citrus oil cuts through the richness beautifully.
- Dietary Swap – Vegan & Dairy-Free: Easily done! Use pretzel rods checked for vegan-friendliness (most standard ones are). Opt for high-quality dairy-free chocolate chips and vegan white chocolate. Coconut oil is already your friend here. All your favorite toppings like nuts, sprinkles, and crushed candies are typically fair game.
A Few Kitchen-Confessional Thoughts
This recipe has been my go-to for years, and it’s evolved from my grandma’s “use what you have” approach. I once tried to melt chocolate directly in a pan on the stove (a tragic, scorched mistake). I’ve also learned that more sprinkles are always the answer. Always.
The beauty of these pretzel rods is in their imperfection. That one you dropped in the sprinkles bowl? That’s the “tester.” The one where the drizzle went a little wild? That’s “abstract art.” Don’t stress about making them look identical. Their handmade charm is what makes them special. I keep a big jar of them on my counter during the holidays, and they disappear faster than I can make them. They’ve been party favors, teacher gifts, and the secret weapon I bring to potlucks when I’ve run out of time to bake. They’ve never, ever let me down.
Your Questions, Answered!
Q: My chocolate got thick and clumpy when I melted it! What did I do wrong?
A: Ah, you’ve experienced “seizing.” This usually happens if a tiny bit of steam or water got into the chocolate. To fix it, try stirring in a little more coconut oil or shortening, one teaspoon at a time, until it becomes smooth again. Prevention is key: keep all utensils and bowls bone dry.
Q: Can I make these ahead of time? How do I store them?
A: Absolutely! They are perfect for making ahead. Once fully set, store them in a single layer in an airtight container at cool room temperature for up to 5 days. You can stack them with parchment paper between layers. Avoid the fridge for long-term storage as condensation can make the pretzels lose their crunch.
Q: My toppings won’t stick! What’s the trick?
A: Timing is everything. You must add your sprinkles, nuts, or drizzles immediately after dipping, while the chocolate is still wet and tacky. If you wait even 30 seconds, a thin shell starts to form, and nothing will adhere. Work in small batches.
Q: Can I use almond bark or candy coating instead of chocolate chips?
A: Yes! Almond bark and candy melts (like Wilton brand) are actually designed for dipping and coating. They melt very smoothly, set firmly, and are often more forgiving than pure chocolate. They’re a fantastic, user-friendly option, especially for beginners.
A Quick Note on Nutrition
Let’s be real: we’re making a celebratory treat here, not a salad! But I believe in mindful enjoyment. Each Chocolate-Covered Pretzel Rod is a perfect portion of indulgence—satisfying enough to curb a sweet craving with just one. The pretzel itself provides a little complex carb energy and that satisfying crunch, while the dark chocolate (if you choose it) offers antioxidants. The joy and creativity involved in making them? That’s nourishment for the soul, and it’s calorie-free. As with all good things, savor them, share them, and enjoy every delicious bite without an ounce of guilt. You’ve earned it!
Go Forth and Create Something Delicious
Well, my friend, there you have it—everything I know about creating the most delightful, crunchy, sweet-and-salty Chocolate-Covered Pretzel Rods. I hope you feel empowered to grab those rods and start dipping. Remember, the goal isn’t perfection; it’s the fun you have along the way and the smiles you create when you share them.
This is the heart of Tasty Chow: recipes that bring people together, spark a little creativity, and leave you feeling like a kitchen rockstar. So, what are you waiting for? Pick your chocolate, choose your sprinkle color, and make a little magic. And when you do, I’d love to see it! Tag me on social or drop a comment below. Now, go on—get that chocolate melting, and let’s chow down!
With love and a sprinkle-covered apron,
Emily