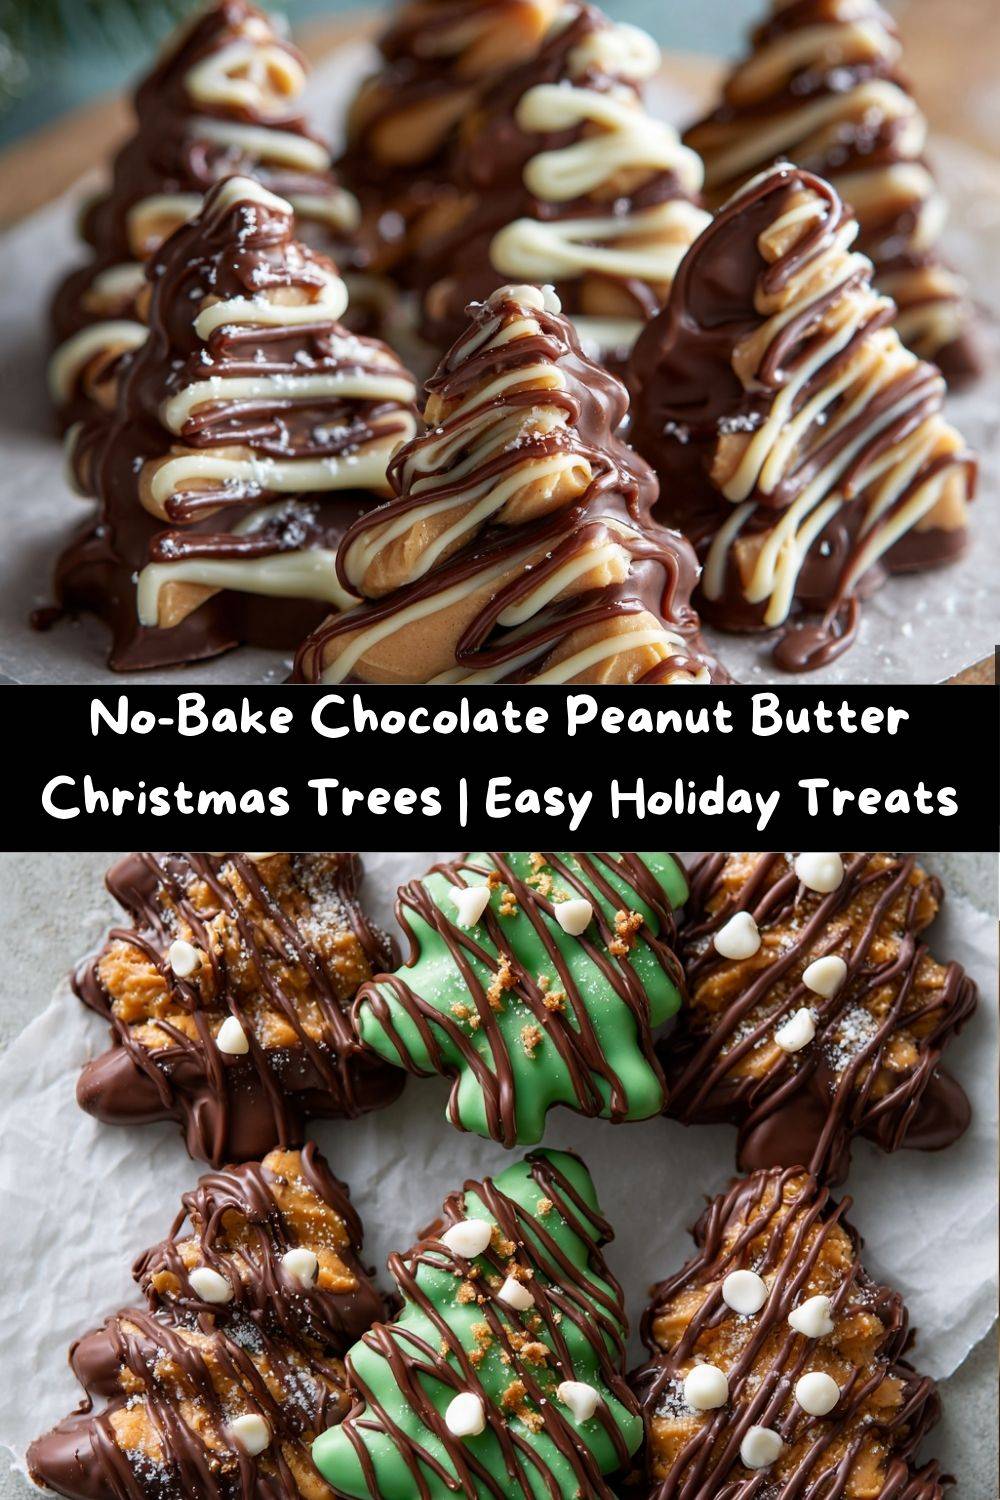
Your New Favorite Holiday Tradition: No-Bake Chocolate Peanut Butter Christmas Trees!
Hey there, my festive friend! Can you smell that? It’s the scent of pine needles, crackling fireplaces, and… is that chocolate and peanut butter? You bet it is! Welcome to my kitchen during the most wonderful—and let’s be real, the busiest—time of the year. I don’t know about you, but my December calendar fills up faster than a mug with hot cocoa. Between shopping, wrapping, and holiday parties, who has time for complicated, fussy recipes?
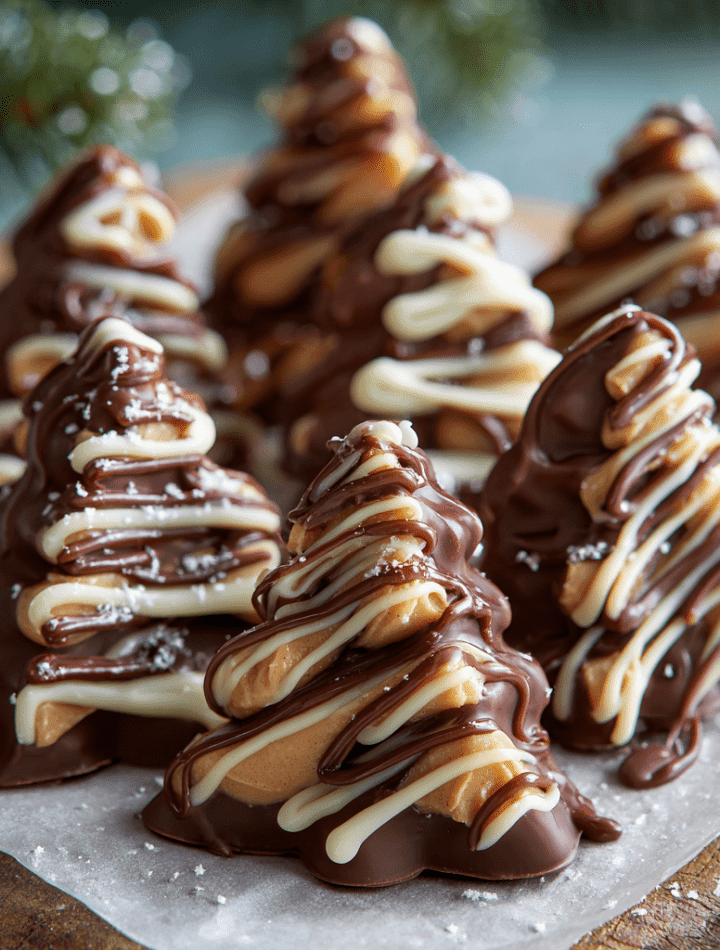
That’s exactly why I’m so head-over-heels in love with these No-Bake Chocolate Peanut Butter Christmas Trees. They are the ultimate holiday hack: incredibly delicious, stunningly festive, and so simple that you can whip them up in between wrapping presents. Imagine the best part of a peanut butter cup—that rich, creamy, salty-sweet center—transformed into an adorable Christmas tree and dunked in a luxurious layer of dark chocolate. They’re fun to make, absolutely irresistible to eat, and they make the most heartfelt homemade gift.
This isn’t just a recipe; it’s a little pocket of joy. It’s the kind of project that doesn’t require a perfectly clean kitchen or a chef’s degree. It’s about getting a little messy, licking the spoon, and creating something magical that will have your family and friends gazing in wonder. So, put on your favorite holiday playlist, tie on that apron (the messy one is totally welcome here), and let’s make some edible Christmas magic together. Trust me, these little trees are about to become a non-negotiable part of your holiday baking lineup!
A Sweet, Messy Memory: Where It All Began
This recipe takes me right back to my grandma’s kitchen table, which was always covered in a dusting of flour and sprinkled with love. She was the queen of no-fuss, big-flavor treats. One particularly chaotic Christmas Eve, she decided we weren’t just making fudge; we were making *shaped* fudge. We didn’t have a fancy tree cutter back then—we used a knife and a whole lot of imagination to carve vaguely triangular shapes from a pan of peanut butter bliss.
My job, at the tender age of seven, was to drizzle the melted chocolate. Let’s just say my “drizzle” looked more like a chocolate blizzard had hit our little trees. There were more chocolaty fingerprints on my face and the tablecloth than on the actual candies. But you know what? We laughed until our sides hurt. And when we served those lopsided, generously glazed creations, you would have thought we’d presented a gourmet Yule log from a Parisian patisserie. The joy wasn’t in perfection; it was in the togetherness, the creativity, and the sheer delight of making something with our own hands.
That’s the spirit I want you to bring to this recipe. Don’t stress if your trees aren’t perfectly symmetrical or your drizzle isn’t Instagram-ready. The real magic is in the making and the sharing. This recipe is my homage to those messy, wonderful, and delicious childhood Christmases.
Gathering Your Festive Ingredients
One of the best things about this recipe is that you probably have most of these ingredients in your pantry right now! Let’s break them down. This isn’t just a list; it’s your roadmap to success, with a few chef-ly insights to make these trees truly your own.
For the Peanut Butter Mixture (The “Tree Trunk”):
- ½ cup salted butter, melted: Salted butter is my secret weapon here. It balances the sweetness and enhances the peanut butter flavor. If you only have unsalted, just add a tiny pinch of fine sea salt to the mixture.
- 2 cups creamy peanut butter: Use a standard, no-stir creamy peanut butter like Jif or Skippy. The natural, oily kinds can make the mixture too greasy and prevent it from setting properly.
- 4 ½ cups powdered sugar: Also known as confectioners’ sugar, this is what gives the center its smooth, melt-in-your-mouth texture. Sift it if it’s lumpy for a perfectly smooth dough.
- 1 tsp vanilla extract: A classic flavor enhancer! It adds a warm, sweet depth that makes the peanut butter filling taste even more complex and delicious.
For the Chocolate Coating (The “Evergreen Branches”):
- 3 cups semi-sweet chocolate chips: I love the rich, slightly bitter contrast of semi-sweet chocolate against the sweet filling. It keeps the overall treat from being cloyingly sweet.
- 2 tbsp shortening: Don’t skip this! This is my little chef hack. The shortening helps thin the chocolate just enough for a smooth, thin, professional-looking coating that sets with a beautiful snap. Butter or coconut oil can cause the chocolate to seize or set unevenly.
For the Drizzle (The “Tinsel & Ornaments”):
- ½ cup milk chocolate chips & ½ cup white chocolate chips: Using two colors gives you that classic, festive look. Feel free to get creative—maybe use dark chocolate and butterscotch chips for a different vibe!
- 1 tsp shortening (divided): A tiny bit mixed into each type of chocolate will make them fluid and perfect for drizzling.
Let’s Build Our Edible Forest: Step-by-Step Instructions
Ready to create? This is where the fun begins. I’ll walk you through each step with all my favorite tips to ensure your Christmas trees are absolutely perfect.
- Create the Peanut Butter Dough: In a large bowl, combine the melted butter, creamy peanut butter, and vanilla extract. Give it a good stir until it’s smooth and well-combined. Now, gradually add the powdered sugar. I like to add it one cup at a time, stirring with a sturdy spoon. Fair warning: when you get to the last cup, it’s going to get thick! This is a great arm workout. You’ll know it’s ready when it forms a soft, pliable dough that holds together when you squeeze it. Chef’s Tip: If the dough feels too crumbly, add a teaspoon of melted butter. If it’s too sticky, add a touch more powdered sugar. You’re looking for Play-Doh consistency!
- Press and Chill: Line a 9×13-inch baking pan with parchment paper, leaving some overhang on the sides. This is your non-stick lifesaver! Press the peanut butter mixture evenly into the pan. I use the bottom of a measuring cup to get it really smooth and compact. Now, pop the whole pan into the freezer for 30-45 minutes. Chef’s Tip: Don’t rush this step! The mixture needs to be very firm so you can get clean cuts with your cookie cutter.
- Cut Out Your Trees: Once the slab is firm, lift it out of the pan using the parchment paper. Now for the fun part! Use a tree-shaped cookie cutter to stamp out your shapes. Press down firmly and cleanly. If the dough starts to get soft, just pop it back in the freezer for 10 minutes. Place the cut-out trees on a parchment-lined baking sheet and return them to the freezer. Chef’s Tip: Re-roll the scraps to get as many trees as possible! No peanut butter goodness left behind.
- Melt the Coating Chocolate: In a microwave-safe bowl, combine the semi-sweet chocolate chips and the 2 tablespoons of shortening. Melt in 30-second bursts, stirring thoroughly after each interval, until it’s completely smooth and glossy. Chef’s Tip: Be patient! Burning chocolate is a sad thing. Short bursts and constant stirring are the keys to success.
- The Big Dip: Remove a few trees from the freezer at a time. Using a fork or a dipping tool, carefully lower a tree into the melted chocolate. Flip it to coat completely, then lift it out, letting the excess chocolate drip back into the bowl. Gently slide the coated tree onto your parchment-lined sheet. Chef’s Tip: If the chocolate starts to thicken, just pop the bowl back in the microwave for 15 seconds.
- Drizzle with Holiday Flair: Melt the milk chocolate and white chocolate chips separately, each with about ½ teaspoon of shortening. You can use a spoon, but for real control, I pour the melted chocolate into a small Ziploc bag, snip a tiny corner off, and use it as a makeshift piping bag. Drizzle away! Get creative with zig-zags, swirls, or polka dots. This is your time to shine.
- The Final Set: Let the trees set completely at room temperature. This could take an hour or two, but if you’re impatient (like me), you can speed things up by placing them in the refrigerator for about 15-20 minutes.
How to Serve Your Masterpiece
Presentation is part of the fun! These trees are so pretty, they deserve a special stage. For a casual family treat, arrange them on a simple holiday platter. If you’re gifting them, find some cute cellophane bags or small cardboard boxes from the craft store. Tie them with a ribbon, and you have a heartfelt, handmade gift that’s infinitely better than anything from a mall.
These are fantastic on a holiday dessert table alongside cookies and fudge. They also make a wonderful sweet ending to a big holiday meal. Serve them with a cold glass of milk, a mug of rich hot chocolate, or even a nice cup of coffee. The rich chocolate and peanut butter are a classic pairing that everyone adores.
Get Creative! Fun Recipe Variations
Once you’ve mastered the classic, why not play around? Here are a few of my favorite twists:
- The Nutty Reindeer: Swap the creamy peanut butter for crunchy! You’ll get little bits of nutty texture in every bite. You could even press a single peanut at the base of the tree to look like a trunk.
- Snow-Capped Trees: Before the chocolate drizzle sets, sprinkle the trees with a dusting of coarse sparkling sugar or even crushed candy canes for a frosty, crunchy effect.
- Almond Joy Trees: Not a peanut butter fan? No problem! Use almond butter instead, and mix ½ cup of shredded coconut into the dough. It’s a whole new flavor paradise.
- Double-Dark Forest: For the dark chocolate lovers, use dark chocolate chips for both the coating and the drizzle. It’s decadent, rich, and incredibly elegant.
- Festive Sprinkle Fun: Immediately after dipping, add a few festive sprinkles or nonpareils for a pop of color and extra holiday cheer.
Chef Emily’s Notes from the Kitchen
This recipe has evolved so much since those first lopsided trees with my grandma. I’ve learned that the key to a smooth coating is truly the shortening, and that a well-chilled peanut butter base is non-negotiable. One year, I was in such a hurry that I tried to cut the trees after only 20 minutes in the freezer. Let’s just say I ended up with more of a “peanut butter Christmas blob” situation. We still ate them, of course, but they were definitely abstract art!
These trees have become a staple in my holiday gifting. I love making a double batch and having a production line with my niece and nephew. It’s chaotic, it’s messy, and it’s filled with laughter—exactly what the holidays should be. Don’t be afraid to make this recipe your own. That’s the beauty of cooking from the heart.
FAQs & Troubleshooting: Your Questions, Answered!
Q: My peanut butter mixture is too crumbly and won’t hold together. What did I do wrong?
A: This usually means you need a bit more moisture. The type of peanut butter can vary. Simply add another tablespoon of melted butter and mix it in. It should come together nicely.
Q: Can I use natural peanut butter?
A: I don’t recommend it for this specific recipe. Natural peanut butters tend to be oilier and can separate, leading to a greasy, soft mixture that doesn’t set firmly enough for cutting.
Q: My chocolate is thick and clumpy after melting. Help!
A> It sounds like your chocolate seized! This can happen if even a tiny drop of water gets into the bowl. Unfortunately, it’s hard to fix. To prevent this, always ensure your bowls and utensils are completely dry. If it happens, you can try adding a tiny bit more shortening and stirring vigorously, but starting fresh is often easier.
Q: How far in advance can I make these?
A> They are perfect for making ahead! Store them in an airtight container in the refrigerator for up to 2 weeks, or you can freeze them for up to 3 months. Just separate layers with parchment paper so they don’t stick together.
Nutritional Information*
Let’s be real, these are a treat, and we’re here to enjoy every delicious bite! But for those who like to know, here’s a general breakdown per tree (assuming the recipe makes about 24 trees).
Per Tree:
Calories: 210 | Fat: 13g | Saturated Fat: 5g | Carbohydrates: 21g | Sugars: 17g | Protein: 4g | Sodium: 85mg
*Please note that this is an estimate based on the specific ingredients used. Values can vary depending on brands and any substitutions you make. The important thing is to savor the moment and the flavor!
Final Sweet Thoughts
Well, my friend, we’ve done it! We’ve created a forest of delicious, festive, and joy-filled treats that are sure to brighten anyone’s holiday. I hope this recipe brings as much happiness to your kitchen as it has to mine over the years. Remember, the goal isn’t perfection; it’s the fun you have along the way. So embrace the messy fingers, the imperfect drizzles, and the smiles these little trees will bring.
From my kitchen to yours, I wish you a season filled with warmth, love, and plenty of tasty chow. If you make these (and I really hope you do!), tag me on social media @TastyChow with #TastyChowHoliday so I can see your beautiful creations! Now, go enjoy your well-deserved treat. You’ve earned it!
With love and a sprinkle of sugar,
Emily