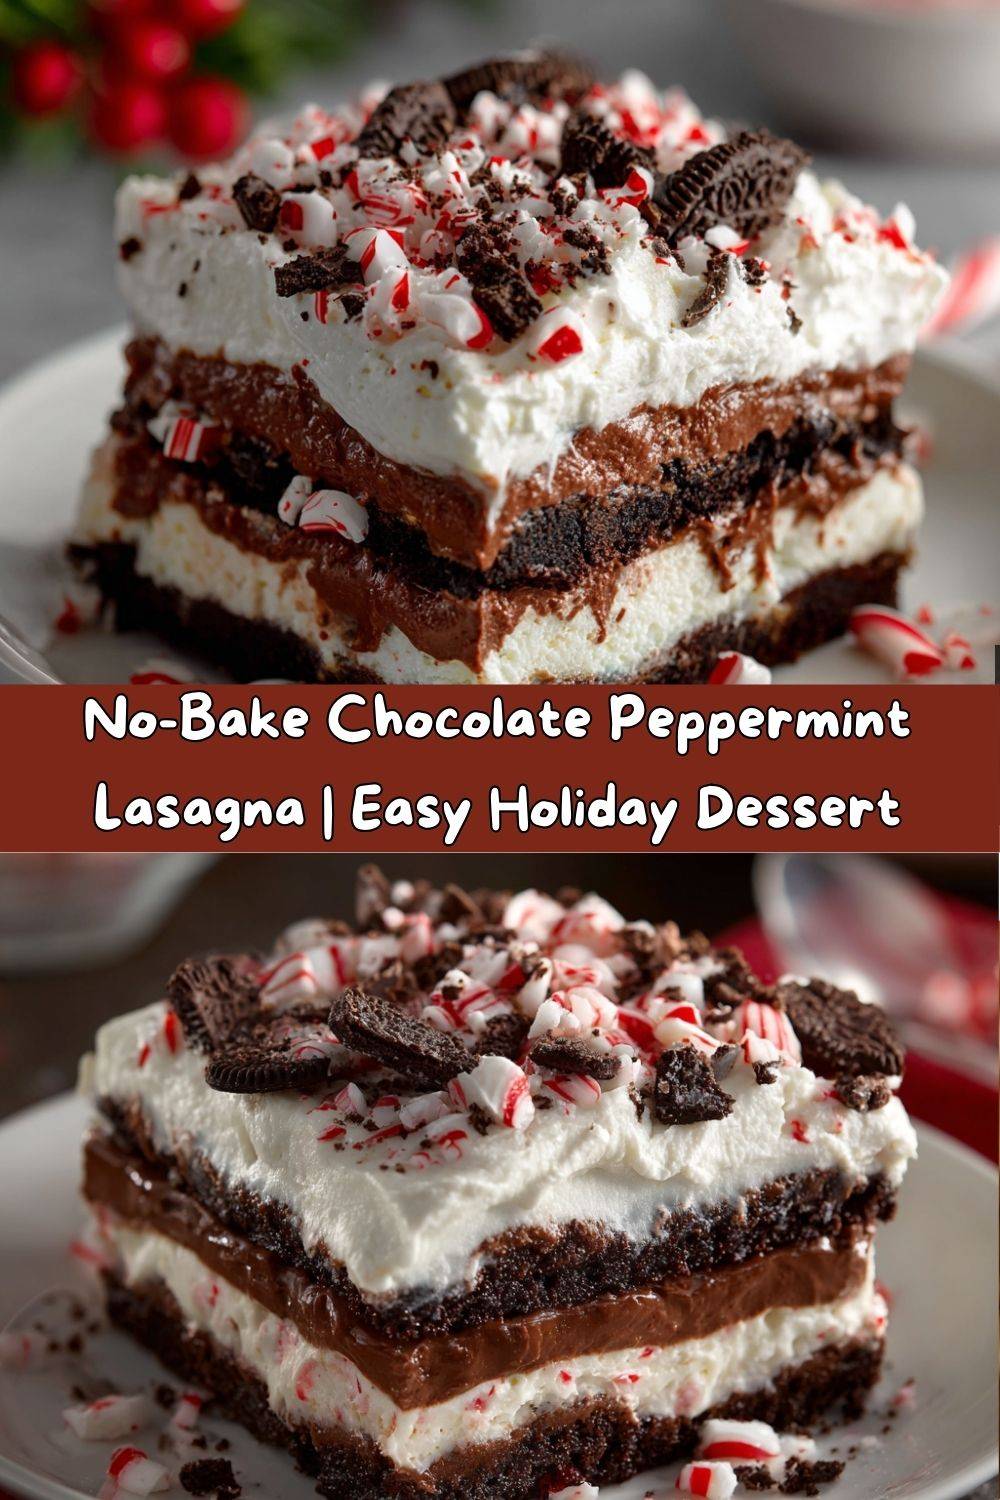
Your New Holiday Showstopper: No-Bake Chocolate Peppermint Lasagna
Hey there, my fellow food lovers! Chef Emily here, coming to you from my wonderfully messy kitchen, where the scent of peppermint and chocolate is currently permanently infused into the air—and honestly, I wouldn’t have it any other way. Is there anything more magical than the flavors of the holiday season? That cool, crisp peppermint paired with rich, decadent chocolate is a match made in dessert heaven, and today, we’re turning that dream team into the most incredible, show-stopping, no-bake dessert you’ll make all year: Chocolate Peppermint Lasagna.
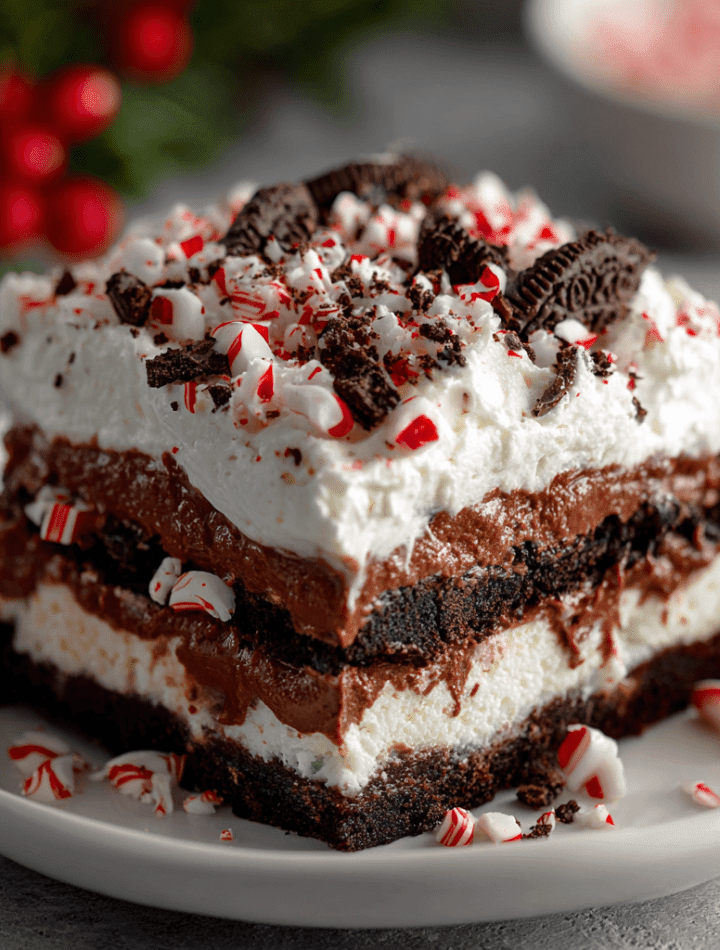
Now, I know what you might be thinking. “Lasagna? For dessert?” Trust me on this one. We’re layering an Oreo cookie crust, a fluffy peppermint cheesecake filling, a silky chocolate pudding, and a cloud of whipped topping into a frozen masterpiece that’s cool, creamy, crunchy, and utterly irresistible. The best part? You don’t even have to turn on your oven. This is the perfect make-ahead dessert for all your holiday parties, cookie exchanges, or for those nights when you just need a giant, celebratory slice of something sweet. So, tie on your favorite apron (the messy one with the stories, like mine!), and let’s create some holiday magic together.
A Spoonful of Nostalgia: My First Bite
This recipe takes me right back to my grandma’s kitchen on a snowy December evening. I was about ten years old, and she was the queen of “secret recipe” desserts she’d clip from magazines. One year, she unveiled this wild, layered dessert she called an “Icebox Cake.” It was this towering, chilly, chocolate-and-mint thing that looked nothing like the lasagna we’d had for dinner. My eyes went wide.
She handed me the first slice, and I remember the sheer delight of cracking my spoon through the creamy layers into the crunchy base. The cool peppermint hit my tongue first, followed by the deep chocolate, and it was an absolute revelation. It felt… festive. It felt special. That dessert became as much a part of our holiday tradition as decorating the tree. My version today is a loving homage to hers, tweaked and perfected over years of making it for friends, but the soul of it—that magical, festive combination—is all Grandma. Every time I make it, I feel like she’s right there in the kitchen with me, giving me a wink.
Gathering Your Holiday Brigade: The Ingredients
Here’s everything you’ll need to build this epic dessert. Read through these notes—I’ve packed them with all my favorite chef insights and substitutions to make this recipe work for you!
For the Oreo Crust:
- 72 Oreo cookies: That’s about two standard packages. We’re using the whole cookie—filling and all! It adds that perfect bit of sweetness and helps bind the crust. Chef’s Insight: For a deeper chocolate flavor, try using Double Stuf Oreos!
- 1 cup unsalted butter, melted: This is the glue that holds our crunchy foundation together. Using unsalted lets you control the salt level. Substitution Tip: Salted butter works in a pinch; just know your crust will have a slight salty-sweet thing going on, which is actually delicious.
For the Peppermint Cheesecake Layer:
- 1 cup unsalted butter, softened & 24 oz brick-style cream cheese, room temp: Room temperature is NON-NEGOTIABLE here, friends! If they’re cold, you’ll end up with a lumpy mixture instead of a smooth, fluffy cloud. Plan ahead and take them out a few hours before you start.
- 3 cups powdered sugar: Sweetens and helps thicken our filling.
- 2 teaspoons vanilla extract & 2 teaspoons peppermint extract: The flavor powerhouses! Use a good quality pure vanilla. For the peppermint, start with 2 tsp and taste. You can add another ½ tsp if you really love a strong mint kick.
- 3 cups stabilized whipped topping (e.g., Cool Whip), thawed: This lightens the whole mixture and gives it that incredible airy texture. Chef’s Hack: You can use an equal amount of freshly whipped heavy cream stabilized with a little powdered sugar.
- 1 cup crushed candy canes: Provides the classic peppermint crunch! Crush them in a zip-top bag with a rolling pin for easy cleanup.
For the Chocolate Pudding Layer:
- 4 (3.9 oz) packages instant chocolate pudding: Instant pudding is key because it sets without cooking. I love the deep color and flavor of the name-brand here.
- 5½ cups whole milk: The higher the fat content, the richer and creamier your pudding layer will be. 2% will work, but whole milk is ideal.
- ½ teaspoon espresso powder (optional): My secret weapon! Coffee doesn’t make it taste like coffee; it just makes the chocolate flavor taste more chocolatey. Don’t skip it if you have it!
- ¾ cup mini chocolate chips or chopped Andes mints (optional mix-in): A little extra texture and surprise. I’m team Andes mints all the way for this one!
For the Topping:
- 5 cups whipped topping: The beautiful, snowy finish on our lasagna.
- ½ cup crushed candy canes & Optional chocolate curls: For that gorgeous, festive look and a final burst of peppermint.
Building Your Masterpiece: Step-by-Step Instructions
Okay, team! Let’s get layering. This process is so much fun and almost foolproof. Follow these steps, and you’ll have a dessert that will have everyone asking for the recipe.
- Make the Crust: Grab your food processor and pulse those Oreos into fine, dark crumbs. If you don’t have a processor, no sweat! Place the cookies in a sturdy zip-top bag and crush them with a rolling pin until they’re uniformly fine. Pour the crumbs into a large bowl and stir in the melted butter until every last crumb is moistened. It should feel like wet sand. Dump this into your 9×13-inch pan and press it down firmly and evenly into the bottom. I like to use the bottom of a measuring cup to really pack it in. Pop this in the fridge to set up while you work on the next layer. Chef’s Tip: Chilling the crust now prevents it from mixing into the creamy layers later.
- Prepare the Peppermint Cheesecake Layer: In the bowl of a stand mixer fitted with the paddle attachment (or using a hand mixer), beat the softened butter and cream cheese together on medium-high speed for a good 2-3 minutes. You want it to be completely smooth, pale, and fluffy. Scrape down the sides of the bowl. Gradually add the powdered sugar, beating on low at first to avoid a sugar cloud, then increasing the speed until it’s fully incorporated. Beat in the vanilla and peppermint extracts. Now, here’s the key: gently fold in the whipped topping and crushed candy canes with a spatula. Don’t beat it! We want to keep all that airiness. Pull your crust out of the fridge and spread this beautiful pink-tinged mixture evenly over the top. Smooth it out and pop it back in the fridge.
- Chocolate Pudding Layer: In another large bowl, whisk the instant pudding mixes and espresso powder together. Pour in the cold milk and whisk vigorously for a full two minutes. It will start to thicken right before your eyes! Let it sit for about 5 minutes to thicken further. If you’re adding the mini chocolate chips or Andes mints, fold them in now. Carefully spread this thick, luscious chocolate layer over the peppermint cheesecake layer. Be gentle to avoid mixing the two white and brown layers. A offset spatula works wonders here.
- Top It Off: Give the final 5 cups of whipped topping a quick stir to loosen it up, then gently spread it over the chocolate pudding layer. This is your blank canvas! Sprinkle the remaining ½ cup of crushed candy canes and any chocolate curls over the top for a gorgeous, festive finish.
- The Big Chill: This is the hardest part: waiting. You absolutely must cover the pan with plastic wrap and refrigerate it for at least 4 hours, but overnight is truly best. This allows all the layers to firm up perfectly, making it sliceable and ensuring you get a beautiful, clean bite of every component.
How to Serve This Winter Wonderland
When it’s finally time to serve, you want to do it right! Take your lasagna out of the fridge about 10 minutes before slicing—this lets it soften just enough for your knife to glide through those gorgeous layers. For picture-perfect slices, dip your sharp knife in hot water, wipe it dry, and then make your cut. Repeat for every slice!
Slide each massive piece onto a plate. I love serving this with a little extra sprinkle of crushed candy cane on the plate and a small, fresh mint leaf for a pop of color. It’s incredibly rich, so a small slice goes a long way… though I’ve never known anyone to stop at just one. Pair it with a hot coffee, a glass of cold milk, or even a peppermint hot chocolate for the ultimate holiday dessert experience.
Mix It Up! Fun Recipe Variations
This recipe is a fantastic base for so many delicious twists! Here are a few of my favorite ways to change it up:
- Cookie Swap: Not an Oreo fan? Use Golden Oreos for a vanilla crust, or even ginger snaps for a spicy, warm twist that pairs amazingly with the peppermint.
- Different Pudding: Try using white chocolate or cheesecake-flavored instant pudding for the middle layer for a different flavor profile.
- Boozy Adult Version: Add a tablespoon of peppermint schnapps or crème de menthe to the cheesecake layer (reduce the extract by ½ tsp if you do). For the chocolate layer, a shot of Irish cream liqueur is divine.
- Dietary Swaps: Use gluten-free Oreos for the crust. For a lighter version, use Neufchâtel cheese, light butter, sugar-free pudding mix, and a light whipped topping. The texture will be slightly different but still delicious!
- Seasonal Twist: Make it for other holidays! Use pastel-colored peppermints for Easter, or swap the peppermint extract for orange extract and use crushed Oreos on top for a Halloween-themed “dirt” dessert.
Chef Emily’s Notes & Kitchen Confessions
This recipe has evolved so much from my grandma’s original. She used to use just one layer of pudding and sweetened condensed milk in her cheesecake layer—which is still delicious, by the way! My version is a bit fluffier and more balanced. One year, I was in such a hurry that I used cold cream cheese. Big mistake. I had tiny little cream cheese lumps throughout my layer, and my family lovingly called it “cheesecake with chunks.” We still ate it, of course, but I learned my lesson: ROOM TEMP IS KEY! Also, the espresso powder was a game-changer I discovered in culinary school. It’s my little secret for making any chocolate dessert sing just a little louder.
FAQs & Troubleshooting
Q: My layers are running together/are soupy. What happened?
A: This almost always means it didn’t chill long enough. This dessert needs a full 4+ hours to set properly. If you’re in a real pinch, you can pop it in the freezer for 1.5-2 hours, but let it sit out for 15 minutes before serving so it’s not rock solid.
Q: Can I make this ahead of time?
A: Absolutely! That’s one of its best features. You can make this up to 2 days in advance. Just keep it covered tightly in the refrigerator. Add the final candy cane garnish the day you serve it so it stays crunchy.
Q: My peppermint cheesecake layer is too runny to spread.
A: This could be from a few things: ingredients not being at room temperature, under-mixing the butter and cream cheese, or the whipped topping was over-stirred and deflated. If it happens, don’t panic! Just pop the whole bowl of filling into the fridge for 20-30 minutes to firm up a bit before trying to spread it.
Q: Can I freeze Chocolate Peppermint Lasagna?
A: You can! Wrap it tightly in a few layers of plastic wrap and freeze for up to a month. Thaw it overnight in the refrigerator before serving. The texture of the pudding and whipped layers may be slightly different after freezing, but it will still taste amazing.
Nutritional Information (Approximate)
Please note: This is an estimate per serving (based on 20 servings) provided by an online nutrition calculator. It is not a substitute for professional dietary advice.
- Calories: 580 kcal
- Carbohydrates: 62g
- Protein: 6g
- Fat: 35g
- Saturated Fat: 21g
- Cholesterol: 75mg
- Sodium: 420mg
- Fiber: 1g
- Sugar: 48g
This is a decadent treat, meant to be enjoyed in moderation as part of your holiday celebrations! Its richness means a small slice is incredibly satisfying.
Final Thoughts from My Kitchen to Yours
Well, my friends, there you have it! My all-time favorite holiday dessert that’s guaranteed to bring joy, spark conversation, and have everyone scraping their plates clean. I love this recipe because it’s more than just a list of ingredients; it’s a experience. It’s about building something beautiful with your hands, sharing stories over the mixing bowl, and creating a new tradition for your own family.
I hope you have as much fun making this Chocolate Peppermint Lasagna as I do. When you do, please tag me on social @TastyChow—I love seeing your creations! From my messy, festive kitchen to yours, happy baking… or rather, happy no-baking! May your holiday season be filled with love, laughter, and incredibly delicious food.
With love and a sprinkle of candy cane,
Emily