When a Cake Hugs You Back
Hey there, my fellow food lover! Let’s be real for a second. Some cakes are beautiful, some are classic, and some are… well, a little bit disappointing. You know the ones I mean. They look like a dream in the bakery window, but when you take that first bite, it’s just… fine. It doesn’t make your eyes roll back in your head. It doesn’t make you want to hide the rest of the pan for yourself. It’s just cake.
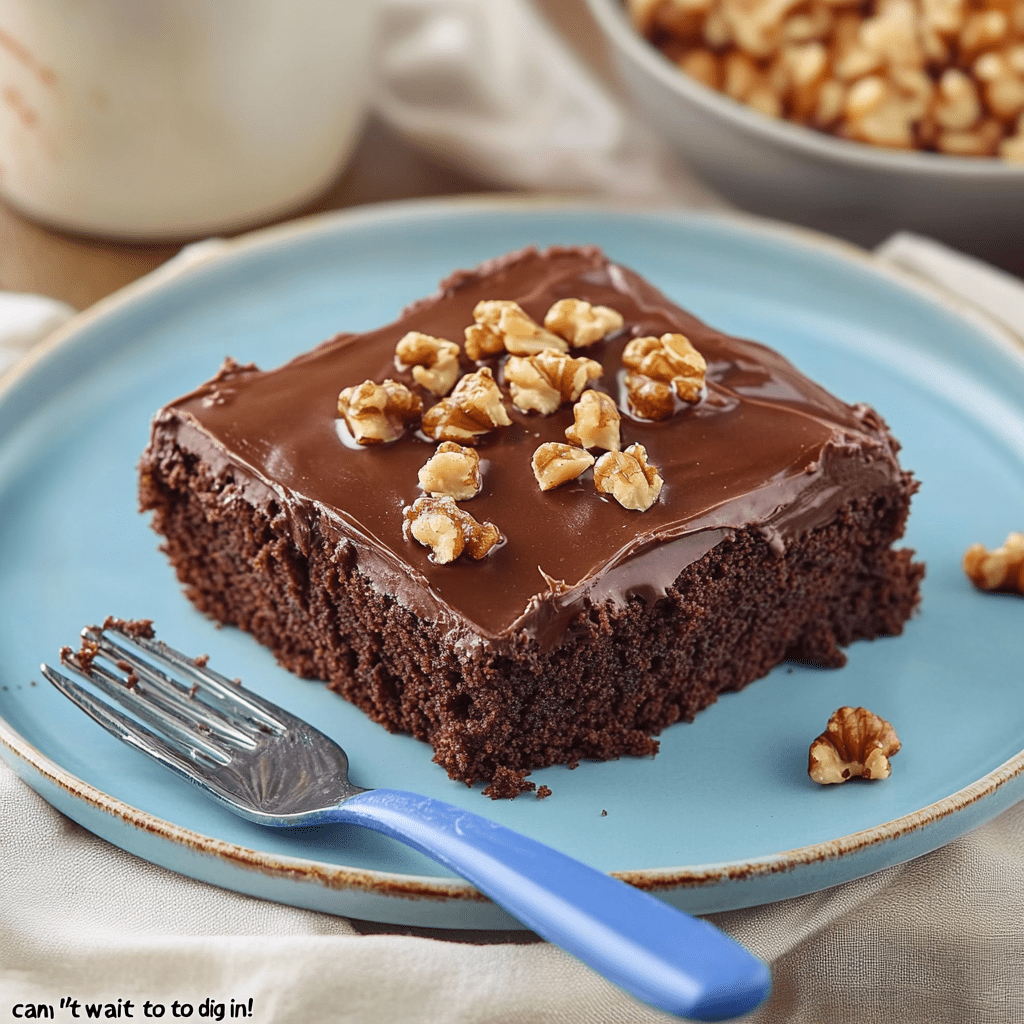
But then, my friends, there are cakes that feel like a celebration in every single bite. Cakes that are so moist, so rich, and so layered with texture and flavor that they feel like a warm, chocolatey hug. The kind of dessert that makes people stop talking mid-sentence. The cake I’m sharing with you today is 100% in that second category. Welcome to my Chocolate Ricotta Cake with Pudding Frosting—the creamy, dreamy dessert that’s about to become your new favorite.
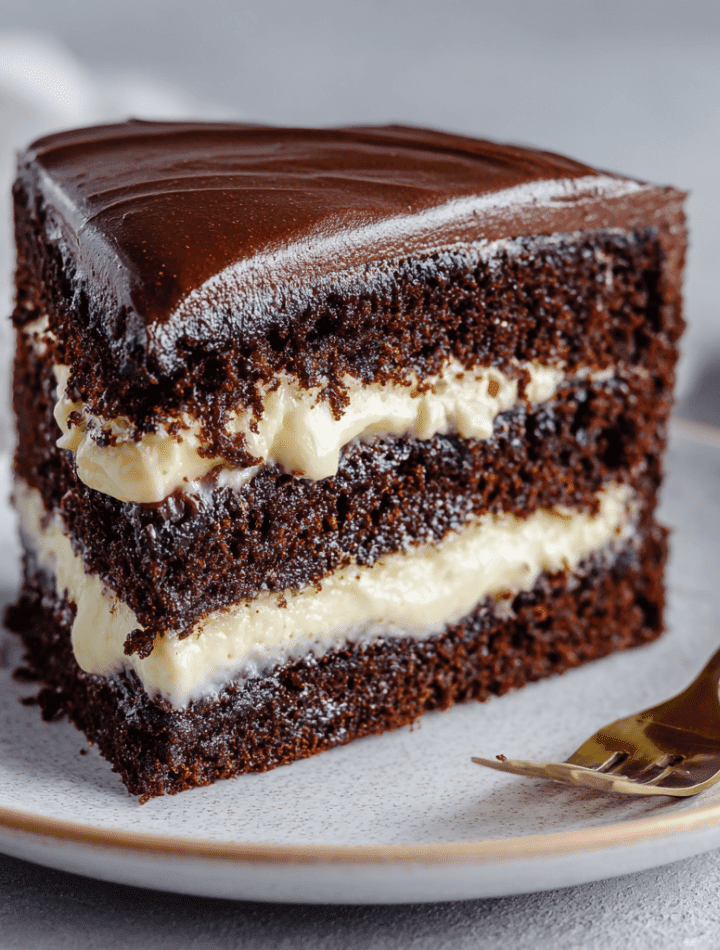
This isn’t just any chocolate cake. Imagine this: a deep, dark, and super-moist devil’s food cake base. On top of that, a hidden layer of sweet, velvety, cheesecake-like ricotta that bakes right into it. And to send it completely over the top, a cloud of light, mousse-like chocolate pudding frosting that’s so smooth, it’s practically sinful. It’s the perfect union of comfort and elegance, and the best part? It’s incredibly easy to make. So, tie on your favorite apron (the messy one is always the best), and let’s make some magic happen.

My Grandma’s Secret Weapon
This recipe always takes me back to my Grandma Rose’s kitchen. She was a wizard with simple ingredients, and her secret weapon for making any dessert extra special was always, always ricotta cheese. She’d sneak it into pancakes, swirl it into coffee cake, and yes, layer it magically beneath chocolate cake. As a kid, I thought it was pure wizardry. How did that creamy, slightly tangy layer get in there? It was our family’s “secret ingredient” that made her cakes legendary at every potluck and birthday party.
I’ve taken her brilliant concept and given it a little “Emily” twist with that fluffy pudding frosting. It’s my way of honoring her tradition of creating food that feels like love, while also making it accessible for all of us with busy, modern lives. Every time I make this cake, I can almost smell her kitchen—a mix of baking cocoa, vanilla, and that unmistakable scent of happiness. It’s more than a recipe; it’s a delicious heirloom.
Gathering Your Dream Team: The Ingredients
One of the things I love most about this cake is how it turns everyday, easy-to-find ingredients into something truly spectacular. Here’s your shopping list, complete with my little chef-y insights to help you build the best cake possible.
For the Luscious Ricotta Layer:
- 4 cups (two 15 oz containers) Ricotta Cheese: This is the star of our hidden layer! I prefer whole-milk ricotta for the creamiest, richest texture. If you can only find part-skim, that’s totally fine, but whole milk is the winner here.
- 1 cup Granulated Sugar: Sweetens the ricotta perfectly without making it grainy.
- 1 teaspoon Vanilla Extract: A must for that warm, aromatic flavor. Don’t be shy with it!
- 4 large Eggs, room temperature: Room temp eggs blend into the ricotta mixture much more smoothly, giving us that seamless, creamy texture. Just pop them in a bowl of warm water for 5-10 minutes if you forgot to take them out!
For the Moist Chocolate Cake:
- 1 box (15.25 oz) Chocolate or Devil’s Food Cake Mix: This is our brilliant shortcut! I’m a huge fan of using a quality box mix as a base—it’s reliable, fast, and delivers a perfect crumb every time. No one will ever know!
- ½ cup Canola or Vegetable Oil: This adds incredible moisture to the cake. I don’t recommend substituting butter here; the oil keeps the cake wonderfully tender.
- 1 cup Water: The simple hydrator for our mix.
- 3 large Eggs: The binder that gives the cake its structure and richness.
For the Whipped Chocolate Pudding Frosting:
- 1 box (5 oz) Instant Chocolate Pudding Mix: The instant kind is key here, as it sets quickly with the cold milk. This gives our frosting that incredible, mousse-like body.
- 3 cups Cold Milk: The colder, the better! I use whole milk for a creamier frosting, but 2% works great, too.
- 1 container (8 oz) Whipped Topping, thawed: This is the magic ingredient that transforms the thick pudding into a light, fluffy, and spreadable cloud of frosting. Make sure it’s fully thawed in the fridge for easy folding.
Let’s Build This Beauty: Step-by-Step
Ready to see the magic happen? Follow these steps, and you’ll have a stunning, professional-looking dessert that’s deceptively simple to create.
- Preheat and Prep. Fire up that oven to 350°F (175°C). Now, grab your pan. You can use a classic 9×13-inch baking dish for easy serving, or two 8-inch round cake pans if you want a gorgeous layered look. Grease the bottom and sides really well with butter or non-stick spray. I like to add a light dusting of flour or a parchment paper sling for absolute foolproof removal. Chef’s Hack: A quick spritz of baking spray with flour is my go-to for never-stick perfection.
- Create the Creamy Ricotta Layer. In a large bowl, add your ricotta, sugar, vanilla, and those room-temperature eggs. Using a hand mixer or a sturdy whisk, beat it all together until it’s smooth, creamy, and beautifully combined. You shouldn’t see any big lumps of ricotta. Once it’s silky, set it aside. Little Tip: Giving this a good mix now ensures you won’t have a grainy texture later. It’s worth the extra minute!
- Whip Up the Chocolate Cake Base. In a separate bowl, it’s time for our trusty shortcut. Dump in the cake mix, oil, water, and eggs. Mix it all together according to the package directions, which usually means beating on medium speed for about 2 minutes, until it’s smooth and gloriously chocolatey. Chef’s Insight: Don’t overmix! Once the ingredients are combined and the batter is smooth, you’re done. Overmixing can make the cake tough.
- The Magical Layering. This is the most important step, and it’s so easy. Pour all of your chocolate cake batter into your prepared pan, spreading it into an even layer. Now, take your bowl of ricotta mixture. Grab a large spoon and gently dollop the ricotta all over the top of the cake batter. Once it’s all dolloped, use the back of your spoon to gently spread it into a smooth, even layer that covers the cake batter from edge to edge. Here’s the key part: DO NOT MIX THEM TOGETHER. We want distinct, beautiful layers. The ricotta will sink a little and the cake will rise around it as it bakes, creating that wonderful marbled effect. Trust the process!
- Bake to Perfection. Slide your beautiful creation into the preheated oven. Bake for 45-50 minutes. You’ll know it’s done when the edges are pulling away from the pan, the top is set, and a toothpick inserted into the center comes out with a few moist crumbs attached, but not wet batter. Pro Tip: Ovens can vary, so start checking at the 40-minute mark. If the top is browning too quickly, you can tent it loosely with aluminum foil.
- The All-Important Cool Down. Once it’s baked, take the cake out and place it on a wire rack. This is the hard part: you MUST let it cool completely. I mean, all the way to room temperature. If you try to frost a warm cake, that lovely pudding frosting will melt right off and become a puddle. Patience is a virtue that pays off in a perfectly frosted cake!
- Whip Up the Dreamy Frosting. Once your cake is cool, it’s frosting time! In a medium bowl, pour in the cold milk and then whisk in the instant chocolate pudding mix. Keep whisking for a full 2 minutes—set a timer! This ensures it’s fully dissolved and starting to thicken properly. Now, walk away. Let it sit for about 5 minutes to thicken up. Finally, take your thawed whipped topping and gently fold it into the thickened pudding. Use a spatula and a light hand, folding until no white streaks remain. You’ll be left with the most divine, fluffy, chocolate mousse-like frosting.
- Frost, Chill, and Serve! Spread this heavenly frosting all over your completely cooled cake. I like to make big, swoopy swirls with my spatula. Once it’s frosted, pop the whole cake into the refrigerator for at least 30 minutes to let everything set. This makes for cleaner slices and allows the flavors to meld together perfectly.
How to Serve This Stunner
This cake is a showstopper all on its own, but a little flair never hurt! Here are a few of my favorite ways to plate it up:
- Classic & Clean: A simple slice on a white plate lets the beautiful layers speak for themselves.
- Berry Bliss: A handful of fresh raspberries or a few sliced strawberries on the side add a pop of color and a lovely tart contrast to the rich chocolate.
- Crunch Factor: A light sprinkle of chocolate shavings, a dusting of cocoa powder, or even a few crushed toasted hazelnuts on top adds a wonderful textural contrast.
- Dessert Drizzle: For the ultimate indulgence, warm up a little caramel or chocolate sauce and drizzle it over each slice right before serving. Trust me on this one.
It’s the perfect dessert for a birthday, a potluck (you’ll be the most popular person there), or just a Tuesday night when you deserve a treat.
Make It Your Own: Delicious Variations
I love a recipe that’s a fantastic canvas for creativity. Here are a few ways you can play with this chocolate ricotta cake to suit your mood or dietary needs:
- Citrus Zing: Add the zest of one orange or one lemon to the ricotta mixture. The bright citrus cuts through the richness beautifully and adds a whole new dimension of flavor.
- Espresso Lover’s Dream: Stir 1-2 tablespoons of instant espresso powder or finely ground coffee into the dry cake mix. It will deepen the chocolate flavor and give it a delicious mocha kick.
- Berry Swirl: Before baking, drop small spoonfuls of your favorite fruit jam (raspberry is incredible) over the ricotta layer and use a knife to gently swirl it in for a marbled, fruity surprise.
- Gluten-Free Friendly: Easy! Simply use your favorite gluten-free chocolate cake mix. The rest of the recipe remains exactly the same.
- Lemon Blueberry Twist: Swap the chocolate cake mix for a yellow or lemon cake mix. Keep the ricotta layer the same, and fold 1 cup of fresh blueberries into the cake batter. Frost with a vanilla pudding frosting (using vanilla pudding mix) for a completely different, but equally amazing, dessert.
From My Kitchen to Yours: Chef’s Notes
This recipe has been a work-in-progress for years, and it’s seen its fair share of kitchen experiments! One time, in a hurry, I tried to mix the ricotta right into the cake batter. The result was… fine. It was a dense, uniform chocolate cake. But it completely lost the magic of those distinct, creamy layers. So, learn from my mistake: the gentle layering is non-negotiable for that signature texture.
I’ve also learned that this cake is even better the next day. The flavors have more time to get to know each other, and the ricotta layer becomes even more set and cheesecake-like. So if you have the willpower, make it a day ahead! Just frost it the day you plan to serve it.
Your Questions, Answered!
Over the years, I’ve gotten a few repeat questions about this cake. Here’s the scoop to ensure your baking success!
Q: My ricotta layer was a bit watery. What happened?
A: This can happen if the ricotta has a lot of excess liquid. To prevent this, you can place your ricotta in a fine-mesh strainer or a cheesecloth-lined colander for about 30 minutes before you start. Letting any whey drain off will give you a thicker, creamier result.
Q: Can I make this cake ahead of time?
A: Absolutely! You have two great options. 1) Bake the cake layers (with the ricotta) up to two days in advance, let them cool completely, wrap tightly in plastic wrap, and refrigerate. Frost the day you serve. 2) The fully assembled, frosted cake can be made a day ahead and kept covered in the fridge. It holds up beautifully!
Q: My pudding frosting is runny. How can I fix it?
A: A runny frosting usually means the pudding didn’t have enough time to set, or the milk/whipped topping wasn’t cold enough. If it happens, don’t panic! Just pop the entire bowl of frosting into the fridge for 15-20 minutes. It will thicken up and be ready to spread.
Q: Can I use homemade whipped cream instead of whipped topping?
A> You can, but it will be less stable. The whipped topping has stabilizers that help the frosting hold its shape for days. If you use fresh whipped cream, the cake is best served the same day, as the frosting may start to weep or deflate over time.
Nutritional Information (Because Knowledge is Power!)
I believe in enjoying every single bite of dessert, but I also believe in being informed! Here’s a general breakdown per serving (based on 12 servings). Remember, these are estimates and can vary based on the specific brands you use.
- Calories: ~410
- Fat: 21g
- Carbohydrates: 45g
- Sugar: 30g
- Protein: 10g
This cake is a rich, indulgent treat, and that protein from the ricotta and eggs actually helps make it a bit more satisfying. My philosophy? Savor a slice, share it with people you love, and enjoy the moment of pure, chocolatey joy without any guilt.
Your New Go-To Dessert Awaits
Well, my sweet friend, we’ve reached the best part — the moment where you take that first forkful and realize this cake isn’t just dessert… it’s comfort, celebration, and nostalgia all rolled into one. My Chocolate Ricotta Cake with Pudding Frosting has a little something for everyone — the rich cocoa depth for the chocolate lovers, the creamy ricotta layer for those who adore a cheesecake twist, and that silky pudding frosting that feels like a cloud you could live on.
This is the cake that makes people lean back in their chairs, eyes closed, murmuring “oh my goodness.” It’s the one you’ll bring to a potluck and watch disappear in record time. It’s the one you’ll crave on quiet evenings when the kitchen feels like your happy place.
And the best part? It’s simple. No fussy techniques, no fancy equipment — just honest ingredients, a little love, and the joy of baking something that brings people together.
So go ahead — bake it, slice it, and savor it. Share it with friends, or don’t (I won’t tell). And when you do, I hope you feel a little bit of Grandma Rose’s magic in every bite — that warm, chocolatey hug that reminds you why we bake in the first place.
From my heart (and my flour-dusted counter) to yours,
Chef Emily 🍫💛