Spooky, Sweet, and Irresistibly Cute: Meet Your New Halloween Obsession!
Hey there, my fellow food fanatics! Chef Emily here, waving from my perpetually flour-dusted kitchen. Is there anything in the world that beats the combination of juicy, sweet strawberries and rich, decadent chocolate? I think not. It’s a pairing that feels like a celebration, a little moment of pure joy in every single bite. But what if we took that classic, beloved treat and gave it a spooky, silly, and absolutely adorable Halloween makeover?
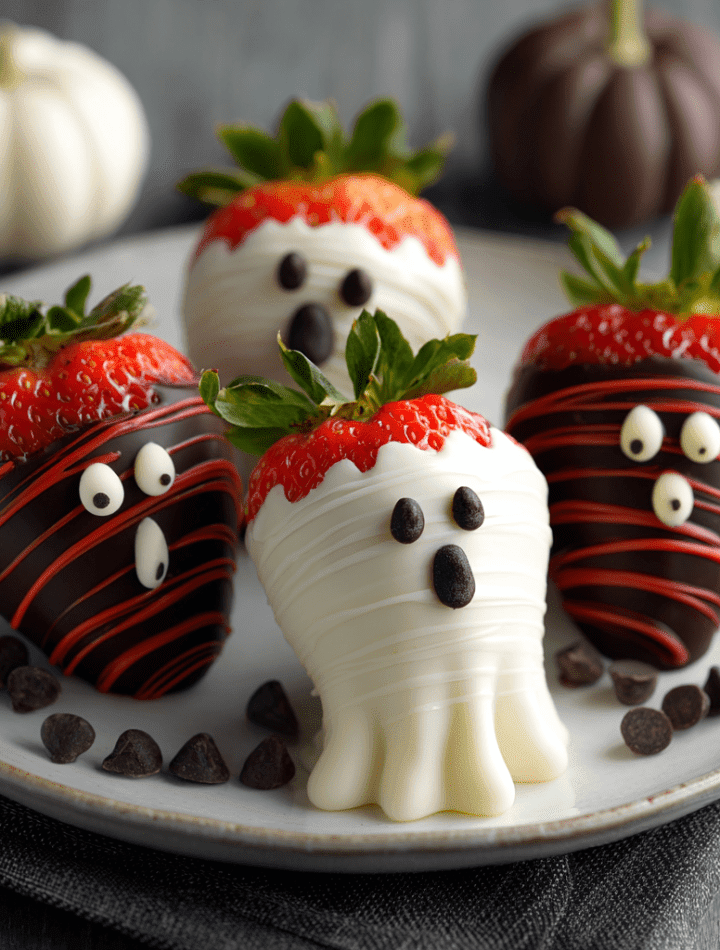
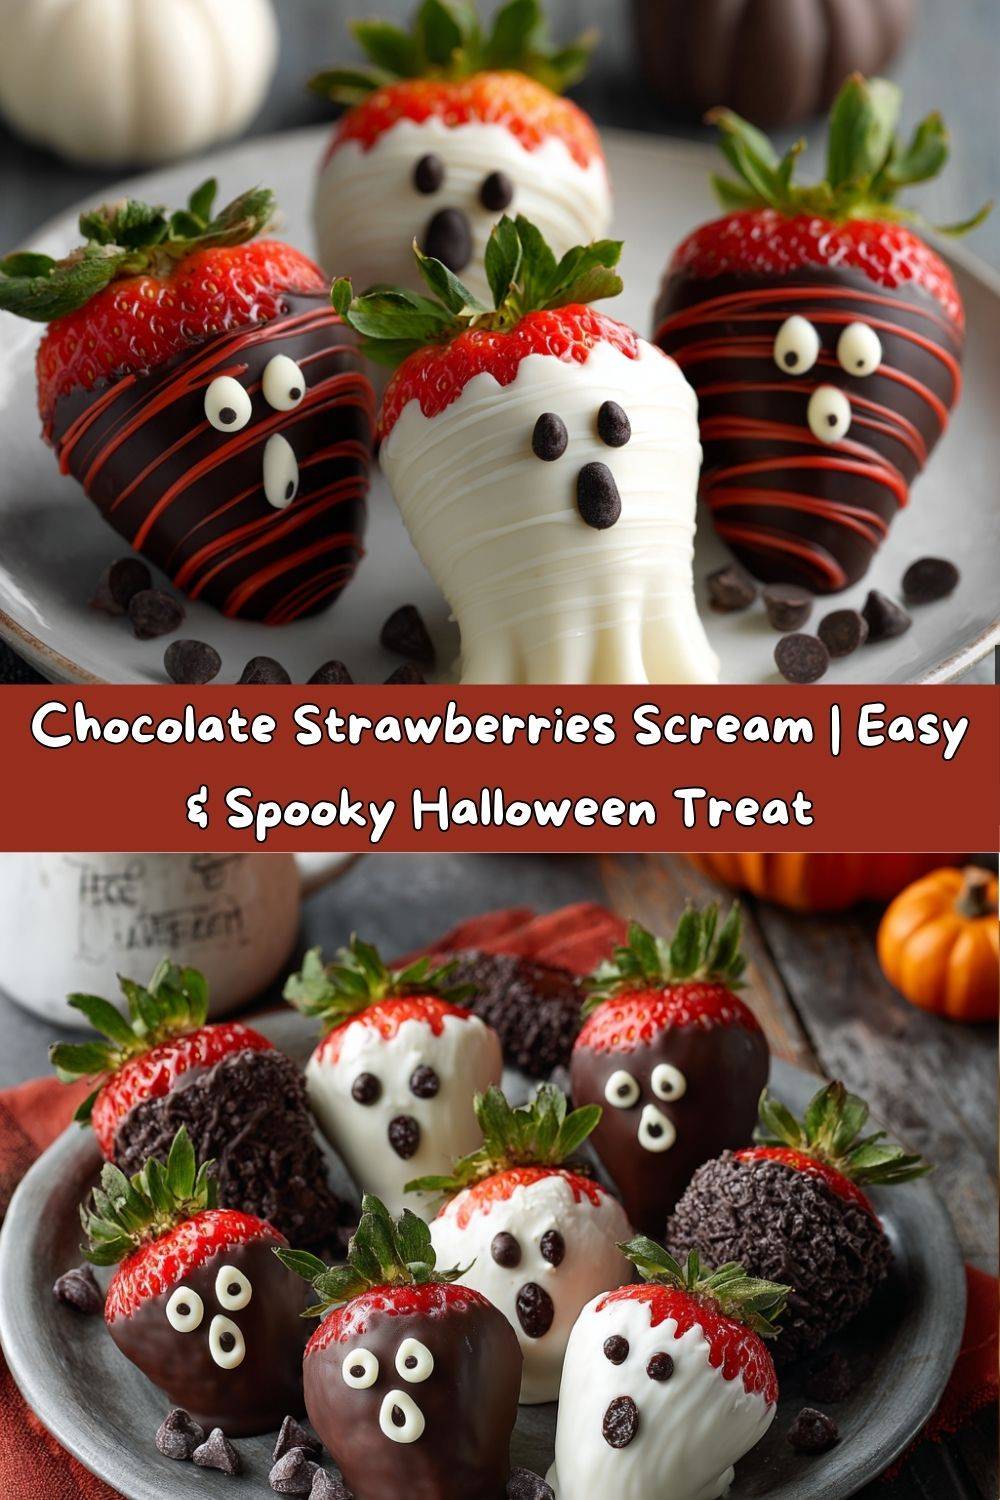
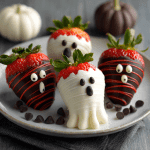
Enter: the Chocolate Strawberries Scream. These aren’t your average chocolate-dipped berries, my friends. These are little ghosties and ghoulies, ready to haunt your Halloween party platter (in the most delicious way possible). Imagine the scene: a plate full of these cute, spooky strawberries, their white chocolate “sheets” flowing, with little chocolate chip eyes peeking out. They’re the kind of treat that makes both kids and adults gasp with delight before they absolutely devour them.
The best part? You don’t need to be a pastry chef to pull these off. Seriously! If you can melt chocolate and dip a strawberry, you are 100% equipped to create these Halloween showstoppers. They are the perfect activity for a fun family baking night, a terrifyingly tasty project for a Halloween party, or just a reason to treat yourself because, well, it’s October and you deserve it. So, tie on your favorite messy apron (you know, the one with all the character), and let’s make some magic—and a little bit of a mess—together. I promise it’ll be a scream!
A Spooky Tradition is Born
This recipe holds such a special, giggly place in my heart. It takes me right back to my first Halloween in my own apartment. I was fresh out of culinary school, bursting with ideas but on a seriously shoestring budget. I wanted to throw a party that was spooky, fun, and most importantly, filled with incredible food. But my wallet was screaming louder than any ghost I could create!
I was staring into my fridge, willing inspiration to strike, when I saw it: a leftover pint of strawberries from a breakfast smoothie. Next to it, tucked in the pantry, were half-used bags of white and dark chocolate chips from a previous cookie disaster. And just like that, a idea sparked. What if I turned these simple ingredients into something magical? I remember the sheer, childlike joy of piping on those first little faces, my roommates gathered around the kitchen island, laughing and “helping” by taste-testing the “mistakes.” They were a little wonky, a little messy, but they were ours. And when our friends arrived that night, those silly strawberry ghosts were the absolute hit of the party. It was a powerful little reminder that the best recipes aren’t about fancy techniques or expensive ingredients—they’re about creativity, joy, and sharing something deliciously fun with the people you love.
Gathering Your Ghoulish Crew: What You’ll Need
Here’s the beautiful part: the ingredient list is short, sweet, and simple. Using high-quality chocolate makes a world of difference here, but honestly, even standard chocolate chips will work their magic. Let’s break it down, chef-to-chef.
- 1 lb fresh strawberries, rinsed and thoroughly dried – This is non-negotiable! Any water on the berries will cause the chocolate to seize up and become a clumpy mess. Pat them completely dry with paper towels. Look for berries that are ripe, red, and firm, with bright green leaves and a nice cone shape—they make the best little ghosts!
- 1½ cups white chocolate chips or candy melts – This is your “ghost sheet.” Candy melts are designed for dipping and set up with a super smooth finish, but good-quality white chocolate chips (like Ghirardelli or Guittard) will taste incredible. A chef’s hack? Add a tiny teaspoon of coconut oil to your chocolate when melting to make it extra smooth and dippable.
- ½ cup semi-sweet or dark chocolate chips (for decorating) – This is for creating the spooky faces! I prefer the deeper, richer flavor of dark chocolate against the sweet white coating. You’ll melt this and use it as your edible “ink.”
- Black gel icing or edible eyes (optional for extra scream factor) – For those who want to skip the piping step, these are a fantastic shortcut! Edible candy eyes instantly add personality and are a huge hit with kids.
- Optional twist: red candy melts for a “bloody” effect – Want to kick the spook factor up a notch? Melt a handful of red candy melts and drizzle them over your set ghosts for a delightfully creepy blood-spatter effect. So fun!
Conjuring Your Spooky Strawberry Specters: A Step-by-Step Guide
Okay, team! Let’s get our hands dirty (or at least a little chocolatey). Follow these steps, and you’ll have a legion of adorable edible ghosts in no time. Read through all the steps first—it’s my number one chef hack for any recipe!
- Prep Your Haunted Headquarters. Line a baking sheet with parchment paper or a silicone baking mat. This is your ghost parking lot and it prevents any sticking tragedies. Have your thoroughly dried strawberries standing by, leaves still on for easy handling.
- Melt the White Chocolate. Place the white chocolate chips or candy melts in a microwave-safe bowl. Microwave on high in 30-second intervals, stirring vigorously between each burst. Do not walk away! Chocolate burns easily. Heat just until it’s almost all melted, then keep stirring—the residual heat will melt the last few lumps perfectly. This is the secret to smooth, not scorched, chocolate. If it seems too thick, stir in that teaspoon of coconut oil I mentioned.
- The Big Dip! Holding a strawberry by its leafy stem, dip it into the melted white chocolate. Swirl it gently to coat it about ¾ of the way up, leaving the very top and leaves exposed to act as your ghost’s “head.” Let the excess chocolate drip back into the bowl. This is key for avoiding a puddle of chocolate around your ghost’s feet! Gently place it on your prepared baking sheet. Repeat with all your strawberries.
- Chill Out, Little Ghosts. Once your sheet is full of future phantoms, pop the entire tray into the refrigerator for 10-15 minutes. This allows the white chocolate to set completely. Don’t skip this! If the chocolate is even slightly wet, your faces will smear.
- Create the Faces. While the ghosts are chilling, melt your dark chocolate chips using the same careful microwave method. Let it cool for a minute, then transfer it to a small piping bag or a zip-top plastic bag. Snip a TINY corner off the bag—you can always make the hole bigger, but you can’t make it smaller! This is your piping tool. Pull the tray from the fridge. Now, for the most fun part: pipe on little “O” mouths for a surprised scream, crooked smiles for a mischievous ghoul, or simple dots for eyes. If you’re using edible candy eyes, use a tiny dot of the melted chocolate as “glue” to stick them on.
- Optional Bloody Drizzle. If you’re going for the bloody effect, melt your red candy melts now. Using another piping bag or a fork, drizzle the red chocolate over your ghosts in a spattery, erratic pattern. Get creative!
- The Final Chill. Once all your ghosts are decorated to perfection, return the tray to the refrigerator for another 5-10 minutes to let everything set completely firm.
How to Serve These Screamingly Good Treats
Presentation is part of the fun! You’ve created edible art, so let’s show it off. Arrange your Chocolate Strawberries Scream on a sleek black platter for a dramatic, modern look. The contrast makes the white chocolate pop beautifully. For a more rustic, haunted house vibe, use a slab of slate or a wooden cutting board.
Scatter a few autumn leaves (make sure they’re clean and food-safe!) or some Halloween candy around the platter to build out your spooky scene. These treats are perfect for a Halloween party dessert table, a creepy-cute snack for a horror movie marathon, or even packed (carefully!) in a lunchbox for a festive school treat. Just be prepared for them to disappear in a phantom-like fashion—they’re that irresistible!
Boo-tiful Twists & Spooky Variations
Feel like playing mad scientist? Here are a few fun ways to mix up your phantom fruit!
- Zombie Berries: Use green candy melts instead of white for your dip to create a horde of zombies. Pipe on the faces with black icing for a truly undead look.
- Dairy-Free Phantoms: Easily accommodate allergies! Use dairy-free white chocolate (like the brand Pascha or Enjoy Life) and dairy-free dark chocolate chips. The method is exactly the same.
- Pumpkin Spice Ghosts: Infuse your white chocolate with a big pinch of pumpkin pie spice before dipping for a warm, autumnal flavor that pairs surprisingly well with the berry.
- Mummy Berries: Instead of a full dip, use your piping bag of white chocolate to draw messy “bandage” stripes over a dark chocolate-dipped strawberry. Add two candy eyes peeking out!
- Spider Web Berries: After the white chocolate sets, use your dark chocolate to draw concentric circles on the berry. Then, immediately take a toothpick and drag it from the center out to the edge to create a web effect. So cool!
Chef Emily’s Spooky Kitchen Notes
Over the years, I’ve made hundreds of these little guys, and let me tell you, not all of them were picture-perfect. I’ve had chocolate that seized into a grainy lump (usually because I got impatient and didn’t dry a berry thoroughly), ghosts that looked more like blobs, and faces that were… well, let’s just say uniquely abstract. And you know what? They all still tasted amazing. The point is to have fun and embrace the imperfections. The slightly lopsided, derpy-looking ghost is often the one everyone remembers and loves the most!
My other big tip? Double the batch. Always. They disappear faster than a ghost in the night, and you’ll be glad you have extras. Happy haunting, my friends!
FAQs: Answering Your Ghoulish Questions
Q: My chocolate got clumpy and thick when I melted it! What happened and can I fix it?
A: Ah, the dreaded “seized” chocolate! This usually happens if a single drop of water or steam got into the melting chocolate. To rescue it, try stirring in a tiny amount of flavorless oil (like coconut or vegetable oil) one teaspoon at a time until it becomes smooth again. If it’s beyond repair, sadly, it’s best to start over. Prevention is key: ensure all your tools and bowls are completely dry!
Q: Can I make these ahead of time?
A: You can! They are best enjoyed the day they are made, as the strawberry can start to release moisture underneath the chocolate shell after about 24 hours. However, you can store them in a single layer in an airtight container in the refrigerator for up to two days.
Q: My piping bag is a mess! Any tips for neater faces?
A: Absolutely! First, make sure your melted chocolate for piping isn’t too hot. Let it cool for a few minutes so it’s slightly thicker. Second, practice piping a few faces on a piece of parchment paper before moving to the strawberries. And third, if you’re really struggling, just use the edible candy eyes—they are foolproof and look fantastic!
Q: Can I use frozen strawberries?
A: I don’t recommend it. Frozen berries release too much water when they thaw, which will make your chocolate coating soggy and prevent it from sticking properly. Fresh is definitely the way to go for this recipe.
Chocolate Strawberries Scream
- Total Time: 35 minutes
- Yield: 15 - 18 1x
Description
A hauntingly sweet twist on classic chocolate-covered strawberries. These spooky treats are dipped in rich chocolate and decorated to look like little ghosts and ghouls — perfect for Halloween parties, spooky movie nights, or a fun family activity. They’re as easy as they are eerie.
Ingredients
1 lb fresh strawberries, rinsed and dried
1½ cups white chocolate chips or candy melts
½ cup semi-sweet or dark chocolate chips (for decorating)
Black gel icing or edible eyes (optional for extra scream factor)
Optional twist: drizzle with red candy melts for a “bloody” effect
Instructions
Line a baking sheet with parchment paper.
Melt white chocolate in a microwave-safe bowl in 30-second intervals, stirring until smooth.
Dip each strawberry in the white chocolate, letting excess drip off, and place on the sheet.
Chill for 10–15 minutes until set.
Melt dark chocolate, transfer to a piping bag or zip-top bag with the tip snipped.
Pipe on eyes and mouths to create ghostly faces. Use edible eyes for added effect.
Optional: Drizzle red melts for extra creep factor. Chill again until firm.
- Prep Time: 20 minutes
- Chill Time: 15 minutes
Nutrition
- Calories: 90 / serving
- Fat: 5g / serving
- Carbohydrates: 10g / serving
- Protein: 1g / serving
Nutritional Info (A Spooktacular Bonus!)
While these are definitely a treat, it’s nice to know what you’re enjoying! Here’s a general breakdown per strawberry (assuming a batch of 18). Remember, this is an estimate and can vary based on the specific brands of ingredients you use.
Per Serving: ~90 calories | 5g fat | 10g carbs | 1g protein
The great news is that you’re getting a little boost of vitamin C and antioxidants from the real fruit underneath all that delicious chocolate. So while it’s a dessert, it’s not a total nutritional ghost town! It’s all about balance, and a few of these spooky treats are a wonderful part of a festive, fun-filled Halloween.
Final Spooky Thoughts
Well, my foodie friends, we’ve done it! We’ve taken a few simple, beautiful ingredients and transformed them into something playful, memorable, and utterly delicious. That’s what cooking is all about, isn’t it? It’s not just about feeding our bodies; it’s about creating experiences, sharing laughter, and making traditions.
I hope these Chocolate Strawberries Scream bring a little bit of magic and a whole lot of yummy to your Halloween celebration. Whether you’re making them with your little monsters, for a party with friends, or just as a sweet treat for yourself, I’d love to see your creations! Tag me on social @TastyChow with your spooky masterpieces.
From my haunted kitchen to yours, have a safe, sweet, and spooktacular Halloween. Now go forth and chow down!
With love and a few chocolate smudges,
Emily