Your New Favorite Holiday Cookie Tradition (That Doesn’t Need an Oven!)
Hey there, my festive friend! Can you smell it? That magical blend of melted butter, sweet marshmallows, and pure, unadulterated holiday joy? It’s that time of year again, and my kitchen is officially buzzing with all things red, green, and delicious. Today, we’re whipping up a batch of pure nostalgia: Christmas Wreath Cookies.
Now, I know what you might be thinking. “Emily, I’m swamped! Between shopping, decorating, and trying to remember where I stored the good wrapping paper, I don’t have time for complicated baking.” I hear you, and that’s the absolute beauty of these little wreaths. They are a no-bake miracle! If you can melt butter and stir a pot, you are 100% qualified to make these. They’re chewy, they’re crunchy, they’re brilliantly green, and dotted with cheerful red “berries.” They’re the kind of cookie that makes kids’ eyes light up and transports adults right back to their own childhood Christmases.
This isn’t just a recipe; it’s a 20-minute shortcut to feeling like a holiday superstar. So, tie on your favorite apron (the one with the gingerbread man stain, we’ve all got one), and let’s create some edible magic that’s as fun to make as it is to eat. Trust me, these are about to become your go-to holiday treat!

The Christmas My Brother Became a Wreath-Making Superhero
I’ll never forget the Christmas I was eight. My mom, the original queen of holiday chaos, had ambitiously planned a cookie-baking marathon that would have put Mrs. Claus herself to shame. We had sugar cookie dough chilling, gingerbread men waiting to be decorated, and then… disaster. The oven decided to take an unscheduled vacation. A chorus of “Oh no!” echoed through the kitchen. But my mom, never one to be defeated, simply smiled, pulled out a giant pot, and declared, “We’re making wreaths!”
My older brother, who usually viewed the kitchen as a no-fly zone, got roped into shaping the sticky, green mixture. At first, he grumbled, but then a funny thing happened. A competitive streak emerged. “My wreath is more circular than yours,” he’d boast, meticulously placing the red candies. We spent the next hour, fingers stained green with food coloring, laughing and creating a whole forest of wonky, lopsided, and absolutely perfect wreaths. That afternoon, filled with more laughter than precision, taught me a beautiful lesson: the best holiday traditions aren’t about perfection. They’re about the messy, joyful, shared moments in the kitchen. And every time I make these cookies, I think of my brother, the unexpected wreath-artist.
Gathering Your Merry Ingredients
Part of the charm of this recipe is its beautiful simplicity. You likely have most of these items in your pantry right now! Here’s what you’ll need to make about two dozen cheerful wreaths.
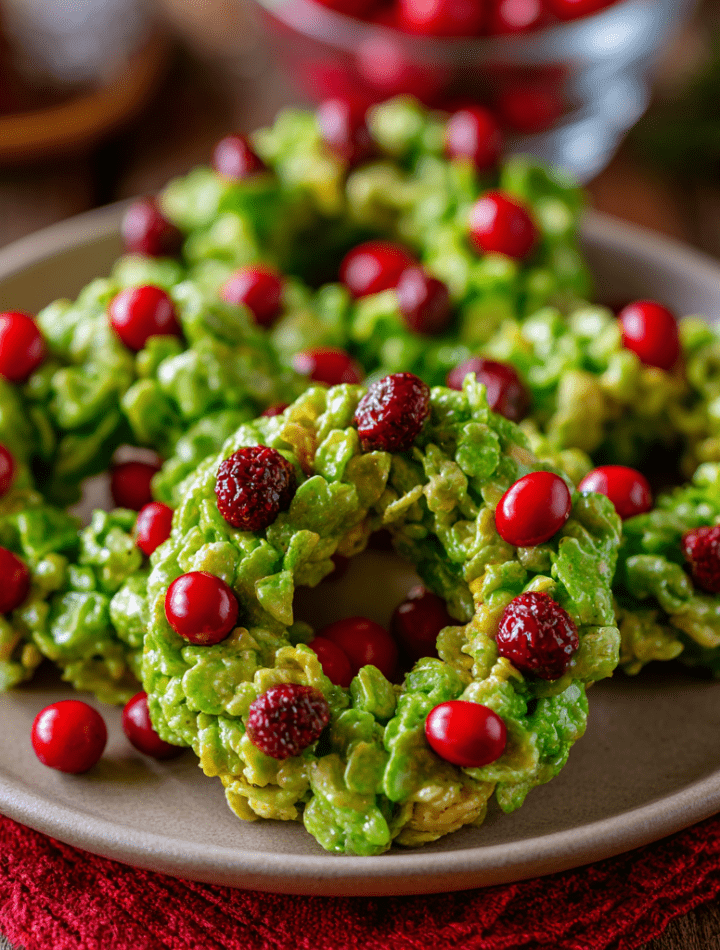
- 8 cups Corn Flakes cereal: This is the backbone of our wreath, providing that fantastic, airy crunch. Make sure they’re fresh and crispy! If you’re feeling adventurous, you could swap in a different flaky cereal, but corn flakes give the best classic texture and neutral flavor.
- 1 cup (2 sticks) Unsalted Butter, plus 1 tablespoon for shaping: I always use unsalted butter so I can control the salt level. That single tablespoon reserved for greasing your hands is the ultimate chef hack—it’s a lifesaver against the sticky marshmallow! Salted butter will work in a pinch, just know your cookies will have a slightly saltier note.
- 16 oz Large Marshmallows: The glue that holds our wreaths together! I prefer the standard large marshmallows over mini ones for a smoother melt. For a super-clean ingredient list, look for all-natural marshmallows, but the classic ones work perfectly.
- 1 ½ tsp Pure Vanilla Extract: A splash of vanilla adds a warm, comforting depth that cuts the pure sweetness. Don’t skip it! It’s the secret whisper of flavor that makes these taste homemade.
- 1 tsp Green Liquid Food Coloring: This gives our wreaths their iconic festive hue. For a more vibrant, natural color, you can use gel food coloring—you’ll only need a tiny drop or two! The liquid coloring works great and gives that classic, slightly retro look I love.
- ¾ cup Cinnamon Imperials (Red Hots): These are our festive red “berries”! They add a cute pop of color and a subtle cinnamon kick. If you can’t find them, other small red candies like red M&Ms or even dried cranberries would be adorable, though the flavor will change.
Crafting Your Edible Wreaths: A Step-by-Step Guide
Okay, team! Let’s get our hands a little green. The process is fast, so I recommend having all your ingredients measured and ready to go (this is called mise en place, a fancy term for “being prepared,” which makes you feel super chef-y).
- Melt the Butter: Place a large, heavy-bottomed pot or Dutch oven over medium heat. Add the 1 cup of butter. Let it melt completely, swirling the pot occasionally, until it’s foamy and fragrant. You’ll know it’s ready when you see those little milk solids starting to settle at the bottom. Chef’s Tip: A heavy pot distributes heat evenly, preventing the marshmallow from scorching. This is your best defense against burnt spots!
- Melt the Marshmallows: Reduce the heat to low. Add all the marshmallows to the melted butter. Now, stir, stir, stir! Use a sturdy silicone spatula or a wooden spoon. Keep stirring until the marshmallows are completely melted and the mixture is smooth and velvety. It should look like a glorious, buttery cloud. Chef’s Tip: Low and slow is the key here! If the heat is too high, the sugar in the marshmallows will seize up and become tough. Patience makes for a perfectly chewy cookie.
- Infuse with Flavor and Color: Remove the pot from the heat immediately. Stir in the vanilla extract and the green food coloring. Don’t be shy! Mix it until the color is uniform. It will be a wonderfully bright, almost electric green at this stage. Chef’s Tip: Taking the pot off the heat before adding the color and vanilla prevents the vanilla from evaporating and the color from “cooking.”
- Fold in the Corn Flakes: Now, gently add the 8 cups of corn flakes to the marshmallow mixture. Using your spatula, fold them in carefully. You want every single flake to be coated in that magical green marshmallow glue, but you also want to avoid crushing them into dust. Be gentle but thorough! Chef’s Tip: “Folding” means using a sweeping motion, turning the mixture over from the bottom. It’s not aggressive stirring. We want to preserve that lovely crunch!
- Grease Up and Shape: This is the fun (and slightly messy) part! Take that reserved tablespoon of butter and grease your hands thoroughly. This creates a non-stick barrier. Pinch off a small handful of the corn flake mixture (about the size of a golf ball) and quickly shape it into a ball. Then, use your thumb to poke a hole in the center and gently form it into a 3-inch wreath shape. Place it on a baking sheet lined with parchment paper. Chef’s Tip: Work quickly because the mixture will cool and become harder to shape. If it does get too stiff, you can pop the whole pot back over very low heat for 15-20 seconds to loosen it up again.
- Add the Berry bling: Immediately press 3 or 4 red cinnamon candies onto each wreath to look like holly berries. Do this while the wreaths are still warm and pliable so the candies stick. Chef’s Tip: If you have kids helping, this is the perfect job for them! Let them get creative with their berry placement.
- Let Them Set: Allow the wreaths to cool and set completely at room temperature. This usually takes about 30-60 minutes. Don’t try to speed this up by putting them in the fridge, as they can become too hard and lose their chewy texture.
How to Serve Your Festive Masterpieces
Once your wreaths have set, it’s time for the grand reveal! I love arranging these on a simple white platter or a rustic wooden board—the green and red really pop against a neutral background. For an extra festive touch, you can tie a tiny red or green ribbon into a bow and place it at the bottom of each wreath, or sprinkle the platter with a little powdered sugar “snow.”
These cookies are the ultimate holiday sharable. They’re perfect for cookie swaps (their unique no-bake nature makes them a standout), piled high on a dessert table next to the fudge and gingerbread, or packaged in cellophane bags tied with a ribbon as a sweet homemade gift for neighbors, teachers, or your mail carrier. A plate of these and a warm cup of cocoa? That’s what holiday coziness is all about.
Get Creative! Fun Twists on the Classic Wreath
Once you’ve mastered the classic, feel free to play with the formula! Here are a few of my favorite variations:
- The Peppermint Patty: Swap the vanilla extract for ½ teaspoon of peppermint extract. Use white candy melts or white chocolate chips as your “berries” instead of red hots for a cool, minty flavor that feels like a winter wonderland.
- Fruity Pebbles Rainbow Wreath: For a fun, colorful twist any time of year, replace the corn flakes with Fruity Pebbles cereal! Omit the green food coloring and use multi-colored sprinkles for the “berries.” Kids go absolutely wild for these.
- Nutty & Nice: Add ½ cup of finely chopped toasted pecans or walnuts to the mixture along with the corn flakes. The nuttiness adds a wonderful depth and crunch that balances the sweetness beautifully.
- Chocolate Drizzle Delight: Once the wreaths are completely set, melt ½ cup of semi-sweet chocolate chips and drizzle it over the top with a fork. It looks gorgeous and adds a rich chocolate flavor that’s simply irresistible.
- Gluten-Free Friendly: This recipe is naturally gluten-free as long as you use a certified gluten-free corn flakes cereal! It’s an easy swap that makes these treats accessible to everyone at the party.
Emily’s Kitchen Confessions
I’ve made these cookies more times than I can count, and my method has evolved. The first time I tried it, I thought, “I don’t need to grease my hands, I’ll be fine.” Famous last words! I spent more time peeling marshmallow goo off my fingers than actually shaping cookies. That single tablespoon of butter is a lesson learned the hard way.
I also used to be a chronic over-stirer, crushing my corn flakes into sad, soggy crumbs. Learning to fold gently was a game-changer. These wreaths are a testament to the fact that sometimes, the simplest recipes teach you the most important kitchen lessons: be prepared, be gentle, and always have butter handy.
Your Christmas Wreath Cookie Questions, Answered!
Q: My mixture is too sticky to shape! What did I do wrong?
A: This usually means you’re working a little too slowly and the mixture is cooling. No worries! Simply place the entire pot back over the lowest possible heat for about 15-30 seconds, stir it gently to rewarm it, and try again. Also, double-check that you greased your hands really well with that extra butter.
Q: Can I make these ahead of time?
A: Absolutely! These cookies store beautifully. Once set, layer them between sheets of parchment paper in an airtight container. They will keep at room temperature for up to 3 days. I don’t recommend refrigerating them, as it can cause them to weep and become too hard.
Q: My cookies turned out really hard. Why?
A: This typically happens if the marshmallow mixture was cooked over too high a heat, causing the sugar to harden. Remember, low and slow is the mantra for melting marshmallows. Also, avoid storing them in the fridge, as this will make them rock-hard.
Q: The green color isn’t very vibrant. How can I fix that?
A: Liquid food coloring can vary in strength. For a much more vivid, jewel-toned green, I highly recommend using gel food coloring. You’ll only need a tiny dab (start with a toothpick dip) to achieve a stunning color.
Nutritional Information (Because We’re All About Balance!)
Let’s be real, these are a festive treat, and they’re here to bring joy! But I believe in transparency. The nutritional info below is an estimate per cookie (based on a yield of 24 wreaths).
Each wreath cookie contains approximately: 160 Calories, 6g Fat (3.5g Saturated Fat), 90mg Sodium, 27g Carbohydrates, 0g Fiber, 17g Sugars, 1g Protein.
As you can see, these are a sugar-forward indulgence, perfect for enjoying in moderation as part of your holiday celebrations. The simplicity of the ingredients means you know exactly what you’re eating—no mysterious additives! To balance out the sweet, I love serving them with a platter of fresh fruit or a savory cheese board.
Go Forth and Create Some Edible Holiday Magic!
Well, my friend, there you have it! Your complete guide to creating the most delightful, easy, and memory-filled Christmas Wreath Cookies. This recipe is more than just a list of ingredients; it’s an invitation to slow down, get your hands a little messy, and create something that sparks joy.
I hope these wreaths bring as much laughter and happiness to your kitchen as they have to mine over the years. Remember, it’s not about creating a picture-perfect cookie. It’s about the fun you have making them. So whether your wreaths are perfectly round or charmingly lopsided, they will be made with love, and that’s the most important ingredient of all.
I’d love to see your creations! Tag me on social @TastyChow with #TastyChowHoliday so I can cheer you on. Now, go grab that pot and get stirring! Wishing you a season filled with delicious food and even better company.
With a full heart and a happy apron,
Emily