Classic Cherry Delight: Your New Favorite No-Bake Dessert Bliss
Hey friends, Emily here! Grab a cup of coffee and pull up a stool. Today, we’re diving fork-first into a dessert that’s less of a recipe and more of a feeling. I’m talking about that iconic, shimmering, crowd-pleasing square of joy: Classic Cherry Delight.
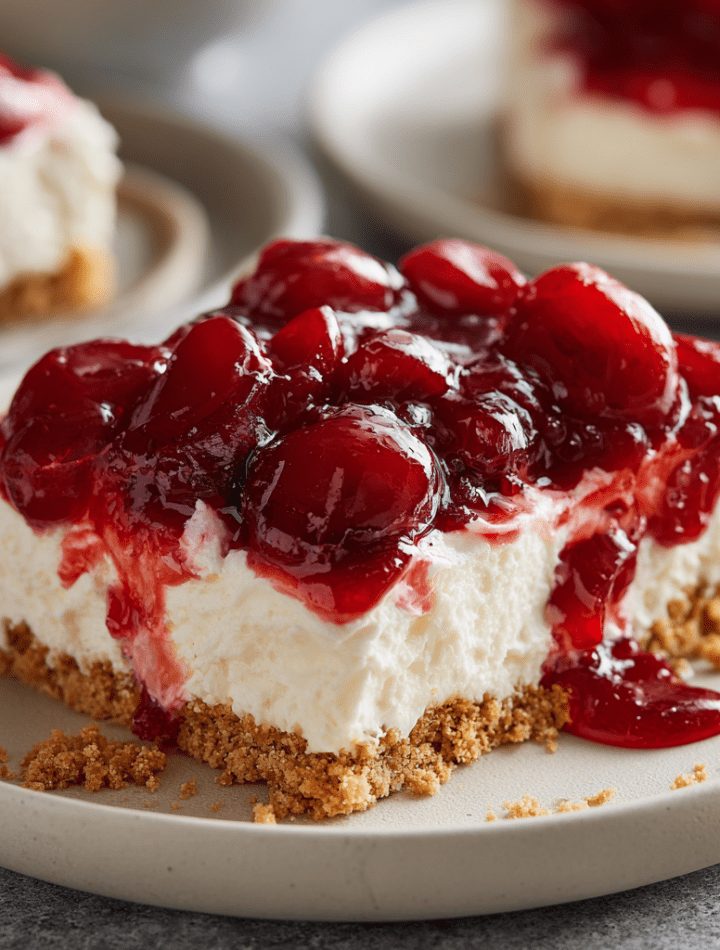
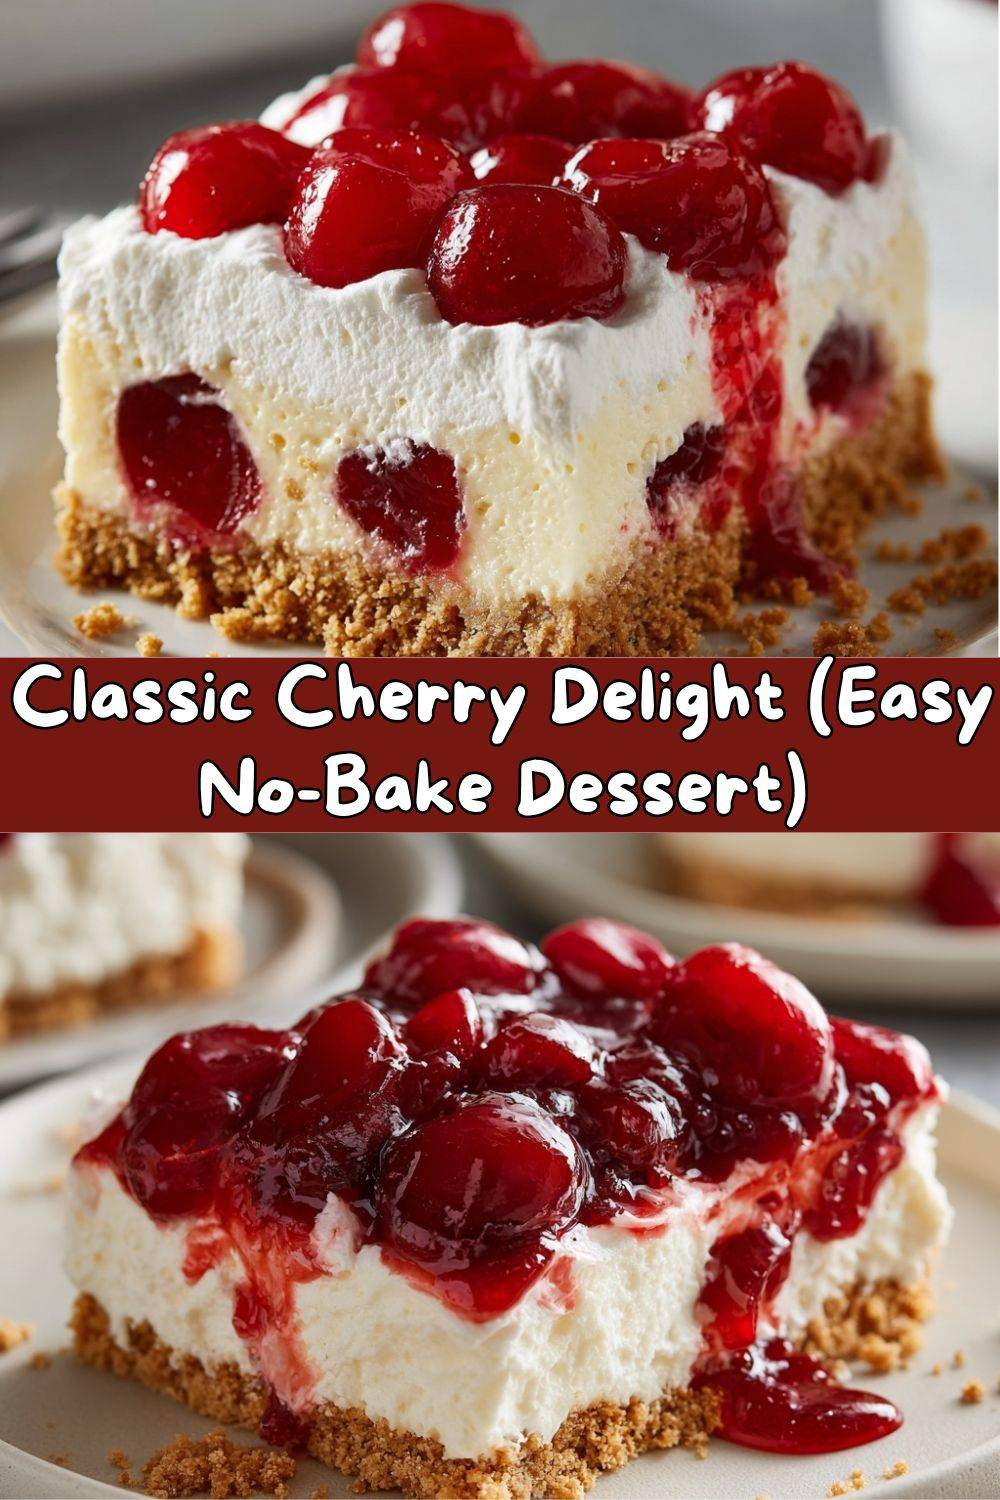
You know the one. The dessert that shows up at every potluck, family reunion, and holiday spread, and is always, always the first pan to be scraped clean. It’s the beautiful marriage of a buttery, crumbly crust, a cloud-like creamy filling, and that glossy, vibrant cherry topping that looks like edible jewels. The best part? No oven required. This is dessert magic made in the fridge, perfect for hot days, busy weeks, or whenever you need a sweet hug without the hassle.
Whether you’re a seasoned baker or someone who thinks the kitchen is just a path to the fridge, this recipe is your ticket to hero status. It’s forgiving, fun, and delivers that unforgettable “Mmm!” with every single bite. So, let’s make some memories—and one spectacularly delicious dessert—together.
The Dish That Tastes Like a Sunday Afternoon
My love affair with Cherry Delight started not in culinary school, but in my Grandma Eleanor’s linoleum-floored kitchen. To her, baking was a precise science of sifted flour and leveled cups. But Cherry Delight? That was her “fun” dessert. I’d stand beside her, still in my church clothes, “helping” by slowly pouring the graham cracker crumbs while she melted the butter.
The real magic happened with the beaters. She’d let me lick the cream cheese and powdered sugar mixture off the paddle attachments—a dangerously delicious paste that felt like a secret prize. We’d carefully spread the white fluffy layer, and then came the grand finale: glooping the cold, syrupy cherry pie filling from the can, spreading it into a perfect, shiny red blanket. The four-hour wait for it to chill in the fridge felt like an eternity! But that first bite, cool and sweet and texturally perfect, was pure childhood bliss. It taught me that the simplest recipes, made with love (and a few stolen bites of filling), create the strongest memories.
Gathering Your Cherry Delight Dream Team
Here’s everything you need. I’ve added my little chef insights and swaps so you can make this recipe your own!
For the Buttery Graham Cracker Crust:
- 1 ½ cups graham cracker crumbs – You can buy these pre-crumbed, but crushing whole crackers in a bag with a rolling pin is a fantastic (and therapeutic!) way to get rid of any weekday stress. The uneven texture gives a rustic, homemade feel.
- ½ cup (1 stick) unsalted butter, melted – Chef’s Insight: Using unsalted butter lets you control the salt level. The butter is the glue here; it should look like wet sand when mixed. If it seems too dry, add another tablespoon of melted butter.
- 2 tablespoons granulated sugar – A little sweetness to complement the tangy filling. For a deeper flavor, try using brown sugar!
For the Fluffy Cloud Filling:
- 8 oz (one block) full-fat cream cheese, softened – This is non-negotiable for the best texture! Take it out of the fridge at least an hour ahead. Poke it with your finger; it should give easily. Soft cream cheese blends smoothly, avoiding lumpy filling.
- 1 cup powdered sugar – Also called confectioners’ sugar. It dissolves instantly and sweetens without graininess. Sift it if it’s lumpy!
- 1 teaspoon pure vanilla extract – The secret flavor booster. It rounds out the sweetness and adds warmth.
- 1 ½ cups whipped topping (like Cool Whip), thawed – The shortcut to amazing fluff! Pro Swap: Feeling fancy? Substitute with an equal amount of freshly whipped heavy cream sweetened with a tablespoon of that powdered sugar. It’s next-level.
For That Gorgeous Glossy Top:
- 1 can (21 oz) cherry pie filling – The classic! It’s the perfect consistency and sweetness. Look for a brand with plump, whole cherries. Fun Twist: Blueberry, strawberry, or apple pie filling are all incredible here. Use what you love!
Let’s Build Some Bliss: Step-by-Step
Follow these simple steps, and you’re guaranteed perfection. I’m chatting you through each one with my best tips!
Step 1: The Foundation (The Crust)
In a medium bowl, combine the graham cracker crumbs, melted butter, and sugar. Mix it with a fork until every crumb is evenly coated and the mixture holds together when pinched. Pour it into your 9×9-inch baking dish (I like glass or metal).
Chef’s Hack: Use the bottom of a flat measuring cup or a glass to press the crumbs firmly and evenly into the bottom of the dish. Really pack it in! This prevents a crumbly, falling-apart crust when you slice it later. Pop the whole dish into the freezer for 15 minutes to set. This chill time is your secret weapon for a crisp base.
Step 2: The Dreamy Filling
In a large mixing bowl, beat the softened cream cheese with a hand mixer or stand mixer fitted with the paddle attachment on medium speed for about 1-2 minutes, until it’s completely smooth and creamy. Scrape down the bowl! Lumps love to hide.
Add the powdered sugar and vanilla extract. Beat on low at first (unless you want a sugar cloud in your kitchen!), then increase to medium until fully combined. Now, here’s the key: fold in the whipped topping with a spatula. Don’t beat it! Gently fold and turn the mixture until it’s uniform, fluffy, and no white streaks remain. This keeps the filling light as air.
Step 3: Assembly & The Grand Finale
Pull your chilled crust from the freezer. Spread the creamy filling over the crust in an even layer, going all the way to the edges. A small offset spatula makes this easy, but the back of a spoon works perfectly too.
Open your can of cherry pie filling. Give it a gentle stir in the can to redistribute the glossy gel. Spoon it evenly over the cream cheese layer. Now, take a moment to admire your beautiful creation—those red cherries against the white backdrop are a thing of beauty!
Step 4: The Patience Game (The Chill)
This is the hardest step! Cover the dish with plastic wrap or a lid and refrigerate for at least 4 hours, but overnight is truly ideal. This allows the layers to firm up, the flavors to marry, and ensures you get those clean, picture-perfect squares when you cut it. Trust me, the wait is worth it!
Serving Your Sweet Masterpiece
When it’s finally time to serve, run a thin, sharp knife under hot water, dry it, and slice your delight into 9 or 12 squares. The warm knife gives you super clean cuts.
I love serving these on simple white plates to let the colors pop. For a little extra “wow,” add a tiny dollop of extra whipped topping on the side, a sprinkle of graham cracker crumbs, or even a few fresh mint leaves. It’s fantastic with a strong cup of black coffee to balance the sweetness, or a cold glass of milk for the ultimate nostalgia trip. Serve it straight from the dish at a gathering and watch it disappear!
Make It Your Own: Delicious Variations
The beauty of this dessert is its versatility. Once you’ve mastered the classic, try one of these fun twists!
- Chocolate Lover’s Dream: Swap the graham cracker crust for one made with crushed Oreos (filling and all!) mixed with butter. Use chocolate pudding (prepared and cooled) mixed into the cream cheese layer, and top with cherry or even raspberry pie filling.
- Sunshine Lemon Delight: Add the zest of one lemon and a tablespoon of lemon juice to the cream cheese filling. Use a blueberry or raspberry pie filling for a gorgeous, tangy, patriotic-looking treat.
- Nutty Crunch: Stir ½ cup of finely chopped toasted pecans or walnuts into your graham cracker crust for a delightful texture and flavor boost.
- Seasonal Fruit Swap: Ditch the can! In summer, top with a layer of fresh, sliced strawberries or peaches macerated with a little sugar. In fall, try a spiced apple pie filling.
- Lighter Option: Use reduced-fat or Neufchâtel cream cheese, light whipped topping, and a sugar substitute designed for baking in the crust and filling. The structure stays perfect!
Chef Emily’s Notes & Kitchen Stories
This recipe has been my reliable “oh crud, I need a dessert” savior more times than I can count. I once made it in a vacation rental with only a plastic fork and a coffee mug for mixing—it still turned out great (if a little…rustic). The recipe has evolved in my kitchen; I now almost always use the fresh whipped cream variation because I love the rich flavor, and I’m heavy-handed with the vanilla. I’ve also learned that a pinch of salt in the crust makes all the flavors sing. The core of it, though—the joyful simplicity—remains unchanged. It’s a dessert that says “welcome” and “I’m glad you’re here.” And isn’t that what the best food is all about?
Your Questions, Answered!
Q: Can I make Cherry Delight ahead of time?
A: Absolutely, and I highly recommend it! It keeps beautifully in the fridge, covered, for 3-4 days. The flavors get even better as they mingle. It’s the ultimate make-ahead dessert.
Q: My crust is soggy. What happened?
A: Two likely culprits: 1) The butter wasn’t mixed in thoroughly, leaving dry spots that soaked up moisture from the filling, or 2) It didn’t chill long enough before adding the filling. That initial 15-minute freeze is crucial for setting the butter and creating a moisture barrier.
Q: Can I freeze Cherry Delight?
A: You can, with a caveat. Wrap the whole dish or individual squares tightly in plastic wrap and then foil. Freeze for up to 1 month. Thaw overnight in the fridge. The texture of the creamy layer may be slightly less fluffy after freezing, but it will still taste delicious.
Q: My filling is runny. How do I fix it?
A: Runny filling usually means the cream cheese wasn’t fully softened or the whipped topping wasn’t fully folded in. Make sure your cream cheese is room-temperature soft. Also, ensure your whipped topping is thawed but still cold. If it’s liquidy, it won’t provide structure. If you’re in a pinch, you can try chilling the filling mixture in the bowl for 20 minutes before spreading.
A Quick Nutritional Glance
Please note: These are approximate estimates based on the specific ingredients listed and will vary with substitutions.
Servings: 9 | Prep Time: 15 min | Chill Time: 4 hours
A Quick Nutritional Glance
Just like Grandma intended, this is a treat meant to be enjoyed, not overanalyzed. That said, here’s a general estimate so you know what you’re working with.
Approximate nutrition per serving (based on 9 servings):
-
Calories: ~380–420
-
Fat: ~24g
-
Carbohydrates: ~38–42g
-
Sugar: ~28g
-
Protein: ~4–5g
Values will vary depending on brands, crust thickness, and whether you use whipped topping or fresh cream. This is a celebration dessert, not an everyday snack—and it does its job beautifully.
Why Cherry Delight Never Goes Out of Style
Cherry Delight has survived decades of food trends for one simple reason: it works.
-
No baking
-
No stress
-
No fancy tools
-
No disappointment
It’s cool, creamy, nostalgic, and unapologetically comforting. It doesn’t need reinvention or viral tricks. It just needs a fridge, a spoon, and people you love sitting around the table.
This is the dessert you make when:
-
You want something guaranteed
-
You need a make-ahead win
-
You’re feeding a crowd with mixed tastes
-
You want to bring that dish everyone asks about
And when someone inevitably says, “My grandma used to make something just like this,” you’ll know you nailed it.
Final Thoughts from My Kitchen to Yours
Cherry Delight isn’t flashy. It doesn’t shout.
It shows up, chills patiently, and steals the spotlight anyway.
So whether you’re making it for a holiday, a potluck, a Sunday dinner, or just because you deserve something sweet in the fridge—this dessert will never let you down.
I hope it earns a permanent place in your recipe box, right next to the dishes that feel like home.
Happy chilling, friends. 🍒