Classic Vanilla Bundt Cake – Buttery Crumb, Golden Crust & Timeless Flavor
Hey there, friend! Pull up a chair and let’s talk about cake. Not just any cake, but the cake. The one that smells like a happy Sunday afternoon and tastes like a buttery, vanilla-scented hug. I’m talking about a Classic Vanilla Bundt Cake.
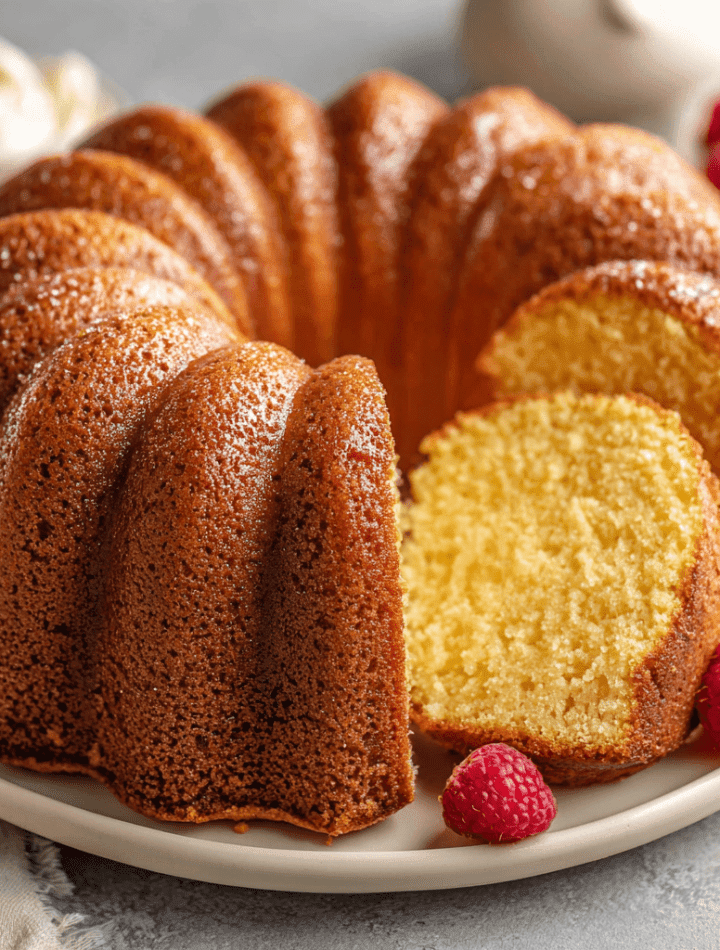
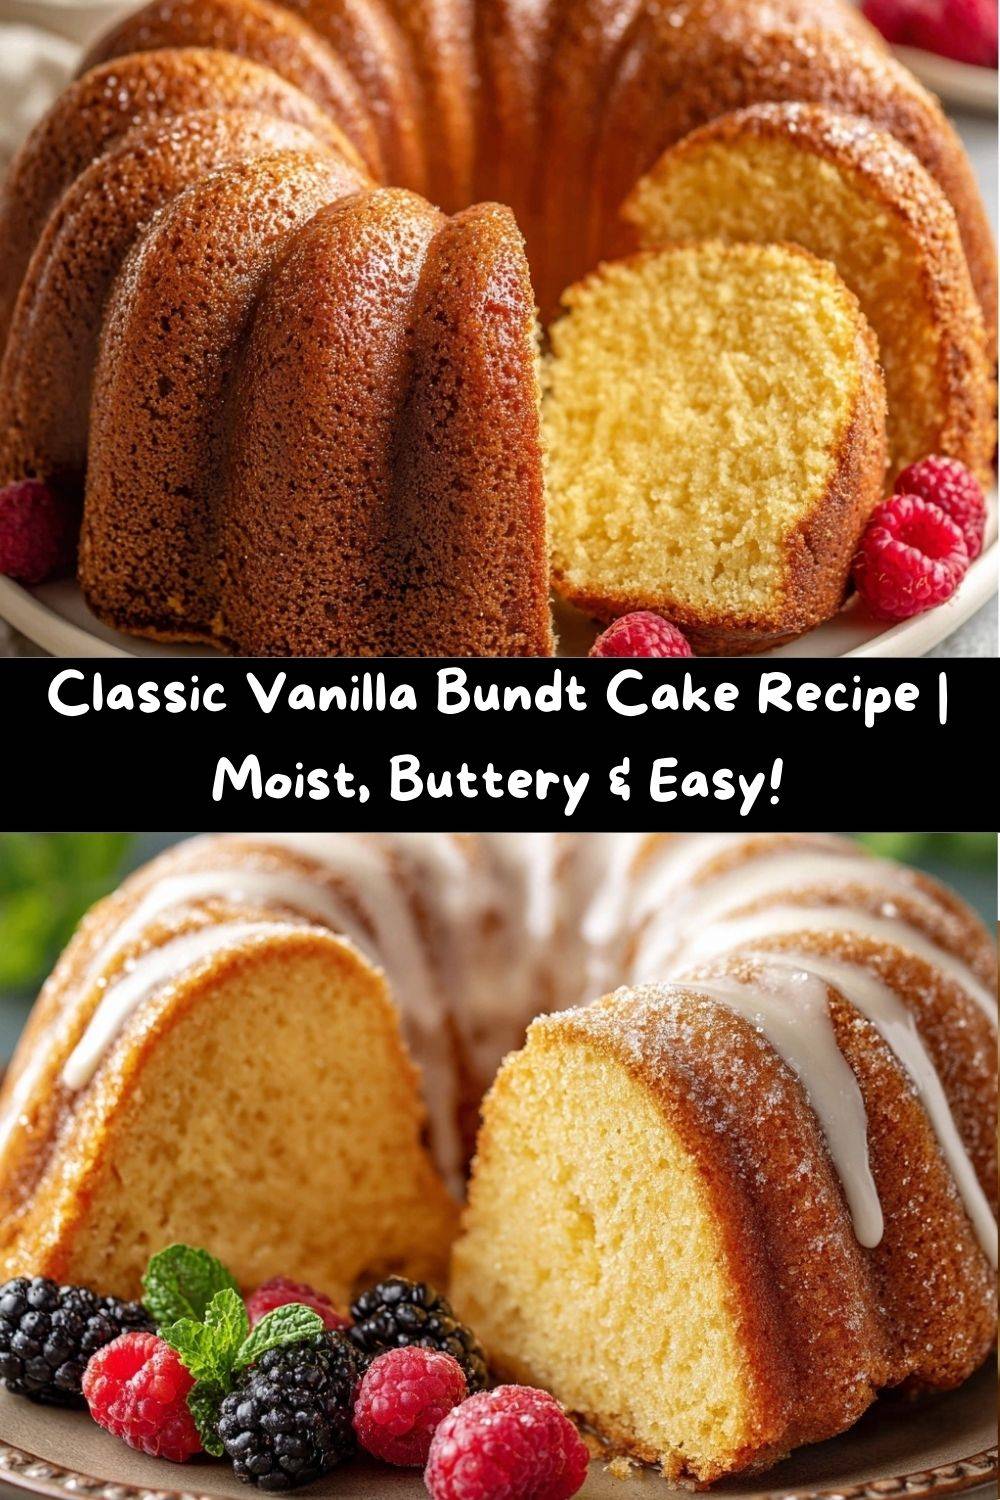
In a world of towering layer cakes and fussy pastries, the humble bundt cake is my forever hero. It’s elegantly simple, wonderfully forgiving, and seriously delicious. With its majestic ridges and that iconic hole in the middle, it bakes up with a perfect golden crust that gives way to a melt-in-your-mouth, tender crumb. This isn’t a shy, bland cake. Oh no. This is a celebration of pure, rich vanilla and sweet, creamy butter in every single forkful.
Whether you’re a baking newbie looking for a win or a seasoned pro craving a timeless classic, this is your recipe. We’re going to bake a cake that stands proudly on its own, begging only for a cup of coffee or a dusting of powdered sugar. It’s the kind of cake you make for a birthday, a potluck, or just because it’s Tuesday and you deserve something spectacular. So, tie on your favorite apron, preheat that oven, and let’s make something beautiful together.
The Cake That Started It All
This cake takes me right back to my grandma’s linoleum-floored kitchen. She had this gorgeous, fluted turquoise pan that she treated like a precious heirloom (and honestly, it was). Every major family gathering, and plenty of un-major ones too, featured her “Grandma’s Special Cake.” She’d let me help, of course—my job was to carefully dust every nook of that intricate pan with flour, creating a little snowstorm on the countertop.
The magic wasn’t just in the eating (though, wow). It was in the ritual. The sound of her hand mixer whirring, the smell of vanilla mixing with melted butter, and the anxious, delicious wait as it baked. When she turned that still-warm pan over onto her wire rack, we’d all hold our breath. That moment when the cake released with a soft *thud* was pure kitchen triumph. That first slice, revealing the perfect golden interior, felt like unlocking a secret. This recipe is my love letter to that feeling. It’s my updated, chef-tweaked version of her classic, and every time I make it, I feel that same warm, sugary joy.
Gathering Your Ingredients: A Chef’s Notes
Great cakes start with great ingredients, and understanding your “why” makes you a better baker! Here’s what you’ll need and why each one matters.
- 3 cups (360g) all-purpose flour: The backbone of our cake. I like to whisk it first to aerate it—it makes measuring more accurate and mixing easier. For a lighter crumb, you can swap 1 cup with cake flour.
- 2 teaspoons baking powder & ½ teaspoon baking soda: Our dynamic leavening duo! The powder gives it lift, and the soda reacts with the sour cream for an extra-tender texture. Make sure they’re fresh for maximum rise.
- 1 teaspoon salt: Never skip this! Salt is the flavor enhancer that makes the vanilla and butter sing. It balances the sweetness perfectly.
- 1 cup (2 sticks) unsalted butter, softened: The star of the show. Using unsalted lets you control the salt level. “Softened” is key—it should indent easily when pressed but not be greasy or melted. This is non-negotiable for that light, fluffy crumb.
- 2 cups (400g) granulated sugar: Sweetness and structure. Creaming it with the butter creates millions of tiny air pockets, which is the secret to a cake that’s light, not dense.
- 4 large eggs, at room temperature: They bind, leaven, and enrich. Room temp eggs incorporate much more smoothly into the butter mixture, preventing a curdled look. Just pop them in a bowl of warm water for 5 minutes if you forgot!
- 1 tablespoon pure vanilla extract: Yes, a whole tablespoon! This is a VANILLA cake. Use the best pure extract you can for that deep, aromatic flavor. A tiny scrape of vanilla bean paste is a magical addition here too.
- 1 cup (240g) full-fat sour cream: My secret weapon. The fat and acid in sour cream guarantee an unbelievably moist, velvety crumb that stays that way for days. Greek yogurt works in a pinch.
- ½ cup (120ml) whole milk: This loosens the batter to the perfect consistency. Whole milk adds richness, but 2% will do just fine.
Step-by-Step: Let’s Build a Masterpiece
Follow these steps, and you’ll have a foolproof, show-stopping cake. I’m adding my chef hacks in the notes—these are the little things that make a big difference!
- Prep Your Pan & Oven: Preheat your oven to 350°F (175°C). Now, give your bundt pan some serious love. Using softened butter or baking spray, grease every single crevice. Then, dust it lightly with flour, tapping out the excess. This double-layer defense is your insurance policy for a clean release. Place the pan in the fridge while you make the batter—this helps the coating set.
- Whisk the Dry Ingredients: In a medium bowl, whisk together the flour, baking powder, baking soda, and salt. Whisking does two things: it combines everything evenly and aerates the flour, leading to a lighter cake. Set this aside.
- Cream Butter & Sugar to Fluffy Perfection: In a large bowl, beat the softened butter and sugar together on medium-high speed for a full 3-5 minutes. Don’t rush this! You want it pale, super fluffy, and almost whipped. This step incorporates air, which is crucial for texture. Scrape down the bowl halfway through.
- Incorporate the Eggs & Vanilla: Beat in the eggs, one at a time, letting each fully blend in before adding the next. This prevents the batter from breaking. Now, pour in that glorious tablespoon of vanilla and beat until combined. The smell alone is worth it.
- Blend in the Sour Cream: Add the sour cream and mix on medium until the batter is smooth and homogenous. It might look a bit curdled at first, but it will come together.
- Alternate Dry & Wet Ingredients: Reduce your mixer speed to low. Add about one-third of your flour mixture, mixing until just combined. Pour in half of the milk, mix, then repeat with another third of flour, the rest of the milk, and finally the last of the flour. Mix until just combined after each addition. A few streaks of flour are okay—we’ll finish by hand. Overmixing at this stage develops gluten and leads to a tough cake.
- Final Batter Touch & Pan: Use a flexible spatula to give the batter one final, gentle fold, scraping the bottom to ensure everything is evenly mixed. Retrieve your chilled pan from the fridge. Spoon the thick, luscious batter into the pan, smoothing the top with your spatula.
- Bake to Golden-Brown Glory: Place the pan in the center of your preheated oven. Bake for 50-60 minutes. DO NOT open the oven door before the 45-minute mark! Around 50 minutes, test for doneness: a long toothpick or skewer inserted near the center should come out with a few moist crumbs, but no wet batter. The top will be a deep golden brown and spring back when lightly touched.
- The All-Important Cool Down: This is the hardest part! Let the cake cool in the pan on a wire rack for exactly 15 minutes—no more, no less. This allows it to set enough to hold its shape but is still warm enough to release. Then, place the rack over the pan, confidently flip it over, and gently lift the pan away. Let the cake cool completely on the rack before glazing or slicing.
Serving Your Vanilla Bundt Cake in Style
This cake is a stunning centerpiece all on its own, but a little dressing up is always fun! Here’s how I love to serve it:
For the simplest elegance, dust the completely cooled cake generously with powdered sugar using a fine-mesh sieve. It looks like a light snowfall settled on those beautiful ridges. If you’re feeling fancy, a vanilla glaze is heavenly. Whisk together 1 cup of powdered sugar, 2-3 tablespoons of milk or cream, and 1 teaspoon of vanilla until smooth. Drizzle it artfully over the top and let it cascade down the sides.
Slice it thick and serve it on a pretty plate alongside a dollop of freshly whipped cream and a pile of ripe berries. The tart berries cut through the richness perfectly. For the ultimate indulgence, warm a slice slightly and add a scoop of vanilla bean ice cream. It’s pure, unadulterated comfort. No matter how you serve it, brew a pot of good coffee or tea. This cake deserves a proper beverage companion.
Make It Your Own: Delicious Recipe Twists
Once you’ve mastered the classic, the world is your oyster (or, more accurately, your bundt cake)! Here are a few of my favorite riffs:
- Lemon-Vanilla Sunshine: Add the zest of two lemons to the sugar before creaming (rub it in with your fingers to release the oils). Swap the vanilla extract for 2 tsp vanilla and 1 tsp pure lemon extract. For the glaze, use lemon juice instead of milk.
- Chocolate Chip Swirl: Toss 1 cup of mini chocolate chips with 1 tbsp of the dry flour mixture (this prevents sinking). Fold them into the finished batter, or for a marbled effect, layer plain batter and chocolate chip batter in the pan.
- Brown Butter Bliss: Take your flavor to a nutty, toasty level! Brown the butter before creaming. Let it cool to room temperature but not re-solidify, then use it as directed. You’ll never go back.
- Gluten-Free Friendly: Use a 1:1 gluten-free all-purpose flour blend (like Bob’s Red Mill or King Arthur). I often add ¼ tsp xanthan gum if the blend doesn’t include it, for structure.
- Spiced Chai Variation: Whisk 1½ tsp cinnamon, ½ tsp ginger, ¼ tsp cardamom, and a pinch of black pepper into the dry ingredients. Use brown sugar for half of the granulated sugar for a deeper flavor.
Chef Emily’s Notebook Scribbles
This recipe has been my trusty sidekick for years, and it’s evolved with every batch. I once, in a frantic moment, used frozen butter and tried to “soften” it in the microwave. Let’s just say I made sweet, vanilla-scented soup. Lesson learned: patience with ingredients is key! I also swear by using a kitchen scale now for measuring flour—it’s the single best way to ensure consistent results. “3 cups” can vary wildly, but “360 grams” is always 360 grams.
This cake also has a magical second-day quality. The flavors meld and the crumb becomes even more tender. If you can resist, wrap the cooled cake tightly and enjoy it the next day. Trust me on this.
Your Questions, Answered!
Q: My cake stuck to the pan! What did I do wrong?
A> Oh, the heartbreak! This usually comes down to pan prep. Next time, be ruthlessly thorough with the butter-and-flour method, getting into every ridge. Also, ensure you’re only letting it cool in the pan for that 15-minute window. Too long, and it can steam and stick.
Q: Can I make this cake ahead of time?
A> Absolutely! Bake and cool it completely. Wrap it tightly in plastic wrap (you can do a layer of glaze first if it’s not sticky) and store at room temp for 2 days or freeze for up to 3 months. Thaw overnight on the counter.
Q: Why is my cake dense/gummy?
A> Two likely culprits: 1) Overmixing the batter after adding the flour develops gluten, or 2) Your leaveners (baking powder/soda) might be old. Test your baking powder by dropping a bit in hot water—it should fizz vigorously.
Q: Can I use a different pan?
A> Yes, but adjust the time. This batter will make two 9-inch loaves (bake ~45 mins) or about 24 cupcakes (bake 18-22 mins). Just keep an eye on it and use the toothpick test.
Nutritional Information*
*Please note: These are estimates based on the specific ingredients used and a 12-slice yield. Values will vary with substitutions.
Per Slice:
Calories: ~360 | Total Fat: 18g | Saturated Fat: 11g | Cholesterol: 105mg | Sodium: 280mg | Total Carbohydrates: 44g | Dietary Fiber: 0.5g | Sugars: 28g | Protein: 5g
This is a celebratory treat, meant to be enjoyed mindfully and shared with joy. The richness comes from quality butter, eggs, and sour cream, which provide not just flavor but also satisfaction—a small slice goes a long way!
Final Thoughts from My Kitchen to Yours
And there you have it—the blueprint for a cake that’s more than just dessert. It’s a memory-maker, a crowd-pleaser, and a testament to the beautiful simplicity of good ingredients combined with a little bit of love.
I hope this recipe becomes a staple in your home, just like it is in mine. I hope you make it for quiet mornings, loud celebrations, and every little moment in between. Most of all, I hope you share it. Slice it up, pass the plates, and watch faces light up. That’s the real magic of cooking, isn’t it? The connection.
Thank you so much for baking with me today. If you make this Classic Vanilla Bundt Cake (and I really hope you do!), tag me @TastyChow so I can see your beautiful creation! Now, go enjoy that first, perfect bite. You’ve earned it.
With love and a full oven,
Emily