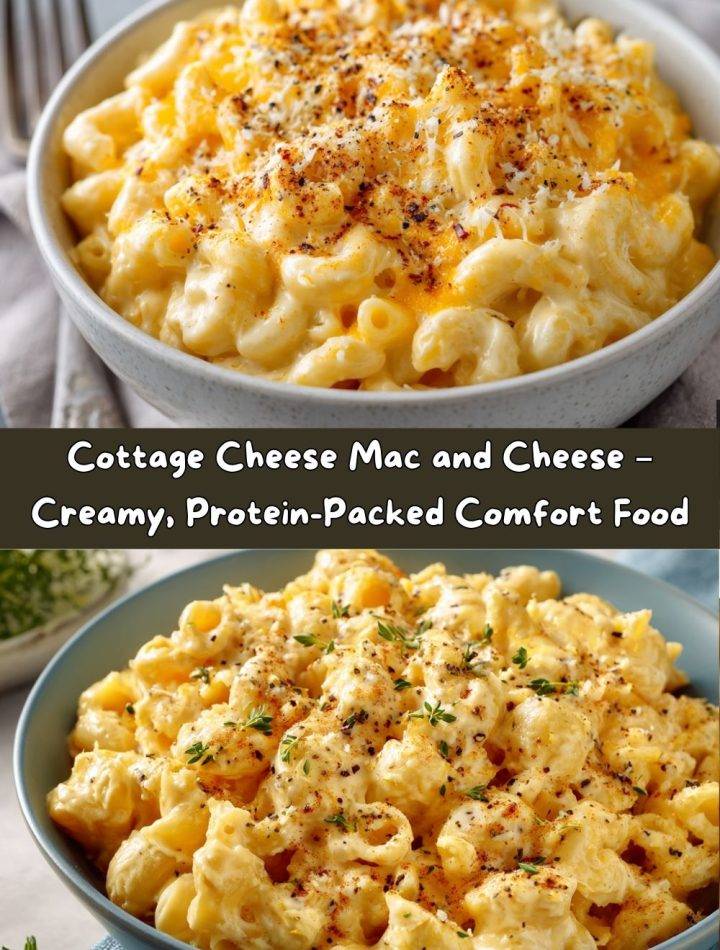
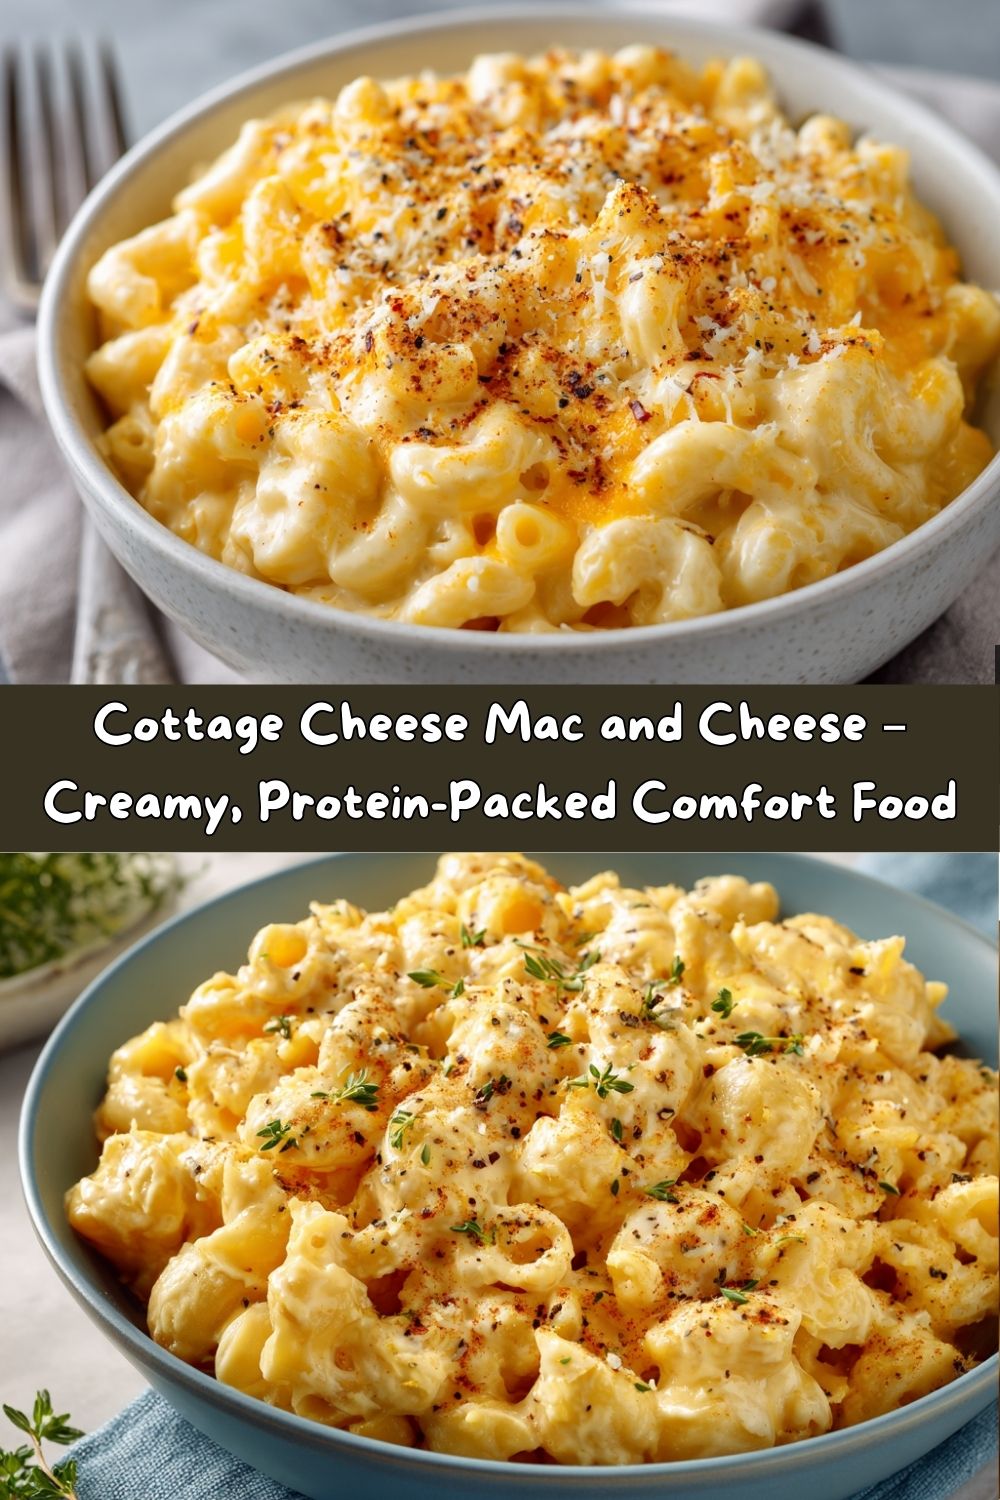
Say Hello to Your New Favorite Comfort Food: Cottage Cheese Mac and Cheese!
Hey there, friend! Pull up a chair and let’s talk about one of life’s greatest simple pleasures: a big, steaming bowl of mac and cheese. That creamy, cheesy, soul-warming goodness that feels like a hug from the inside out. But what if I told you we could make that classic comfort food even better? What if we could give it a sneaky protein boost, make it incredibly creamy without a ton of heavy cream, and have it on your table in about 25 minutes flat? Sounds like a dream, right?
Well, grab your favorite apron (the one with the questionable stains that tells the best stories) because we’re making my legendary Cottage Cheese Mac and Cheese today. This isn’t just any mac and cheese; this is the recipe that’s saved countless busy weeknights, been the star of potlucks, and has even converted the most skeptical of cottage cheese critics. It’s rich, it’s flavorful, and it’s packed with enough protein to keep you full and satisfied. We’re ditching the complicated roux and embracing the magic of the blender for a sauce that’s foolproof and fantastically smooth. Get ready to fall in love with mac and cheese all over again. Let’s get cooking!
My Grandma’s Spoon and a Modern Twist
This recipe has a little piece of my heart baked right into it. It all goes back to my grandma’s kitchen. Her mac and cheese was the stuff of legend—a giant, bubbling pan with a golden-brown crust that we kids would fight over. It was rich, indulgent, and a once-in-a-while treat. When I started culinary school and then began developing recipes for all of you, I kept thinking about how to capture that same soulful comfort but in a way we could enjoy any old Tuesday without the food coma.
The “aha!” moment hit me after a marathon day of recipe testing. I was hungry, wanted something fast and cheesy, and all I had was some pasta, cottage cheese, and a block of cheddar. I threw it all in a blender on a whim, heated it up, and… magic. It was unbelievably creamy and had that tangy, cheesy flavor I loved from my grandma’s version, but it felt lighter and more energizing. It was the perfect marriage of nostalgic comfort and my modern “let’s make it work” kitchen philosophy. Now, it’s a staple in my home, and I’m just so thrilled to share that same feeling with you.
Gathering Your Cheesy Arsenal
Here’s what you’ll need to create this protein-packed masterpiece. Don’t just think of this as a shopping list; think of it as your flavor roadmap!
- 1 lb elbow macaroni (about 4 cups dry): The classic vessel for holding all that cheesy goodness. Elbows have those perfect little tubes for sauce to hide in. Chef’s Insight: Feel free to swap for any short pasta you love! Cavatappi, shells, or even rigatoni work beautifully.
- 2 cups full-fat cottage cheese: This is our secret weapon! It creates an incredibly rich and creamy base without needing heavy cream. Substitution Tip: Low-fat cottage cheese will work in a pinch, but for the creamiest, most indulgent texture, full-fat is the way to go. Trust me on this one.
- 2 cups whole milk (or milk of choice): This helps thin our blended cottage cheese into a perfect sauce consistency. Chef’s Insight: Whole milk gives the sauce extra body and richness, but 2% or even a plain, unsweetened almond or oat milk will work just fine.
- 3 cups freshly grated sharp cheddar (about 12 oz): The star of the show! Chef’s Hack: Please, please, PLEASE grate your own cheese! Pre-shredded bags contain anti-caking agents that can make your sauce grainy and less smooth. Grating it fresh is a game-changer for silky, meltable cheese bliss.
- 2 tbsp arrowroot powder or cornstarch: Our magical thickener. It gives the sauce that luscious, clingy texture without the fuss of a roux. Substitution Tip: They work exactly the same here, so use what you have on hand.
- 1 tsp garlic powder, 1 tsp onion powder, 1 tsp paprika (smoked preferred), 1 tsp sea salt, ½ tsp black pepper: The flavor dream team! Smoked paprika adds a subtle, smoky depth that makes this mac and cheese truly next-level.
Twists for Extra Flavor (Because Why Not?):
- 1 tsp Dijon mustard: Adds a fantastic depth and a little tang that cuts through the richness.
- ½ cup grated Parmesan or Gruyère: For my fellow cheese fanatics. It adds a salty, nutty complexity that is just *chef’s kiss*.
- 1 tbsp nutritional yeast: A powerhouse of umami, cheesy flavor that also gives a little nutrition boost. Great for a cheesy flavor if you’re dairy-sensitive (paired with dairy-free cheese).
- Optional: ½ cup steamed cauliflower: Blend it right in! You won’t taste it, I promise. It adds creaminess, fiber, and a sneaky veggie boost—perfect for picky eaters.
Let’s Build the Creamy Dream: Your Step-by-Step Guide
Okay, team! Let’s fire up the stove. This comes together so quickly, so have all your ingredients prepped and ready to go. This is called mise en place (everything in its place) and it makes you feel like a total pro.
- Cook Your Pasta: Bring a large pot of well-salted water to a rolling boil. Add your elbow macaroni and cook it until it’s just al dente—meaning it still has a slight bite to it. Chef’s Crucial Tip: We’re going to cook the pasta a bit more in the sauce, so if you cook it all the way now, it’ll turn to mush later. Drain it and set it aside. You can drizzle a tiny bit of oil to prevent sticking if you’re not making the sauce immediately.
- Blend the Liquid Gold: Now, for the magic trick! Grab your blender. To it, add the cottage cheese, milk, arrowroot powder (or cornstarch), garlic powder, onion powder, paprika, salt, pepper, and any of your chosen “flavor twists” (Dijon, nutritional yeast, or steamed cauliflower). Chef’s Hack: No need to dirty another bowl. This one-step blending method is our ticket to a lump-free, perfectly emulsified sauce every single time. Blend on high for a good 45-60 seconds until it is completely, utterly smooth. No curds in sight!
- Wake Up the Sauce: Pour that beautiful, smooth mixture into a large saucepan or Dutch oven. Turn the heat to medium. Now, here’s where you need to pay attention. Cook the sauce, stirring constantly with a whisk or a wooden spoon, for about 5-7 minutes. You’ll feel it start to thicken slightly and become warm to the touch. This step activates the thickener and cooks out any starchy flavor. Don’t let it boil just yet!
- The Big Cheese Melt: Once the sauce is warm and has thickened a touch, reduce the heat to low. Now, start sprinkling in your freshly grated cheddar cheese (and Parmesan/Gruyère if using) a handful at a time. Stir, stir, stir until each addition is fully melted and incorporated before adding the next. Chef’s Secret: Keeping the heat low and slow prevents the cheese from seizing up and becoming oily. Patience rewards us with a velvety, smooth cheese sauce.
- The Grand Finale: You’ve done it! You have a perfect, glossy cheese sauce. Now, add your drained, cooked pasta to the pot. Gently fold the pasta into the sauce until every single noodle is coated in that glorious, cheesy embrace. Let it heat through for another minute or two on low heat. And just like that, it’s done!
How to Serve This Cheesy Masterpiece
This mac and cheese is a star all on its own, but a little flair never hurt anybody! Here’s how I love to serve it up:
For the Family: Pile it high into a big, beautiful serving bowl. Let everyone serve themselves family-style right from the center of the table. It encourages seconds (and thirds!) and feels so communal and cozy.
For the Gourmand: Use a round biscuit cutter or a measuring cup to create a perfect, sleek mound of mac and cheese in the center of a shallow bowl. Garnish with a light sprinkle of paprika, some freshly cracked black pepper, and a tiny sprig of fresh thyme or parsley for a pop of color and freshness.
For the Snacky Superstar: My absolute favorite way to eat the leftovers (if there are any!): pour it into an oven-safe dish, top with a handful of buttery panko breadcrumbs mixed with a little more grated cheese, and broil it for 2-3 minutes until the top is golden and crispy. It’s a whole new meal!
Top It Off!: Don’t forget the toppings! A few dashes of your favorite hot sauce, a drizzle of truffle oil, some crispy bacon bits, or even a handful of chopped chives can take this dish to incredible new heights.
Mix It Up! Delicious Variations to Try
Once you’ve mastered the base recipe, the world is your cheesy oyster! Here are a few of my favorite ways to switch it up:
- Buffalo Chicken Mac: Stir in 1-2 cups of shredded cooked chicken and ¼ cup of buffalo sauce (like Frank’s RedHot) into the finished mac and cheese. Top with crumbled blue cheese and chopped celery. Game day, here we come!
- Taco Mac & Cheese: Add 1 tablespoon of taco seasoning to the blender with the sauce. After combining the pasta and sauce, stir in a can of drained black beans and a cup of corn. Serve with crushed tortilla chips, diced avocado, and a dollop of sour cream.
- Veggie-Packed Power Bowl: Sauté 1 cup of chopped broccoli florets and ½ a diced red bell pepper. Fold them into the mac and cheese along with the pasta for a complete, colorful meal.
- Lobster or Crab Mac: Feeling fancy? Fold in 1 cup of lump crab meat or chopped cooked lobster meat at the very end. A truly decadent and special occasion twist.
- Dairy-Light Version: Use a dairy-free milk (like unsweetened almond or oat) and your favorite meltable dairy-free cheddar cheese shreds. The cottage cheese and nutritional yeast will still provide that classic cheesy flavor profile.
Emily’s Kitchen Notes & Funny Stories
This recipe has been through it all in my kitchen! The first time I made it, I was so excited I forgot to add the thickener. Let’s just say I ended up with a delicious, albeit very soupy, cheese soup with pasta! A happy accident, but not quite mac and cheese. Another time, my dear husband (bless his heart) decided to “help” by adding the cheese while the sauce was still on high heat. We ended up with a slightly greasy, clumpy sauce that we still ate because, well, cheese. The lesson? Low and slow for the win, friends.
Over time, I’ve learned that this recipe is incredibly forgiving. A little more milk if it’s too thick, a little more cheese if you’re feeling wild. It’s a recipe that wants you to succeed and make it your own. Don’t be afraid to play and experiment!
Your Questions, Answered!
Q: My sauce seems a little thin. How can I thicken it up?
A: No panic! First, make sure you let it simmer for a few more minutes; the thickener might just need a little more time to work its magic. If it’s still too thin, make a quick slurry: mix 1 teaspoon of cornstarch with 1 tablespoon of cold milk or water until smooth. Whisk this into your simmering sauce and it should thicken up within a minute.
Q: Can I taste the cottage cheese?
A: I get this question a lot! When blended completely smooth, the cottage cheese loses its curdy texture and simply adds a rich, tangy creaminess that is very similar to the flavor profile of a good cheese sauce. If you’re skeptical, I promise you—you won’t even know it’s in there. It just makes it creamier and protein-packed!
Q: Can I make this ahead of time?
A: Absolutely! This is a fantastic meal prep option. Prepare the recipe completely, let it cool, and store it in an airtight container in the fridge for up to 4 days. When ready to eat, reheat it gently on the stove with a splash of milk to loosen it up. You can also reheat single portions in the microwave.
Q: Why did my cheese sauce get grainy/oily?
A: This almost always happens if the heat is too high when you add the cheese. High heat can cause the proteins in the cheese to tighten and squeeze out the fat, leading to a broken sauce. The fix is simple: always add cheese to a warm, not boiling, sauce over low heat.

Cottage Cheese Mac and Cheese
- Total Time: ~1½ hrs
- Yield: 18 Cookies 1x
Description
These snow globe cookies are as fun to make as they are to eat. A buttery sugar cookie base is decorated with royal icing and a clear candy “glass,” then filled with sprinkles or tiny edible trees. Perfect for gifting, cookie swaps, or simply dazzling your holiday guests.
Ingredients
2½ cups all-purpose flour
1 tsp baking powder
½ tsp salt
1 cup unsalted butter, softened
1 cup sugar
1 egg
2 tsp vanilla extract
For Decoration:
Royal icing (made with powdered sugar, meringue powder, and water)
Clear hard candies (like Jolly Ranchers or clear mints), crushed
Sprinkles, edible glitter, or mini sugar decorations (tiny trees, snowflakes, stars)
Optional Twists:
Flavor cookies with almond extract or orange zest
Tint royal icing pale blue for a frosty look
Use crushed peppermint candies for a red “snow globe” effect
Instructions
Make Cookies: Whisk flour, baking powder, and salt. In another bowl, beat butter and sugar until fluffy. Add egg and vanilla, then dry ingredients. Chill 30 minutes.
Cut & Bake: Roll out dough and cut into rounds with a small circle cut out of the center (for the “globe”). Place on parchment-lined baking sheets. Fill cutouts with crushed candy. Bake at 350°F (175°C) for 10–12 min until edges are golden. Cool completely.
Decorate: Outline cookies with royal icing. Once set, pipe bases and details.
Fill & Finish: Add sprinkles or tiny edible trees behind the candy “glass” effect. Seal edges with more icing if needed. Let dry fully before packaging or serving.
- Prep Time: 30 minutes
- Chill Time: 30 minutes
- Cook Time: 30–40 min
Nutrition
- Calories: 390 / Cookie
- Sodium: 430mg / Cookie
- Fat: 18g / Cookie
- Carbohydrates: 34g / Cookie
- Protein: 20g / Cookie
Nutritional Information (Per Serving, Approximate)
This information is an estimate based on the specific ingredients listed above. Remember, variations and substitutions will change these values.
Servings: 8 | Serving Size: About 1 cup
- Calories: ~390
- Fat: 18g
- Carbohydrates: 34g
- Fiber: 2g
- Protein: 20g (See? I told you it was a powerhouse!)
- Sodium: ~430mg
Compared to a traditional, heavy cream-based mac and cheese, this version typically offers more protein and less saturated fat, making it a more balanced comfort food option that still delivers on every bit of flavor.
Final Thoughts from My Kitchen to Yours
Well, my friend, there you have it. My not-so-secret, secret weapon for the creamiest, dreamiest, protein-packed mac and cheese on the planet. This recipe is proof that comfort food doesn’t have to be complicated or leave you feeling weighed down. It’s about smart, simple techniques and ingredients that work together to create something truly magical.
I hope this recipe becomes a trusted favorite in your home, just like it is in mine. I hope it saves your busy weeknights, impresses your friends, and maybe even creates a new food memory for your own family. That’s what Tasty Chow is all about.