Let’s Churn Up Some Holiday Magic: Creamy Peppermint Ice Cream
Hey there, my fellow flavor-chaser! Is there anything that screams “holiday cheer” quite like the cool, refreshing crunch of a candy cane? That burst of peppermint is like a little winter wonderland for your taste buds. But what if I told you that pure, unadulterated peppermint joy could be captured in the creamiest, dreamiest, most scoopable ice cream you’ve ever made? Friends, get ready, because we’re about to dive headfirst into my absolute favorite frozen treat: homemade Creamy Peppermint Ice Cream.
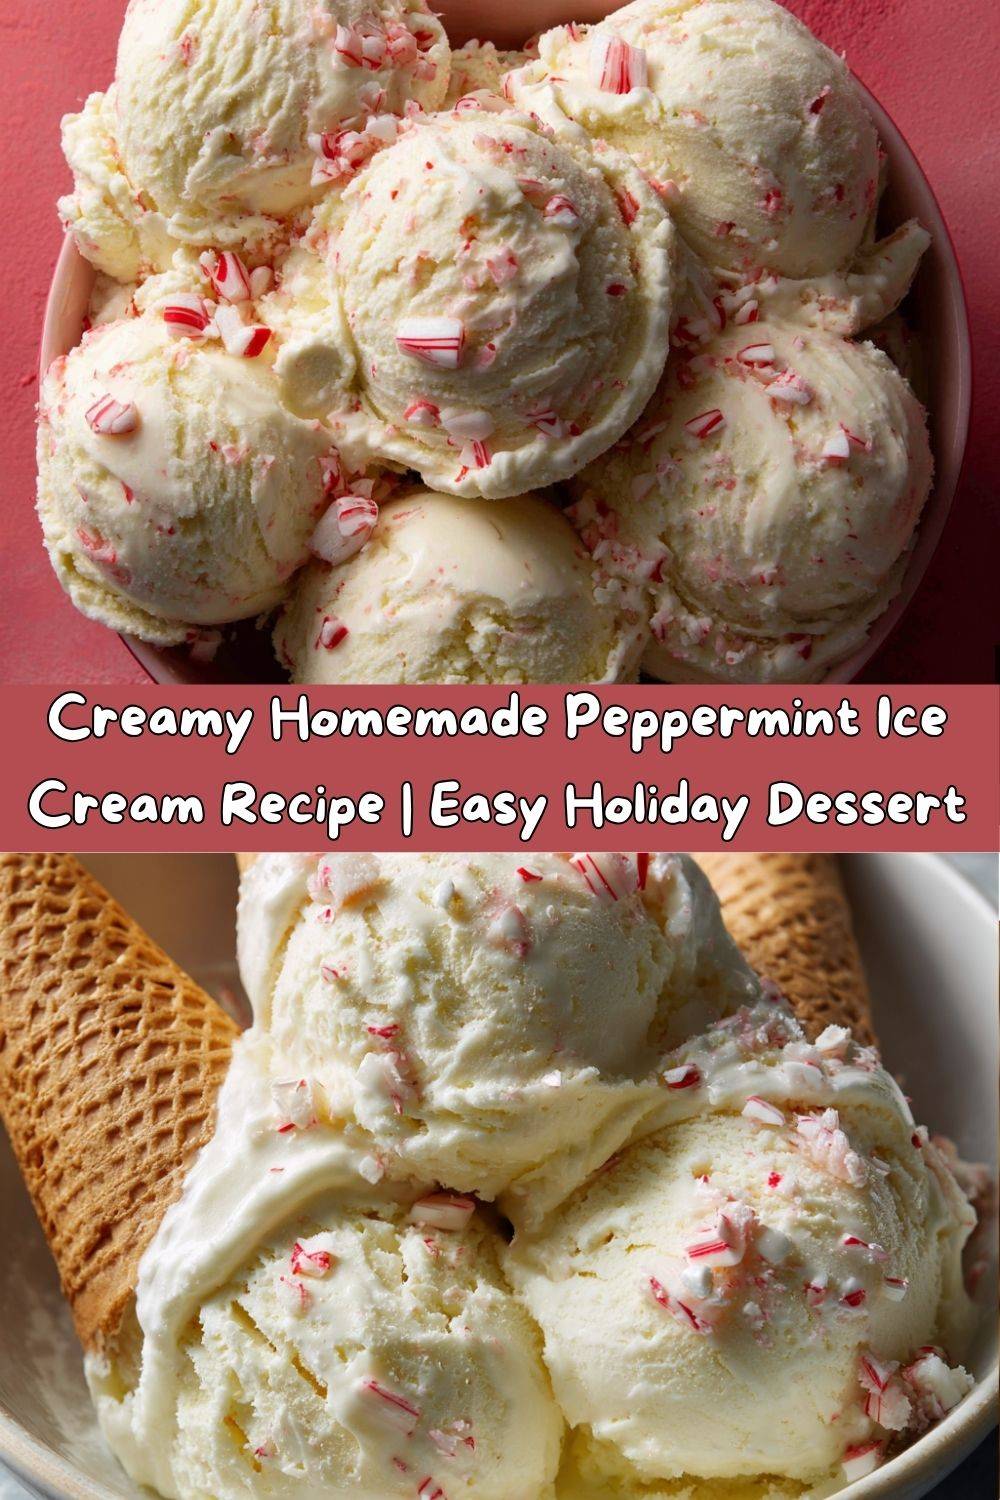
This isn’t just any ice cream. This is the stuff of legends. We’re talking a luxuriously rich vanilla base that’s so smooth it’ll make you swoon, infused with the perfect hit of cool, bright peppermint, and loaded with cheerful, crunchy bits of crushed candy cane in every single bite. It’s a holiday classic, for sure, but let’s be real—this kind of happiness deserves a spot in your freezer all year long.
I know what you might be thinking: “Emily, homemade ice cream sounds… complicated.” But I’m here to tell you, with my super simple, no-cook, no-egg method, it’s one of the easiest and most satisfying things you’ll ever whip up in your kitchen. So, grab your favorite apron (the messy one is always the best), and let’s make something utterly delicious together. Your ice cream maker is calling our name!
A Spoonful of Nostalgia: My First Ice Cream Memory
This recipe always takes me right back to my grandma’s kitchen on a blustery December afternoon. The windows would be fogged up from a simmering pot of stew on the stove, and the whole house smelled like pine and gingerbread. But the real magic happened when my grandpa would pull out the old, hand-crank ice cream maker from the depths of the pantry.
It was a family affair. My brother and I would take turns sitting on a towel on top of the wooden bucket (to keep the cold in, he’d say), desperately trying to turn the stubborn crank while our little arms burned with the effort. My grandma would hover, adding the rock salt and ice, and just when we thought we couldn’t crank another turn, she’d lean in, peek under the lid, and declare it perfect. That first spoonful of the freshly churned, slightly soft ice cream, flecked with bits of red and white candy she’d smashed with a rolling pin, was pure, unbridled joy. It tasted like love and laughter and the promise of Christmas morning. This recipe is my simpler, no-crank-required homage to that memory. It’s my way of sharing that warm, fuzzy feeling with you.
Gathering Your Ice Cream Dream Team: The Ingredients
Part of what makes this recipe so fantastic is its beautiful simplicity. You only need a handful of high-quality ingredients to create something truly spectacular. Here’s what you’ll need and why each one is a superstar:
- 2 cups heavy cream: This is the heart and soul of our creamy base. It’s what gives the ice cream its luxurious, rich mouthfeel that you just can’t get from store-bought. For the best texture, don’t substitute this with half-and-half or milk. We’re going for indulgence here!
- 1 cup whole milk: Using a combination of cream and milk gives us the perfect balance of richness and scoopability. The milk lightens the base just enough so it doesn’t feel like you’re eating frozen butter (which, okay, sometimes I’m into, but not today!).
- ¾ cup granulated sugar: This sweetens our base and, just as importantly, helps create a softer freeze. Sugar lowers the freezing point of the mixture, which is the science-y secret to preventing rock-hard ice cream.
- A generous pinch of salt: Never, ever skip the salt! It’s a flavor enhancer that makes the sweet, creamy, and minty notes pop. It balances everything out perfectly.
- 1 tsp pure vanilla extract: A classic partner for peppermint. Vanilla adds a warm, complex depth to the background that keeps the peppermint from tasting one-dimensional or like toothpaste. Trust me on this.
- 1½ tsp peppermint extract: This is where the magic happens! I prefer extract over essential oil for a consistent, food-safe flavor. Start with 1 tsp, give it a taste, and add more if you want a stronger minty kick. We’re aiming for a fresh, clean peppermint taste, not a mouthful of gum.
- ½ cup crushed peppermint candies or candy canes: The fun, festive crunch! I use a zip-top bag and a rolling pin to crush them. You want a mix of fine powder and small chunks for the best texture.
- Optional: A few drops of red food coloring: This is purely for that classic pink peppermint look! I love a soft pastel pink swirl in my ice cream. Use natural food coloring if you prefer, or leave it out entirely for a beautiful, creamy white dessert dotted with red and white candy pieces.
Let’s Make Some Magic: The Step-by-Step Guide
Okay, team! Let’s get churning. This process is wonderfully straightforward, but I’ve packed each step with my favorite chef hacks to ensure your ice cream is nothing short of perfection.
- The Simple Whisk. In a large bowl, whisk together the heavy cream, whole milk, granulated sugar, and that all-important pinch of salt. Whisk it until you can’t feel any grit from the sugar at the bottom of the bowl. This usually takes a good 2-3 minutes of enthusiastic whisking. You’re not trying to whip it, just dissolve the sugar completely. Chef’s Hack: If you’re impatient (like me sometimes), you can give the mixture a quick 30-second blitz in a blender to ensure the sugar is fully dissolved and incorporated.
- Flavor Party. Now, whisk in the vanilla extract and peppermint extract. This is where you taste! Dip a spoon in and see if you want more minty punch. Remember, the flavor will mellow slightly once frozen. If you’re using food coloring, add a few drops now and whisk until you achieve a lovely, even color. Chef’s Hack: To avoid over-mixing and creating bubbles, switch to a gentle stirring motion with a rubber spatula once you add the extracts and coloring.
- The Patience Game (Chill Time!). This might be the hardest step: cover the bowl with plastic wrap and pop it into the fridge for at least 2 hours, or ideally, overnight. I know, I know—waiting is the worst! But this is non-negotiable. A thoroughly chilled base churns faster and results in a creamier final product because your ice cream maker doesn’t have to work as hard. It also allows the flavors to get to know each other and marry beautifully.
- Churn, Baby, Churn! Pour the chilled mixture into your ice cream maker and churn according to the manufacturer’s instructions. This usually takes about 20-30 minutes. You’ll know it’s ready when it looks like thick, luxurious soft-serve. Chef’s Hack: Make sure your ice cream maker’s bowl is completely frozen solid. I keep mine in the back of my freezer at all times so it’s always ready for a spontaneous ice cream session!
- The Grand Finale (Adding the Candy!). In the last 5 minutes of churning, sprinkle in your crushed peppermint candies. Adding them at the very end ensures they stay crunchy and don’t get pulverized by the dasher. You’ll see those beautiful red and white specks get swirled throughout perfectly.
- Freeze to Firm Up. Transfer the freshly churned ice cream into a loaf pan or a freezer-safe container. Press a piece of parchment paper directly onto the surface of the ice cream. This little trick prevents ice crystals from forming! Seal it with a lid or more plastic wrap and freeze for 2-4 hours, or until it’s firm enough to scoop.
Scooping and Serving: The Grand Reveal
The moment has arrived! Take your container out of the freezer and let it sit on the counter for about 5-10 minutes before scooping. This allows it to soften just enough for perfect, beautiful scoops that won’t bend your spoons.
Now, how to serve this masterpiece? The possibilities are endless!
- Classic Bowl: A simple bowl is always a winner. Let the peppermint flavor shine.
- The Ultimate Sundae: Oh yes. Warm up some hot fudge or chocolate sauce, drizzle it over the top, and add a mountain of whipped cream and a cherry. The combination of chocolate and peppermint is iconic for a reason.
- Ice Cream Cookie Sandwiches: Sandwich a scoop between two chewy chocolate chip or rich brownie cookies for the most epic dessert ever.
- On Pie: A scoop of this on top of a warm piece of apple pie or a rich chocolate tart is a game-changer. The cool creaminess cuts through the richness of the pie beautifully.
No matter how you serve it, serve it with a big smile. You made this!
Get Creative: Fun Flavor Twists!
I love this base recipe because it’s a fantastic canvas for your creativity. Here are a few of my favorite ways to mix it up:
- Chocolate Peppermint Crunch: Fold in ½ cup of dark chocolate chips or chopped up chocolate bars along with the peppermint candy. It’s like a frozen version of your favorite holiday candy!
- Peppermint Fudge Ripple: Before freezing, layer the ice cream with a homemade or store-bought hot fudge sauce. Use a knife to gently swirl it through for a gorgeous marbled effect.
- Dairy-Free Delight: Easily make this vegan! Use full-fat canned coconut milk for the heavy cream and a creamy oat or almond milk for the whole milk. The result is incredibly rich and delicious.
- “Grasshopper” Ice Cream: Add ¼ cup of crème de menthe liqueur (non-alcoholic syrup works too) and swap the peppermint candy for crushed chocolate cookies or brownies for a grown-up, cocktail-inspired treat.
- Candy Cane Blizzard: For a serious crunch fest, double the amount of crushed candy canes. It’s for the crunch-lovers in your life!
From My Kitchen to Yours: Chef Emily’s Notes
This recipe has evolved so much since my first attempt years ago. The first time I made it, I got overzealous and added the candy canes at the beginning of the churn. Let’s just say I ended up with pink, vaguely mint-flavored ice cream with no crunch in sight—a delicious, but very homogenous, mistake! I’ve also learned that the quality of your peppermint extract makes a huge difference. Splurge on the good, pure stuff; it tastes so much fresher and less synthetic.
This ice cream has become a non-negotiable part of our holiday traditions. We always make a double batch—one for Christmas Eve and one to have on hand for those post-holiday blues. It never fails to bring a little bit of joy, no matter the time of year.
Your Questions, Answered: FAQs & Troubleshooting
Q: I don’t have an ice cream maker. Can I still make this?
A: You can try the no-churn method! After step 2, whip the heavy cream to stiff peaks separately. Then, gently fold the chilled milk/sugar mixture into the whipped cream until combined. Fold in the candy, freeze, and voilà! The texture will be a bit lighter and airier, but still delicious.
Q: My ice cream is rock hard! What did I do wrong?
A> Don’t worry! This is usually a fixable issue. First, did you add the sugar? It’s crucial for a soft texture. Second, did you chill the base thoroughly? A warm base can cause larger ice crystals to form. Finally, just let it sit on the counter for 10-15 minutes before you try to scoop it. Homemade ice cream doesn’t have the stabilizers commercial versions do, so it needs a little thaw time.
Q: The candy got really soft and chewy in the freezer. How do I keep it crunchy?
A> The key is adding it at the very last minute of churning. Also, make sure your candies are thoroughly crushed. Larger pieces can draw moisture and become chewy. A fine crush with some small chunks is the perfect balance.
Q: Can I use fresh mint instead of extract?
A> While fresh mint is wonderful, it won’t give you that classic, sharp peppermint flavor. Peppermint extract is made from peppermint oil, which is much more concentrated and potent. For a true “peppermint” taste, stick with the extract.
Nutritional Information
Okay, let’s be real: this is a decadent treat meant to be enjoyed in moderation. Here’s a rough breakdown per ½ cup serving. Remember, this can vary based on the specific brands of ingredients you use.
- Calories: 210
- Fat: 14g
- Carbohydrates: 21g
- Sugar: 19g
- Protein: 2g
This ice cream is a source of energy (thanks to the carbs and fats!) and, more importantly, joy. It’s not an everyday health food, but it’s a perfect, celebratory dessert made with real ingredients. For a lighter version, see the dairy-free variation above using coconut milk!
Final Scoop: You’ve Got This!
Well, my friend, there you have it—my heart and soul poured into a bowl of Creamy Peppermint Ice Cream. This recipe is more than just a list of ingredients; it’s an invitation to create your own kitchen memories, to embrace a little mess, and to treat yourself and your loved ones to something made with genuine love.
I am so incredibly proud of you for taking the time to make something from scratch. That effort is what transforms simple ingredients into something magical. I hope this ice cream brings as much laughter and happiness to your table as it has to mine over the years.
Now, I’d love to hear from you! Did you add a twist? Did your family go crazy for it? Tag me on social @emilywalker_tastychow so I can see your beautiful creations. Until next time, happy churning!
With love and a full freezer,
Emily