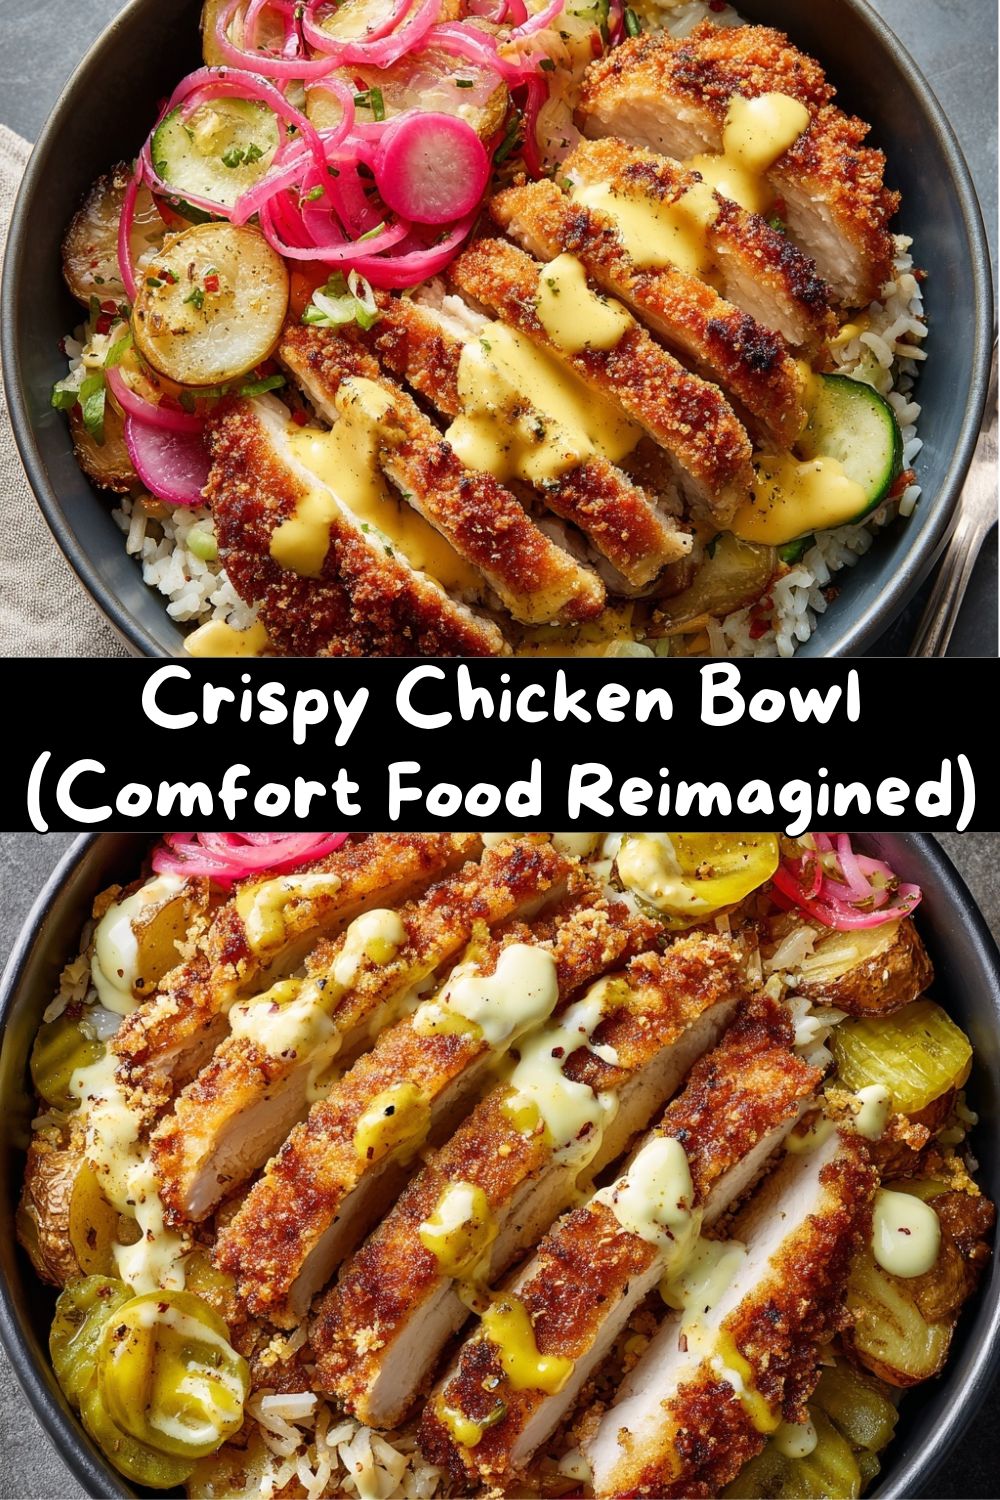
Crispy Chicken Cutlet Bowls with Honey Dijon Drizzle – Comfort Food, Reimagined
Hey friends! Chef Emily here, back with another one of those recipes that just… hits. You know the kind. The one you start thinking about at 2 PM, the one that makes your stomach do a little happy dance just imagining the first bite. We’re talking about the glorious marriage of crispy, juicy chicken, something hearty and cozy underneath, and a sauce so good you’ll want to put it on everything. But we’re not making a sandwich today. Oh no. We’re building a bowl.
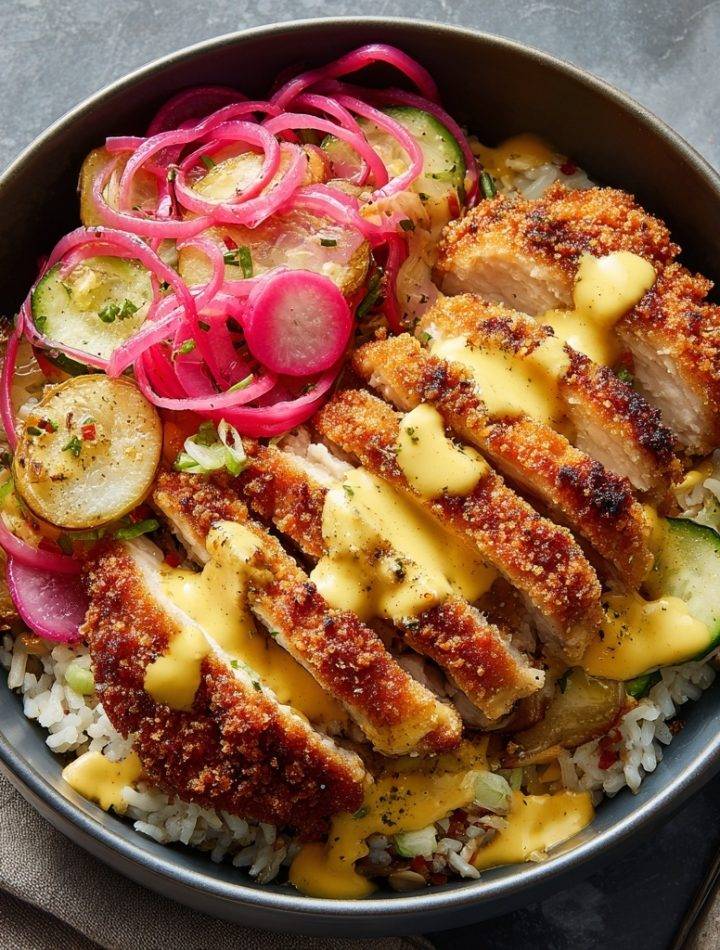
These Crispy Chicken Cutlet Bowls with Honey Dijon Drizzle are my absolute favorite way to reimagine classic comfort food. It’s got all the soul-satisfying crunch of your favorite schnitzel or chicken tender, but it’s served up in a way that feels fresh, fun, and totally customizable. Imagine: a base of fluffy rice or golden roasted potatoes, topped with a perfectly pan-fried chicken cutlet sliced into juicy strips, a bright pop of tangy pickles or quick-pickled onions, and the whole thing brought together with a creamy, sweet, and zippy honey Dijon drizzle.
This isn’t a “salad bowl.” This is a celebration-in-a-bowl. It’s for those nights when you want something truly delicious without a ton of fuss, or when you want to impress your family (or just yourself!) with something that looks and tastes like it came from a trendy restaurant. So, tie on your apron—the messy one is totally fine, that’s my uniform too—and let’s make something incredible together.
The Cutlet That Started It All
This recipe honestly takes me straight back to my grandma’s linoleum-floored kitchen. She made the world’s most legendary pan-fried chicken. It wasn’t fancy. It was chicken, flour, a hot cast iron skillet, and a whole lot of love. The sound of it sizzling was the dinner bell. We’d eat it with mashed potatoes and green beans, and I’d always, always sneak an extra piece straight from the plate she was letting rest on the stove.
But as I got older and started playing in my own kitchen, I wanted to capture that magic in a different way. One night, after a particularly successful chicken cutlet experiment, I had leftovers, some leftover rice, and a nearly-empty jar of pickles. I threw it all in a bowl, whisked up a quick sauce with what was in the fridge (mustard, honey, mayo—the holy trinity of quick fixes), and drizzled it over the top. One bite in, I texted my best friend: “Okay, I just accidentally invented the best thing ever.” It was that perfect combo of crunchy, soft, tangy, and creamy that made my taste buds sing. That “happy accident” bowl is now this recipe, and it’s a weekly staple in my house.
Gathering Your Flavor Arsenal
Here’s everything you’ll need to build these epic bowls. I’ve added my little chef-y notes and swaps so you can make it your own with what you’ve got!
For the Crispy Chicken Cutlets:
- 2 boneless, skinless chicken breasts – Look for ones that are similar in size so they cook evenly. We’re going to pound them thin, which is a fantastic stress-reliever, trust me.
- 1/2 cup all-purpose flour – This is our first layer of the breading trifecta. It helps the egg stick! Chef Tip: You can use gluten-free flour here with zero issues.
- 1 large egg, beaten – The “glue” that holds our crispy dream together. A splash of water or milk in the egg makes it easier to coat.
- 1 cup panko breadcrumbs – The SECRET to maximum, airy crunch! Japanese-style panko gives you those gorgeous, shatteringly crisp flakes. Regular breadcrumbs work, but you won’t get the same spectacular texture.
- Salt, black pepper, garlic powder – Season every single layer! I season the flour, the egg, and the panko. This builds flavor into every bite.
- High-heat oil for pan-frying – Avocado oil, vegetable oil, or light olive oil are perfect. You need about 1/4 inch in the skillet.
For the Bowls:
- 2 cups cooked rice or roasted potatoes – The cozy foundation! Jasmine or basmati rice is fluffy and fragrant. For potatoes, cubed Yukon golds tossed in oil, salt, and pepper and roasted at 425°F until golden are *chef’s kiss*.
- 1/2 cup sliced dill pickles or quick-pickled red onions – This is the essential tangy crunch that cuts through the richness. Pickles are easy, but quick-pickled onions (thinly sliced onion soaked in hot vinegar, water, sugar, and salt for 20 mins) are a game-changer.
For the Honey Dijon Drizzle:
- 2 tablespoons Dijon mustard – Provides that sharp, tangy backbone. Whole grain Dijon adds a nice texture if you have it!
- 1 tablespoon honey – The sweet balance to the Dijon. Maple syrup or agave are great vegan swaps.
- 2 tablespoons mayonnaise – Creates the creamy, dreamy, drizzle-able consistency. Greek yogurt can work in a pinch, but the sauce will be tangier and thicker.
- 1 teaspoon lemon juice or apple cider vinegar – A tiny bit of acid brightens the whole sauce. Don’t skip it!
- Salt & freshly cracked black pepper to taste
Let’s Build Some Magic: Step-by-Step
Ready for the fun part? Follow these steps and you’ll have restaurant-quality bowls on your table in no time. I’m walking you through every little hack I know!
Step 1: Prep Your Chicken & Set Up Your Breading Station
Place your chicken breasts between two pieces of plastic wrap or in a large zip-top bag. Using a rolling pin, meat mallet, or even a heavy saucepan, gently pound them to an even 1/2-inch thickness. This ensures quick, even cooking and maximum crispy surface area! Now, set up three shallow dishes (pie plates or soup plates are perfect): one with the seasoned flour, one with the beaten egg, and one with the seasoned panko. This “assembly line” is key for a clean(ish) kitchen.
Step 2: Bread Like a Boss
Take a pounded chicken breast and dredge it thoroughly in the flour, shaking off any excess. Next, dip it fully into the egg, letting the excess drip off. Finally, press it firmly into the panko crumbs, coating both sides and all edges. Really press that panko on there! Place the breaded cutlet on a clean plate and repeat with the second breast. Pro Tip: Use one hand for the dry ingredients (flour & panko) and the other for the wet (egg). This keeps you from getting “club fingers” covered in breading!
Step 3: Pan-Fry to Golden Perfection
Heat your oil in a large skillet (cast iron is my MVP here) over medium heat. You’ll know it’s ready when a single panko breadcrumb dropped in sizzles immediately. Carefully add the breaded cutlets. Don’t crowd the pan—cook in batches if needed. Fry for 3-4 minutes per side, until they’re a deep, glorious golden brown and the chicken is cooked through (internal temp of 165°F). The sizzle should be steady and happy. Transfer to a wire rack set over a paper towel—this keeps the bottom crispy instead of steaming it soft on a plate. Let them rest for 5 minutes before slicing.
Step 4: Whip Up That “Liquid Gold” Drizzle
While the chicken rests, make your sauce. It could not be easier. In a small bowl, whisk together the Dijon, honey, mayo, and lemon juice/vinegar until it’s completely smooth and creamy. Taste it! Want more tang? Add a pinch more mustard. Sweeter? A tiny bit more honey. This is your sauce, make it sing to you. Season with a pinch of salt and pepper.
Step 5: Assemble Your Masterpiece Bowls
Slice your rested chicken cutlets into beautiful, juicy strips. Now, grab your bowls! Start with a generous bed of your warm rice or roasted potatoes. Artfully (or just haphazardly—no judgment!) arrange the sliced chicken on top. Scatter over those tangy pickles or pink pickled onions. Finally, take a spoon and drizzle that gorgeous honey Dijon sauce all over everything. Don’t be shy with it.
How to Serve & Savor
Presentation is part of the fun! I love using wide, shallow bowls so you can see all the beautiful layers. For a family-style vibe, you can set out all the components (the rice/potatoes, sliced chicken, pickles, sauce) and let everyone build their own bowl. It’s interactive and guarantees happy customers.
While this bowl is a complete meal, a simple side of steamed broccoli or a light arugula salad with a lemon vinaigrette can be lovely if you want something green on the side. The most important step? Take a picture (tag me if you share it!), then grab your fork, mix it all up a little, and get ready for a symphony of textures and flavors in every single bite.
Make It Your Own: Delicious Twists
One of the best things about a bowl recipe is how flexible it is. Here are a few of my favorite spins:
- Spicy Sriracha Honey Version: Add 1-2 teaspoons of sriracha to the honey Dijon drizzle. Swap the pickles for sliced jalapeños for a real kick!
- Parmesan Herb Crust: Mix 1/4 cup of finely grated Parmesan cheese and 1 teaspoon of dried Italian herbs into the panko breadcrumbs for an extra savory, cheesy crust.
- Gluten-Free & Air Fryer Friendly: Use gluten-free panko and flour. For air frying, lightly spray the breaded cutlets with oil and air fry at 400°F for 10-12 minutes, flipping halfway, until crispy and cooked through.
- Mediterranean Twist: Use tzatziki sauce instead of the honey Dijon. Top the bowl with diced tomatoes, cucumbers, kalamata olives, and a sprinkle of feta cheese.
- Pork or Eggplant Swap: This method works brilliantly with thin pork chops or even slices of eggplant for a fantastic vegetarian option. Adjust cooking time as needed.
Chef Emily’s Kitchen Notes
This recipe has become a true workhorse in my kitchen. I’ve made it for last-minute dinners, for friends who claim they “don’t cook,” and even as a fancy-ish date night meal. The honey Dijon drizzle, in particular, has a permanent spot in my fridge—it’s incredible on salmon, as a burger sauce, or as a dip for sweet potato fries.
Funny story: I once was filming a video for this recipe and got so excited talking about the panko crunch that I accidentally knocked the whole plate of breaded chicken onto the floor. My dog, Chowder, had the best day of his life. I, however, had to start over. Moral of the story? Secure your plates, and if disaster strikes, laugh it off and pour yourself a little wine while you re-bread. It’s just food, and the making should be as joyful as the eating.
FAQs & Troubleshooting
Q: My breading keeps falling off in the pan! What am I doing wrong?
A: This usually comes down to two things: oil temperature and the dredging process. Make sure your oil is hot enough (that sizzling panko crumb test is key). If the oil is too cool, the breading will soak up oil and slide off. Also, remember to shake off the excess flour after the first dredge, and let the excess egg drip off before hitting the panko. A firm press into the panko helps it adhere.
Q: Can I make these ahead of time?
A: You can prep components! The sauce can be made 3 days ahead. The chicken can be breaded and kept in the fridge on a plate for up to 2 hours before frying (don’t leave it much longer or it might get soggy). You can also cook the chicken, let it cool, and reheat it in a 375°F oven on a wire rack for 10-15 minutes to re-crisp.
Q: Is baking the chicken an option?
A: Absolutely! For a lighter version, place the breaded cutlets on a wire rack set over a baking sheet, spray lightly with oil, and bake at 425°F for 15-20 minutes, flipping halfway, until golden and cooked through. They won’t be *quite* as crispy as pan-fried, but still delicious.
Q: My sauce is too thick/thin. How can I fix it?
A: Too thick? Whisk in a teaspoon of water or lemon juice at a time until it’s drizzle-able. Too thin? Add a bit more mayo or Dijon to thicken it up. The consistency is totally up to you!