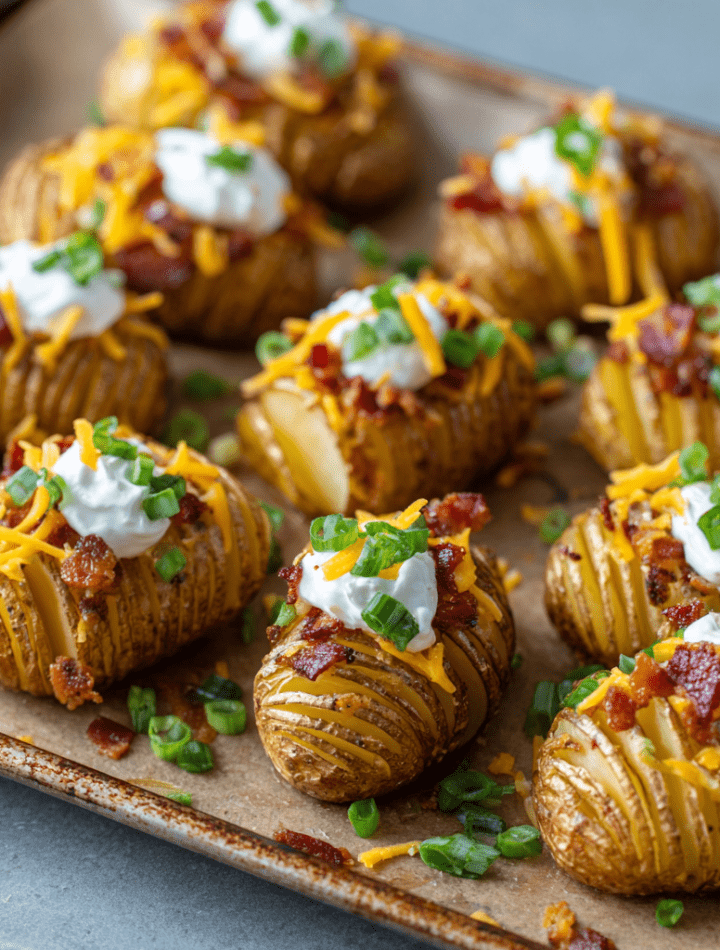
The Tiny Potato That Steals the Party: Crispy Loaded Hasselback Potato Bites
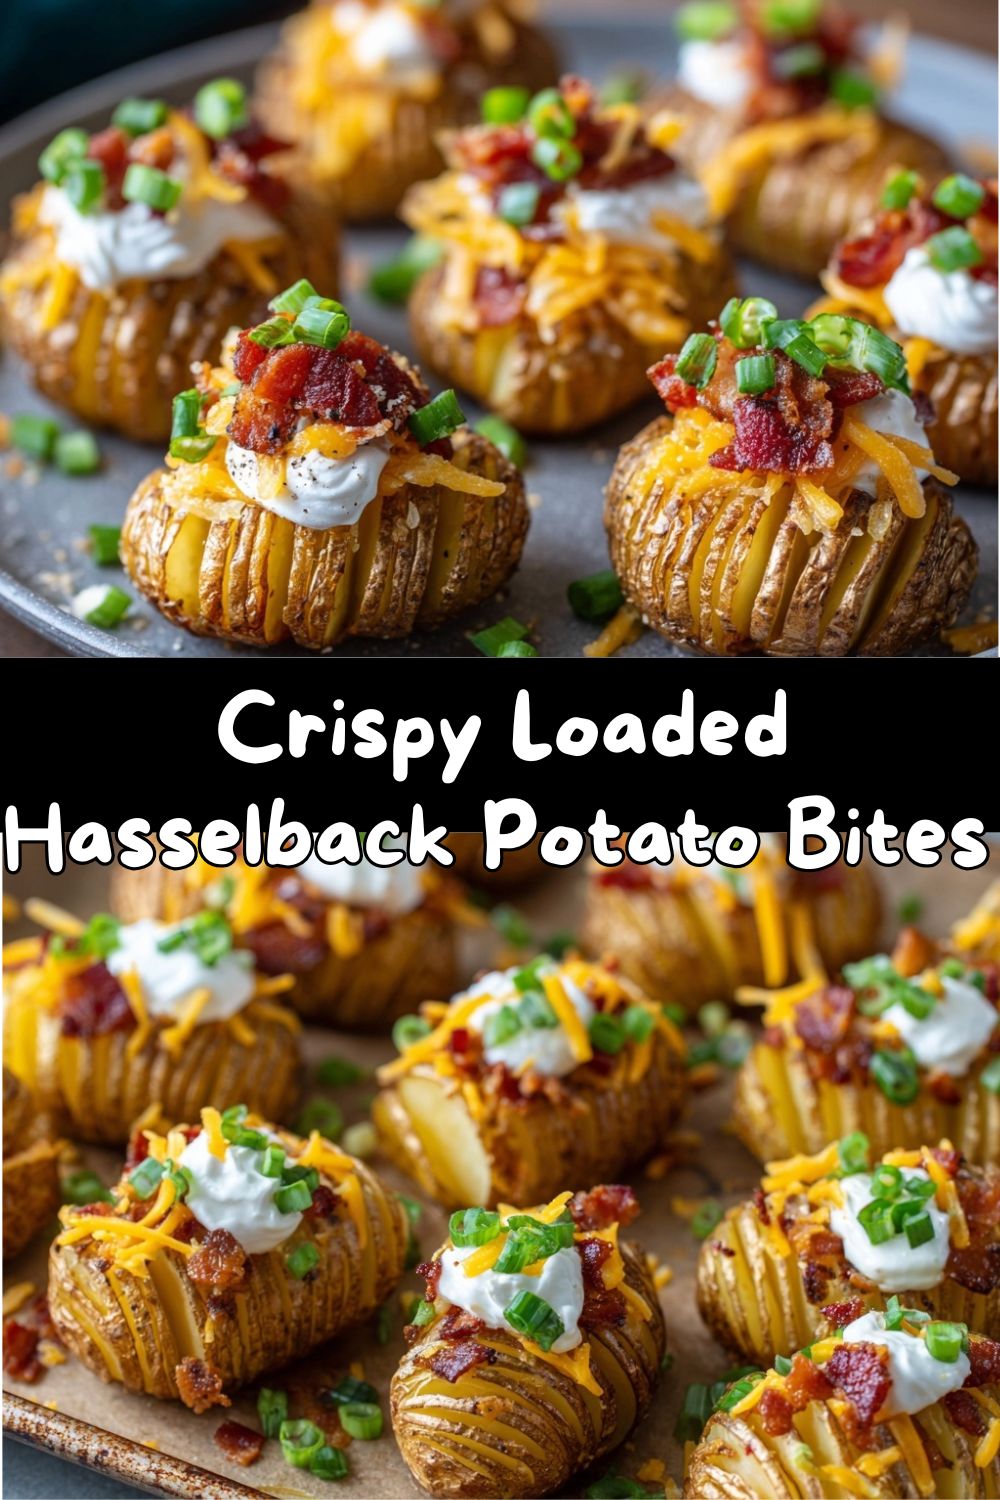
Hey there, friend! Pull up a chair and imagine this: a platter lands on the table, steam rising gently. On it are dozens of tiny, golden potatoes, each one fanned out like a little accordion, crispy edges glistening. Between those crispy layers, you spot gooey, melted cheddar cheese and crunchy bits of bacon. A final confetti of green onions and a cool dollop of sour cream crown each perfect, bite-sized masterpiece. The first bite? A symphony of textures—the shattering crisp shell, the soft, fluffy interior, the salty-savory-cheesy burst. That, my fellow food lover, is the magic of Crispy Loaded Hasselback Potato Bites.
If you’ve ever looked at a classic loaded baked potato and thought, “I love you, but you’re a commitment,” these bites are your answer. They’re the fun-sized, party-ready, no-fork-required version of that comfort food icon. I created this recipe for those moments when you want to serve something that looks like you fussed for hours, but secretly comes together with clever, simple tricks. They’re perfect for game day gatherings, holiday appetizer spreads, or even just a fancy-ish Friday night movie snack. Today, I’m going to walk you through every step, share all my favorite kitchen hacks, and help you make a batch that will have everyone asking, “How did you DO that?” Let’s turn those humble baby potatoes into the star of the show!
My Grandma’s Wooden Spoon & The Hasselback “Aha!” Moment
My love affair with the Hasselback technique didn’t start in culinary school. It started with a memory—and a mild kitchen disaster. Years ago, I was attempting the classic Swedish Hasselback potato for a dinner party. I was so focused on not slicing all the way through that I turned a large potato into something resembling a spiny sea creature. My grandma, watching from the kitchen table where she was shelling peas, just chuckled. “Honey,” she said, waving her trusty wooden spoon, “you’re thinking too big. Good things come in small packages.”
That spoon-thought wiggled its way into my brain and stayed there. Fast forward to my first big football Sunday hosting duty at my tiny apartment. I wanted to serve something shareable, delicious, and less messy than wings. I remembered the Hasselback idea and looked at a bowl of baby potatoes. Click. That was the “aha!” moment. By scaling it down, I wasn’t just making a smaller potato; I was creating a perfect, one-bite vessel for all my favorite loaded potato toppings. The first test batch disappeared in 90 seconds flat, and I knew we had a winner. It was a nod to that fancy technique, mixed with the down-home, share-from-the-platter spirit of my grandma’s kitchen. Every time I make them, I think of her simple wisdom: don’t overcomplicate it, and make it with love.
Gathering Your Flavor Squad: Ingredients & Why They Work
Here’s what you’ll need to make these irresistible bites. I’ve added my chef notes next to each one—why it’s there and how you can swap it if needed!
- 1½ lbs baby potatoes (Yukon Gold or red): These are the canvas! Yukon Golds have a buttery, creamy interior that’s dreamy, while red potatoes hold their shape beautifully and have a slightly firmer bite. Pick ones that are similar in size (about 1-1.5 inches in diameter) for even cooking. Chef’s Insight: No need to peel! The skin adds great texture and nutrients.
- 2 tbsp olive oil or melted butter: This is our crisp-maker and flavor carrier. Olive oil gives a lovely herbaceous note and high-heat tolerance. Melted butter? Pure, decadent richness. I often use a mix! Sub Tip: Avocado oil or even bacon fat (yes, please!) are fantastic alternatives.
- Salt & pepper to taste: The dynamic duo. Season generously! The salt will penetrate the slices, seasoning the potato from the inside out.
- ½ tsp garlic powder: We use powder here instead of fresh because it distributes evenly and won’t burn in the hot oven, giving a consistent garlicky warmth throughout.
- 1 cup shredded cheddar cheese: The melty glue that holds it all together. I prefer to shred a block of sharp cheddar myself—it melts smoother and tastes better than pre-shredded (which has anti-caking agents). Fun Twist: Try pepper jack for a kick, or Gruyère for a nutty, sophisticated flavor.
- 4 slices bacon, cooked & crumbled: Our salty, smoky, crispy powerhouse. Baking your bacon on a sheet pan in the oven while the potatoes cook is the ultimate multitasking move. For Vegetarians: Smoked almonds or crispy chickpeas make a fabulous crunchy, savory swap.
- ¼ cup sour cream: The cool, tangy counterpart to all the rich, savory elements. It balances everything beautifully. Sub Tip: Plain Greek yogurt or a drizzle of creamy ranch work great too.
- 2 green onions, finely sliced: This isn’t just garnish, it’s a necessary pop of fresh, oniony flavor and vibrant color. Don’t skip it!
Let’s Get Cooking: Your Step-by-Step Roadmap to Perfection
Ready to make some magic? Follow these steps, and you’ll be a Hasselback hero in no time. I’ve packed each one with my best tips to ensure success.
- Preheat & Prep: Fire up your oven to 425°F (220°C). This high heat is crucial for getting those edges outrageously crispy. Line a baking sheet with parchment paper—not just for easy cleanup, but to prevent any sneaky cheese from fusing to your pan. Chef’s Hack: If you have a wire rack that fits on your baking sheet, use it! Elevating the potatoes helps air circulate for maximum crispiness on all sides.
- The Signature Slice (No Stress!): Wash and dry your potatoes thoroughly. Now, the fun part: slicing. Place a potato on a cutting board. Place two chopsticks or the handles of two wooden spoons on either side of it, running parallel. Using a sharp knife, slice down until the knife hits the chopsticks. This prevents you from cutting all the way through and creates that perfect fan effect. Repeat slices every 1/8 to 1/4 inch along the potato. My Tip: Don’t aim for paper-thin slices. A little thickness gives you that perfect soft interior. Repeat with all potatoes.
- Season & Oil Up: In a large bowl, toss the sliced potatoes with olive oil or melted butter, making sure you get some in between those slices. Don’t be shy! Sprinkle generously with salt, pepper, and the garlic powder. Toss again until they’re all evenly coated and gleaming.
- First Bake for Crisp: Arrange the potatoes cut-side up on your prepared sheet, giving them a little room to breathe. Roast for 25-30 minutes. You’ll know they’re ready when the tops are golden brown and crispy, and the insides are tender when pierced with a fork. Watch for the Splay: As they bake, the slices will naturally fan open—that’s exactly what you want!
- The Loaded Toppings: Carefully remove the pan from the oven (those edges are hot!). Evenly sprinkle the shredded cheese and crumbled bacon over the top of each potato, aiming to get some into the crevices. The residual heat will start melting the cheese immediately.
- Second Bake for Melt: Return the pan to the oven for 5-7 minutes, just until the cheese is fully melted, bubbly, and maybe even a little golden in spots. Your kitchen will smell like heaven.
- The Final Flourish: Let the bites cool for just 5 minutes—this helps the cheese set slightly so it doesn’t all slide off. Then, using a small spoon, add a tiny dollop of sour cream to each bite and shower them with the sliced green onions. Serve immediately while they’re warm and fabulous!
How to Serve These Bite-Sized Beauties
Presentation is part of the fun! I love using a large wooden board or a vibrant platter. Scatter the potato bites across it, maybe with a small bowl of extra sour cream or ranch for dipping in the center. Tuck in a few extra green onion stalks or fresh herbs like chives or parsley around the edges for a pop of color.
These are the ultimate hands-on, communal food. Stick a cocktail pick or a small fork in each one for easy grabbing, or just let people dive in with their hands (napkins recommended!). They pair perfectly with a cold beer, a crisp white wine, or a zesty margarita. For a full spread, serve them alongside other finger foods like buffalo cauliflower bites, a fresh veggie crudité, or a simple, crunchy salad to balance the richness.
Make It Your Own: 5 Delicious Twists on the Classic
The basic recipe is a winner, but the fun doesn’t stop there! Here are a few of my favorite ways to mix things up:
- Everything Bagel Style: Swap the cheddar for a mix of cream cheese and mozzarella. After the cheesy bake, top with a sprinkle of everything bagel seasoning and fresh dill. Incredible for brunch!
- Southwestern Fiesta: Use a Monterey Jack or Tex-Mex blend cheese. Top with crumbled chorizo (instead of bacon), a dollop of guacamole or salsa, and a squeeze of lime. Cilantro is a must here!
- Buffalo Blue Cheese: After the first bake, toss the potatoes in a light coating of buffalo sauce. Proceed with cheese (blue cheese crumbles are amazing here!), then top with a drizzle of ranch and very finely chopped celery.
- Greek-Inspired: Skip the bacon. Use a feta and mozzarella cheese mix. After baking, top with a dollop of tzatziki, chopped Kalamata olives, and fresh oregano.
- Fully Loaded Vegan: Use vegan butter or oil. Skip the bacon and cheese, and after baking, fill the crevices with a vegan cashew queso or a sprinkle of nutritional yeast. Top with vegan sour cream, chives, and vegan bacon bits.
Chef Emily’s Kitchen Confidential
This recipe has evolved from that first “aha!” batch. I’ve learned that slightly larger baby potatoes (closer to 1.5 inches) are actually easier to slice Hasselback-style. I also used to be timid with the oil, but I learned that a generous coating is the key to the crispiest, most flavorful results—don’t worry, most of it stays on the pan!
A funny story: I once tried to speed up the slicing process by using a mandoline. Let’s just say it was a very brief experiment that resulted in one oddly waffled potato and a renewed respect for my chef’s knife and the humble chopstick guard-rail method. Some shortcuts are worth it; others are best left untried. The chopstick trick is your foolproof friend. Remember, cooking is about joy, not perfection. If a slice goes all the way through, just smoosh it back together—it will still taste amazing!
FAQs & Quick Fixes for Hasselback Happiness
Q: My potatoes aren’t fanning open! What did I do wrong?
A: No panic! This usually means your slices weren’t quite deep enough, or the potatoes needed a bit more time in the oven. Next time, make sure your knife hits the chopsticks squarely. For this batch, you can gently coax the slices apart with the tip of your knife after the first bake, before adding cheese. They’ll still be delicious.
Q: Can I make these ahead of time?
A> You can absolutely do the prep ahead! Slice and oil the potatoes, then keep them covered in the fridge for up to 6 hours before baking. You can also fully bake them (through step 4), let them cool, and store them in the fridge for a day. Re-crisp in a 400°F oven for 5-10 minutes before adding cheese and finishing.
Q: My cheese is sliding off. Help!
A> This happens if the cheese is added to potatoes that are too oily or if you don’t let them rest after the final bake. Make sure to let the cheesy bites sit for 5 minutes on the pan—the cheese will set slightly and cling beautifully.
Q: Are there other potato types I can use?
A> Baby potatoes are ideal for bite-sized portions. If you can only find larger small potatoes, just cut them in half through the equator and place them cut-side down to slice. You’ll get half-sphere bites that work just as well!
Nutritional Info (Because We’re Curious!)
While these are definitely a treat, it’s nice to know what’s in your food! Here’s a general breakdown per serving (about 2 potato bites):
- Calories: ~160
- Protein: 5g (Thank you, cheese and bacon!)
- Carbohydrates: 12g (Complex carbs from the potato for energy)
- Fat: 10g (A mix from the oil, cheese, and bacon—this is where the flavor lives!)
Remember, these are approximations and can vary based on your specific ingredients and toppings. To lighten it up slightly, you can use a reduced-fat cheese, increase the veggie toppings, or use a leaner protein like turkey bacon. But as a chef who believes in balance, I say enjoy them as part of a fun gathering or a special snack!
Your New Go-To Party Trick
And there you have it! Your complete guide to creating the most addictive, crispy, loaded potato bites that will have your friends and family begging for the recipe. They’re proof that big flavor doesn’t require complicated techniques or a million ingredients—just a little know-how and a whole lot of love.
I hope you have as much fun making these as I do. The best part about food is sharing it, so whip up a batch, gather your favorite people, and watch them disappear. Remember, the messier the fingers and the bigger the smiles, the bigger the success. Now, go forth and make something delicious! Don’t forget to tag me @TastyChow if you share your creations—I love seeing your kitchen wins.
Until next time, keep that oven warm and your apron messier,
Emily 🧡