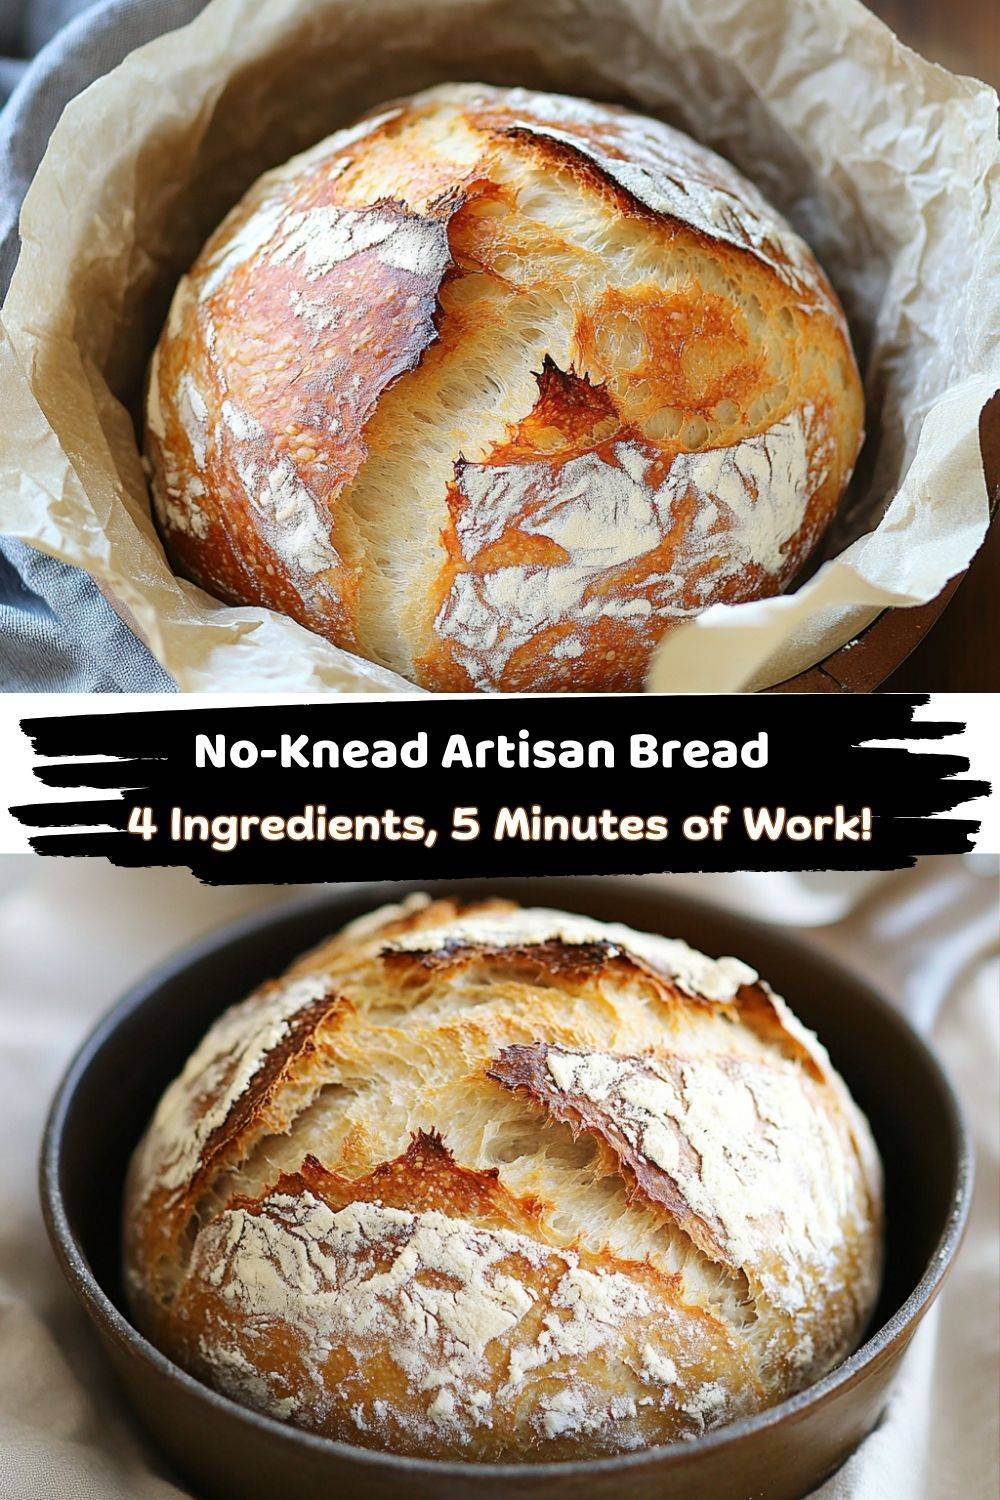
Easiest Yeast Bread – Artisan, No Knead (That’ll Make You Feel Like a Baking Rockstar!)
Hey, fellow flavor adventurers! Emily here, apron slightly dusted with flour, coming to you live from my happy kitchen corner. Ever had one of those days where you just crave the smell of warm, crusty bread filling your home? That deep, yeasty perfume promising golden crust and a chewy, tender crumb? I get it. Totally. But maybe you’ve hesitated, thinking, “Bread? That’s complicated. Kneading? Proofing? Sourdough starters that need names?”
What if I told you the most soul-satisfying, bakery-worthy, crackly-crusted artisan loaf you’ve ever made requires zero kneading, just 4 simple ingredients, and about 5 minutes of hands-on time? Seriously! This isn’t magic (though it feels like it!), it’s science and simplicity working together. This no-knead bread recipe is the one that cracked the code for me. It’s the loaf that had me dancing around my kitchen, waving a tea towel like a victory flag, shouting “I MADE BREAD!” to my very confused cat. It’s rustic, forgiving, and delivers that incredible artisan look and taste without any fancy equipment or stress. Whether you’re a seasoned cook or someone who thinks “baking” means slicing store-bought cookie dough, this recipe is your golden ticket to bread-baking glory. Grab your biggest bowl and let’s unlock the magic of truly easy, spectacular homemade bread together. Your future self (and your kitchen, smelling like a Parisian boulangerie) will thank you!
My “Holy Crust!” Moment
Picture this: It was a drizzly Sunday years ago, early in my culinary school days. I was buzzing with fancy techniques but honestly felt a bit intimidated by “real” bread. My grandma’s cinnamon rolls? Sure! But a free-form, crusty loaf? That felt like wizardry. I stumbled upon this no-knead method, skeptical but desperate for a win. I remember mixing the shaggy dough – it looked messy, nothing like the smooth balls in textbooks. “Well, that’s ruined,” I sighed, covering it with a slightly doubtful tea towel.
Three hours later? Pure alchemy. The bowl was practically humming with life, the dough billowy and dotted with bubbles like a happy sponge. The scent! Warm, yeasty, promising. The real shock came when I lifted the lid off my grandma’s old, battered Dutch oven after baking. There it was: a loaf so stunningly golden, crust crackling audibly as it cooled, it looked like it teleported straight from a Tuscan farmhouse. That first slice, still warm, slathered with melting butter… the crunch giving way to a tender, slightly chewy interior. It wasn’t just bread; it was a revelation. I felt like I’d discovered a secret superpower. That messy little dough ball didn’t just make a loaf; it made me a believer in the magic of simple ingredients and patience. It’s the recipe I gift to every nervous new baker friend. If it can work for a doubting culinary student on a grey Sunday, it can work for anyone.
Print
Easiest Yeast Bread – Artisan, No Knead
- Total Time: 3–4 hrs
- Yield: 10 slices 1x
Description
This is the kind of bread that made me feel like a baker, even when I didn’t know what I was doing. It’s rustic, golden, and gloriously crusty—without the kneading! I first baked it on a quiet Sunday and couldn’t believe how simple it was. Just mix, wait, and bake—it’s that magical.
Ingredients
3 cups (450g) all-purpose or bread flour
2 tsp instant or rapid-rise yeast
2 tsp kosher or cooking salt (not table salt)
1½ cups (375 ml) very warm tap water (up to 130°F / 55°C)
For shaping:
1½ tbsp flour, for dusting
Instructions
In a large bowl, mix flour, yeast, and salt. Pour in warm water and stir until combined.
Cover bowl with plastic wrap or a towel. Let dough rise at room temperature for 2–3 hours, until doubled and bubbly.
Sprinkle flour on a surface. Gently turn out dough and shape into a round.
Place on parchment, cover with a towel, and let rest while oven preheats.
Preheat oven to 450°F (230°C). Place a Dutch oven with lid inside to heat.
Carefully place dough (with parchment) into hot Dutch oven. Cover and bake 30 minutes.
Remove lid and bake 10–15 minutes more until crust is deep golden.
Cool slightly before slicing.
Notes
Warm, crusty, and deeply satisfying—this is the kind of bread that wins hearts straight from the oven.
- Prep Time: 5 minutes
- Rest Time: 2–3 hrs
- Cook Time: 45 mins
Nutrition
- Calories: 150 per slice
- Fat: 0g
- Carbohydrates: 30g per slice
- Protein: 4g per slice
Your Bread-Baking Toolkit: Just 4 Stars & One Trusty Pot
- 3 cups (450g) All-Purpose or Bread Flour: The foundation! All-purpose flour works beautifully and is what most of us have. For a slightly chewier crumb and higher rise, bread flour is my secret weapon (its extra protein is magic). Chef Insight: Fluff your flour in the bag before scooping, then level off the cup – no packing! This ensures accuracy.
- 2 tsp Instant or Rapid-Rise Yeast: Our tiny, mighty leavening hero! Instant yeast is the MVP here – just mix it right in with the dry stuff, no proofing needed. Substitution Tip: If you only have active dry yeast, use the same amount but whisk it into the warm water first and let it sit for 5-10 minutes until foamy before adding to the flour. Easy swap!
- 2 tsp Kosher Salt or Cooking Salt: Flavor booster and crust enhancer! Kosher salt or coarse cooking salt dissolves evenly and tastes cleaner. Vital Note: Avoid super-fine table salt – it’s denser and can make the bread taste too salty. If it’s all you have, use only 1.5 tsp.
- 1½ cups (375 ml) Very Warm Tap Water (up to 130°F / 55°C): The catalyst! Warmth wakes up the yeast. Aim for bathwater warmth – comfortably hot to the touch but not scalding (over 140°F can kill yeast). A quick 10-second zap in the microwave from cold tap usually gets it perfect. Chef Hack: No thermometer? Stick your (clean!) finger in. It should feel warm, not “ouch!” hot.
- For Shaping: 1½ tbsp Flour, for dusting: Just a little insurance to prevent sticky situations when you shape your masterpiece. All-purpose is fine here.
The Essential Tool: A Dutch oven with a tight-fitting lid (cast iron or enameled cast iron, around 5-7 quarts). This creates the steamy environment crucial for that incredible crust. No Dutch oven? See the FAQ section for clever workarounds!
Baking Magic: Your Foolproof Steps to Glory
- Mix it Up, Buttercup! Grab your largest bowl (dough rises a LOT!). Whisk together the flour, instant yeast, and salt. Pour in that lovely warm water. Stir with a sturdy wooden spoon or even just a fork until everything is combined and there are no dry flour patches. The dough will look shaggy, rough, and sticky – PERFECT! This isn’t smooth pizza dough territory. Chef Hack: Scrape down the sides of the bowl with a rubber spatula to get every bit of flour incorporated. Embrace the mess!
- Let it Rise & Shine (aka The Nap Phase): Cover the bowl tightly with plastic wrap, a damp kitchen towel, or even a reusable silicone lid. No peeking! Let it sit right on your countertop at room temperature for 2-3 hours. The dough is ready when it’s doubled in size, looks bubbly and puffy, and maybe even slightly domed. Time is flexible! A cooler room might take closer to 3-3.5 hours, a warmer spot might be done in 2. Trust the look, not just the clock. Chef Insight: This long, slow rise at room temp develops amazing flavor – no fancy “cold ferment” needed!
- Shape with Confidence (It’s Forgiving!): Sprinkle your clean countertop or a large cutting board generously with about half of that reserved flour. Gently scrape the risen dough out onto the floured surface. It will be loose and airy – handle it like a delicate cloud! Sprinkle the top lightly with a little more flour. Using floured hands or a bench scraper, gently fold the edges of the dough towards the center, turning the dough as you go, about 4-6 times. This builds a bit of surface tension. Flip it over so the smooth(ish) side is up. Chef Tip: Don’t knead or punch it down! Just gentle folds. It doesn’t need to be a perfect ball – rustic is beautiful! Let it rest uncovered while the oven heats (next step). This 20-30 minute rest helps it relax.
- Preheat Like a Pro (Pot Included!): Place your Dutch oven (with its lid ON) right onto the middle rack of your oven. Crank the heat up to 450°F (230°C). Let it preheat for a full 30 minutes. This is CRUCIAL for getting that explosive “oven spring” (the initial big rise) and a killer crust. Chef Hack: Use this time to tidy up or sip your beverage of choice. Your dough is happily resting!
- The Grand Entrance (Carefully!): Carefully remove the scorching hot Dutch oven from the oven using thick oven mitts. Take the lid off and set it aside nearby. Lift your rested dough ball gently (it might have spread a bit – that’s fine!) and carefully lower it, smooth side up, into the screaming hot pot. Chef Safety Note: Use the parchment paper! Place the dough (on the parchment it was resting on) directly into the pot. The parchment acts as a sling, making removal MUCH easier and safer. If your dough wasn’t on parchment, just carefully plop it in.
- Bake Under Cover (Steam Power!): Immediately put the hot lid back on the Dutch oven. This traps the steam released from the dough, creating the humid environment essential for that glossy, crackly crust and allowing the bread to rise fully before the crust sets. Slide it back into the oven. Bake covered for 30 minutes. Resist the urge to peek!
- Uncover & Go for Gold: After 30 minutes, carefully remove the Dutch oven from the oven (mitts again!), take off the lid (behold the risen beauty!), and marvel at your creation! It will be pale but puffed. Slide the pot back in, uncovered, for another 10-15 minutes. Now, we develop that deep, golden-brown, irresistible crust. Bake until it’s a glorious deep golden brown and sounds hollow when tapped on the bottom. Chef Tip: If it’s browning too fast on top but still pale underneath, you can reduce the heat slightly to 425°F for the uncovered bake.
- The Hardest Part: Waiting! Using the parchment paper sling or sturdy tongs, carefully lift the bread out of the Dutch oven and place it directly onto a wire rack. LET IT COOL COMPLETELY (at least 1 hour, ideally 2) before slicing. I know, I know! The aroma is torture. But slicing too soon traps steam, making the crumb gummy. Trust me, it’s worth the wait for perfect texture. Chef Confession: I sometimes “accidentally” tear off a tiny corner piece while it’s cooling… purely for quality control, of course!
Showtime! Serving Your Masterpiece
This bread is the star of the show! Let it shine. Place the cooled (or mostly cooled!) loaf on a beautiful wooden board. Slice it thickly with a serrated bread knife – you’ll hear that crust sing! My absolute favorite way? Thick slices, still slightly warm, slathered with good salted butter that melts into the nooks and crannies. Pure heaven. It’s the ultimate companion to steaming bowls of soup or stew – dunking is mandatory! Build epic sandwiches with your favorite fillings – the sturdy crust holds up beautifully. For brunch, toast slices and top with avocado, ricotta & honey, or jam. It also makes incredible croutons or breadcrumbs if you have leftovers (unlikely!). The key is simplicity – let the incredible flavor and texture speak for itself.
Get Creative! Flavor Adventures Await
Once you’ve mastered the basic beauty, the world is your oyster (or olive, or cheese wheel)! Here are some easy, delicious twists:
- Rosemary & Sea Salt: Add 1-2 tbsp finely chopped fresh rosemary and 1/2 tsp coarse flaky sea salt to the dry ingredients. Heavenly aroma!
- Cheesy Garlic Pull-Apart: After the first rise, gently deflate dough. Roll out into a rough rectangle. Brush with olive oil mixed with 2 minced garlic cloves. Sprinkle generously with 1 cup shredded sharp cheddar or Gruyère. Roll up jelly-roll style, slice into 8 pieces, place pieces cut-side up in a greased loaf pan. Let rise 30 mins, bake at 375°F for 35-45 mins.
- Whole Wheat Honey: Substitute 1 cup of all-purpose flour with whole wheat flour. Add 1-2 tbsp honey to the warm water. Heartier flavor, touch of sweetness.
- Olive & Herb: Fold in 1/2 cup chopped pitted Kalamata olives and 1 tbsp dried Italian herbs (or 2 tbsp fresh) during the final shaping stage. Salty, savory perfection.
- Seeded Crust: After shaping the loaf (step 3) and before the final rest, brush the top lightly with water or milk and generously sprinkle with your favorite seeds—think sesame, poppy, sunflower, flax, or everything bagel mix. Press gently so they stick. This adds gorgeous texture and visual flair.
FAQs: Your Bread-Baking Questions—Answered Like a Pro
Q: Do I really need a Dutch oven?
A: It’s ideal, yes! The lid traps steam, giving you that crackly artisan crust. BUT—if you don’t have one, don’t sweat it. Use a heavy oven-safe pot (with or without a lid), or create steam by placing a metal baking dish filled with 1 cup of hot water on the lower oven rack while the bread bakes on a sheet pan. Pro tip: Preheat your baking sheet too for best rise!
Q: Can I let it rise overnight?
A: Absolutely! For even more flavor, cover the dough and let it rise in the fridge for 8–18 hours. It’ll rise slowly and develop deeper complexity. Just bring it to room temp for 30–60 mins before shaping.
Q: My dough didn’t rise much—what happened?
A: A few culprits: old yeast (check expiration!), water too hot (over 140°F = yeast murder), or a cold kitchen. If your room is chilly, place the dough near a warm appliance, in an oven with the light on, or wrap the bowl in a warm towel.
Q: How do I store this beauty?
A: Store at room temp, cut side down on a cutting board or wrapped loosely in a towel. Avoid sealing in plastic—it softens the crust. Best enjoyed within 2–3 days. For longer storage, freeze sliced in a zip bag. Toast straight from the freezer!
Q: My bread is gummy inside—why??
A: Most likely, it was sliced too soon! Let it cool fully to let the crumb set. Other possible reasons: not baking long enough (always check that hollow tap sound!) or using too much water.
Q: Can I double the recipe?
A: Yes, but it’s best to bake as two loaves for even cooking. Use two Dutch ovens or bake one after the other. Just divide the dough after the first rise and shape as usual.
Final Thoughts: Flour-Dusted Confidence Starts Here
There’s a special kind of joy that comes from baking your own bread—the proud crackle as you slice into it, the golden crust shards that scatter like confetti, the realization that you did that. And not just any bread… bakery-level, hand-torn, butter-melting artisan magic made from flour, water, salt, and yeast. No machines. No kneading. Just you and the alchemy of time.
If this is your first loaf—welcome to the bread tribe. If it’s your fiftieth, I bet this recipe still makes you smile. That’s the thing about baking: every loaf feels like a little miracle.
So preheat that oven, flour that counter, and remember—there’s nothing more satisfying than saying, “I made this.”