The Easter Cookie Cake That Will Steal Your Heart (and the Spotlight!)
Hey, friends! Emily here, from my flour-dusted kitchen to yours. Is there anything better than the smell of something sweet baking in the oven? Especially when that something is a giant, shareable, sprinkle-flecked cookie the size of your favorite plate. I’m talking about our star of the show today: the Ultimate Easter Cookie Cake.
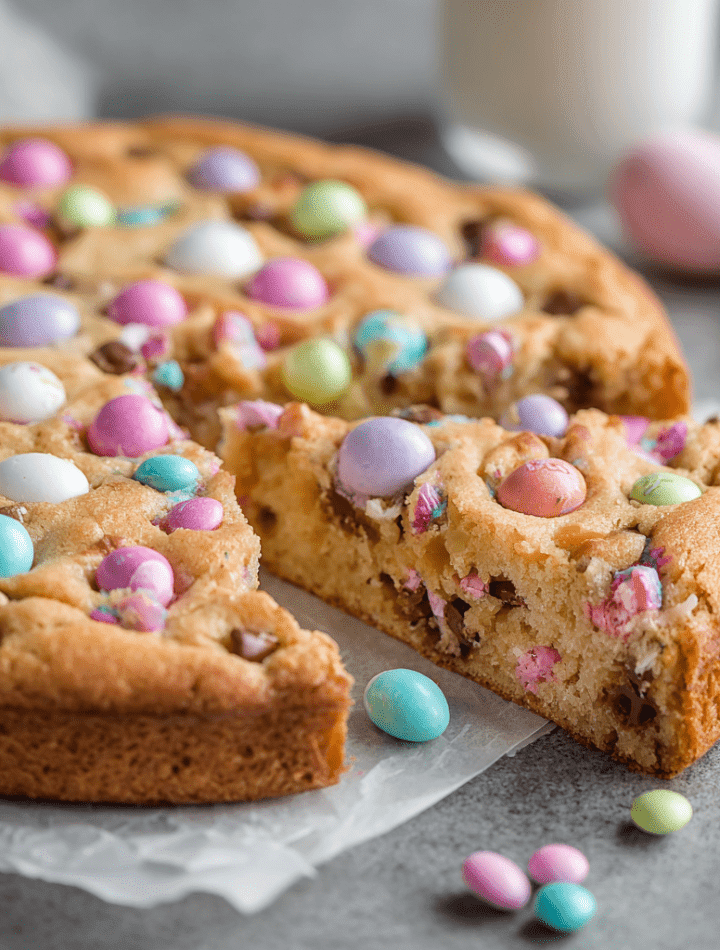
This isn’t just a cookie; it’s a mood. It’s a celebration on a platter. Imagine all the best parts of a chewy, buttery chocolate chip cookie—the golden edges, the soft center that melts in your mouth—but baked into one glorious, festive round and loaded with cheerful pastel candies. It’s the dessert that sits proudly in the middle of your Easter table, begging for a knife and a crowd. It’s what you bring to the potluck when you want to hear a chorus of “oohs” and “aahs.” And the best part? It’s shockingly easy. We’re talking minimal dishes, straightforward steps, and maximum wow factor. So, tie on your favorite apron (the cute one with the stains, we don’t judge here), and let’s make a memory that’s as delicious as it is beautiful.
A Sweet Slice of Memory
This cookie cake always takes me right back to my grandma’s linoleum-floored kitchen. She wasn’t a fancy baker, but she was a master of joy. Every Easter, alongside the obligatory (and let’s be honest, sometimes dry) lamb cake, she’d whip up a giant “cookie pie.” Hers was studded with the rainbow-colored sprinkles from the big jar in the pantry. My brother and I would sit at the counter, legs swinging, watching her press the dough into her old, warped pie tin with her gentle, floury hands. The waiting for it to cool felt like an eternity. That first warm, gooey slice, eaten with our fingers because the forks hadn’t made it out yet, tasted like pure, unadulterated happiness. It wasn’t about perfection; it was about the shared moment, the sweetness, the love pressed right into the dough. That’s the spirit I want you to channel today. Don’t stress over perfect candy placement. Embrace the mess, the laughter, and the incredible smell filling your home. This recipe is your new tradition in the making.
Gathering Your Cookie Cake Crew (Ingredients & Insights)
Here’s what you’ll need to summon this circle of deliciousness. I’ve added my little chef-y thoughts next to each one because knowing the “why” makes you a more confident cook!
- 1/2 cup (1 stick) unsalted butter, softened: This is the heart of the flavor. Unsalted lets you control the salt level. Chef’s Tip: “Softened” means when you press it, your finger leaves a clear indent. Too melted? Your cookie cake might be greasy. Too cold? It won’t cream properly. If you forgot to take it out, try cutting it into chunks and letting it sit for 15-20 minutes.
- 1/2 cup brown sugar: Hello, moisture and chew! The molasses in brown sugar is our secret weapon for that soft, tender center.
- 1/4 cup granulated sugar: The sidekick that helps create those perfect, slightly crisp edges. This dynamic sugar duo is non-negotiable for perfect texture.
- 1 large egg: Our binder and structure-builder. Make sure it’s at room temp to play nicely with the butter. A quick soak in warm water for 5 minutes does the trick!
- 1 teaspoon pure vanilla extract: The flavor enhancer. It rounds out all the sweetness. If you have vanilla bean paste, a half-teaspoon would be gorgeous here.
- 1 1/4 cups all-purpose flour: The foundation. For a slightly more tender crumb, you can replace 2 tablespoons with cornstarch (this is my sneaky hack!).
- 1/2 teaspoon baking soda: Our leavening agent. It helps the cake puff up and gives it lift. Check the date on your box—old baking soda is a sad leavener.
- 1/4 teaspoon salt: The flavor superhero! Salt makes the sweet flavors pop and balances everything beautifully. Don’t skip it.
- 1/2 cup mini chocolate chips: I prefer minis because they distribute chocolate in every single bite without sinking. Semi-sweet is my go-to, but milk or dark work too.
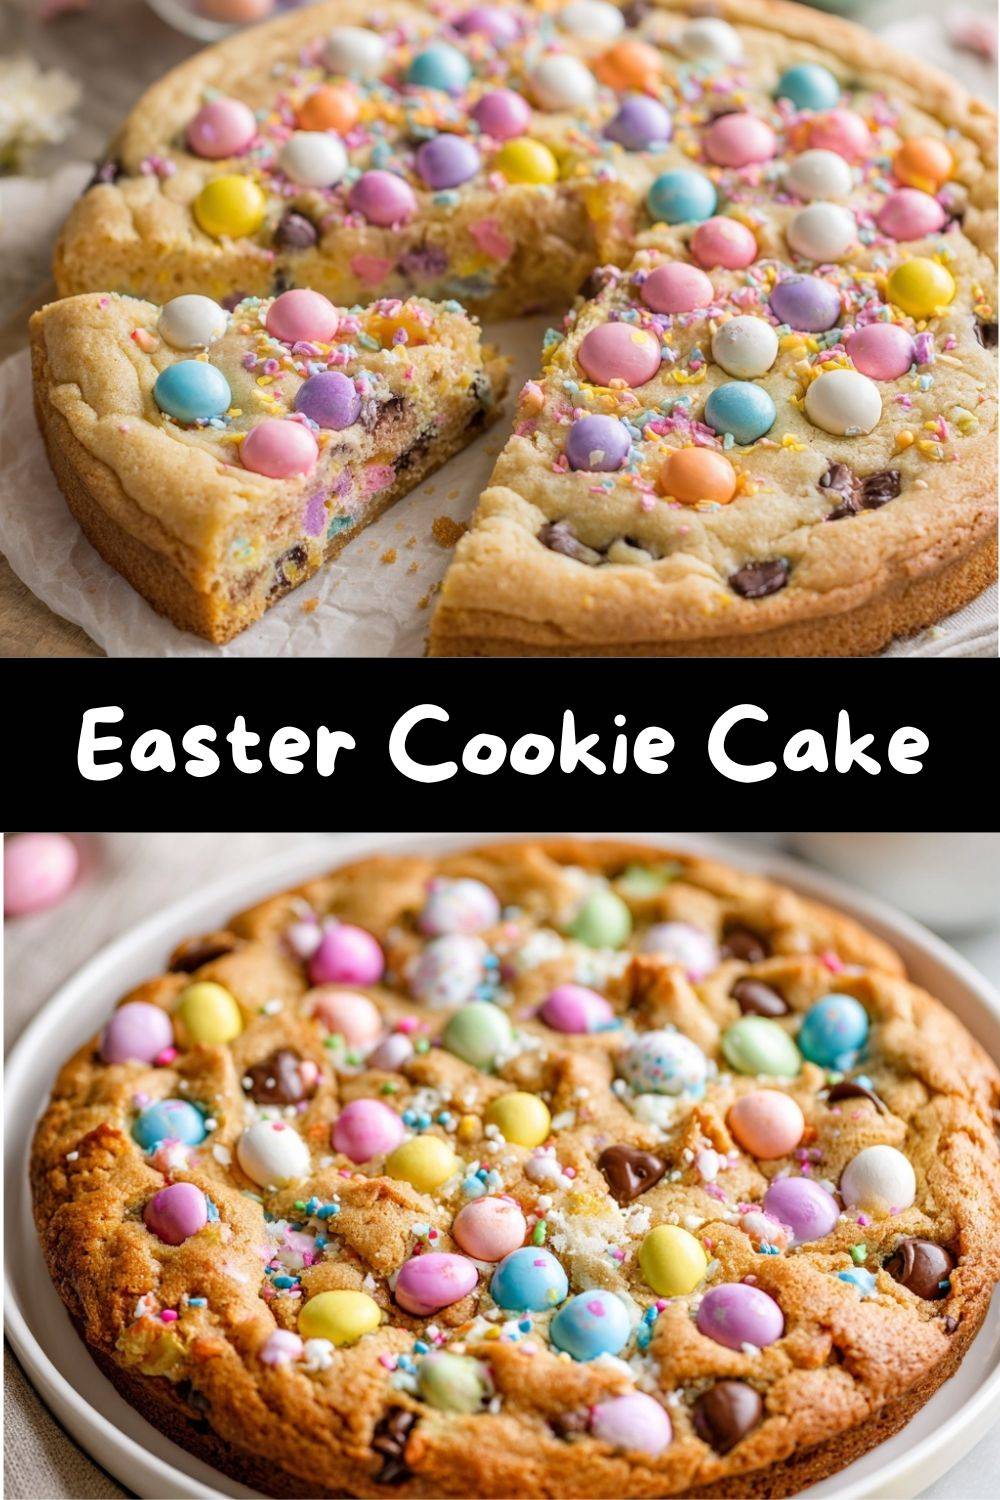
- 1/2 cup pastel M&M’s or candy-coated chocolate eggs: The Easter magic! I use half in the dough and half on top for a gorgeous look. Substitution Alert: For nut allergies, check the labels carefully, as some candies are processed in facilities with nuts. You can also use pastel sprinkles, chopped white chocolate, or even dried cranberries for a fun twist.
- Optional for decorating: Vanilla frosting, cream cheese frosting, a drizzle of melted white chocolate, and extra sprinkles. Go wild!
Let’s Build This Beauty: Step-by-Step
Ready? Let’s do this. Clear a little space, put on some happy music, and let’s make magic.
- Preheat & Prep: Fire up your oven to 350°F (175°C). Grab a 9-inch round cake pan or springform pan. My absolute favorite method: Trace the bottom of the pan on a piece of parchment paper, cut it out, and place it in the greased pan. This guarantees a flawless, crack-free release later. A quick spritz of baking spray on the sides and over the paper locks it in place.
- Creaming is Key: In a large bowl, use a hand mixer (or strong arm and a wooden spoon!) to beat the softened butter, brown sugar, and granulated sugar together. We’re not just mixing; we’re “creaming.” Beat on medium speed for a good 1-2 minutes until the mixture is visibly paler, fluffy, and well combined. This step incorporates air, which is part of what gives our cookie cake its lovely texture. Don’t rush it!
- Wet Team Assemble: Crack in the room-temperature egg and add the vanilla. Mix on medium just until the egg is fully incorporated and the mixture looks smooth. It might look a little curdled at first—that’s okay! Keep mixing until it comes back together.
- Dry Team Unite: In a separate bowl, whisk together the flour, baking soda, and salt. This little pre-mix ensures the baking soda is evenly distributed, so you don’t get a bitter bite. Add this dry mixture to the wet ingredients. Here’s the crucial part: Mix on low speed (or stir by hand) just until the flour disappears. A few dry streaks are fine—they’ll get mixed in next. Overmixing at this stage is the #1 cause of tough cookie cake! We want tender, not tough.
- The Fun Fold-In: Now, grab a spatula. Pour in the mini chocolate chips and only half of your pastel candies. Gently fold them into the dough until they’re evenly distributed. This keeps the dough from getting overworked.
- Press Play: Transfer your beautiful, chunky dough to your prepared pan. Use your fingers, the bottom of a flat glass, or a small spatula to press it into a smooth, even layer from edge to edge. This ensures even baking.
- Top It Off: Take the remaining half of your pastel candies and press them gently into the top of the dough. Get artistic! Make a pattern, scatter them randomly, or spell out “EGG.” This is where you make it your own.
- Bake to Perfection: Slide the pan into your preheated oven. Bake for 20-24 minutes. You’re looking for golden brown edges and a top that looks set. The center will still look a tiny bit soft—that’s perfect! It will continue to cook as it cools, giving us that dreamy chewy center. Pro Hack: For extra-gooey centers, lean toward 20-22 minutes. For a slightly more set, cake-like texture, go for the full 24.
- The Patience Test: This is the hardest step. Remove the pan from the oven and place it on a wire rack. Let it cool completely in the pan—at least 30-45 minutes. If you try to cut or remove it while warm, it will fall apart. I use this time to whip up a quick frosting or tidy up. I believe in you, you can wait!
- Decorate & Devour: Once cool, run a butter knife around the edge. If you used parchment, you can just lift it out. Slather on frosting, drizzle with chocolate, or go crazy with sprinkles. Then, slice it like a pizza and watch it disappear.
How to Serve This Show-Stopper
Presentation is part of the fun! Here are a few ways to make your Easter Cookie Cake the star of any gathering:
- The Classic Centerpiece: Place the whole cake on a pretty cake stand or platter. Garnish the platter with a few real spring flowers (food-safe, like pansies or violets, kept away from the cake itself) or faux greenery for a gorgeous Easter table focal point.
- Slice & Stack: Cut generous wedges and serve them on individual plates with a scoop of vanilla ice cream or a dollop of freshly whipped cream. The warm-cold contrast is heavenly.
- Coffee Break Style: For a more casual vibe, cut it into smaller squares or bars and pile them on a wooden board alongside cups of coffee or milk. Perfect for an afternoon treat!
- Gift from the Heart: This cake travels beautifully. Wrap a whole cake or a few slices in clear cellophane, tie it with a ribbon, and you have the most delicious, heartfelt gift for a neighbor, friend, or host.
Make It Your Own: Flavor Twists & Swaps
Got an idea? Run with it! Here are some of my favorite ways to riff on this recipe:
- Funfetti Birthday Style: Omit the pastel candies. Fold in 1/2 cup rainbow sprinkles + 1/4 cup white chocolate chips into the dough. Top with vanilla frosting and MORE sprinkles for an instant birthday cake.
- Lemon Berry Bliss: Add the zest of one lemon to the butter-sugar mixture. Swap the chocolate chips for 1/2 cup dried blueberries or cranberries. Top with a simple lemon glaze (powdered sugar + lemon juice) instead of frosting.
- S’mores Galore: Fold in 1/2 cup crushed graham crackers and 1/2 cup milk chocolate chunks. After baking and cooling, top with dollops of marshmallow fluff and briefly broil (WATCH CLOSELY!) to toast. Divine.
- Gluten-Free Friend: Use a 1:1 gluten-free all-purpose flour blend (like Bob’s Red Mill or King Arthur). Ensure your candies and other ingredients are GF.
- Peanut Butter Paradise: Replace 1/4 cup of the butter with 1/4 cup creamy peanut butter. Use peanut butter chips instead of chocolate chips and top with chopped Reese’s Pieces for the ultimate PB lover’s dream.
Emily’s Kitchen Notebook
This recipe has seen some things in my kitchen! I once, in a pre-coffee haze, accidentally used a whole cup of brown sugar and skipped the white. The result? A wildly chewy, almost brownie-like cookie cake that my friends still request. It taught me that baking is resilient! I’ve also learned that the type of pan matters. A dark metal pan will bake faster and yield darker edges, while a light-colored pan gives a more even, lighter bake. My personal evolution with this recipe has been in the decorating. Some years I go full-on bunny-face with frosting, other years I love the simple, rustic look of just the candies on top. There’s no wrong way. The only failure is not making it at all!
Your Questions, Answered!
Q: Can I make this ahead of time?
A: Absolutely! Bake and cool the cake completely. Wrap it tightly in plastic wrap (undecorated) and store at room temperature for up to 2 days, or freeze for up to a month. Thaw and decorate the day you plan to serve it.
Q: My center sunk a bit/is super gooey. Did I underbake it?
A: A slight dip in the center is normal for a cookie cake—it’s part of the charm! If it’s truly liquidy, it needed a few more minutes. Remember, the edges should be golden and the top should look set, not wet. For next time, try adding 2-3 minutes. If you’ve already taken it out, just enjoy it as a “spoonable” cookie cake—it’ll still taste amazing!
Q: Can I use a different size pan?
A: Yes, but the bake time will change. A 9-inch is ideal. An 8-inch will yield a thicker cake, so add 3-5 minutes to the bake time and watch it carefully. A 10-inch will be thinner and may bake 2-4 minutes faster.
Q: Why press the candies on top instead of mixing them all in?
A: Two reasons: First, it gives you that gorgeous, festive “Easter egg” look on top. Second, some candies (like M&M’s) can bleed color into the dough if mixed in thoroughly. This method keeps the colors bright and vibrant.
Nutritional Info (A Peek at the Sweet Details)
Please note: This is an estimated breakdown for informational purposes, based on a standard recipe calculator. Values will vary based on specific ingredients and brands used, especially with decorations.
Per slice (1/10th of the cake, including a basic vanilla frosting): Approximately 280-320 calories, 14g fat, 40g carbohydrates, 2g protein, 1g fiber, 28g sugar. This is a celebratory treat, meant to be savored and shared with joy. I always believe in balancing indulgence with nourishment, so enjoy a big slice with your favorite people, and maybe follow it with a brisk spring walk to hunt for the last of the hidden eggs!
Final Sweet Thoughts
And there you have it, friends—your new Easter tradition, baked golden and brimming with joy. This Easter Cookie Cake isn’t just dessert; it’s a reason to gather, laugh, and linger a little longer around the table. It’s the kind of treat that invites hands instead of forks, sparks conversations, and disappears slice by slice while memories are made.
Whether you decorate it simply with pastel candies or go all out with frosting swirls and sprinkles, remember this: perfection isn’t the goal—connection is. Bake it for your family, bring it to a potluck, gift a slice to a neighbor, or keep it all to yourself with a cup of coffee (no judgment here). However you serve it, let it be easy, let it be joyful, and let it taste like spring.
From my kitchen to yours, wishing you a season filled with sweetness, sunshine, and just enough sprinkles to make everything feel special. Happy Easter baking! 🐣🍪💐