Your New Favorite Shortcut to Cozy: The Apple Pie Crescent Bake
Hey there, friend! Let’s get real for a second. Do you ever get that intense, sudden craving for the warm, spiced, soul-hugging comfort of a homemade apple pie… but then reality hits you with the thought of making pie dough, peeling a mountain of apples, and patiently waiting for it to bake? Yeah, me too. Especially on a Tuesday after a long day.
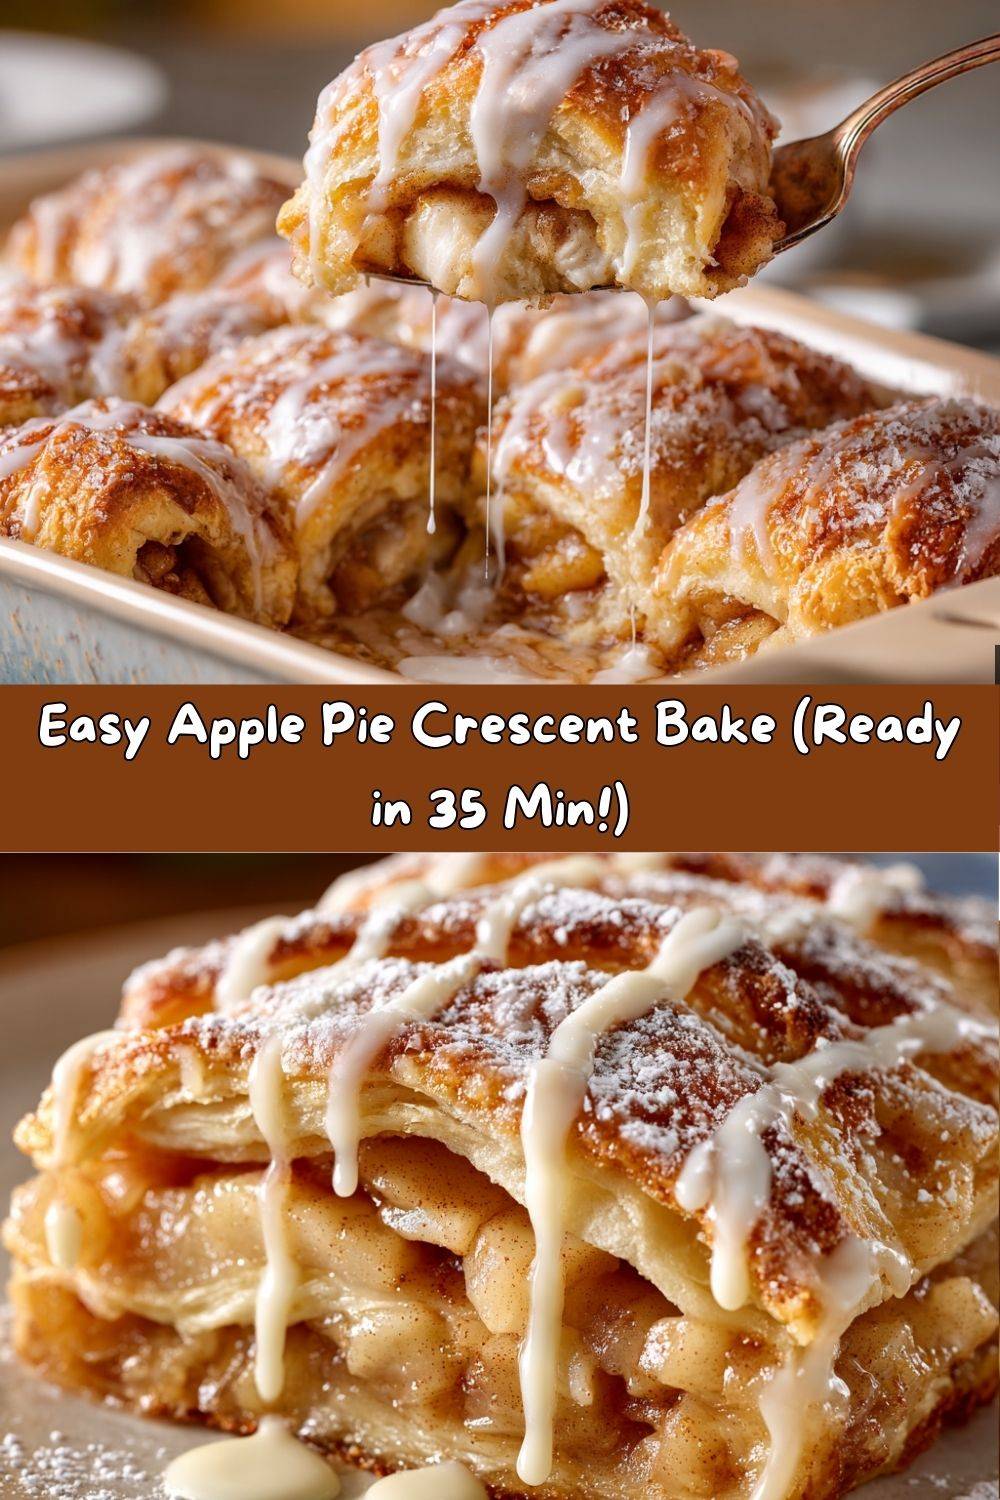
That’s exactly why I’m so ridiculously excited to share this recipe with you today. This Easy Apple Pie Crescent Bake is my absolute go-to when I need a dessert that tastes like I spent all afternoon in the kitchen, but really only took me about 10 minutes of active effort. We’re talking flaky, buttery crescent roll layers hugging a sweet, cinnamony apple pie filling, all baked until golden and bubbly and finished with a simple, dreamy glaze. It’s the ultimate cheat code for comfort food.
This isn’t just a recipe; it’s your ticket to impressing the family, satisfying that sweet tooth, and soaking in all the compliments without breaking a sweat. So, preheat that oven, grab your favorite baking dish, and let’s make something incredibly delicious together. I promise, this one’s a game-changer!
Grandma’s Wisdom & My Shortcut Secret
This recipe always makes me think of my Grandma Eleanor. Her apple pie was legendary—the flakiest crust, the perfect balance of sweet and tart filling. She’d always say, “Emily, good food is just love made visible.” But you know what else she’d say? “A smart cook knows a good shortcut when she sees one.”
I remember one frantic afternoon when I was supposed to bring a dessert to a school potluck. I had grand plans for apple pie, but a last-minute homework crisis (why did I always leave my diorama to the last minute?!) meant I had zero time. In a panic, I stared at the ingredients on the counter: a can of crescent rolls my mom had bought for breakfast and a jar of apple pie filling. Channeling my grandma’s pragmatic spirit, I decided to experiment. I layered, baked, and crossed my fingers.
The result? A pan of dessert that disappeared in minutes. Kids and parents alike were asking for the recipe. That day, I learned that “made from scratch” isn’t just about the ingredients; it’s about the joy you pour into it. This crescent bake is pure, unadulterated joy—and my grandma would have absolutely loved it.
Gather Your Ingredients: Shortcut Magic!
Here’s the beautiful shortlist of everything you’ll need. I’ve added my little chef notes to help you make it your own!
- 2 cans (8-count each) crescent roll dough: This is our superstar shortcut! The buttery, flaky layers are perfection. Keep them chilled until the very second you’re ready to use them—it makes them so much easier to work with.
- 1 (20 oz) can apple pie filling: The other half of our dynamic duo! I like to give the filling a rough chop right in the can to break down the bigger apple chunks so every bite has the perfect amount. Feel free to use homemade filling if you have it!
- 1/2 cup (57g) powdered sugar: Also called confectioner’s sugar. This is the base of our simple, sweet glaze that takes this bake from great to “oh wow!”
- 1–2 tbsp heavy whipping cream: This creates a rich, drizzle-able glaze. No heavy cream? Whole milk or even a splash of apple cider will work in a pinch, you’ll just need a little less.
- Optional, but highly encouraged: A 1/2 tsp of cinnamon stirred right into the pie filling for an extra spice kick, or a dash of vanilla extract in the glaze for a beautiful depth of flavor.
Let’s Build Our Masterpiece: Step-by-Step
Okay, team! Let’s do this. It’s so simple, you’ll have it memorized after one try.
Step 1: Fire up that oven to 375°F (190°C). This is the perfect temperature to get our crescent layers beautifully golden and cooked through without burning. While it’s warming up, lightly grease your 9×13-inch baking dish. A little butter, cooking spray, or a swipe of oil—your choice! This prevents any sticking and makes for easy serving later.
Step 2: Time for the dough! Unroll your first can of crescent rolls. You’ll see it’s perforated into triangles. Here’s my favorite chef hack: Press the seams together along the perforated lines to form one solid, beautiful sheet of dough. No need to be perfect here, just seal up those seams as best you can. This creates a solid base so our filling doesn’t leak out everywhere. Once you have your sheet, carefully cut it in half. One half will be the bottom, the other half will be the top. Place the first half right into the bottom of your prepared dish. If it doesn’t fit perfectly, that’s okay! Just press it out gently to cover the bottom.
Step 3: Now for the good stuff! Take your apple pie filling (don’t forget to stir in that extra cinnamon if you’re using it!) and spread it evenly over the dough layer. Try to leave a little border around the edges—about half an inch—to help the top and bottom layers seal.
Step 4: Top it off! Take your second half-sheet of crescent dough and gently place it over the mountain of apple goodness. If it tears a little, no stress at all—just pinch it back together. Gently press the edges all the way around to seal in that filling.
Step 5: Bake it to golden perfection! Pop that dish into your preheated oven and let it work its magic for 20-25 minutes. You’re looking for a deep, golden brown color on top. Your kitchen is about to smell absolutely incredible.
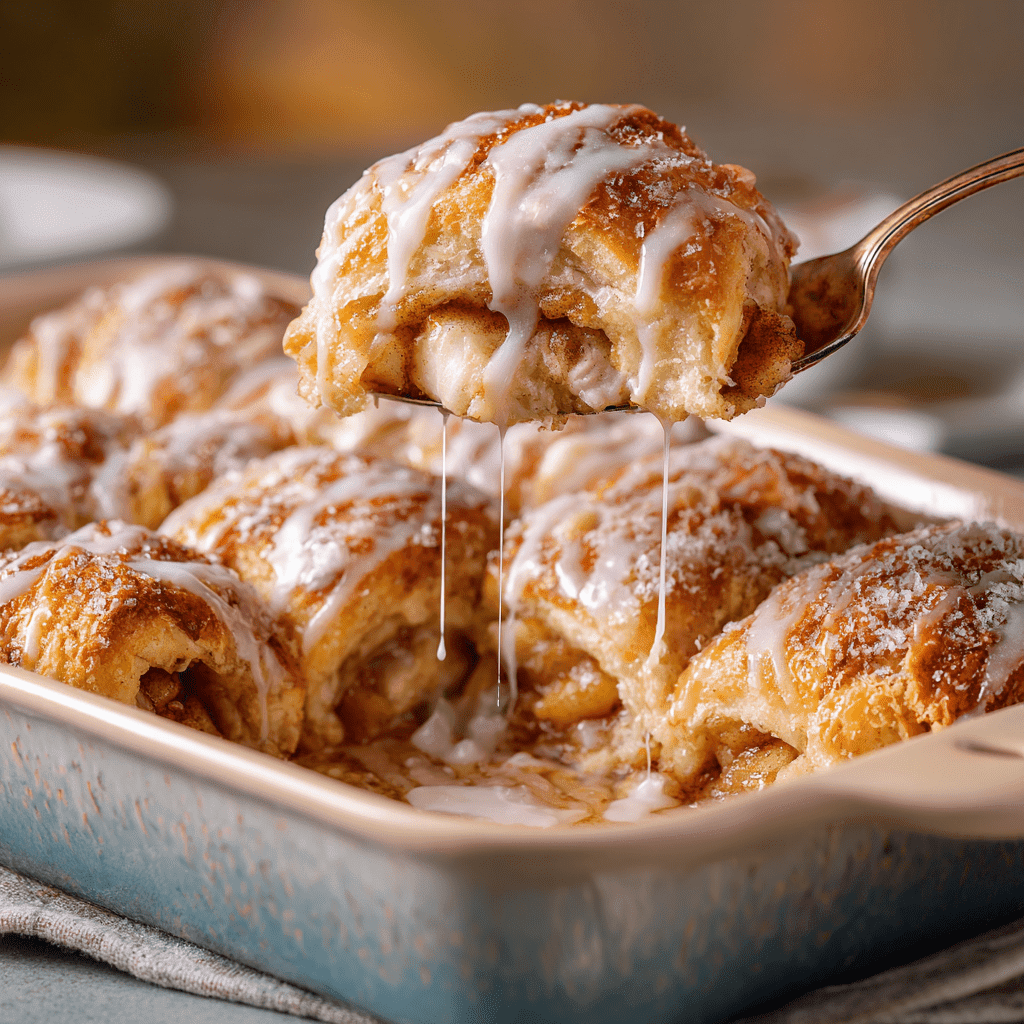
Step 6: The grand finale! While your bake is cooling slightly, whisk together your powdered sugar and 1 tablespoon of heavy cream. Want it thicker? Add a bit more sugar. Want it thinner? Add a tiny bit more cream until it’s a perfect drizzling consistency. Drizzle this glorious glaze all over the warm bake. Serve it up and get ready for the happy sighs!
How to Serve This Warm Hug of a Dessert
This bake is fantastic straight from the pan, but let’s talk about how to make it a truly unforgettable experience.
For the ultimate cozy dessert, serve it warm. The glaze will be slightly melty, the filling is cozy, and the crust is at its peak flakiness. I love cutting it into squares and plating it with a big ol’ scoop of vanilla ice cream. The contrast of the warm bake and the cold, creamy ice cream is literally a match made in heaven. A drizzle of caramel sauce takes it to an 11/10.
For a fantastic brunch option, let it cool slightly and serve it at room temperature with a hot cup of coffee or tea. It’s sweet enough to feel like a treat but not so heavy that it’ll weigh you down for the day.
And hey, no one will judge you if you just stand over the baking dish with a fork. I’ve been there. Sometimes the best serving suggestion is straight from the source!
Make It Your Own: Delicious Variations
The beauty of this recipe is its versatility! Here are a few of my favorite ways to switch it up:
- Cherry or Berry Bliss: Swap the apple pie filling for cherry, blueberry, or peach! It’s like a whole new dessert every time.
- Nutty Crumble Top: Want some crunch? Skip the top layer of crescent dough. Instead, mix 1/2 cup rolled oats, 1/4 cup flour, 1/4 cup brown sugar, 1/2 tsp cinnamon, and 3 tbsp melted butter until crumbly. Sprinkle it over the filling and bake as usual.
- Cream Cheese Swirl: Take 4 oz of softened cream cheese, 1/4 cup sugar, and 1/2 tsp vanilla and beat until smooth. Dollop this over the bottom crescent layer before adding the apple filling, then swirl gently with a knife.
- Maple Glaze: Swap the heavy cream in the glaze for pure maple syrup for a rich, autumnal flavor.
- From Scratch Upgrade: If you have more time, use 2 cups of your own homemade apple pie filling! Sauté sliced apples with butter, brown sugar, cinnamon, and a pinch of nutmeg until just tender.
Chef Emily’s Kitchen Notes
Over the years, this recipe has become a beloved staple in my home, and it’s evolved in little ways. I used to just unroll the dough and lay the triangles down haphazardly, but sealing the seams truly is a game-changer for structural integrity (read: no leaky filling!).
One time, I was filming a reel for Instagram and I was talking so much I completely forgot to add the glaze. The comments were flooded with “WHERE’S THE GLAZE, EMILY?!” Lesson learned: the glaze is non-negotiable for my followers (and for me!). It’s the perfect sweet finish.
This is also my daughter’s favorite recipe to “help” me make. Her little hands are experts at pressing the dough into the pan. It’s become our special Saturday tradition. I hope it becomes a fun, easy tradition in your home, too.
FAQs & Troubleshooting: Your Questions, Answered!
Q: My bottom crust came out a bit soggy. How can I prevent that?
A: This can happen if the filling is extra juicy! A great trick is to pre-bake the bottom crescent layer for about 5-7 minutes before adding the filling and the top layer. Let it cool slightly before assembling. This creates a barrier and helps the bottom get crisp.
Q: Can I make this ahead of time?
A: Absolutely! You can assemble the entire bake (without the glaze), cover it tightly, and keep it in the fridge for up to 8 hours before baking. You might need to add a few extra minutes to the bake time since it’ll be going into the oven cold. I’d recommend adding the glaze right before serving.
Q: My crescent dough is tearing! Help!
A> No worries at all! Crescent dough is very forgiving. Just pinch the tears back together. If it’s getting too soft and sticky, pop it in the fridge for 10 minutes to firm up. Chilled dough is much easier to work with.
Q: Can I use puff pastry instead?
A: You sure can! One sheet of thawed puff pastry for the bottom, and one for the top. The texture will be a bit flakier and more pastry-like, which is delicious. Bake at the same temperature until puffed and golden.

Easy Apple Pie Crescent Bake
- Total Time: 35 minutes
- Yield: 16 pieces 1x
Description
This shortcut dessert is everything you love about apple pie—without the fuss. Buttery crescent rolls wrap around tender apple pie filling and bake into golden, gooey layers. Finished with a light powdered sugar glaze, it’s fast, flavorful, and fall-ready.
Ingredients
2 cans crescent rolls (8-count each)
1 (20 oz) can apple pie filling
1/2 cup (57g) powdered sugar
1–2 tbsp heavy whipping cream
Optional twist: add 1/2 tsp cinnamon to the filling or a dash of vanilla to the glaze
Instructions
Preheat oven to 375°F (190°C) and lightly grease a 9×13-inch baking dish.
Unroll crescent dough and press seams together to form one large sheet. Cut in half to create a base and top layer.
Place one sheet in the bottom of the baking dish. Spread apple pie filling evenly on top.
Lay the second sheet of dough over the filling. Press edges gently.
Bake for 20–25 minutes, or until golden brown.
Mix powdered sugar and cream until smooth. Drizzle over warm bake before serving.
- Prep Time: 10 minutes
- Cook Time: 25 minutes
Nutrition
- Calories: 180 / piece
- Fat: 8g/ piece
- Carbohydrates: 24g/ piece
- Protein: 2g / piece
Nutritional Information
Okay, let’s talk nutrition—because balance is key, right? This is a dessert, so it’s meant to be enjoyed as a treat! Here’s a rough breakdown per serving (assuming 16 pieces):
- Calories: ~180
- Fat: 8g
- Carbohydrates: 24g
- Protein: 2g
*Please note: This is an estimate based on the specific ingredients I used. Values can vary significantly based on the brands of crescent rolls and pie filling you choose. For more precise information, I recommend using a nutritional calculator with your exact ingredients.
Final Thoughts
And there you have it, my friend! Your secret weapon for an impossibly easy, incredibly delicious dessert that’s guaranteed to bring everyone to the table. This Apple Pie Crescent Bake is proof that you don’t need to be a professional pastry chef to create moments of pure, sugary joy in your kitchen.
It’s about the laughter while you’re pressing the dough into the pan, the incredible aroma that fills your home, and the shared smiles over a warm, gooey slice. That’s what Tasty Chow is all about.
I’d love to hear how yours turns out! Tag me on Instagram @TastyChow so I can see your beautiful bakes and share in your kitchen victories. Now, go forth and bake with love (and a brilliant shortcut or two)!
With a full heart and a happy belly,
Emily