Your New Kitchen Secret Weapon: Easy Homemade Garlic Butter
Hey there, friend! Let’s talk about one of the greatest, simplest joys in life: the glorious, golden, aromatic magic that is homemade garlic butter. If you’ve ever been to a fancy steakhouse and swooned over the warm, crusty bread served with a ramekin of melting garlicky goodness, I’m here to let you in on a little secret. You can make something even better right in your own kitchen, and it takes less than 10 minutes.
This isn’t just a recipe; it’s a fundamental building block for a thousand delicious meals. We’re talking about a compound butter that’s rich, savory, and flecked with fresh herbs and real garlic. It’s the kind of kitchen staple that transforms the ordinary into the extraordinary. Slather it on a baguette and pop it under the broiler for instant garlic bread heaven. Melt a generous tablespoon over a sizzling steak fresh off the grill. Toss it with hot pasta and a handful of Parmesan for a dinner that feels decadent but is embarrassingly easy. The possibilities are truly endless, and once you experience the vibrant, fresh flavor of the homemade version, that pre-packaged log at the store just won’t cut it anymore.
So, tie on your apron (a messy one is totally welcome here!), grab your favorite mixing bowl, and let’s whip up a batch of pure, unadulterated joy. This is more than just butter and garlic; it’s a dollop of love ready to make your next meal unforgettable. Let’s get chowing!

A Whiff of Heaven in Grandma’s Kitchen
My love affair with garlic butter started not in a fancy culinary school, but in my Grandma Rose’s wonderfully chaotic kitchen. Sundays were for family, and that always meant a big, roast chicken dinner. But for me, the true star of the show was always the bread basket. I’d hover by the counter, watching as she’d take a stick of butter and let it soften in her old yellow ceramic bowl near the warm oven. Then, with a practiced hand, she’d crush fresh garlic with the flat of her knife, the papery skins flying, releasing that pungent, promise-filled scent.
She’d mash it all together with a generous pinch of salt and what seemed like a whole forest of freshly chopped parsley. She never measured, just tasted. “A little more love,” she’d say, adding another pat of butter. She’d then slather this masterpiece onto thick slices of Italian bread and toast it in the oven until the edges were crisp and the butter was bubbling and singing. The smell that filled her house was pure, undiluted happiness. It’s the smell of family, of laughter, of anticipation for a good meal shared with loved ones. To this day, every time I make this recipe, I’m seven years old again, standing in her kitchen, waiting for that first, perfect, garlicky bite.
Gathering Your Flavor All-Stars
Here’s the beautiful part: you only need a handful of simple ingredients to create something spectacular. Quality matters, but don’t stress! This is about making it work for you.
- 1 cup (2 sticks) Unsalted Butter, softened: This is our creamy, rich base. I highly recommend using unsalted butter so you have complete control over the seasoning. If you only have salted, just reduce the added salt in the recipe and taste as you go! A good European-style butter with a higher fat content will make it extra luxurious.
- 4-5 cloves Fresh Garlic, minced or grated: The heart and soul of the operation! Fresh is non-negotiable here for that bright, punchy flavor. Don’t be shy with it. A microplane is my secret weapon for getting a super fine mince that distributes evenly and infuses the butter perfectly.
- 1½ tsp Kosher Salt (or to taste): Salt is a flavor enhancer, and it’s crucial for making all the other ingredients pop. I prefer kosher salt because it’s less salty by volume than table salt, but start with a little less and always adjust to your palate.
- 1 tbsp Fresh Parsley, finely chopped: This adds a touch of fresh, grassy color and flavor that cuts through the richness. In a pinch, 1 teaspoon of dried parsley will work, but fresh really does make a difference.
- ½ tsp Freshly Cracked Black Pepper: A little peppery bite adds dimension. Always crack it fresh for the best aroma!
- Optional: ½ tsp Garlic Powder: “But Emily, more garlic?” YES. A little garlic powder gives an extra layer of deep, toasty garlic flavor that complements the fresh stuff beautifully. Trust me on this one.
- Optional: 1 tbsp grated Parmesan Cheese: For a cheesy, umami-packed twist. Perfect for garlic bread or pasta.
Let’s Make Some Magic: Your Step-by-Step Guide
See? I told you it was easy. Now, let’s turn these simple ingredients into your new favorite condiment.
- Soften the Butter Perfectly. Take your butter out of the fridge about 30-60 minutes before you start. You want it soft enough to be pliable when you press it, but not melted or greasy. Chef’s Quick Hack: If you’re short on time, you can gently soften it in the microwave. Place the sticks on a plate and microwave for 5-second bursts, turning after each, until just soft. Be careful—melted butter will change the texture of your final product!
- Prepare Your Garlic. Peel your garlic cloves. For the most potent flavor, I love using a microplane grater. It creates a fine, almost pasty garlic that incorporates seamlessly into the butter. If you’re mincing with a knife, just make sure it’s nice and fine so you don’t get big, crunchy chunks.
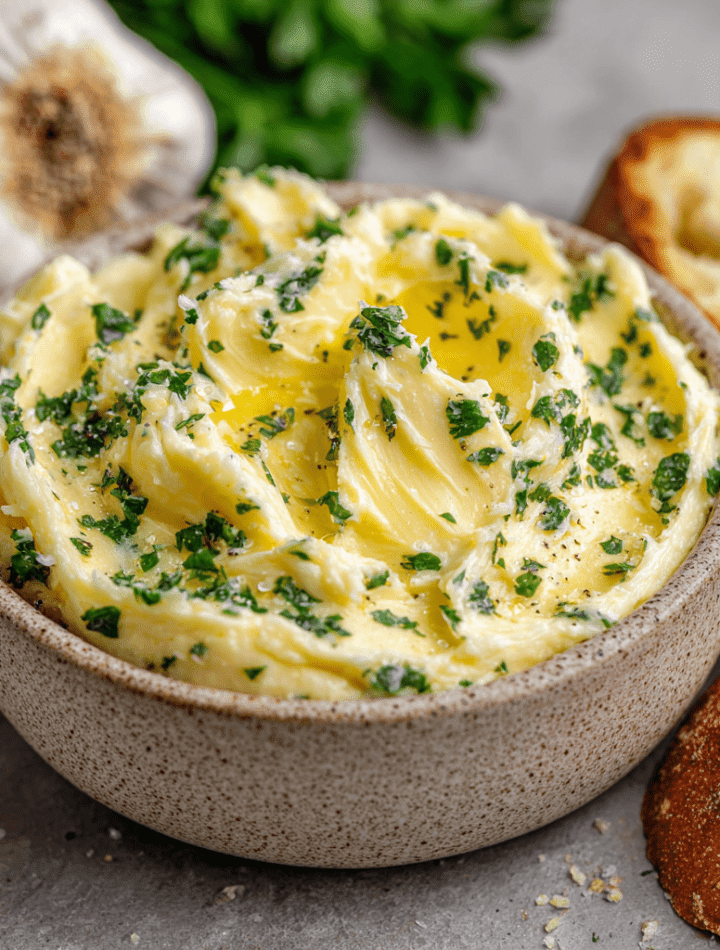
- Mix It All Up! In a medium-sized bowl, combine the softened butter, your prepared garlic, salt, chopped parsley, black pepper, and the optional garlic powder if you’re using it. Now, get in there with a flexible spatula or a fork and mash and stir until everything is beautifully combined and flecked with green. The goal is a uniform, creamy mixture.
- The Most Important Step: Taste and Adjust. This is where you make it yours! Grab a small, clean spoon and taste your creation. Does it need more salt? A bit more garlic? Maybe another crack of pepper? Adjust the seasonings until it makes your taste buds sing. Remember, you’re the boss of your butter!
- Store It Like a Pro. You can simply spoon the butter into a small airtight container or jar. But my favorite method is to create a log. Spoon the butter onto a sheet of plastic wrap or parchment paper. Shape it into a rough log, then use the paper to roll it tightly, twisting the ends to seal. This creates a perfect “slice-and-go” log that looks super professional and is incredibly convenient.
And that’s it! You’ve just made homemade garlic butter. Pop it in the fridge to firm up for at least an hour, or store it for future feasts.
So Many Delicious Ways to Use Your Garlic Butter!
Now for the really fun part—eating it! Here are just a few of my favorite ways to use this versatile wonder:
- The Ultimate Garlic Bread: Spread a generous layer on a split baguette or thick slices of ciabatta. Broil for 1-3 minutes until bubbly and golden brown at the edges. Life-changing.
- Pasta Perfection: Toss a few tablespoons with hot, freshly cooked pasta (linguine or spaghetti are classics). Add a splash of the starchy pasta water to create a silky sauce, and finish with a heap of grated Parmesan and more parsley.
- Steakhouse-Style Steak: Top a perfectly grilled or pan-seared steak with a cold slice of your garlic butter log right as it comes off the heat. Watch it melt over the top, creating an instant, luxurious sauce.
- Savory Seafood: A dollop melted over grilled shrimp, scallops, or a simple baked salmon fillet elevates it to a whole new level.
- Flavorful Veggies: Toss roasted or steamed vegetables like broccoli, asparagus, or green beans with a little melted garlic butter right before serving. So good!
Mix It Up! 5 Flavorful Twists on the Classic
Once you’ve mastered the basic recipe, the culinary world is your oyster! Here are a few of my favorite ways to play with the flavors:
- Lemon-Herb Delight: Add the zest of one lemon and 1 additional tablespoon of mixed fresh herbs like chives, dill, or thyme. This is incredible on fish or chicken.
- Spicy ‘Nduja Butter: Mash in 1-2 tablespoons of ‘nduja (a spreadable spicy Italian sausage) for a spicy, porky, and deeply flavorful butter that’s killer on pizza crusts or burgers.
- Sun-Dried Tomato & Basil: Finely chop 2-3 tablespoons of oil-packed sun-dried tomatoes and 1 tablespoon of fresh basil. This tastes like summer in a jar and is amazing tossed with pasta.
- Dairy-Free/Vegan Version: Use your favorite high-quality plant-based butter (I find the block-style works better than tubs). The flavor will be spot-on and perfect for anyone with dietary restrictions.
- Everything Bagel Butter: Mix in 2 tablespoons of everything bagel seasoning for the ultimate schmear for your morning bagel or a fantastic topping for baked potatoes.
Emily’s Kitchen Notes & Stories
This recipe has been a living, evolving thing in my kitchen for years. I once accidentally made a “triple garlic” version for a dinner party after misreading my own notes—let’s just say it was potent, but everyone loved it! The recipe truly is a guideline. Don’t have parsley? Use basil. Want it more savory? Add a dash of Worcestershire sauce. This is your canvas.
I also learned the hard way about the “soft but not melted” butter rule. I once tried to speed up the process by microwaving it into a puddle. The result was a greasy, separated butter that never quite came back together properly. A little patience goes a long way for the perfect, spreadable consistency!
Your Garlic Butter Questions, Answered!
I get a lot of questions about this recipe, so I’ve compiled the most common ones right here for you.
- Q: How long does homemade garlic butter last?
A: In an airtight container in the refrigerator, it will keep beautifully for up to 1 week. For longer storage, the freezer is your best friend! It will last for up to 3 months. You can slice off rounds from your frozen log as needed. - Q: My garlic butter tastes too sharp/bitter. What happened?
A: This can happen if the garlic is burned or cooked at too high a temperature. When making garlic bread, watch it closely under the broiler! When using it in a pan, use medium heat. Using fresh, high-quality garlic also makes a big difference. - Q: Can I use roasted garlic instead?
A: Absolutely! Roasted garlic will give you a much sweeter, mellower, and deeper flavor. Simply squeeze the soft, caramelized cloves from a head of roasted garlic and mash them into the butter. It’s a completely different, but equally delicious, experience. - Q: Is it safe to leave garlic in butter at room temperature?
A: For food safety, it’s best to always store your finished garlic butter in the refrigerator. While the risk is low, storing garlic in oil (or butter) at room temperature can create an environment where botulism bacteria can grow. Better safe than sorry!
Nutritional Information (A Quick Note!)
Hey, we’re all about balance here at Tasty Chow! While this garlic butter is a celebration of rich, delicious flavor, I know many of you like to keep track. Here’s a general breakdown per tablespoon (assuming the recipe makes about 16 tbsp and you use unsalted butter). Remember, these are estimates and can vary based on your specific ingredients.
- Calories: ~102
- Fat: 11g
- Saturated Fat: 7g
- Carbohydrates: 0.3g
- Protein: 0.1g
- Sodium: ~160mg (will vary based on the salt you use)
The beauty of this butter is that a little goes a long way in adding immense flavor. Use it as a flavorful accent to vegetables, proteins, and carbs to create a satisfying and delicious meal without needing to use a huge amount.
Go Forth and Butter Everything!
Well, my friend, you are now officially armed and dangerous with the knowledge of how to make the most incredible homemade garlic butter. This little jar (or log!) of gold is more than just a recipe—it’s a tool for creating easy, impressive, and deeply satisfying meals that will make you feel like a rockstar in the kitchen.
I hope this recipe becomes a staple in your home, just like it is in mine. I hope it leads to many happy, messy, and flavor-filled kitchen moments. Don’t forget to tag me @TastyChowEmily if you make it—I love seeing your creations!
Now, go grab a fork, get cozy, and let’s chow down.
— With love and a full heart,
Emily