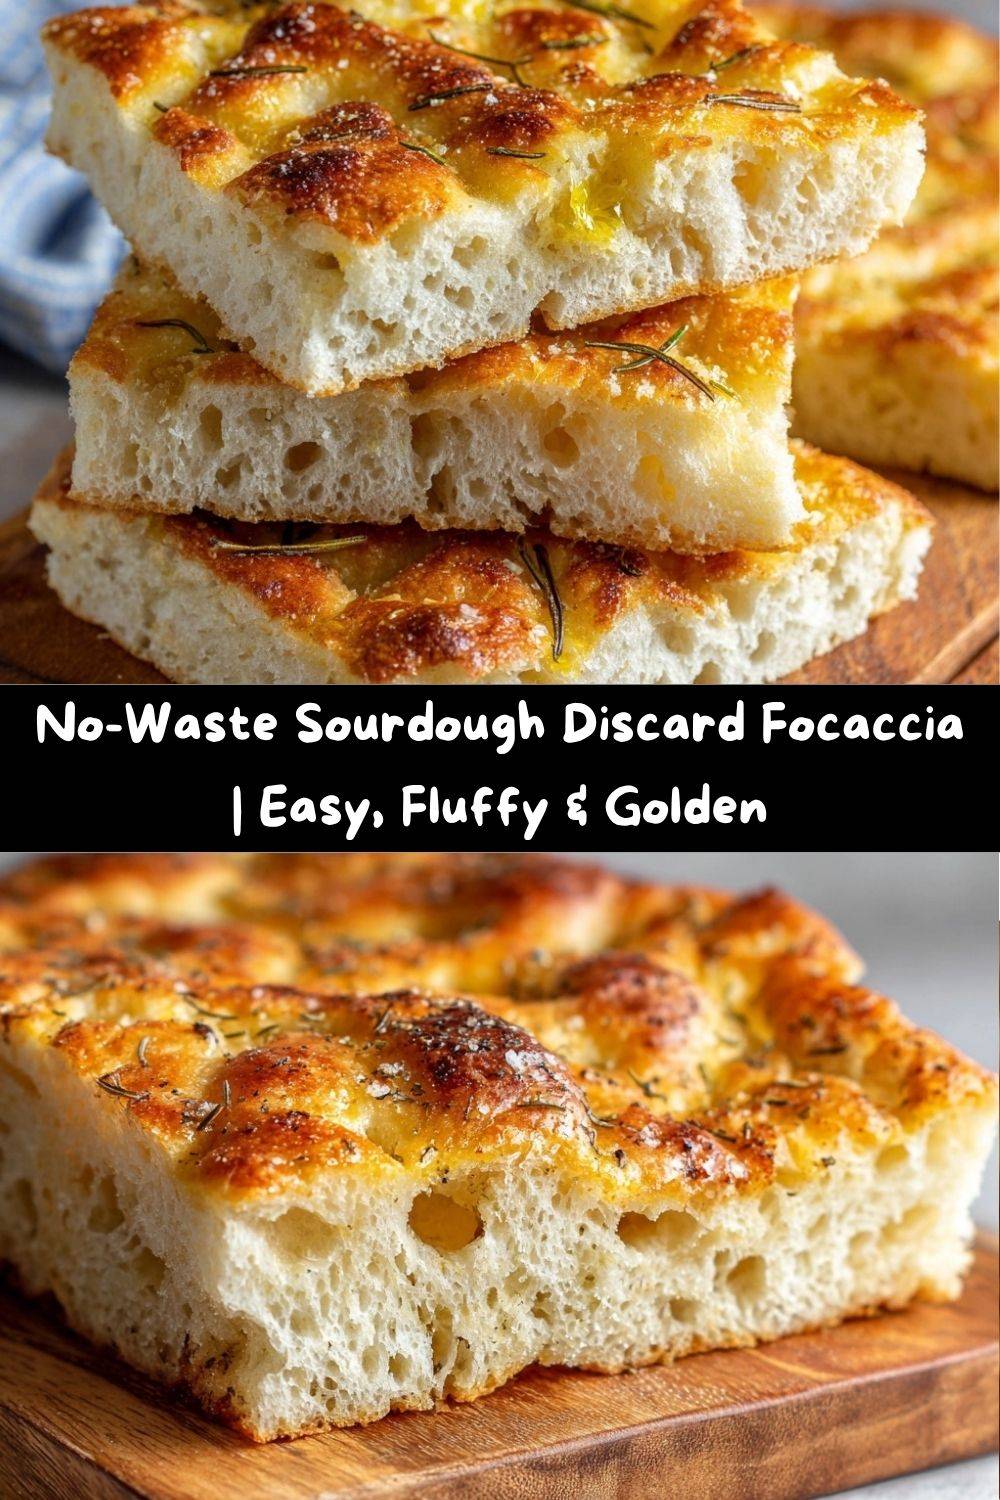
Easy Homemade Sourdough Discard Focaccia – Your New Kitchen Obsession
Hey there, my fellow food lover! Have you ever stood in your kitchen, staring at that jar of sourdough discard, feeling a tiny pang of guilt? You’re not alone. We’ve all been there. That tangy, bubbly byproduct of a happy starter is just too full of flavor to pour down the drain. But what if I told you that this “discard” is actually a secret weapon? A magical ingredient waiting to transform into the most incredible, golden, and ethereally fluffy focaccia you’ve ever made at home?
Welcome to your new favorite baking project. This Sourdough Discard Focaccia is a game-changer. It’s the recipe that bridges the gap between the intimidating world of artisan sourdough and the comforting, achievable joy of homemade bread. We’re taking that discard and giving it a glorious purpose, creating a canvas for your culinary creativity. Imagine a bread with a shatteringly crisp, olive oil-infused crust, a soft and airy crumb dotted with those iconic dimples, and a subtle tang that makes it utterly irresistible.
This isn’t just a recipe; it’s a celebration of no-waste cooking and big, bold flavors. It’s simple enough to whip up on a relaxed weeknight but stunning enough to be the star of your next dinner party. So, tie on your favorite (probably slightly flour-dusted) apron, preheat that oven, and let’s turn that discard into a masterpiece. Get ready to fill your home with the kind of aroma that makes everyone gather in the kitchen, asking, “Is it ready yet?”
The Day My Grandma’s Spirit Met My Sourdough Starter
This recipe always takes me back to my grandma’s kitchen. She wasn’t a “sourdough person”—her starter was a packet of dry yeast and a whole lot of love. But she made a simple, glorious focaccia that she’d tear apart with her hands, always giving me the first, saltiest corner piece. She taught me that the best bread isn’t about perfection; it’s about the joy of sharing it.
Years later, when I was deep in my sourdough phase, I found myself with a cup of discard and a powerful craving for that memory. I decided to throw caution to the wind and merge my world with hers. I added the discard to my grandma’s basic method, not knowing what would happen. The result? Pure magic. The dough seemed to come alive with a deeper personality. The bake filled my apartment with a scent that was both nostalgically familiar and excitingly new. When I pulled that golden, dimpled loaf from the oven and tore into that first piece, it was a perfect culinary hug from the past. It felt like my grandma was right there with me, giving me a nod of approval.
Gathering Your Focaccia Dream Team
Here’s everything you’ll need to create this no-waste wonder. Don’t be shy with substitutions—cooking is all about making it work for you!
- 1 cup sourdough discard (unfed, room temperature): This is our flavor hero! Using it at room temp helps it incorporate smoothly into the dough. Don’t worry if your discard is a few days old; that extra tang is a bonus. If you only have fed starter, that works too, but the rise might be a tad faster.
- 1½ cups warm water (around 105-110°F): Think baby-bottle warm, not hot. Too hot, and you’ll upset the yeast. This warm bath wakes them up and gets them ready to party.
- 2 teaspoons instant yeast: “But Emily, why yeast AND sourdough?” Great question! The yeast gives us a reliable, quick rise, while the discard gives us that incredible sourdough flavor and a more tender crumb. It’s the best of both worlds!
- 1 tablespoon sugar or honey: This is the favorite snack for our yeast. It gets them active and bubbly, ensuring a good rise. Honey adds a very subtle floral note, but plain sugar works perfectly.
- 4 cups all-purpose flour: The workhorse of our dough. I use unbleached all-purpose for a consistent, chewy texture. For a bit more heartiness, you can swap in one cup of bread flour.
- 2 teaspoons kosher salt: Please use kosher salt for the dough! Its clean taste is essential. Table salt is denser and can make your bread taste too salty. We’ll use flaky sea salt for topping later.
- ¼ cup olive oil (plus more for greasing and drizzling): Do not skimp here! A good, robust extra virgin olive oil makes all the difference, lending fruity notes and creating that unforgettable crispy crust.
- Optional toppings: This is your playground! My classic trio is flaky sea salt, fresh rosemary, and sliced garlic. But feel free to get creative with cherry tomatoes, olives, or even thinly sliced onions.
Let’s Make Some Dough Magic: Step-by-Step
Ready to get your hands a little dirty? Follow these steps, and you’ll be a focaccia pro in no time.
- Activate Your Yeast Dream Team. In a large mixing bowl, whisk together the warm water, instant yeast, and sugar/honey. Now, plop in that cup of sourdough discard and give it a good stir until everything is combined. Let this happy mixture sit for about 5-10 minutes. You’re looking for a foamy, creamy surface—this is your sign that the yeast is active and ready to go! Chef’s Hack: No instant yeast? You can use active dry yeast, but make sure to proof it in the warm water and sugar alone for 5-10 minutes before adding the discard.
- Mix the Dough. To the yeast mixture, add the 4 cups of flour, 2 teaspoons of kosher salt, and 2 tablespoons of that glorious olive oil. Stir with a sturdy wooden spoon or your hands until a shaggy, sticky dough forms. It might look a little messy, and that’s okay! We’re not looking for a smooth ball at this stage. Chef’s Insight: The stickiness is what will help create those beautiful, airy pockets later. Trust the process!
- The First Rise – Let it Rest and Rise. Cover the bowl with a damp kitchen towel or plastic wrap and place it in a warm, draft-free spot. Let the dough rise for 1 to 1.5 hours, or until it has just about doubled in size. Because we’re using yeast, this happens faster than a traditional sourdough, but the discard adds wonderful flavor complexity during this time.
- Shape and Second Rest. Generously drizzle olive oil into a standard 9×13-inch baking pan. I use my fingers to make sure every corner is slick. Then, gently scrape your risen dough into the center of the pan. Now, with oiled fingertips, gently press and stretch the dough out towards the corners. It might be springy and want to shrink back—that’s normal! Just be patient and gently coax it. It doesn’t have to perfectly fill the pan yet. Cover it again and let it rest for another 30 minutes. This second rest relaxes the gluten, making it easier to get those final dimples.
- Dimple and Top – The Most Fun Part! Preheat your oven to a hot 425°F (220°C). Now, the signature move! Oil your fingertips again (this prevents sticking) and press straight down into the dough, creating deep dimples all over the surface. You’re basically creating little wells for the olive oil to pool in. Drizzle a generous amount of olive oil over the entire surface—let it glisten! Now, scatter your toppings. Press rosemary sprigs and garlic slices gently into the dimples so they don’t burn.
- Bake to Golden Perfection. Pop the pan into your preheated oven and bake for 22-25 minutes. You’re looking for a deep, golden-brown top and a crisp bottom. Chef’s Hack: For an extra-crispy bottom, place a baking sheet on the rack below your focaccia to deflect direct heat. The smell will be absolutely intoxicating!
- Cool (If You Can Wait!). Remove the focaccia from the oven and let it cool in the pan for about 5-10 minutes before carefully transferring it to a wire rack. I know it’s hard, but letting it cool slightly helps the crumb set and makes slicing easier.
How to Serve Your Masterpiece
Okay, the focaccia is out of the oven, and you’re ready to dive in. Here are a few of my favorite ways to serve this versatile bread:
The Showstopper Appetizer: Place the whole focaccia on a big wooden board in the middle of the table. Give everyone a small plate and let them tear off their own piece. It’s interactive, fun, and always a hit. Serve with a side of high-quality balsamic vinegar and olive oil for dipping.
The Ultimate Sandwich Bread: Once completely cool, slice the focaccia horizontally and build the sandwich of your dreams. It’s fantastic with mozzarella, pesto, roasted red peppers, and prosciutto. It holds up to juicy ingredients without getting soggy.
The Soup’s Best Friend: A warm, fluffy square of this focaccia is the perfect tool for scooping up the last bits of a hearty minestrone or a creamy tomato basil soup. It’s comfort food heaven.
On its Own: Honestly, a piece of this focaccia, still slightly warm from the oven, needs no accompaniment. It’s a perfect snack all on its own.
Get Creative! Flavor Twists & Dietary Swaps
Once you’ve mastered the classic, the world is your oyster! Here are some fun ways to mix it up:
- Everything Bagel Focaccia: Before baking, brush with a mix of olive oil and an egg white wash, then sprinkle generously with everything bagel seasoning. It’s savory, oniony, and completely addictive.
- Sun-Dried Tomato & Basil: Chop up sun-dried tomatoes (the oil-packed ones are best) and fresh basil. Scatter them over the dimpled dough for a Mediterranean vibe.
- Vegan & Dairy-Free: Good news! This recipe is naturally vegan if you use sugar instead of honey. You’re all set for a plant-based treat.
- Gluten-Free Adaptation: You can try a 1:1 gluten-free all-purpose flour blend. The texture will be slightly different, but it will still be delicious. You may need to add a touch more water, as GF flours absorb liquid differently.
- “Garden Harvest” Focaccia: Use the dimples to create a picture! Press in thin slices of bell pepper, olives, red onion, and fresh herbs to make little flowers or designs. It’s a stunning centerpiece.
Chef Emily’s Kitchen Notes
This recipe has evolved so much in my kitchen. I’ve learned that focaccia is incredibly forgiving. One time, I got a phone call right after I dimpled the dough and had to leave it on the counter for an extra 20 minutes. I was sure I ruined it, but it ended up being the fluffiest one yet! The lesson? Don’t stress. Bread baking is as much about feeling as it is about precise timing.
I also highly recommend using your hands for as much of this process as possible. Feeling the dough come together, sensing its springiness, and pressing in those dimples is a wonderfully tactile experience. It connects you to your food in a way a mixer never could. This is my happy-place recipe.
Your Focaccia Questions, Answered!
Q: My dough is super sticky and hard to handle. What did I do wrong?
A: You likely did nothing wrong! This is a high-hydration dough, which means it’s supposed to be sticky. This is the secret to big air bubbles. The key is to use well-oiled hands and your bench scraper when transferring it to the pan. Don’t be tempted to add lots of extra flour, as it will make the focaccia dense.
Q: Why didn’t my focaccia rise very much?
A: The most common culprit is old yeast that has lost its potency. Always check the expiration date! Another reason could be that your water was too hot and killed the yeast, or your rising spot was too cold. Find a warm, cozy spot for your dough to do its thing.
Q: Can I make this dough ahead of time?
A> Absolutely! After the first rise, you can cover the bowl tightly and pop it in the fridge for up to 24 hours. When you’re ready, let it sit at room temp for 30 minutes, then proceed with shaping, dimpling, and baking. The slow, cold ferment will develop an even deeper sourdough flavor.
Q: My focaccia is browning too quickly on top. What should I do?
A> If the top is getting too dark but the inside isn’t cooked, simply tent the pan loosely with aluminum foil for the remaining bake time. This will slow down the browning without trapping steam.
Nutritional Information (A General Guide)
Let’s talk about what’s in this delicious bread! Please remember, this is an approximate calculation and can vary based on your specific ingredients and portion size.
Per Serving (1 piece, based on 12 pieces per loaf):
Calories: ~180 | Total Fat: 6g | Saturated Fat: 1g | Carbohydrates: 28g | Fiber: 1g | Sugar: 1g | Protein: 4g
This focaccia is a source of carbohydrates for energy. The olive oil provides heart-healthy monounsaturated fats. While it’s not a significant source of fiber or protein on its own, it becomes part of a balanced meal when paired with soups, salads, or protein-rich sandwich fillings. The joy and satisfaction it brings are, of course, immeasurable and calorie-free!
Final Thoughts from My Kitchen to Yours
Well, my friend, we’ve done it. We’ve taken something that was destined for the compost and turned it into a golden, glorious, shareable feast. I hope this Sourdough Discard Focaccia becomes a regular in your kitchen rotation, just like it is in mine. It’s more than a recipe; it’s a reminder that the most delicious things often come from a place of resourcefulness and love.
I’d love to see your creations! When you make this (and I know you will), please share a picture and tag me @TastyChow on social media. Let me know what toppings you used, or tell me about your own kitchen stories. You’re not just following a recipe; you’re joining a community of food lovers who believe that every meal is a chance to create something wonderful.
Now, go forth and bake with confidence! Your kitchen is about to smell amazing.
With love and a full belly,
Emily